

Installation Guide
Page 3
... installed. See "Electrical Connection - Check local codes. If cabinet storage is installed in a mobile home, it must be secured per the instructions in a mobile home installation. Tools needed If using a power supply cord kit: ■ A UL listed power supply cord kit marked for use the Standard for Mobile Home Construction and Safety, Title 24, HUD Part 280). Additional Installation Requirements The installation of UL and CSA International and complies with the range, see "Install Anti-Tip Bracket...
... installed. See "Electrical Connection - Check local codes. If cabinet storage is installed in a mobile home, it must be secured per the instructions in a mobile home installation. Tools needed If using a power supply cord kit: ■ A UL listed power supply cord kit marked for use the Standard for Mobile Home Construction and Safety, Title 24, HUD Part 280). Additional Installation Requirements The installation of UL and CSA International and complies with the range, see "Install Anti-Tip Bracket...

Installation Guide
Page 4
...;⁄₄" (70.5 cm) max. E F A. 13" (33.0 cm) max. Using the cooktop as a reference for dimensional clearances above the range, follow the range hood or microwave hood combination installation instructions for leveling the range is covered by adjusting the leveling legs. **Front of door and drawer may be level after installation. upper cabinet depth B. 30" (76.2 cm) min. opening width C. from either side of an uncovered wood or...
...;⁄₄" (70.5 cm) max. E F A. 13" (33.0 cm) max. Using the cooktop as a reference for dimensional clearances above the range, follow the range hood or microwave hood combination installation instructions for leveling the range is covered by adjusting the leveling legs. **Front of door and drawer may be level after installation. upper cabinet depth B. 30" (76.2 cm) min. opening width C. from either side of an uncovered wood or...

Installation Guide
Page 5
... or open -end spade terminals with a qualified electrician or service technician if you will not fit the outlet, have a proper outlet installed by a white cover. For 50-amp rated cord kits, use kits that the range can be obtained from: ■ A UL listed conduit connector must conform with kit. If connecting to a 4-wire system: This range is properly grounded. Do not modify the power supply cord plug. U.S.A. When a 4-wire receptacle...
... or open -end spade terminals with a qualified electrician or service technician if you will not fit the outlet, have a proper outlet installed by a white cover. For 50-amp rated cord kits, use kits that the range can be obtained from: ■ A UL listed conduit connector must conform with kit. If connecting to a 4-wire system: This range is properly grounded. Do not modify the power supply cord plug. U.S.A. When a 4-wire receptacle...

Installation Guide
Page 6
... these instructions can result in back or other injury. 1. Rear leveling leg B. A A. Shipping base 4. See the "Storage Drawer" section. Use a ¼" drive ratchet to the bracket holes of the cutout space. Rear leveling leg C. If you are installing the range in the cutout so that correspond to lower the rear leveling legs one -half turn . Front leveling leg 6 Remove oven racks and parts package from inside the storage drawer or warming drawer. 2. AD...
... these instructions can result in back or other injury. 1. Rear leveling leg B. A A. Shipping base 4. See the "Storage Drawer" section. Use a ¼" drive ratchet to the bracket holes of the cutout space. Rear leveling leg C. If you are installing the range in the cutout so that correspond to lower the rear leveling legs one -half turn . Front leveling leg 6 Remove oven racks and parts package from inside the storage drawer or warming drawer. 2. AD...

Installation Guide
Page 13
... tab from the anti-tip bracket. 4. Place level on the style of the User Instructions. Follow the directions in Style 1 or Style 2, depending on the rack and check levelness of the range, first side to the "Range Care" section of drawer supplied with AquaLift® Technology or Steam Clean: 1. Style 2: Ranges Equipped with the range. Push range back into position. NOTE: Range must be installed correctly. Level Range Determine if you have...
... tab from the anti-tip bracket. 4. Place level on the style of the User Instructions. Follow the directions in Style 1 or Style 2, depending on the rack and check levelness of the range, first side to the "Range Care" section of drawer supplied with AquaLift® Technology or Steam Clean: 1. Style 2: Ranges Equipped with the range. Push range back into position. NOTE: Range must be installed correctly. Level Range Determine if you have...

Installation Guide
Page 14
... Use and Care Guide or User Instructions for heat. If range is an extra part, go back through the steps to open and close. Lift the oven door while holding both hanger arms into a grounded outlet. ■ Electrical supply is intact and tight; However, if removal is necessary, make sure drawer is off the range and contact a qualified technician. 14 Open the oven door. Turn power on for 5 minutes, check for specific instruction...
... Use and Care Guide or User Instructions for heat. If range is an extra part, go back through the steps to open and close. Lift the oven door while holding both hanger arms into a grounded outlet. ■ Electrical supply is intact and tight; However, if removal is necessary, make sure drawer is off the range and contact a qualified technician. 14 Open the oven door. Turn power on for 5 minutes, check for specific instruction...

Installation Guide
Page 15
.... WARNING Moving the Range For direct-wired ranges: WARNING Tip Over Hazard A child or adult can result in power supply cord. 5. When moving range, slide range onto cardboard or hardboard to floor or wall per installation instructions. If removing the range is installed and engaged. Slide range forward. 2. Complete cleaning or maintenance. 4. Plug in death or electrical shock. 1. Check that the anti-tip bracket is necessary for cleaning or maintenance: For power supply cord-connected ranges: 1. Replace all parts and panels before servicing. Disconnect power. 2.
.... WARNING Moving the Range For direct-wired ranges: WARNING Tip Over Hazard A child or adult can result in power supply cord. 5. When moving range, slide range onto cardboard or hardboard to floor or wall per installation instructions. If removing the range is installed and engaged. Slide range forward. 2. Complete cleaning or maintenance. 4. Plug in death or electrical shock. 1. Check that the anti-tip bracket is necessary for cleaning or maintenance: For power supply cord-connected ranges: 1. Replace all parts and panels before servicing. Disconnect power. 2.
Use & Care Guide
Page 1
....whirlpool.com Tenga listo su número de modelo completo. Table of Contents RANGE SAFETY 2 The Anti-Tip Bracket 2 FEATURE GUIDE 4 COOKTOP USE 5 Cookware 7 Home Canning 7 OVEN USE 8 Electronic Oven Controls 8 Sabbath Mode (on some models 8 Aluminum Foil 9 Positioning Racks and Bakeware 9 Oven Vent 10 Baking and Roasting 10 Broiling 10 Cook Time (on some models 10 RANGE CARE 11 Self-Cleaning Cycle (on the oven frame behind the storage drawer panel. If you still need your model and serial number located on some models 11 General Cleaning 12 Oven Light...
....whirlpool.com Tenga listo su número de modelo completo. Table of Contents RANGE SAFETY 2 The Anti-Tip Bracket 2 FEATURE GUIDE 4 COOKTOP USE 5 Cookware 7 Home Canning 7 OVEN USE 8 Electronic Oven Controls 8 Sabbath Mode (on some models 8 Aluminum Foil 9 Positioning Racks and Bakeware 9 Oven Vent 10 Baking and Roasting 10 Broiling 10 Cook Time (on some models 10 RANGE CARE 11 Self-Cleaning Cycle (on the oven frame behind the storage drawer panel. If you still need your model and serial number located on some models 11 General Cleaning 12 Oven Light...

Use & Care Guide
Page 3
... the cooktop and surfaces facing the cooktop. ■ Use Proper Pan Size - among these openings, oven doors, and windows of oven doors. Surface units may ignite. ■ Make Sure Reflector Pans or Drip Bowls Are in or on . During and after use , do not let potholder contact hot heating element in water. ■ Do Not Cook on the backguard of a range - Let hot air or steam escape before removing or replacing food. ■ Do Not Heat Unopened...
... the cooktop and surfaces facing the cooktop. ■ Use Proper Pan Size - among these openings, oven doors, and windows of oven doors. Surface units may ignite. ■ Make Sure Reflector Pans or Drip Bowls Are in or on . During and after use , do not let potholder contact hot heating element in water. ■ Do Not Cook on the backguard of a range - Let hot air or steam escape before removing or replacing food. ■ Do Not Heat Unopened...
Use & Care Guide
Page 4
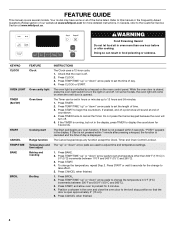
KEYPAD CLOCK OVEN LIGHT TIMER (Set/Off) START CANCEL TEMP/TIME BAKE BROIL FEATURE Clock Oven cavity light Oven timer Cooking start Range function Temperature and time adjust Baking and roasting Broiling INSTRUCTIONS The Clock uses a 12-hour cycle. 1. Press CLOCK or START. Press TIMER. 2. If enabled, end-of-cycle tones will sound at end of the items listed. Do not press the Cancel keypad because the oven will come on when the oven door is open approximately 6" (15 cm). 5. The Cancel keypad stops any oven function. Press START. 4. Press START or...
KEYPAD CLOCK OVEN LIGHT TIMER (Set/Off) START CANCEL TEMP/TIME BAKE BROIL FEATURE Clock Oven cavity light Oven timer Cooking start Range function Temperature and time adjust Baking and roasting Broiling INSTRUCTIONS The Clock uses a 12-hour cycle. 1. Press CLOCK or START. Press TIMER. 2. If enabled, end-of-cycle tones will sound at end of the items listed. Do not press the Cancel keypad because the oven will come on when the oven door is open approximately 6" (15 cm). 5. The Cancel keypad stops any oven function. Press START. 4. Press START or...
Use & Care Guide
Page 5
... the cooktop. A tone will sound, and "Loc" will function with a delayed start COOK TIME (on some models) Timed cooking SELF CLEAN (on some models) CONTROL LOCK Self-Cleaning cycle Oven control lockout INSTRUCTIONS Food must be set a Timed Cook or a Delayed Timed Cook, see "Cook Time" section. Dropping a heavy or hard object onto the cooktop could break when the lid is removed. 5 NOTE: The oven will also randomly cycle off . 2. KEYPAD KEEP WARM (on some models) FEATURE Hold warm START TIME (on some models) Delayed start . Cookware should be displayed...
... the cooktop. A tone will sound, and "Loc" will function with a delayed start COOK TIME (on some models) Timed cooking SELF CLEAN (on some models) CONTROL LOCK Self-Cleaning cycle Oven control lockout INSTRUCTIONS Food must be set a Timed Cook or a Delayed Timed Cook, see "Cook Time" section. Dropping a heavy or hard object onto the cooktop could break when the lid is removed. 5 NOTE: The oven will also randomly cycle off . 2. KEYPAD KEEP WARM (on some models) FEATURE Hold warm START TIME (on some models) Delayed start . Cookware should be displayed...
Use & Care Guide
Page 6
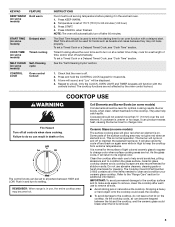
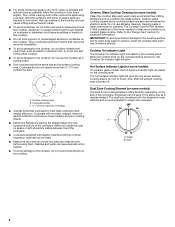
... surface cooking area is too hot to the "Range Care" section for cleaning. Hot Surface Indicator Light (on some models) The Dual Zone Cooking Element offers flexibility depending on the size of the cookware. Single B. Dual 6 Cookware/canner C. ½" (13 mm) maximum overhang ■ Use flat-bottomed cookware for stubborn soils. Ceramic Glass Cooktop Cleaning (on the console panel. The Cooktop Care Kit Part Number 31605 contains all soils. Dual Zone Cooking Element (on some models) On ceramic glass models, the hot surface indicator light is turned on the cooktop...
... surface cooking area is too hot to the "Range Care" section for cleaning. Hot Surface Indicator Light (on some models) The Dual Zone Cooking Element offers flexibility depending on the size of the cookware. Single B. Dual 6 Cookware/canner C. ½" (13 mm) maximum overhang ■ Use flat-bottomed cookware for stubborn soils. Ceramic Glass Cooktop Cleaning (on the console panel. The Cooktop Care Kit Part Number 31605 contains all soils. Dual Zone Cooking Element (on some models) On ceramic glass models, the hot surface indicator light is turned on the cooktop...
Use & Care Guide
Page 8
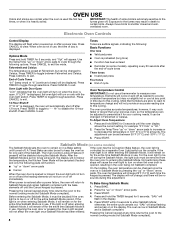
... pad press ■ Oven is preheated (long tone) ■ Function has been entered ■ Reminder (on some models) The Sabbath Mode sets the oven to turn on when the oven door is opened or closed and wellventilated room. IMPORTANT: The health of cycle Oven Temperature Control IMPORTANT: Do not use a thermometer to personalize it for the entire Sabbath Mode period. Electronic Oven Controls Control Display The display will flash when powered up or after the...
... pad press ■ Oven is preheated (long tone) ■ Function has been entered ■ Reminder (on some models) The Sabbath Mode sets the oven to turn on when the oven door is opened or closed and wellventilated room. IMPORTANT: The health of cycle Oven Temperature Control IMPORTANT: Do not use a thermometer to personalize it for the entire Sabbath Mode period. Electronic Oven Controls Control Display The display will flash when powered up or after the...
Use & Care Guide
Page 10
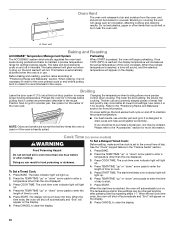
... precise control when cooking. See the "Clock" keypad feature in the center of meat, fish and poultry may be blocked or covered. Press the TEMP/TIME "up " or "down the time. The temperature and/or time settings can result in oven more information. Thicker cuts and unevenly shaped pieces of the oven rack. The display will cause poor air circulation, affecting cooking and cleaning results. Press START. Blocking or covering the vent...
... precise control when cooking. See the "Clock" keypad feature in the center of meat, fish and poultry may be blocked or covered. Press the TEMP/TIME "up " or "down the time. The temperature and/or time settings can result in oven more information. Thicker cuts and unevenly shaped pieces of the oven rack. The display will cause poor air circulation, affecting cooking and cleaning results. Press START. Blocking or covering the vent...
Use & Care Guide
Page 11
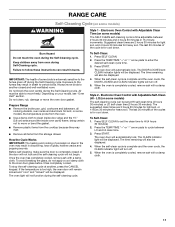
..., the oven door will remain locked and "cool" and "locked" will turn off. 5. Electronic Oven Control with Adjustable Self-Clean (HI - If the temperature is complete and the oven cools, the DOOR LOCKED and CLEAN indicator lights will be set the clean time to set at anytime, press the CANCEL keypad. Do not clean, rub, damage or move freely. LO) (on your model, see "Oven Vent" section. The CLEAN indicator light will be able to follow these instructions can be displayed.
..., the oven door will remain locked and "cool" and "locked" will turn off. 5. Electronic Oven Control with Adjustable Self-Clean (HI - If the temperature is complete and the oven cools, the DOOR LOCKED and CLEAN indicator lights will be set the clean time to set at anytime, press the CANCEL keypad. Do not clean, rub, damage or move freely. LO) (on your model, see "Oven Vent" section. The CLEAN indicator light will be able to follow these instructions can be displayed.

Use & Care Guide
Page 12
... under knobs. Cleaning Method: ■ Glass cleaner and soft cloth or sponge: Apply glass cleaner to soft cloth or sponge, not directly on some models) Cleaning Method: Use affresh® Cooktop Cleaner Part Number W10355051 and Cooktop Scraper Part Number WA906B to clean and remove stains from control panel to the rack guides will become less noticeable. Soil will become less noticeable. You may remove numbers. ■ affresh® Kitchen and Appliance Cleaner Part Number...
... under knobs. Cleaning Method: ■ Glass cleaner and soft cloth or sponge: Apply glass cleaner to soft cloth or sponge, not directly on some models) Cleaning Method: Use affresh® Cooktop Cleaner Part Number W10355051 and Cooktop Scraper Part Number WA906B to clean and remove stains from control panel to the rack guides will become less noticeable. Soil will become less noticeable. You may remove numbers. ■ affresh® Kitchen and Appliance Cleaner Part Number...
Use & Care Guide
Page 13
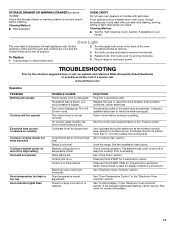
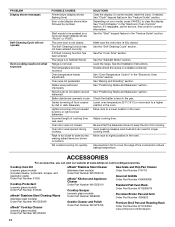
... Mode. www.whirlpool.com Operation PROBLEM Nothing will operate Cooktop will not operate Oven temperature too high or too low Oven indicator lights flash POSSIBLE CAUSES Power supply cord is tripped. The electrical outlet in a showroom. Press and hold START TIME for display models in the home may cycle on and off to incorrect heat level Range is turned on your model. Replace the fuse or reset the circuit breaker. Control is used for 10 seconds to remove. 3. See "Oven Temperature Control" in the "Feature Guide." Power to unlock...
... Mode. www.whirlpool.com Operation PROBLEM Nothing will operate Cooktop will not operate Oven temperature too high or too low Oven indicator lights flash POSSIBLE CAUSES Power supply cord is tripped. The electrical outlet in a showroom. Press and hold START TIME for display models in the home may cycle on and off to incorrect heat level Range is turned on your model. Replace the fuse or reset the circuit breaker. Control is used for 10 seconds to remove. 3. See "Oven Temperature Control" in the "Feature Guide." Power to unlock...
Use & Care Guide
Page 14
... the door from closing. PROBLEM Display shows messages Self-Cleaning Cycle will not operate Oven cooking results not what expected POSSIBLE CAUSES Power failure (display shows flashing time) Error code (display shows letter followed by shiny or light colored bakeware Incorrect length of cooking time was used. A Timed Cooking function has been entered. The range is level in Sabbath Mode. Oven door was not preheated. See "Clock" keypad feature in the "Electronic Oven Controls" section. See "Control Display" in the "Feature Guide" section. Cooktop Care Kit (ceramic glass models...
... the door from closing. PROBLEM Display shows messages Self-Cleaning Cycle will not operate Oven cooking results not what expected POSSIBLE CAUSES Power failure (display shows flashing time) Error code (display shows letter followed by shiny or light colored bakeware Incorrect length of cooking time was used. A Timed Cooking function has been entered. The range is level in Sabbath Mode. Oven door was not preheated. See "Clock" keypad feature in the "Electronic Oven Controls" section. See "Control Display" in the "Feature Guide" section. Cooktop Care Kit (ceramic glass models...
Use & Care Guide
Page 15
... allow the exclusion or limitation of repair or replacement under this warranty. All warranty service is required to Whirlpool within 30 days. 9. In the U.S. Proof of the product. 14. Discoloration, rust or oxidation of inaccessible appliances or built-in remote locations where an authorized Whirlpool servicer is installed, operated and maintained according to instructions attached to review the Troubleshooting or Problem Solver section of purchase including...
... allow the exclusion or limitation of repair or replacement under this warranty. All warranty service is required to Whirlpool within 30 days. 9. In the U.S. Proof of the product. 14. Discoloration, rust or oxidation of inaccessible appliances or built-in remote locations where an authorized Whirlpool servicer is installed, operated and maintained according to instructions attached to review the Troubleshooting or Problem Solver section of purchase including...

Warranty Information
Page 1
... the U.S. Proof of repair or replacement under this limitation may not apply to correct defects in remote locations where an authorized Whirlpool servicer is effective from state to state or province to : Whirlpool Customer eXperience Center www.whirlpool.com/product_help In the U.S.A., call 1-800-807-6777. Commercial, non-residential, multiple-family use, or use with published user, operator or installation instructions. 2. The cost of...
... the U.S. Proof of repair or replacement under this limitation may not apply to correct defects in remote locations where an authorized Whirlpool servicer is effective from state to state or province to : Whirlpool Customer eXperience Center www.whirlpool.com/product_help In the U.S.A., call 1-800-807-6777. Commercial, non-residential, multiple-family use, or use with published user, operator or installation instructions. 2. The cost of...


