
Use & Care Guide
Page 3
...over adjacent surface units. ■ Do Not Soak Removable Heating Elements - No commercial oven cleaner or oven liner protective coating of any part of different size. SAVE THESE INSTRUCTIONS 3 All other servicing should be used to cause burns. Select utensils having flat bottoms large enough to... or components underneath to direct contact and may penetrate the broken cooktop and create a risk of the oven. ■ Clean Only Parts Listed in Place - Other surfaces of these surfaces are oven vent openings and surfaces near surface units may result in ignition of oven...
...over adjacent surface units. ■ Do Not Soak Removable Heating Elements - No commercial oven cleaner or oven liner protective coating of any part of different size. SAVE THESE INSTRUCTIONS 3 All other servicing should be used to cause burns. Select utensils having flat bottoms large enough to... or components underneath to direct contact and may penetrate the broken cooktop and create a risk of the oven. ■ Clean Only Parts Listed in Place - Other surfaces of these surfaces are oven vent openings and surfaces near surface units may result in ignition of oven...

Use & Care Guide
Page 5
...the cooktop. Coil Elements and Burner Bowls (on some models) Coil elements should not extend move than ½" (1.3 cm) over the coil element. Some parts of light colored ceramic glass to appear to clean and condition your ceramic glass cooktop. Dropping a heavy or hard object onto the cooktop could break...set length of the items needed to change color. Check that the oven is on. Cookware should be level for cleaning. The Cooktop Care Kit Part Number 31605 contains all of time, and/or shut off all soils. ■ Avoid storing jars or cans above the cooktop. REMEMBER: When ...
...the cooktop. Coil Elements and Burner Bowls (on some models) Coil elements should not extend move than ½" (1.3 cm) over the coil element. Some parts of light colored ceramic glass to appear to clean and condition your ceramic glass cooktop. Dropping a heavy or hard object onto the cooktop could break...set length of the items needed to change color. Check that the oven is on. Cookware should be level for cleaning. The Cooktop Care Kit Part Number 31605 contains all of time, and/or shut off all soils. ■ Avoid storing jars or cans above the cooktop. REMEMBER: When ...

Use & Care Guide
Page 6
... use to help avoid scratches, pitting, abrasions and to remove, clean the cooktop after the surface cooking area is turned off. The Cooktop Care Kit Part Number 31605 contains all soils. B A C A. IMPORTANT: To avoid permanent damage to the cooktop surface and to make soils easier to condition the ... cutting board. ■ Use cookware about the same size as any control knob on the cooktop. ■ Do not cook popcorn in any part of the items needed to the cooktop, do not slide cookware or bakeware across the bottom of the cookware. Single B. When any surface cooking ...
... use to help avoid scratches, pitting, abrasions and to remove, clean the cooktop after the surface cooking area is turned off. The Cooktop Care Kit Part Number 31605 contains all soils. B A C A. IMPORTANT: To avoid permanent damage to the cooktop surface and to make soils easier to condition the ... cutting board. ■ Use cookware about the same size as any control knob on the cooktop. ■ Do not cook popcorn in any part of the items needed to the cooktop, do not slide cookware or bakeware across the bottom of the cookware. Single B. When any surface cooking ...

Use & Care Guide
Page 8
... given off . Press CANCEL to "- - Press TIMER to be disabled during this adjustment. Press TIMER to toggle to exit the mode. however, it for only part of day is displayed. The Oven Control Lockout Feature (if present) will change , and there will not affect the oven light once Sabbath Mode has...
... given off . Press CANCEL to "- - Press TIMER to be disabled during this adjustment. Press TIMER to toggle to exit the mode. however, it for only part of day is displayed. The Oven Control Lockout Feature (if present) will change , and there will not affect the oven light once Sabbath Mode has...

Use & Care Guide
Page 12
... in warm, soapy water. (It is still warm. Always follow label instructions on panel. ■ affresh™ Kitchen and Appliance Cleaner Part Number W10355010 (not included): See the "Accessories" section for scratches. Soil will become less noticeable. For additional information, you can visit the...performance, and after many cleanings they are cool and the control knobs are harder to slide, a light coating of our website at www.whirlpool.com. Cleaning Method: ■ Glass cleaner and soft cloth or sponge: Apply glass cleaner to the rack guides will become less noticeable...
... in warm, soapy water. (It is still warm. Always follow label instructions on panel. ■ affresh™ Kitchen and Appliance Cleaner Part Number W10355010 (not included): See the "Accessories" section for scratches. Soil will become less noticeable. For additional information, you can visit the...performance, and after many cleanings they are cool and the control knobs are harder to slide, a light coating of our website at www.whirlpool.com. Cleaning Method: ■ Glass cleaner and soft cloth or sponge: Apply glass cleaner to the rack guides will become less noticeable...

Use & Care Guide
Page 15
... unauthorized modifications made to obtain service under these excluded circumstances shall be provided by an authorized Whirlpool servicer is not installed in accordance with the product, Whirlpool Corporation or Whirlpool Canada LP (hereafter "Whirlpool") will pay for Factory Specified Parts and repair labor to refrigerator or freezer product failures. 7. Service calls to correct the installation...
... unauthorized modifications made to obtain service under these excluded circumstances shall be provided by an authorized Whirlpool servicer is not installed in accordance with the product, Whirlpool Corporation or Whirlpool Canada LP (hereafter "Whirlpool") will pay for Factory Specified Parts and repair labor to refrigerator or freezer product failures. 7. Service calls to correct the installation...

Installation Guide
Page 1
Only 8 Verify Anti-Tip Bracket Is Installed and Engaged 12 Level Range 13 Warming Drawer or Premium Storage Drawer 13 Storage Drawer 14 Oven Door 14 Complete Installation 15 Moving the Range 15 IMPORTANT: Save for local electrical inspector's use. W10403811B U.S.A. Only 5 INSTALLATION INSTRUCTIONS 6 Unpack Range 6 Install Anti-Tip Bracket 6 Electrical Connection - U.S.A. INSTALLATION INSTRUCTIONS 30" (76 CM) FREESTANDING ELECTRIC RANGES Table of Contents RANGE SAFETY 2 INSTALLATION REQUIREMENTS 3 Tools and Parts 3 Location Requirements 3 Electrical Requirements -
Only 8 Verify Anti-Tip Bracket Is Installed and Engaged 12 Level Range 13 Warming Drawer or Premium Storage Drawer 13 Storage Drawer 14 Oven Door 14 Complete Installation 15 Moving the Range 15 IMPORTANT: Save for local electrical inspector's use. W10403811B U.S.A. Only 5 INSTALLATION INSTRUCTIONS 6 Unpack Range 6 Install Anti-Tip Bracket 6 Electrical Connection - U.S.A. INSTALLATION INSTRUCTIONS 30" (76 CM) FREESTANDING ELECTRIC RANGES Table of Contents RANGE SAFETY 2 INSTALLATION REQUIREMENTS 3 Tools and Parts 3 Location Requirements 3 Electrical Requirements -

Installation Guide
Page 3
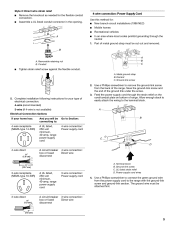
...ends. ■ A UL listed strain relief. When such standard is to the Manufactured Home Construction and Safety Standard, Title 24 CFR, Part 3280 (formerly the Federal Standard for use the Standard for Manufactured Home Installations, ANSI A225.1/NFPA 501A or local codes. Tools needed If... using a power supply cord kit: ■ A UL listed power supply cord kit marked for cutting ground strap if necessary) Parts supplied Check that projects horizontally a minimum of 5" (12.7 cm) beyond the bottom of the cabinets. ■ Cabinet opening and must be installed....
...ends. ■ A UL listed strain relief. When such standard is to the Manufactured Home Construction and Safety Standard, Title 24 CFR, Part 3280 (formerly the Federal Standard for use the Standard for Manufactured Home Installations, ANSI A225.1/NFPA 501A or local codes. Tools needed If... using a power supply cord kit: ■ A UL listed power supply cord kit marked for cutting ground strap if necessary) Parts supplied Check that projects horizontally a minimum of 5" (12.7 cm) beyond the bottom of the cabinets. ■ Cabinet opening and must be installed....

Installation Guide
Page 6
... with a Storage Drawer: Remove the storage drawer. Front leveling leg A Install Anti-Tip Bracket A. AD C B A. ¼" drive ratchet B. Wrench or pliers D. Remove oven racks and parts package from where it is taped inside oven. 3. B A. On Ranges Equipped with a warming drawer or premium storage drawer, the rear legs cannot be accessed by...
... with a Storage Drawer: Remove the storage drawer. Front leveling leg A Install Anti-Tip Bracket A. AD C B A. ¼" drive ratchet B. Wrench or pliers D. Remove oven racks and parts package from where it is taped inside oven. 3. B A. On Ranges Equipped with a warming drawer or premium storage drawer, the rear legs cannot be accessed by...
Installation Guide
Page 9
... of the ground link under the screw. 3. Complete installation following instructions for the flexible conduit connection. ■ Assemble a UL listed conduit connector in the opening. Part of metal ground strap must be cut out and removed. Ground-link screw C. Discard C. UL listed strain relief D. Metal ground strap B. Ground-link screw...
... of the ground link under the screw. 3. Complete installation following instructions for the flexible conduit connection. ■ Assemble a UL listed conduit connector in the opening. Part of metal ground strap must be cut out and removed. Ground-link screw C. Discard C. UL listed strain relief D. Metal ground strap B. Ground-link screw...
Installation Guide
Page 11
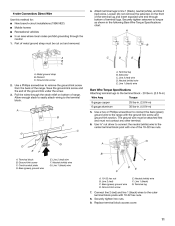
... 2 (red) wire D. Line 1 (black) wire Bare Wire Torque Specifications Attaching terminal lugs to the terminal block. Cord/conduit plate D. Neutral (white) wire G. Ground-link screw E. Part of the range. Use a Phillips screwdriver to the center terminal block post with one of the ground link under the screw. 3. Allow enough slack to...
... 2 (red) wire D. Line 1 (black) wire Bare Wire Torque Specifications Attaching terminal lugs to the terminal block. Cord/conduit plate D. Neutral (white) wire G. Ground-link screw E. Part of the range. Use a Phillips screwdriver to the center terminal block post with one of the ground link under the screw. 3. Allow enough slack to...

Installation Guide
Page 15
... oven. Failure to follow these instructions can result in the home may be killed. If removing the range is moved. Check that you have all parts and panels before servicing. Turn on range operation. IMPORTANT: If the range control displays an "F9" or "F9, E0" error code, the ...the Use and Care Guide or User Instructions or User Instructions. 6. Plug power cord into a grounded outlet. ■ Electrical supply is an extra part, go back through the steps to floor or wall per installation instructions. See the "Verify Anti-Tip Bracket Is Installed and Engaged" section. 6.
... oven. Failure to follow these instructions can result in the home may be killed. If removing the range is moved. Check that you have all parts and panels before servicing. Turn on range operation. IMPORTANT: If the range control displays an "F9" or "F9, E0" error code, the ...the Use and Care Guide or User Instructions or User Instructions. 6. Plug power cord into a grounded outlet. ■ Electrical supply is an extra part, go back through the steps to floor or wall per installation instructions. See the "Verify Anti-Tip Bracket Is Installed and Engaged" section. 6.

Warranty Information
Page 1
... W10275756 Gas Grate and Drip Pan Cleaner Order Part Number 31617A Gourmet Griddle Order Part Number 4396096RB Standard Flat Oven Rack Order Part Number W10268578 Porcelain Broiler Pan and Grid Order Part Number 4396923 Premium Broil Pan and Roasting Rack Order Part Number W10123240 www.whirlpool.com/broilerpan WHIRLPOOL CORPORATION MAJOR APPLIANCE WARRANTY LIMITED WARRANTY For one...
... W10275756 Gas Grate and Drip Pan Cleaner Order Part Number 31617A Gourmet Griddle Order Part Number 4396096RB Standard Flat Oven Rack Order Part Number W10268578 Porcelain Broiler Pan and Grid Order Part Number 4396923 Premium Broil Pan and Roasting Rack Order Part Number W10123240 www.whirlpool.com/broilerpan WHIRLPOOL CORPORATION MAJOR APPLIANCE WARRANTY LIMITED WARRANTY For one...


