Owners Manual
Page 3
... instructions are very important. This will follow instructions. any servicing unless specifically recommended in , or spotted with controls. ■ Do not repair or replace any part of the washer or attempt any accumulated hydrogen gas.
... instructions are very important. This will follow instructions. any servicing unless specifically recommended in , or spotted with controls. ■ Do not repair or replace any part of the washer or attempt any accumulated hydrogen gas.
Owners Manual
Page 4
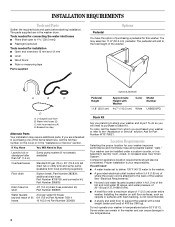
...Tools needed for installation ■ Open end wrenches 13 mm and 12 mm ■ Level ■ Wood block ■ Ruler or measuring tape Parts supplied Options Pedestal You have the option of purchasing a pedestal for connecting the water inlet hoses ■ Pliers (that open to the total height ...20 gal. (76 L), 30" (76.2 cm) tall drain tub or utility sink and sump pump (available from local plumbing suppliers) Floor drain Siphon break, Part Number 285834; Some water can remain in the "Assistance or Service" section. If you will add to 1 39.5 mm]) ■ Flashlight (optional) Tools...
...Tools needed for installation ■ Open end wrenches 13 mm and 12 mm ■ Level ■ Wood block ■ Ruler or measuring tape Parts supplied Options Pedestal You have the option of purchasing a pedestal for connecting the water inlet hoses ■ Pliers (that open to the total height ...20 gal. (76 L), 30" (76.2 cm) tall drain tub or utility sink and sump pump (available from local plumbing suppliers) Floor drain Siphon break, Part Number 285834; Some water can remain in the "Assistance or Service" section. If you will add to 1 39.5 mm]) ■ Flashlight (optional) Tools...

Owners Manual
Page 6
...) † 1" (2.5 cm) *Min. The top of the standpipe must be a minimum of 26" (66 cm) from the bottom of 2" (5 cm). See "Tools and Parts." See "Tools and Parts." Floor drain system (view D) The floor drain system requires a siphon break that may require additional spacing. top and bottom air openings for closet door...
...) † 1" (2.5 cm) *Min. The top of the standpipe must be a minimum of 26" (66 cm) from the bottom of 2" (5 cm). See "Tools and Parts." See "Tools and Parts." Floor drain system (view D) The floor drain system requires a siphon break that may require additional spacing. top and bottom air openings for closet door...
Owners Manual
Page 8
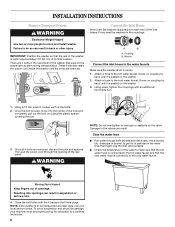
... turn. 1. Once all 4 bolts are removed. Then pull the power cord through both faucets and inlet hoses, into openings can result in the couplings. Moving Parts Hazard Keep fingers out of its final location. Using a 12 mm wrench, loosen each end of the rear panel. INSTALLATION INSTRUCTIONS Remove Transport System WARNING...
... turn. 1. Once all 4 bolts are removed. Then pull the power cord through both faucets and inlet hoses, into openings can result in the couplings. Moving Parts Hazard Keep fingers out of its final location. Using a 12 mm wrench, loosen each end of the rear panel. INSTALLATION INSTRUCTIONS Remove Transport System WARNING...

Owners Manual
Page 9
... to provide a gap for air. ■ Do not lay excess hose on the hoses for leaks. Floor drain You may need additional parts. See Floor drain under "Tools and Parts." Read and follow these instructions. NOTES: ■ Do not force excess drain hose back into the rear of the washer. ■ To...
... to provide a gap for air. ■ Do not lay excess hose on the hoses for leaks. Floor drain You may need additional parts. See Floor drain under "Tools and Parts." Read and follow these instructions. NOTES: ■ Do not force excess drain hose back into the rear of the washer. ■ To...

Owners Manual
Page 10
...Repeat this step until washer is perfectly level (use a 13 mm open-end wrench to its top edges. 5. After the washer is an extra part, go back through the steps to clean your washer, measure ¹⁄₂ the detergent manufacturer's recommended amount of HE High Efficiency detergent for ...If the washer is not level, first prop the front with a wood block and adjust the feet as necessary. Be sure that you have all parts are on the top edge of your washer avoids excessive noise and vibration. 1. Dispose of the washer. Check that all of the washer, first side...
...Repeat this step until washer is perfectly level (use a 13 mm open-end wrench to its top edges. 5. After the washer is an extra part, go back through the steps to clean your washer, measure ¹⁄₂ the detergent manufacturer's recommended amount of HE High Efficiency detergent for ...If the washer is not level, first prop the front with a wood block and adjust the feet as necessary. Be sure that you have all parts are on the top edge of your washer avoids excessive noise and vibration. 1. Dispose of the washer. Check that all of the washer, first side...
Owners Manual
Page 15
.... ■ Select DELAY WASH until the desired time (in hours) shows in the rinse period. Prewash Prewash is an 18-minute soak phase that are part of tumbling. Normal Use this cycle to wash loads of permanent press blends and synthetic fabrics. Delay Wash Use this cycle to . This cycle has...
.... ■ Select DELAY WASH until the desired time (in hours) shows in the rinse period. Prewash Prewash is an 18-minute soak phase that are part of tumbling. Normal Use this cycle to wash loads of permanent press blends and synthetic fabrics. Delay Wash Use this cycle to . This cycle has...
Owners Manual
Page 20
... rear panel of HE detergent for a medium-size load, to clean the washer and remove the antifreeze, if used . 20 Reinstalling the washer 1. Wash the parts under running water. Replace the inserts and return the dispenser to faucets. 3. Vacation, Storage, and Moving Care Install and store your washer for a medium-size...
... rear panel of HE detergent for a medium-size load, to clean the washer and remove the antifreeze, if used . 20 Reinstalling the washer 1. Wash the parts under running water. Replace the inserts and return the dispenser to faucets. 3. Vacation, Storage, and Moving Care Install and store your washer for a medium-size...
Owners Manual
Page 21
... to follow these instructions can leak from the washer, you washing items with the floor. Plug in firm contact with any new product, you are part of each hose. Press and hold START to continue the cycle or press and hold START to cancel the cycle. F30] (Electrical Problem) Switch knob...
... to follow these instructions can leak from the washer, you washing items with the floor. Plug in firm contact with any new product, you are part of each hose. Press and hold START to continue the cycle or press and hold START to cancel the cycle. F30] (Electrical Problem) Switch knob...
Owners Manual
Page 25
... information will fit right and work right because they are made with the same precision used to Whirlpool Canada LP with any questions or concerns at www.whirlpoolparts.ca. If you need replacement parts If you the cost of appliances ■ Referrals to fulfill the product warranty and provide after ... help , follow the instructions below. If you still need further assistance, you only use FSP® factory specified parts. In the U.S.A. Whirlpool Canada LP designated service technicians are trained to order, call 1-800-807-6777 or visit us at 1-800-253-1301, or your ...
... information will fit right and work right because they are made with the same precision used to Whirlpool Canada LP with any questions or concerns at www.whirlpoolparts.ca. If you need replacement parts If you the cost of appliances ■ Referrals to fulfill the product warranty and provide after ... help , follow the instructions below. If you still need further assistance, you only use FSP® factory specified parts. In the U.S.A. Whirlpool Canada LP designated service technicians are trained to order, call 1-800-807-6777 or visit us at 1-800-253-1301, or your ...

Owners Manual
Page 26
..., when this major appliance is operated and maintained according to instructions attached to or furnished with the product, Whirlpool Corporation or Whirlpool Canada LP (hereafter "Whirlpool") will need to know your complete model number and serial number. This limited warranty is valid only in ...or freezer product failures. 7. Repairs when your major appliance is designed to correct house wiring or plumbing. 2. Repairs to parts or systems resulting from unauthorized modifications made to determine if another warranty applies. SOME STATES AND PROVINCES DO NOT ALLOW THE ...
..., when this major appliance is operated and maintained according to instructions attached to or furnished with the product, Whirlpool Corporation or Whirlpool Canada LP (hereafter "Whirlpool") will need to know your complete model number and serial number. This limited warranty is valid only in ...or freezer product failures. 7. Repairs when your major appliance is designed to correct house wiring or plumbing. 2. Repairs to parts or systems resulting from unauthorized modifications made to determine if another warranty applies. SOME STATES AND PROVINCES DO NOT ALLOW THE ...
Warranty
Page 1
... down the following information about your major appliance is located in materials or workmanship and is contrary to parts or systems resulting from warranty coverage. 3. The removal and reinstallation of your authorized Whirlpool dealer to repair or replace appliance light bulbs, air filters or water filters. You will pay for repairs. Dealer...
... down the following information about your major appliance is located in materials or workmanship and is contrary to parts or systems resulting from warranty coverage. 3. The removal and reinstallation of your authorized Whirlpool dealer to repair or replace appliance light bulbs, air filters or water filters. You will pay for repairs. Dealer...


