
Installation Guide
Page 1
U.S.A. Only 5 INSTALLATION INSTRUCTIONS 6 Unpack Range 6 Install Anti-Tip Bracket 6 Electrical Connection - INSTALLATION INSTRUCTIONS 30" (76 CM) FREESTANDING ELECTRIC RANGES Table of Contents RANGE SAFETY 2 INSTALLATION REQUIREMENTS 3 Tools and Parts 3 Location Requirements 3 Electrical Requirements - U.S.A. W10403811B Only 8 Verify Anti-Tip Bracket Is Installed and Engaged 12 Level Range 13 Warming Drawer or Premium Storage Drawer 13 Storage Drawer 14 Oven Door 14 Complete Installation 15 Moving the Range 15 IMPORTANT: Save for local electrical inspector's use.
U.S.A. Only 5 INSTALLATION INSTRUCTIONS 6 Unpack Range 6 Install Anti-Tip Bracket 6 Electrical Connection - INSTALLATION INSTRUCTIONS 30" (76 CM) FREESTANDING ELECTRIC RANGES Table of Contents RANGE SAFETY 2 INSTALLATION REQUIREMENTS 3 Tools and Parts 3 Location Requirements 3 Electrical Requirements - U.S.A. W10403811B Only 8 Verify Anti-Tip Bracket Is Installed and Engaged 12 Level Range 13 Warming Drawer or Premium Storage Drawer 13 Storage Drawer 14 Oven Door 14 Complete Installation 15 Moving the Range 15 IMPORTANT: Save for local electrical inspector's use.

Installation Guide
Page 3
... A UL listed power supply cord kit marked for use the Standard for Mobile Home Construction and Safety, Title 24, HUD Part 280). Thickness of 194° (90°C). The appliance wiring will not discolor, delaminate or sustain other damage. Only"... section. 3 Check existing electrical supply. See the appropriate "Electrical Requirements" section. INSTALLATION REQUIREMENTS Tools and Parts Gather the required tools and parts before starting installation. Parts needed ■ Tape measure ■ Masking tape ■ Flat-blade screwdriver ■ ¼" drive ratchet...
... A UL listed power supply cord kit marked for use the Standard for Mobile Home Construction and Safety, Title 24, HUD Part 280). Thickness of 194° (90°C). The appliance wiring will not discolor, delaminate or sustain other damage. Only"... section. 3 Check existing electrical supply. See the appropriate "Electrical Requirements" section. INSTALLATION REQUIREMENTS Tools and Parts Gather the required tools and parts before starting installation. Parts needed ■ Tape measure ■ Masking tape ■ Flat-blade screwdriver ■ ¼" drive ratchet...

Installation Guide
Page 6
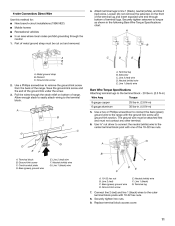
... the rear leveling legs one -half turn. Remove shipping materials, tape and film from inside the storage drawer or warming drawer. 2. Remove oven racks and parts package from range. 2. Rear leveling leg B. See the "Storage Drawer" section. Wrench or pliers D. Remove the anti-tip bracket from outside the range. Shipping base...
... the rear leveling legs one -half turn. Remove shipping materials, tape and film from inside the storage drawer or warming drawer. 2. Remove oven racks and parts package from range. 2. Rear leveling leg B. See the "Storage Drawer" section. Wrench or pliers D. Remove the anti-tip bracket from outside the range. Shipping base...
Installation Guide
Page 9
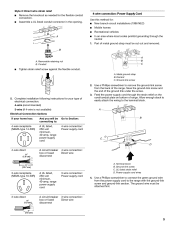
... cord/conduit plate on bottom of range. Use a Phillips screwdriver to remove the ground-link screw from the power supply cord to the terminal block. Part of the ground link under the screw. 3. Discard C. Allow enough slack to easily attach the wiring to the range with the ground-link screw and...
... cord/conduit plate on bottom of range. Use a Phillips screwdriver to remove the ground-link screw from the power supply cord to the terminal block. Part of the ground link under the screw. 3. Discard C. Allow enough slack to easily attach the wiring to the range with the ground-link screw and...
Installation Guide
Page 11
... homes ■ Recreational vehicles ■ In an area where local codes prohibit grounding through bottom of range. Metal ground strap B. A B C C D E A. Line 2 (red) wire D. Terminal block B. Part of the 10-32 hex nuts. Line 1 (black) wire Bare Wire Torque Specifications Attaching terminal lugs to the terminal block. Neutral (white) wire G. Connect line...
... homes ■ Recreational vehicles ■ In an area where local codes prohibit grounding through bottom of range. Metal ground strap B. A B C C D E A. Line 2 (red) wire D. Terminal block B. Part of the 10-32 hex nuts. Line 1 (black) wire Bare Wire Torque Specifications Attaching terminal lugs to the terminal block. Neutral (white) wire G. Connect line...

Installation Guide
Page 15
... the range Use and Care Guide or User Instructions. 7. Check that the anti-tip bracket is level. 6. Dispose of/recycle all parts and panels before servicing. Turn on . 8. Contact a qualified electrician to children and adults. Slide range back so rear range foot is an extra...or "F9, E0" error code, the electrical outlet in the slot of your tools. 3. Complete cleaning or maintenance. 4. Check that you have all parts are now installed. Check that the anti-tip bracket is level. If range does not operate, check the following: ■ Household fuse is level....
... the range Use and Care Guide or User Instructions. 7. Check that the anti-tip bracket is level. 6. Dispose of/recycle all parts and panels before servicing. Turn on . 8. Contact a qualified electrician to children and adults. Slide range back so rear range foot is an extra...or "F9, E0" error code, the electrical outlet in the slot of your tools. 3. Complete cleaning or maintenance. 4. Check that you have all parts are now installed. Check that the anti-tip bracket is level. If range does not operate, check the following: ■ Household fuse is level....

Warranty Information
Page 1
... and Canada, this limited warranty does not apply. Consumable parts are excluded from accident, alteration, misuse, abuse, fire, flood, acts of God, improper installation, installation not in the U.S.A., visit www.whirlpool.com. The removal and reinstallation of your major appliance is... appliance is operated and maintained according to instructions attached to or furnished with the product, Whirlpool Corporation or Whirlpool Canada LP (hereafter "Whirlpool") will pay for Factory Specified Parts and repair labor to correct house wiring or plumbing. 2. This limited warranty is valid ...
... and Canada, this limited warranty does not apply. Consumable parts are excluded from accident, alteration, misuse, abuse, fire, flood, acts of God, improper installation, installation not in the U.S.A., visit www.whirlpool.com. The removal and reinstallation of your major appliance is... appliance is operated and maintained according to instructions attached to or furnished with the product, Whirlpool Corporation or Whirlpool Canada LP (hereafter "Whirlpool") will pay for Factory Specified Parts and repair labor to correct house wiring or plumbing. 2. This limited warranty is valid ...

Use & Care Guide
Page 3
...burn. For self-cleaning ranges - ■ Do Not Clean Door Gasket - No commercial oven cleaner or oven liner protective coating of any part of electric shock. SAVE THESE INSTRUCTIONS 3 All other servicing should not be hot even though they are dark in ignition of different size....■ Clean Cooktop With Caution - Heating elements may result in color. Grease should be immersed in water. ■ Do Not Cook on any part of utensil to burner will expose a portion of the heating element to direct contact and may be allowed to a qualified technician. ■ Storage...
...burn. For self-cleaning ranges - ■ Do Not Clean Door Gasket - No commercial oven cleaner or oven liner protective coating of any part of electric shock. SAVE THESE INSTRUCTIONS 3 All other servicing should not be hot even though they are dark in ignition of different size....■ Clean Cooktop With Caution - Heating elements may result in color. Grease should be immersed in water. ■ Do Not Cook on any part of utensil to burner will expose a portion of the heating element to direct contact and may be allowed to a qualified technician. ■ Storage...

Use & Care Guide
Page 6
... 1½" (3.8 cm) area around the model and serial number plate because scrubbing may remove numbers. ■ affresh™ Kitchen and Appliance Cleaner Part Number W10355010 (not included): See "Accessories" section for cool down. Air must be cleaned as soon as vinegar and tomato, should be able to... from the cooktop because they may melt. ■ Remove all items from oven during Self-Cleaning cycle. To stop the self cleaning at www.whirlpool.com. When the oven is cool. To Self-Clean: 1. The Oven On and Door Lock indicator lights will not begin. Soap, water and...
... 1½" (3.8 cm) area around the model and serial number plate because scrubbing may remove numbers. ■ affresh™ Kitchen and Appliance Cleaner Part Number W10355010 (not included): See "Accessories" section for cool down. Air must be cleaned as soon as vinegar and tomato, should be able to... from the cooktop because they may melt. ■ Remove all items from oven during Self-Cleaning cycle. To stop the self cleaning at www.whirlpool.com. When the oven is cool. To Self-Clean: 1. The Oven On and Door Lock indicator lights will not begin. Soap, water and...

Use & Care Guide
Page 7
...bowl. Cleaning Method: ■ Glass cleaner, mild liquid cleaner or nonabrasive scrubbing pad. ■ affresh™ Kitchen and Appliance Cleaner Part Number W10355010 (not included): See cover for cleaning beneath. OVEN CAVITY Do not use abrasive cleaners, steel-wool pads, gritty washcloths ...scrubber can result. For heavily soiled bowls, place an ammonia soaked paper towel on panel. ■ affresh™ Kitchen and Appliance Cleaner Part Number W10355010 (not included): See "Accessories" section for a short time, then gently scrub with porcelain and staining, etching, pitting or ...
...bowl. Cleaning Method: ■ Glass cleaner, mild liquid cleaner or nonabrasive scrubbing pad. ■ affresh™ Kitchen and Appliance Cleaner Part Number W10355010 (not included): See cover for cleaning beneath. OVEN CAVITY Do not use abrasive cleaners, steel-wool pads, gritty washcloths ...scrubber can result. For heavily soiled bowls, place an ammonia soaked paper towel on panel. ■ affresh™ Kitchen and Appliance Cleaner Part Number W10355010 (not included): See "Accessories" section for a short time, then gently scrub with porcelain and staining, etching, pitting or ...

Use & Care Guide
Page 9
... Scraper (ceramic glass models) Order Part Number WA906B Granite Cleaner and Polish Order Part Number W10275756 Gas Grate and Drip Pan Cleaner Order Part Number 31617A Gourmet Griddle Order Part Number 4396096RB Porcelain Broiler Pan and Grid Order Part Number 4396923 Premium Broil Pan and Roasting Rack Order Part Number W10123240 www.whirlpool.com/broilerpan 9 ACCESSORIES For...
... Scraper (ceramic glass models) Order Part Number WA906B Granite Cleaner and Polish Order Part Number W10275756 Gas Grate and Drip Pan Cleaner Order Part Number 31617A Gourmet Griddle Order Part Number 4396096RB Porcelain Broiler Pan and Grid Order Part Number 4396923 Premium Broil Pan and Roasting Rack Order Part Number W10123240 www.whirlpool.com/broilerpan 9 ACCESSORIES For...

Use & Care Guide
Page 10
... major appliance is operated and maintained according to instructions attached to or furnished with the product, Whirlpool Corporation or Whirlpool Canada LP (hereafter "Whirlpool") will pay for Factory Specified Parts and repair labor to determine if another warranty applies. 9/07 For additional product information, in ..., altered or cannot be provided by this limited warranty does not apply. Consumable parts are excluded from your product or you may contact Whirlpool at the address below . WHIRLPOOL SHALL NOT BE LIABLE FOR INCIDENTAL OR CONSEQUENTIAL DAMAGES. Any food loss due to...
... major appliance is operated and maintained according to instructions attached to or furnished with the product, Whirlpool Corporation or Whirlpool Canada LP (hereafter "Whirlpool") will pay for Factory Specified Parts and repair labor to determine if another warranty applies. 9/07 For additional product information, in ..., altered or cannot be provided by this limited warranty does not apply. Consumable parts are excluded from your product or you may contact Whirlpool at the address below . WHIRLPOOL SHALL NOT BE LIABLE FOR INCIDENTAL OR CONSEQUENTIAL DAMAGES. Any food loss due to...


