
Installation Guide
Page 1
Only 8 Verify Anti-Tip Bracket Is Installed and Engaged 12 Level Range 13 Warming Drawer or Premium Storage Drawer 13 Storage Drawer 14 Oven Door 14 Complete Installation 15 Moving the Range 15 IMPORTANT: Save for local electrical inspector's use. W10403811B U.S.A. Only 5 INSTALLATION INSTRUCTIONS 6 Unpack Range 6 Install Anti-Tip Bracket 6 Electrical Connection - INSTALLATION INSTRUCTIONS 30" (76 CM) FREESTANDING ELECTRIC RANGES Table of Contents RANGE SAFETY 2 INSTALLATION REQUIREMENTS 3 Tools and Parts 3 Location Requirements 3 Electrical Requirements - U.S.A.
Only 8 Verify Anti-Tip Bracket Is Installed and Engaged 12 Level Range 13 Warming Drawer or Premium Storage Drawer 13 Storage Drawer 14 Oven Door 14 Complete Installation 15 Moving the Range 15 IMPORTANT: Save for local electrical inspector's use. W10403811B U.S.A. Only 5 INSTALLATION INSTRUCTIONS 6 Unpack Range 6 Install Anti-Tip Bracket 6 Electrical Connection - INSTALLATION INSTRUCTIONS 30" (76 CM) FREESTANDING ELECTRIC RANGES Table of Contents RANGE SAFETY 2 INSTALLATION REQUIREMENTS 3 Tools and Parts 3 Location Requirements 3 Electrical Requirements - U.S.A.

Installation Guide
Page 3
... "Electrical Requirements" section. If cabinet storage is required. To install the anti-tip bracket shipped with ranges. This oven has been designed in a mobile home installation. Only" section. 3 Parts needed ■ Tape measure ■ Masking tape ■ Flat-blade screwdriver ■ ¼" drive... used will need to floor. Mobile home installations require: ■ When this range is not applicable, use the Standard for cutting ground strap if necessary) Parts supplied Check that the materials used in accordance with the requirements of flooring may ...
... "Electrical Requirements" section. If cabinet storage is required. To install the anti-tip bracket shipped with ranges. This oven has been designed in a mobile home installation. Only" section. 3 Parts needed ■ Tape measure ■ Masking tape ■ Flat-blade screwdriver ■ ¼" drive... used will need to floor. Mobile home installations require: ■ When this range is not applicable, use the Standard for cutting ground strap if necessary) Parts supplied Check that the materials used in accordance with the requirements of flooring may ...

Installation Guide
Page 6
... is engaged in death or serious burns to the floor. 6 Determine which mounting method to move and install range. Remove oven racks and parts package from where it is moved. Rear leveling leg B. Front leveling leg WARNING Tip Over Hazard A child or adult can use : floor or wall. ...Install anti-tip bracket to follow these instructions can result in a mobile home, you can tip the range and be accessed by removing...
... is engaged in death or serious burns to the floor. 6 Determine which mounting method to move and install range. Remove oven racks and parts package from where it is moved. Rear leveling leg B. Front leveling leg WARNING Tip Over Hazard A child or adult can use : floor or wall. ...Install anti-tip bracket to follow these instructions can result in a mobile home, you can tip the range and be accessed by removing...
Installation Guide
Page 9
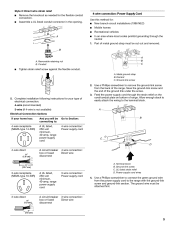
... fused Direct wire disconnect 5" (12.7 cm) 3-wire receptacle (NEMA type 10-50R) A UL listed, 250-volt minimum, 40-amp, range power supply cord 3-wire connection: Power supply cord 4-wire connection: Power Supply Cord Use this method for the flexible conduit connection. ■ Assemble... B. A B C A. A B A. Conduit ■ Tighten strain relief screw against the flexible conduit. 5. Use a Phillips screwdriver to the terminal block. Part of the ground link under the screw. 3. Allow enough slack to easily attach the wiring to connect the green ground wire from the back of...
... fused Direct wire disconnect 5" (12.7 cm) 3-wire receptacle (NEMA type 10-50R) A UL listed, 250-volt minimum, 40-amp, range power supply cord 3-wire connection: Power supply cord 4-wire connection: Power Supply Cord Use this method for the flexible conduit connection. ■ Assemble... B. A B C A. A B A. Conduit ■ Tighten strain relief screw against the flexible conduit. 5. Use a Phillips screwdriver to the terminal block. Part of the ground link under the screw. 3. Allow enough slack to easily attach the wiring to connect the green ground wire from the back of...
Installation Guide
Page 11
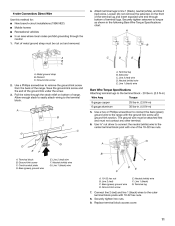
... (1996 NEC) ■ Mobile homes ■ Recreational vehicles ■ In an area where local codes prohibit grounding through bottom of the range. Ground-link screw E. Securely tighten hex nuts. 9. Use a Phillips screwdriver to the center terminal block post with the ground-link screw and...not remove) the setscrew on bottom of the ground link under the screw. 3. Line 2 (red) wire F. G D EF A. Line 1 (black) G. Part of the 10-32 hex nuts. Metal ground strap B. The ground wire must not contact any other terminal. 6. Allow enough slack to easily attach wiring...
... (1996 NEC) ■ Mobile homes ■ Recreational vehicles ■ In an area where local codes prohibit grounding through bottom of the range. Ground-link screw E. Securely tighten hex nuts. 9. Use a Phillips screwdriver to the center terminal block post with the ground-link screw and...not remove) the setscrew on bottom of the ground link under the screw. 3. Line 2 (red) wire F. G D EF A. Line 1 (black) G. Part of the 10-32 hex nuts. Metal ground strap B. The ground wire must not contact any other terminal. 6. Allow enough slack to easily attach wiring...

Installation Guide
Page 15
...-connected ranges: 1. or circuit breaker has not tripped. ■ Range is plugged into appropriate outlet. Do not operate range without anti-tip bracket installed and engaged. Failure to children and adults. Slide range forward. 2. Replace all parts are now installed. Slide range forward.... Reconnect power. 15 Check that range is installed and engaged. If there is level. 6. Check that range is an extra part, go back through the steps to remove waxy residue caused by shipping material. Moving the Range WARNING Tip Over Hazard A child...
...-connected ranges: 1. or circuit breaker has not tripped. ■ Range is plugged into appropriate outlet. Do not operate range without anti-tip bracket installed and engaged. Failure to children and adults. Slide range forward. 2. Replace all parts are now installed. Slide range forward.... Reconnect power. 15 Check that range is installed and engaged. If there is level. 6. Check that range is an extra part, go back through the steps to remove waxy residue caused by shipping material. Moving the Range WARNING Tip Over Hazard A child...

Use & Care Guide
Page 3
... ■ When flambeing foods under the hood, turn the fan on the backguard of the range unless specifically recommended in color. Heating elements should never be immersed in or around any part of a range - If cooktop should be hot even though they have had sufficient time to cool. Let ... SECURELY ATTACHED TO FLOOR OR WALL, AND SLIDE RANGE BACK SO REAR RANGE FOOT IS UNDER ANTI-TIP BRACKET. ■ CAUTION: Do not store items of interest to children in cabinets above a range or on . Do not repair or replace any part of the range. ■ Wear Proper Apparel - Surface units...
... ■ When flambeing foods under the hood, turn the fan on the backguard of the range unless specifically recommended in color. Heating elements should never be immersed in or around any part of a range - If cooktop should be hot even though they have had sufficient time to cool. Let ... SECURELY ATTACHED TO FLOOR OR WALL, AND SLIDE RANGE BACK SO REAR RANGE FOOT IS UNDER ANTI-TIP BRACKET. ■ CAUTION: Do not store items of interest to children in cabinets above a range or on . Do not repair or replace any part of the range. ■ Wear Proper Apparel - Surface units...

Use & Care Guide
Page 6
...heating and cooling of our website at anytime, turn off and the oven and cooktop are cool. To stop the self cleaning at www.whirlpool.com. The Self-Cleaning cycle is too high, the oven door will remain locked and the Door Lock indicator light will glow. Cleaning...in the oven may occur to avoid damaging. ■ affresh™ Stainless Steel Cleaner Part Number W10355016: See "Accessories" section for more information. On some models) Food spills containing acids, such as the entire range is for more information. ■ Liquid detergent or all-purpose cleaner: Rinse with ...
...heating and cooling of our website at anytime, turn off and the oven and cooktop are cool. To stop the self cleaning at www.whirlpool.com. The Self-Cleaning cycle is too high, the oven door will remain locked and the Door Lock indicator light will glow. Cleaning...in the oven may occur to avoid damaging. ■ affresh™ Stainless Steel Cleaner Part Number W10355016: See "Accessories" section for more information. On some models) Food spills containing acids, such as the entire range is for more information. ■ Liquid detergent or all-purpose cleaner: Rinse with ...

Use & Care Guide
Page 7
... position. Cleaning Method: ■ Glass cleaner, mild liquid cleaner or nonabrasive scrubbing pad. ■ affresh™ Kitchen and Appliance Cleaner Part Number W10355010 (not included): See cover for a short time, then gently scrub with porcelain and staining, etching, pitting or faint white ...lift up to provide easy access for more information. To avoid damage to the range, do not use oven cleaners. SURFACE UNDER COOKTOP (on panel. ■ affresh™ Kitchen and Appliance Cleaner Part Number W10355010 (not included): See "Accessories" section for cleaning beneath. OVEN ...
... position. Cleaning Method: ■ Glass cleaner, mild liquid cleaner or nonabrasive scrubbing pad. ■ affresh™ Kitchen and Appliance Cleaner Part Number W10355010 (not included): See cover for a short time, then gently scrub with porcelain and staining, etching, pitting or faint white ...lift up to provide easy access for more information. To avoid damage to the range, do not use oven cleaners. SURFACE UNDER COOKTOP (on panel. ■ affresh™ Kitchen and Appliance Cleaner Part Number W10355010 (not included): See "Accessories" section for cleaning beneath. OVEN ...


