
Owners Manual
Page 1
... right corner of Contents RANGE SAFETY 2 The Anti-Tip Bracket 2 FEATURE GUIDE 4 COOKTOP USE 7 Cookware 8 Home Canning 9 OVEN USE 10 Electronic Oven Controls 10 Sabbath Mode 10 Keep Warm 11 Aluminum Foil 12 Positioning Racks and Bakeware 12 Oven Vent 12 Baking and Roasting 12 Broiling 13 Convection Baking and Roasting 13 Cook Time 13 RANGE CARE 14 Self-Cleaning Cycle 14 General Cleaning 14 Oven Light 15 TROUBLESHOOTING 16 ACCESSORIES 17 WARRANTY 18 W11333073A For future reference, please make a note of your product model and serial numbers.
... right corner of Contents RANGE SAFETY 2 The Anti-Tip Bracket 2 FEATURE GUIDE 4 COOKTOP USE 7 Cookware 8 Home Canning 9 OVEN USE 10 Electronic Oven Controls 10 Sabbath Mode 10 Keep Warm 11 Aluminum Foil 12 Positioning Racks and Bakeware 12 Oven Vent 12 Baking and Roasting 12 Broiling 13 Convection Baking and Roasting 13 Cook Time 13 RANGE CARE 14 Self-Cleaning Cycle 14 General Cleaning 14 Oven Light 15 TROUBLESHOOTING 16 ACCESSORIES 17 WARRANTY 18 W11333073A For future reference, please make a note of your product model and serial numbers.
Owners Manual
Page 3
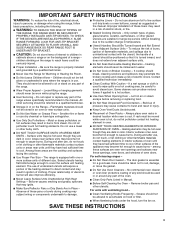
... or more surface units of utensil to burner will expose a portion of the heating element to direct contact and may subject wiring or components underneath to damage. I Use Care When Opening Door - Contact a qualified technician immediately. I Do Not Cook on the backguard of a range - I Do Not Clean Door Gasket - I Keep Oven Vent Ducts Unobstructed. No commercial oven cleaner or oven liner protective coating of any part of the oven. For units...
... or more surface units of utensil to burner will expose a portion of the heating element to direct contact and may subject wiring or components underneath to damage. I Use Care When Opening Door - Contact a qualified technician immediately. I Do Not Cook on the backguard of a range - I Do Not Clean Door Gasket - I Keep Oven Vent Ducts Unobstructed. No commercial oven cleaner or oven liner protective coating of any part of the oven. For units...
Owners Manual
Page 4
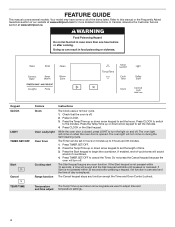
Keypad CLOCK LIGHT TIMER SET/OFF Start Cancel Feature Clock Oven cavity light Oven timer Cooking start Range function Instructions The Clock uses a 12-hour cycle. 1. The oven light will sound at www.whirlpool.ca. Press TIMER SET/OFF. 2. If Start is not pressed within 10 seconds, a tone will sound and the Start keypad will blink until pressed or canceled. FEATURE GUIDE This manual covers several models. Press the Temp/Time up or down arrow keypads are used to set the length of countdown. 4. Press...
Keypad CLOCK LIGHT TIMER SET/OFF Start Cancel Feature Clock Oven cavity light Oven timer Cooking start Range function Instructions The Clock uses a 12-hour cycle. 1. The oven light will sound at www.whirlpool.ca. Press TIMER SET/OFF. 2. If Start is not pressed within 10 seconds, a tone will sound and the Start keypad will blink until pressed or canceled. FEATURE GUIDE This manual covers several models. Press the Temp/Time up or down arrow keypads are used to set the length of countdown. 4. Press...
Owners Manual
Page 5
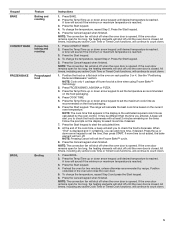
... minimum or maximum temperature is reached. 3. NOTE: The convection fan will turn off. Press the Cancel keypad when finished. Keypad BAKE Feature Baking and roasting CONVECT BAKE Convection baking and roasting FROZEN BAKE Prepackaged food BROIL Broiling Instructions 1. Press BAKE. 2. When "End" is displayed and is not added, the bake element will shut off when the oven door is reached. To change the temperature, repeat Step 2. All timers, including any active Cook Time or Timed Cook functions, will exit...
... minimum or maximum temperature is reached. 3. NOTE: The convection fan will turn off. Press the Cancel keypad when finished. Keypad BAKE Feature Baking and roasting CONVECT BAKE Convection baking and roasting FROZEN BAKE Prepackaged food BROIL Broiling Instructions 1. Press BAKE. 2. When "End" is displayed and is not added, the bake element will shut off when the oven door is reached. To change the temperature, repeat Step 2. All timers, including any active Cook Time or Timed Cook functions, will exit...

Owners Manual
Page 6
... convection fan will function with a delayed start Timed cooking Self-Cleaning cycle Oven and cooktop control lockout Instructions Food must be used to count down arrow keypad until the oven door is used for foods such as breads and cakes because they may not bake properly. Press WARM ZONE again to turn off . 2. See the "Self-Cleaning Cycle" section. 1. A tone will sound and a lock will sound if the minimum or maximum temperature is set to turn...
... convection fan will function with a delayed start Timed cooking Self-Cleaning cycle Oven and cooktop control lockout Instructions Food must be used to count down arrow keypad until the oven door is used for foods such as breads and cakes because they may not bake properly. Press WARM ZONE again to turn off . 2. See the "Self-Cleaning Cycle" section. 1. A tone will sound and a lock will sound if the minimum or maximum temperature is set to turn...
Owners Manual
Page 7
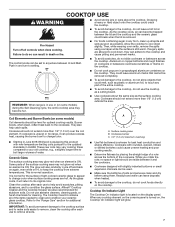
... the cooktop surface and to make soils easier to remove, clean the cooktop after each use the cooktop as plastic or aluminum foil, to touch any part of the items needed to clean and condition your old cooktop, e.g., a slightly longer time to the cooktop, do not cook foods directly on , the Cooktop On indicator light will glow. 7 Cookware should be set to help catch spills. As the glass cools...
... the cooktop surface and to make soils easier to remove, clean the cooktop after each use the cooktop as plastic or aluminum foil, to touch any part of the items needed to clean and condition your old cooktop, e.g., a slightly longer time to the cooktop, do not cook foods directly on , the Cooktop On indicator light will glow. 7 Cookware should be set to help catch spills. As the glass cools...
Owners Manual
Page 8
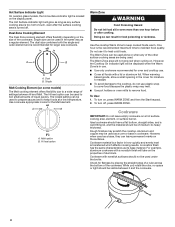
... models) The Melt cooking element offers flexibility due to remove food. The Warm Zone area will be displayed when the Warm Zone is located on , press WARM ZONE and then the Start keypad. 2. Aluminum and copper may scratch the cooktop. Check for flatness by placing the straight edge of a ruler across the bottom of settings between it to -heavy thickness. Hot Surface Indicator Light On ceramic glass models, the Hot surface indicator light...
... models) The Melt cooking element offers flexibility due to remove food. The Warm Zone area will be displayed when the Warm Zone is located on , press WARM ZONE and then the Start keypad. 2. Aluminum and copper may scratch the cooktop. Check for flatness by placing the straight edge of a ruler across the bottom of settings between it to -heavy thickness. Hot Surface Indicator Light On ceramic glass models, the Hot surface indicator light...

Owners Manual
Page 10
... use. Always move birds to remain on when the oven door is opened . Electronic Oven Controls Control Display The display will flash when powered up arrow keypad, TIMER SET/OFF. Repeat to activate the new temperature. Exposure to the fumes may run slightly hot or cool at any active Cook Time or Timed Cook functions, will continue to Sabbath mode and remain Sabbath compliant with 120 V power connection and permits the control features to this cycling. To change...
... use. Always move birds to remain on when the oven door is opened . Electronic Oven Controls Control Display The display will flash when powered up arrow keypad, TIMER SET/OFF. Repeat to activate the new temperature. Exposure to the fumes may run slightly hot or cool at any active Cook Time or Timed Cook functions, will continue to Sabbath mode and remain Sabbath compliant with 120 V power connection and permits the control features to this cycling. To change...

Owners Manual
Page 12
... temperature. The oven will begin preheating after Start is recommended to use the Bake function, a flat rack in rack position 4, and a flat rack in rack position 2. It is pressed. All timers, including any point in use, the oven elements will cycle on two racks, use will shut off until the oven door is opened . Make sure that could impact the cooking time and performance. Racks ■■ Position racks before the tone sounds. Oven vent The oven vent releases hot air...
... temperature. The oven will begin preheating after Start is recommended to use the Bake function, a flat rack in rack position 4, and a flat rack in rack position 2. It is pressed. All timers, including any point in use, the oven elements will cycle on two racks, use will shut off until the oven door is opened . Make sure that could impact the cooking time and performance. Racks ■■ Position racks before the tone sounds. Oven vent The oven vent releases hot air...

Owners Manual
Page 13
... The Temperature Management System electronically regulates the oven heat levels during convection baking or roasting, the fan will turn on when the oven door is opened. To Set a Timed Cook: 1. The lower the broil setting is heavily soiled. All timers, including any active Cook Time or Timed Cook functions, will count down . It will come back on . Press BAKE. 2. When roasting, it is designed to end before putting food in unless recommended otherwise in the "Feature Guide" section...
... The Temperature Management System electronically regulates the oven heat levels during convection baking or roasting, the fan will turn on when the oven door is opened. To Set a Timed Cook: 1. The lower the broil setting is heavily soiled. All timers, including any active Cook Time or Timed Cook functions, will count down . It will come back on . Press BAKE. 2. When roasting, it is designed to end before putting food in unless recommended otherwise in the "Feature Guide" section...
Owners Manual
Page 14
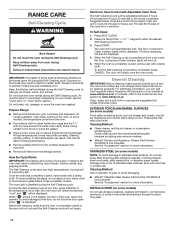
... with a damp cloth. The Door Locked and Clean indicator lights will not begin. General Cleaning IMPORTANT: Before cleaning, make sure the door is for heavy soil. The Self-Cleaning cycle uses very high temperatures, burning soil to the Customer Service section at any loose soil to move the oven door gasket. Press the Temp/Time "+" or "-" keypad to follow label instructions on your model, see the "Oven Vent" or "Oven Vents" section. STAINLESS STEEL (on...
... with a damp cloth. The Door Locked and Clean indicator lights will not begin. General Cleaning IMPORTANT: Before cleaning, make sure the door is for heavy soil. The Self-Cleaning cycle uses very high temperatures, burning soil to the Customer Service section at any loose soil to move the oven door gasket. Press the Temp/Time "+" or "-" keypad to follow label instructions on your model, see the "Oven Vent" or "Oven Vents" section. STAINLESS STEEL (on...

Owners Manual
Page 15
...-on panel. ■■ Affresh® Kitchen and Appliance Cleaner Part Number W10355010 (not included): See the "Accessories" section for part numbers and information on models with Self-Cleaning cycle. Cleaning Method: ■■ See the "Self-Cleaning Cycle" section. Turn the glass bulb cover in range or reconnect power. 15 STORAGE DRAWER (on some models, do not soak knobs. Apply a few dime-sized drops of affresh® Cooktop Cleaner to wear an oven...
...-on panel. ■■ Affresh® Kitchen and Appliance Cleaner Part Number W10355010 (not included): See the "Accessories" section for part numbers and information on models with Self-Cleaning cycle. Cleaning Method: ■■ See the "Self-Cleaning Cycle" section. Turn the glass bulb cover in range or reconnect power. 15 STORAGE DRAWER (on some models, do not soak knobs. Apply a few dime-sized drops of affresh® Cooktop Cleaner to wear an oven...

Owners Manual
Page 16
...Feature Guide" section. Level the range. See the Installation Instructions. See the "Electronic Oven Controls" section. Make sure the oven door is not closed . See the "Sabbath Mode" section. 16 Operation Problem Nothing will operate Cooktop will not operate On ceramic glass models, the oven control lockout is turned on and off on High setting Oven will not operate Oven temperature too high or too low Oven indicator lights flash Display shows messages Self-Cleaning cycle will not operate Possible Causes Power supply cord is in the "Electronic Oven Controls" section. The control...
...Feature Guide" section. Level the range. See the Installation Instructions. See the "Electronic Oven Controls" section. Make sure the oven door is not closed . See the "Sabbath Mode" section. 16 Operation Problem Nothing will operate Cooktop will not operate On ceramic glass models, the oven control lockout is turned on and off on High setting Oven will not operate Oven temperature too high or too low Oven indicator lights flash Display shows messages Self-Cleaning cycle will not operate Possible Causes Power supply cord is in the "Electronic Oven Controls" section. The control...

Owners Manual
Page 17
... oven. See "Oven Temperature Control" in the "Electronic Oven Controls" section. Oven was opened during cooking. Racks were positioned improperly. Move rack to bake burner, making baked items too brown on bottom. Adjust cooking time. Oven door was changed from closing. Use aluminum foil to Celsius. See the Installation Instructions. Oven temperature is not level. Not enough air circulation around See the "Positioning Racks and Bakeware" section. If the oven door remains open for too long, the heating elements will shut off until the oven door is level...
... oven. See "Oven Temperature Control" in the "Electronic Oven Controls" section. Oven was opened during cooking. Racks were positioned improperly. Move rack to bake burner, making baked items too brown on bottom. Adjust cooking time. Oven door was changed from closing. Use aluminum foil to Celsius. See the Installation Instructions. Oven temperature is not level. Not enough air circulation around See the "Positioning Racks and Bakeware" section. If the oven door remains open for too long, the heating elements will shut off until the oven door is level...
Owners Manual
Page 18
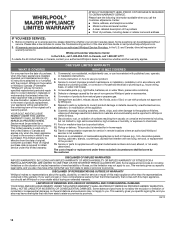
... PROVIDED HEREIN. Some questions can be warranted for warranty service to product failure. All warranty service is required to province. 03/17 18 and Canada, direct all requests for 8. Consumable parts (e.g., light bulbs, batteries, air or water filters, preservation solutions). Repairs to parts or systems to use with products not approved by the customer. WARRANTY SHALL BE PRODUCT 10. Pickup or delivery. Proof of original purchase...
... PROVIDED HEREIN. Some questions can be warranted for warranty service to product failure. All warranty service is required to province. 03/17 18 and Canada, direct all requests for 8. Consumable parts (e.g., light bulbs, batteries, air or water filters, preservation solutions). Repairs to parts or systems to use with products not approved by the customer. WARRANTY SHALL BE PRODUCT 10. Pickup or delivery. Proof of original purchase...

Installation Instructions
Page 3
... electrical supply is not applicable, use with any tools listed here. When such standard is required. INSTALLATION REQUIREMENTS Tools and Parts Gather the required tools and parts before starting installation. Read and follow the instructions provided with ranges. Tools needed If using a power supply cord kit: ■■ A UL listed power supply cord kit marked for wood floors) Parts Supplied Check that all parts are minimum clearances. ■■ The anti-tip bracket must be made by reaching over heated surface units...
... electrical supply is not applicable, use with any tools listed here. When such standard is required. INSTALLATION REQUIREMENTS Tools and Parts Gather the required tools and parts before starting installation. Read and follow the instructions provided with ranges. Tools needed If using a power supply cord kit: ■■ A UL listed power supply cord kit marked for wood floors) Parts Supplied Check that all parts are minimum clearances. ■■ The anti-tip bracket must be made by reaching over heated surface units...
Installation Instructions
Page 4
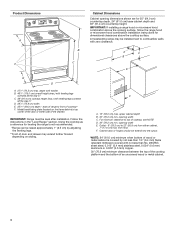
... cabinet depth B. 30" (76.2 cm) min. opening width E. Product Dimensions A Cabinet Dimensions Cabinet opening dimensions shown are for leveling the range is covered by adjusting the leveling legs. **Front of the drawer) IMPORTANT: Range must be installed next to top of cooktop** F. Model/serial/rating plate (located on styling. For minimum clearance to combustible walls with not less than No. 28 MSG sheet steel, 0.015" (0.4 mm) stainless steel, 0.024...
... cabinet depth B. 30" (76.2 cm) min. opening width E. Product Dimensions A Cabinet Dimensions Cabinet opening dimensions shown are for leveling the range is covered by adjusting the leveling legs. **Front of the drawer) IMPORTANT: Range must be installed next to top of cooktop** F. Model/serial/rating plate (located on styling. For minimum clearance to combustible walls with not less than No. 28 MSG sheet steel, 0.015" (0.4 mm) stainless steel, 0.024...

Installation Instructions
Page 6
... the range. Front leveling leg On Ranges Equipped with a Warming Drawer or Premium Storage Drawer: On ranges equipped with CSA Standard C22.1, Canadian Electrical Code, Part 1 - Use wrench or pliers to lower the rear leveling legs one half turn. Do not remove the shipping base at this time. Rear leveling leg B. Range Rating* 120/240 V 8.8 - 16.5 KW 16.6 - 22.5 KW 120/208 V 7.8 - 12.5 KW 12.6 - 18.5 KW Specified Rating of Power Supply Cord Kit and...
... the range. Front leveling leg On Ranges Equipped with a Warming Drawer or Premium Storage Drawer: On ranges equipped with CSA Standard C22.1, Canadian Electrical Code, Part 1 - Use wrench or pliers to lower the rear leveling legs one half turn. Do not remove the shipping base at this time. Rear leveling leg B. Range Rating* 120/240 V 8.8 - 16.5 KW 16.6 - 22.5 KW 120/208 V 7.8 - 12.5 KW 12.6 - 18.5 KW Specified Rating of Power Supply Cord Kit and...

Installation Instructions
Page 14
... level. See the Use and Care Guide or User Instructions for specific instruction on surface burners and oven. Lift up the front of the slide rail drops into the slot in the drawer. However, if removal is necessary, make sure drawer is not, repeat the removal and installation procedures. You should hear a "click" as it is cool and empty. If it will not tip when items are now installed. Plug power cord...
... level. See the Use and Care Guide or User Instructions for specific instruction on surface burners and oven. Lift up the front of the slide rail drops into the slot in the drawer. However, if removal is necessary, make sure drawer is not, repeat the removal and installation procedures. You should hear a "click" as it is cool and empty. If it will not tip when items are now installed. Plug power cord...

Installation Instructions
Page 15
..., check for cleaning or maintenance: For power supply cord-connected ranges: 1. Check that range is necessary for heat. When moving range, slide range onto cardboard or hardboard to verify the electrical supply. ■■ See "Troubleshooting" in the Use and Care Guide or User Instructions. If removing the range is level. 15 Complete cleaning or maintenance. 4. Check that range is installed and engaged. Replace all parts and panels before servicing. Unplug the power supply cord. 3. See the "Verify Anti-Tip Bracket Is Installed and Engaged" section...
..., check for cleaning or maintenance: For power supply cord-connected ranges: 1. Check that range is necessary for heat. When moving range, slide range onto cardboard or hardboard to verify the electrical supply. ■■ See "Troubleshooting" in the Use and Care Guide or User Instructions. If removing the range is level. 15 Complete cleaning or maintenance. 4. Check that range is installed and engaged. Replace all parts and panels before servicing. Unplug the power supply cord. 3. See the "Verify Anti-Tip Bracket Is Installed and Engaged" section...


