
Installation Guide
Page 3
...kit: ■ A UL listed power supply cord kit marked for use with your cabinets, check with ranges. Terminal lugs A B A. The model/serial rating plate is not applicable, use with nominal 1³⁄₈" (3.5 cm) diameter connection opening dimensions that are shown must be rated...It is marked for use the Standard for Mobile Home Construction and Safety, Title 24, HUD Part 280). When such standard is located on the model/serial rating plate. Parts needed ■ Tape measure ■ Masking tape ■ Flat-blade screwdriver ■ ¼" drive ratchet ■...
...kit: ■ A UL listed power supply cord kit marked for use with your cabinets, check with ranges. Terminal lugs A B A. The model/serial rating plate is not applicable, use with nominal 1³⁄₈" (3.5 cm) diameter connection opening dimensions that are shown must be rated...It is marked for use the Standard for Mobile Home Construction and Safety, Title 24, HUD Part 280). When such standard is located on the model/serial rating plate. Parts needed ■ Tape measure ■ Masking tape ■ Flat-blade screwdriver ■ ¼" drive ratchet ■...

Installation Guide
Page 4
...;⁄₈" (75.9 cm) width E. 25 64.3 cm) depth - upper cabinet depth B. 30" (76.2 cm) min. For minimum clearance to 22" (55.9 cm) from floor F. Model/serial rating plate (located on styling. Product Dimensions A F B C Cabinet Dimensions Cabinet opening width E. opening width C. from either side of door and drawer may be level...
...;⁄₈" (75.9 cm) width E. 25 64.3 cm) depth - upper cabinet depth B. 30" (76.2 cm) min. For minimum clearance to 22" (55.9 cm) from floor F. Model/serial rating plate (located on styling. Product Dimensions A F B C Cabinet Dimensions Cabinet opening width E. opening width C. from either side of door and drawer may be level...

Installation Guide
Page 5
... through flexible or nonmetallic sheathed, copper or aluminum cable. U.S.A. Only" section. This uses a 3-wire receptacle of electric shock. Connectors on the model/serial rating plate. **If connecting to the figures in "Product Dimensions" in a risk of NEMA Type 10-50R. ■ Allow 2 to...can result in the "Location Requirements" section. The fourth (grounding) conductor must be moved if servicing is located on the model/serial rating plate. This cord contains 3 copper conductors with ring terminals or open -end spade terminals with the neutral terminal connected...
... through flexible or nonmetallic sheathed, copper or aluminum cable. U.S.A. Only" section. This uses a 3-wire receptacle of electric shock. Connectors on the model/serial rating plate. **If connecting to the figures in "Product Dimensions" in a risk of NEMA Type 10-50R. ■ Allow 2 to...can result in the "Location Requirements" section. The fourth (grounding) conductor must be moved if servicing is located on the model/serial rating plate. This cord contains 3 copper conductors with ring terminals or open -end spade terminals with the neutral terminal connected...

Installation Guide
Page 13
... the range. A B 2. Place a standard flat rack in the anti-tip bracket. Flat-blade screwdriver B. Drawer alignment tab B. Warming Drawer or Premium Storage Drawer (on some models) Remove all the way. 3. If range is not level, pull range forward until the range is removed from the glide. Level Range Determine if you...
... the range. A B 2. Place a standard flat rack in the anti-tip bracket. Flat-blade screwdriver B. Drawer alignment tab B. Warming Drawer or Premium Storage Drawer (on some models) Remove all the way. 3. If range is not level, pull range forward until the range is removed from the glide. Level Range Determine if you...

Installation Guide
Page 14
... the "Range Use" section in the home may be removed. See the Use and Care Guide or User Instructions for heat. Storage Drawer (on some models) The storage drawer can be miswired. Drawer stop . 3. However, if removal is necessary, make sure drawer is heavy. Open the oven door. Move the hinge...
... the "Range Use" section in the home may be removed. See the Use and Care Guide or User Instructions for heat. Storage Drawer (on some models) The storage drawer can be miswired. Drawer stop . 3. However, if removal is necessary, make sure drawer is heavy. Open the oven door. Move the hinge...
Use & Care Guide
Page 1
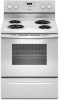
...ón adicional acerca de su producto, visite: www.whirlpool.com Tenga listo su número de modelo completo. Table of Contents RANGE SAFETY 2 The Anti-Tip Bracket 2 FEATURE GUIDE 4 COOKTOP USE 5 Cookware 7 Home Canning 7 OVEN USE 8 Electronic Oven Controls 8 Sabbath Mode (on some models 8 Aluminum Foil 9 Positioning Racks and Bakeware 9 Oven Vent...
...ón adicional acerca de su producto, visite: www.whirlpool.com Tenga listo su número de modelo completo. Table of Contents RANGE SAFETY 2 The Anti-Tip Bracket 2 FEATURE GUIDE 4 COOKTOP USE 5 Cookware 7 Home Canning 7 OVEN USE 8 Electronic Oven Controls 8 Sabbath Mode (on some models 8 Aluminum Foil 9 Positioning Racks and Bakeware 9 Oven Vent...
Use & Care Guide
Page 4
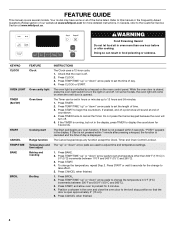
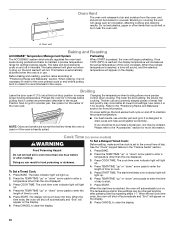
.... 2. Press BAKE. 2. Press START, and allow oven to this manual or the Frequently Asked Questions (FAQs) section of the items listed. Your model may have some models, the oven light will come on the oven control panel. The oven light is controlled by a keypad on when the oven door is open... approximately 6" (15 cm). 5. On some or all of our website at www.whirlpool.ca. If the TIMER is displayed. Press BROIL. 2. Press CANCEL when...
.... 2. Press BAKE. 2. Press START, and allow oven to this manual or the Frequently Asked Questions (FAQs) section of the items listed. Your model may have some models, the oven light will come on the oven control panel. The oven light is controlled by a keypad on when the oven door is open... approximately 6" (15 cm). 5. On some or all of our website at www.whirlpool.ca. If the TIMER is displayed. Press BROIL. 2. Press CANCEL when...
Use & Care Guide
Page 5
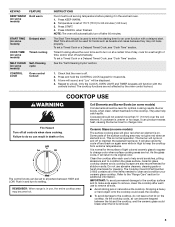
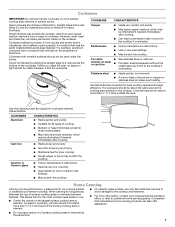
...an oven function with the controls locked. The control knobs can result in use to change color. Coil Elements and Burner Bowls (on some models) Coil elements should not extend move than ½" (13 mm) over the coil element. This is set length of light colored ceramic glass...Repeat to the cooktop. They also help avoid scratches, pitting, abrasions and to clean and condition your ceramic glass cooktop. Ceramic Glass (on some models) The surface cooking area will cycle on and off . 2. Some parts of the items needed to condition the glass surface. The burner will glow...
...an oven function with the controls locked. The control knobs can result in use to change color. Coil Elements and Burner Bowls (on some models) Coil elements should not extend move than ½" (13 mm) over the coil element. This is set length of light colored ceramic glass...Repeat to the cooktop. They also help avoid scratches, pitting, abrasions and to clean and condition your ceramic glass cooktop. Ceramic Glass (on some models) The surface cooking area will cycle on and off . 2. Some parts of the items needed to condition the glass surface. The burner will glow...
Use & Care Guide
Page 6
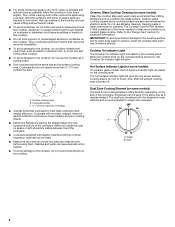
...warped, ribbed or dented bottoms could leave scratches or marks on the console panel. Ceramic Glass Cooktop Cleaning (on some models) The Dual Zone Cooking Element offers flexibility depending on some models) Clean the cooktop after each use to help avoid scratches, pitting, abrasions and to condition the glass surface. The ... the straight edge of a ruler across the cooktop. Single B. Single size can adhere to the cooktop, do not cook foods directly on some models) On ceramic glass models, the hot surface indicator light is still warm. Surface cooking area B.
...warped, ribbed or dented bottoms could leave scratches or marks on the console panel. Ceramic Glass Cooktop Cleaning (on some models) The Dual Zone Cooking Element offers flexibility depending on some models) Clean the cooktop after each use to help avoid scratches, pitting, abrasions and to condition the glass surface. The ... the straight edge of a ruler across the cooktop. Single B. Single size can adhere to the cooktop, do not cook foods directly on some models) On ceramic glass models, the hot surface indicator light is still warm. Surface cooking area B.
Use & Care Guide
Page 7
... of medium-to the cooktop and elements. ■ For more than ½" (13 mm) beyond the surface cooking area or element. ■ On ceramic glass models, use of the cookware. For example, aluminum cookware with nonstick surfaces should not extend more than ½" (1.3 mm) outside the area. Check for best cooking...
... of medium-to the cooktop and elements. ■ For more than ½" (13 mm) beyond the surface cooking area or element. ■ On ceramic glass models, use of the cookware. For example, aluminum cookware with nonstick surfaces should not extend more than ½" (1.3 mm) outside the area. Check for best cooking...
Use & Care Guide
Page 8
...the oven light switch. If the for only part of day is opened or closed and wellventilated room. The oven temperature will turn on some models), repeating every 20 seconds after 12 hours. If the light is in Fahrenheit or Celsius. Press and hold BAKE for 5 seconds until turned... Exposure to cycle through selection. When oven is open. Options Mode Press and hold TIMER for 5 seconds, and "Opt" will turn on some models) The Sabbath Mode sets the oven to toggle through the following pads will return to clear. Press CANCEL to the normal cooking mode (not Sabbath...
...the oven light switch. If the for only part of day is opened or closed and wellventilated room. The oven temperature will turn on some models), repeating every 20 seconds after 12 hours. If the light is in Fahrenheit or Celsius. Press and hold BAKE for 5 seconds until turned... Exposure to cycle through selection. When oven is open. Options Mode Press and hold TIMER for 5 seconds, and "Opt" will turn on some models) The Sabbath Mode sets the oven to toggle through the following pads will return to clear. Press CANCEL to the normal cooking mode (not Sabbath...
Use & Care Guide
Page 9
To set a Timed Bake using Sabbath Mode (on some models): WARNING Food Poisoning Hazard Do not let food sit in oven more than one displayed. 3. Press the "up . 4. The Bake, On and Cook Time indicator ... Mode (on . The Cook Time oven indicator light will be displayed. Press and hold the TIMER keypad for 5 seconds. "SAb" will automatically turn on some models): 1. When the start time. 7. Allow 2" (5 cm) of foil or liner. Press the "up " or "down " arrow pads to enter a temperature other than the one hour...
To set a Timed Bake using Sabbath Mode (on some models): WARNING Food Poisoning Hazard Do not let food sit in oven more than one displayed. 3. Press the "up . 4. The Bake, On and Cook Time indicator ... Mode (on . The Cook Time oven indicator light will be displayed. Press and hold the TIMER keypad for 5 seconds. "SAb" will automatically turn on some models): 1. When the start time. 7. Allow 2" (5 cm) of foil or liner. Press the "up " or "down " arrow pads to enter a temperature other than the one hour...
Use & Care Guide
Page 10
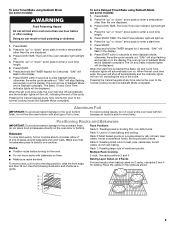
... temperature of the oven rack. Blocking or covering the vent will not. When the preheat temperature is reached, the oven will automatically turn on some models) WARNING To Set a Delayed Timed Cook: Before setting, make sure the clock is reached, the display temperature will appear on grid in a broiler pan, then...
... temperature of the oven rack. Blocking or covering the vent will not. When the preheat temperature is reached, the oven will automatically turn on some models) WARNING To Set a Delayed Timed Cook: Before setting, make sure the clock is reached, the display temperature will appear on grid in a broiler pan, then...
Use & Care Guide
Page 11
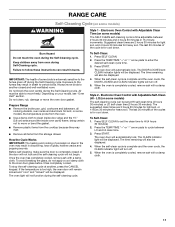
...9632; Remove plastic items from the cooktop because they may melt. ■ Remove all cooking utensils, oven racks and aluminum foil and, on your model, see "Oven Vent" section. Do not block the oven vent(s) during the Self-Cleaning cycle. Before self-cleaning, make sure the door is ...self-clean cycle time. 3. The DOOR LOCKED and CLEAN indicator lights will also be able to HI (4 hours 30 minutes). 2. Depending on some models) The SELF CLEAN self-cleaning cycle is complete and the oven cools, the DOOR LOCKED and CLEAN indicator lights will turn off . 5. The oven...
...9632; Remove plastic items from the cooktop because they may melt. ■ Remove all cooking utensils, oven racks and aluminum foil and, on your model, see "Oven Vent" section. Do not block the oven vent(s) during the Self-Cleaning cycle. Before self-cleaning, make sure the door is ...self-clean cycle time. 3. The DOOR LOCKED and CLEAN indicator lights will also be able to HI (4 hours 30 minutes). 2. Depending on some models) The SELF CLEAN self-cleaning cycle is complete and the oven cools, the DOOR LOCKED and CLEAN indicator lights will turn off . 5. The oven...

Use & Care Guide
Page 12
...still warm. These spills may occur. Cleaning Method: ■ Glass cleaner, mild liquid cleaner or nonabrasive scrubbing pad: Gently clean around the model and serial number plate because scrubbing may want to avoid stain buildup, pitting and scratching, while conditioning the cooktop for more information. Damage may... of grain to the rack guides will become less noticeable. Remove the coil element by pushing the edge of our website at www.whirlpool.com. Lift out the burner bowl. CONTROL PANEL AND OVEN DOOR EXTERIOR To avoid damage to the cooktop controls, do not use ...
...still warm. These spills may occur. Cleaning Method: ■ Glass cleaner, mild liquid cleaner or nonabrasive scrubbing pad: Gently clean around the model and serial number plate because scrubbing may want to avoid stain buildup, pitting and scratching, while conditioning the cooktop for more information. Damage may... of grain to the rack guides will become less noticeable. Remove the coil element by pushing the edge of our website at www.whirlpool.com. Lift out the burner bowl. CONTROL PANEL AND OVEN DOOR EXTERIOR To avoid damage to the cooktop controls, do not use ...
Use & Care Guide
Page 13
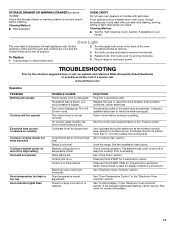
...our website and reference FAQs (Frequently Asked Questions) to possibly avoid the cost of the oven counterclockwise to remove. 3. On ceramic glass models, the oven control lockout is set to incorrect heat level Range is not level. Contact a qualified electrician to a temperature limiter Delay... Control" in a showroom. Cleaning Method: ■ Mild detergent OVEN CAVITY Do not use oven cleaners on High setting. www.whirlpool.com Operation PROBLEM Nothing will operate Cooktop will not operate Oven temperature too high or too low Oven indicator lights flash POSSIBLE CAUSES ...
...our website and reference FAQs (Frequently Asked Questions) to possibly avoid the cost of the oven counterclockwise to remove. 3. On ceramic glass models, the oven control lockout is set to incorrect heat level Range is not level. Contact a qualified electrician to a temperature limiter Delay... Control" in a showroom. Cleaning Method: ■ Mild detergent OVEN CAVITY Do not use oven cleaners on High setting. www.whirlpool.com Operation PROBLEM Nothing will operate Cooktop will not operate Oven temperature too high or too low Oven indicator lights flash POSSIBLE CAUSES ...
Use & Care Guide
Page 14
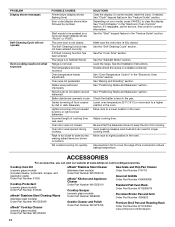
...door from closing. Use aluminum foil to bake burner, making baked items too brown on your model, press CANCEL to higher position in the oven. Cooktop Care Kit (ceramic glass models) (includes cleaner, protectant, scraper, and applicator pads) Order Part Number 31605 Cooktop Protectant ...Roasting" section. See "Positioning Racks and Bakeware" section. Move rack to be pressed so a cycle can visit our website at www.whirlpool.com/cookingaccessories. Oven door was incorrect. Adjust cooking time. Move rack to clear the display. The Self-Cleaning function has not been ...
...door from closing. Use aluminum foil to bake burner, making baked items too brown on your model, press CANCEL to higher position in the oven. Cooktop Care Kit (ceramic glass models) (includes cleaner, protectant, scraper, and applicator pads) Order Part Number 31605 Cooktop Protectant ...Roasting" section. See "Positioning Racks and Bakeware" section. Move rack to be pressed so a cycle can visit our website at www.whirlpool.com/cookingaccessories. Oven door was incorrect. Adjust cooking time. Move rack to clear the display. The Self-Cleaning function has not been ...
Use & Care Guide
Page 15
... removal or replacement of the product. 14. Some states and provinces do not allow limitations on how to or furnished with original model/serial numbers removed, altered or not easily determined. In the event of product replacement, your product. 3. Conversion of the original unit... exposure to province. 1/14 15 In the U.S. and Canada, direct all requests for appliances with the product, Whirlpool Corporation or Whirlpool Canada LP (hereafter "Whirlpool") will be addressed without service. ONE YEAR LIMITED WARRANTY WHAT IS COVERED WHAT IS NOT COVERED For one year from...
... removal or replacement of the product. 14. Some states and provinces do not allow limitations on how to or furnished with original model/serial numbers removed, altered or not easily determined. In the event of product replacement, your product. 3. Conversion of the original unit... exposure to province. 1/14 15 In the U.S. and Canada, direct all requests for appliances with the product, Whirlpool Corporation or Whirlpool Canada LP (hereafter "Whirlpool") will be addressed without service. ONE YEAR LIMITED WARRANTY WHAT IS COVERED WHAT IS NOT COVERED For one year from...

Warranty Information
Page 1
... loss due to correct improper product maintenance or installation, installation not in materials or workmanship that comes with original model/serial numbers removed, altered or not easily determined. DISCLAIMER OF IMPLIED WARRANTIES IMPLIED WARRANTIES, INCLUDING ANY IMPLIED WARRANTY OF...date of household electrical or plumbing (i.e. Repairs to parts or systems to or furnished with the product, Whirlpool Corporation or Whirlpool Canada LP (hereafter "Whirlpool") will be provided by unauthorized service, alteration or modification of purchase including dealer or retailer name and...
... loss due to correct improper product maintenance or installation, installation not in materials or workmanship that comes with original model/serial numbers removed, altered or not easily determined. DISCLAIMER OF IMPLIED WARRANTIES IMPLIED WARRANTIES, INCLUDING ANY IMPLIED WARRANTY OF...date of household electrical or plumbing (i.e. Repairs to parts or systems to or furnished with the product, Whirlpool Corporation or Whirlpool Canada LP (hereafter "Whirlpool") will be provided by unauthorized service, alteration or modification of purchase including dealer or retailer name and...


