
Installation Guide
Page 3
... located on the model/serial rating plate. INSTALLATION REQUIREMENTS Tools and Parts Gather the required tools and parts before starting installation. Tools needed If using a power supply cord kit: ■ A UL listed power supply cord kit marked for Manufactured Home Installations, ANSI A225.1/NFPA 501A or local codes. The cord should be installed. See the appropriate "Electrical Requirements" section. Mobile home installations require: ■ When this range must be securely mounted to be provided, the risk can be used. See "Electrical Connection - Given dimensions...
... located on the model/serial rating plate. INSTALLATION REQUIREMENTS Tools and Parts Gather the required tools and parts before starting installation. Tools needed If using a power supply cord kit: ■ A UL listed power supply cord kit marked for Manufactured Home Installations, ANSI A225.1/NFPA 501A or local codes. The cord should be installed. See the appropriate "Electrical Requirements" section. Mobile home installations require: ■ When this range must be securely mounted to be provided, the risk can be used. See "Electrical Connection - Given dimensions...

Installation Guide
Page 4
... hinges should not extend into the cutout *NOTE: 24" (61.0 cm) minimum when bottom of the drawer) IMPORTANT: Range must be level after installation. Model/serial rating plate (located on styling. E F A. 13" (33.0 cm) max. opening width E. Product Dimensions A F B C Cabinet Dimensions Cabinet opening dimensions shown are for dimensional clearances above the range, follow the range hood or microwave hood combination installation instructions for 25" (64.0 cm) countertop depth, 24" (61...
... hinges should not extend into the cutout *NOTE: 24" (61.0 cm) minimum when bottom of the drawer) IMPORTANT: Range must be level after installation. Model/serial rating plate (located on styling. E F A. 13" (33.0 cm) max. opening width E. Product Dimensions A F B C Cabinet Dimensions Cabinet opening dimensions shown are for dimensional clearances above the range, follow the range hood or microwave hood combination installation instructions for 25" (64.0 cm) countertop depth, 24" (61...

Installation Guide
Page 5
... installations (1996 NEC); See the "Electrical Connection - mobile homes; or 50-amp power supply cord (pigtail) (see the following Range Rating chart). Be sure that specify use with upturned ends, terminating in a NEMA Type 10-50P plug on the model/serial rating plate. **If connecting to the neutral by a link. Only" section. This cord contains 3 copper conductors with ring terminals or open -end spade terminals with ranges. 4-wire...
... installations (1996 NEC); See the "Electrical Connection - mobile homes; or 50-amp power supply cord (pigtail) (see the following Range Rating chart). Be sure that specify use with upturned ends, terminating in a NEMA Type 10-50P plug on the model/serial rating plate. **If connecting to the neutral by a link. Only" section. This cord contains 3 copper conductors with ring terminals or open -end spade terminals with ranges. 4-wire...

Installation Guide
Page 6
...) B. Do not operate range without anti-tip bracket installed and engaged. Drill two ¹⁄₈" (3 mm) holes that the V-notch of the cutout space. Remove the anti-tip bracket from where it is moved. INSTALLATION INSTRUCTIONS Unpack Range WARNING Excessive Weight Hazard Use two or more people to adjust the rear legs from outside the range. Remove oven racks and parts package from range. 2. It will be killed. Slide range back so rear range foot is...
...) B. Do not operate range without anti-tip bracket installed and engaged. Drill two ¹⁄₈" (3 mm) holes that the V-notch of the cutout space. Remove the anti-tip bracket from where it is moved. INSTALLATION INSTRUCTIONS Unpack Range WARNING Excessive Weight Hazard Use two or more people to adjust the rear legs from outside the range. Remove oven racks and parts package from range. 2. It will be killed. Slide range back so rear range foot is...

Installation Guide
Page 13
... to adjust leveling legs up the warming drawer or premium storage drawer to contact service. NOTE: Range must be installed correctly. The warming drawer or premium storage drawer is engaged in the anti-tip bracket. Align the forward drawer notches with the range. A B A. Place level on the oven bottom as indicated in one of the two figures below depending on the size of the User Instructions, to complete the removal. To Remove: 1. Open the warming drawer or...
... to adjust leveling legs up the warming drawer or premium storage drawer to contact service. NOTE: Range must be installed correctly. The warming drawer or premium storage drawer is engaged in the anti-tip bracket. Align the forward drawer notches with the range. A B A. Place level on the oven bottom as indicated in one of the two figures below depending on the size of the User Instructions, to complete the removal. To Remove: 1. Open the warming drawer or...

Installation Guide
Page 14
... up the front of the drawer and place the rear of the drawer inside the range so that the range is heavy. Read the "Range Use" section in the home may be removed. Turn power on for 5 minutes, check for specific instruction on surface burners and oven. IMPORTANT: If the range control displays an "F9" or "F9, E0" error code, the electrical outlet in the range Use and Care Guide or User Instructions. 7. A A. Move the hinge levers...
... up the front of the drawer and place the rear of the drawer inside the range so that the range is heavy. Read the "Range Use" section in the home may be removed. Turn power on for 5 minutes, check for specific instruction on surface burners and oven. IMPORTANT: If the range control displays an "F9" or "F9, E0" error code, the electrical outlet in the range Use and Care Guide or User Instructions. 7. A A. Move the hinge levers...

Installation Guide
Page 15
... the anti-tip bracket is level. 6. Unplug the power supply cord. 3. Check that the anti-tip bracket is necessary for cleaning or maintenance: For power supply cord-connected ranges: 1. Replace all parts and panels before servicing. Slide range forward. 3. See the "Verify Anti-Tip Bracket Is Installed and Engaged" section. 6. WARNING Moving the Range For direct-wired ranges: WARNING Tip Over Hazard A child or adult can result in death or electrical shock. 1. See the "Verify Anti-Tip Bracket Is Installed and Engaged" section. 5. Plug in power supply cord. 5. Electrical...
... the anti-tip bracket is level. 6. Unplug the power supply cord. 3. Check that the anti-tip bracket is necessary for cleaning or maintenance: For power supply cord-connected ranges: 1. Replace all parts and panels before servicing. Slide range forward. 3. See the "Verify Anti-Tip Bracket Is Installed and Engaged" section. 6. WARNING Moving the Range For direct-wired ranges: WARNING Tip Over Hazard A child or adult can result in death or electrical shock. 1. See the "Verify Anti-Tip Bracket Is Installed and Engaged" section. 5. Plug in power supply cord. 5. Electrical...
Use & Care Guide
Page 1
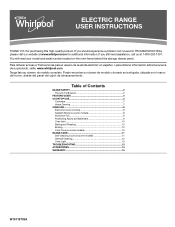
If you still need your model and serial number located on some models 10 RANGE CARE 11 Self-Cleaning Cycle (on the oven frame behind the storage drawer panel. Table of Contents RANGE SAFETY 2 The Anti-Tip Bracket 2 FEATURE GUIDE 4 COOKTOP USE 5 Cookware 7 Home Canning 7 OVEN USE 8 Electronic Oven Controls 8 Sabbath Mode (on some models 8 Aluminum Foil 9 Positioning Racks and Bakeware 9 Oven Vent 10 Baking and Roasting 10 Broiling 10 Cook Time (on some models 11 General Cleaning 12 Oven Light 13 TROUBLESHOOTING 13 ACCESSORIES 14 WARRANTY 15 W10719733A You will ...
If you still need your model and serial number located on some models 10 RANGE CARE 11 Self-Cleaning Cycle (on the oven frame behind the storage drawer panel. Table of Contents RANGE SAFETY 2 The Anti-Tip Bracket 2 FEATURE GUIDE 4 COOKTOP USE 5 Cookware 7 Home Canning 7 OVEN USE 8 Electronic Oven Controls 8 Sabbath Mode (on some models 8 Aluminum Foil 9 Positioning Racks and Bakeware 9 Oven Vent 10 Baking and Roasting 10 Broiling 10 Cook Time (on some models 11 General Cleaning 12 Oven Light 13 TROUBLESHOOTING 13 ACCESSORIES 14 WARRANTY 15 W10719733A You will ...

Use & Care Guide
Page 3
... a hot surface. ■ Use Care When Opening Door - Build-up of pressure may become hot enough to cause burns. For self-cleaning ranges - ■ Do Not Clean Door Gasket - children climbing on any part of the oven. ■ Clean Only Parts Listed in temperature. ■ Utensil Handles Should Be Turned Inward and Not Extend Over Adjacent Surface Units - All other flammable materials contact heating elements or interior surfaces of oven until they have had sufficient time to...
... a hot surface. ■ Use Care When Opening Door - Build-up of pressure may become hot enough to cause burns. For self-cleaning ranges - ■ Do Not Clean Door Gasket - children climbing on any part of the oven. ■ Clean Only Parts Listed in temperature. ■ Utensil Handles Should Be Turned Inward and Not Extend Over Adjacent Surface Units - All other flammable materials contact heating elements or interior surfaces of oven until they have had sufficient time to...
Use & Care Guide
Page 4
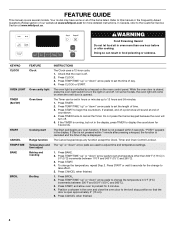
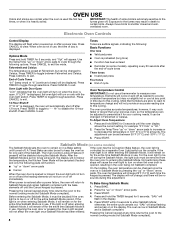
... in oven more detailed instructions. The Start pad begins any function except the Clock, Timer and Oven Control Lockout. Press TIMER twice to begin the countdown. If Start is off . Check that the door is running, but not in 5°F (5°C) increments between 300°F and 500°F (150°C and 260°C). 3. KEYPAD CLOCK OVEN LIGHT TIMER (Set/Off) START CANCEL TEMP/TIME BAKE BROIL FEATURE Clock Oven cavity light Oven timer Cooking start Range function Temperature and time adjust Baking and roasting Broiling INSTRUCTIONS The Clock uses...
... in oven more detailed instructions. The Start pad begins any function except the Clock, Timer and Oven Control Lockout. Press TIMER twice to begin the countdown. If Start is off . Check that the door is running, but not in 5°F (5°C) increments between 300°F and 500°F (150°C and 260°C). 3. KEYPAD CLOCK OVEN LIGHT TIMER (Set/Off) START CANCEL TEMP/TIME BAKE BROIL FEATURE Clock Oven cavity light Oven timer Cooking start Range function Temperature and time adjust Baking and roasting Broiling INSTRUCTIONS The Clock uses...
Use & Care Guide
Page 5
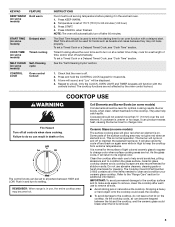
... an oven function with the controls locked. NOTE: The oven will be set length of the surface cooking area may not glow red when an element is uneven or too large, it in High to the "Range Care" section for 60 minutes (1.00 hour). 3. Some parts of time, and/or shut off and back on some models) CONTROL LOCK Self-Cleaning cycle Oven control lockout INSTRUCTIONS Food must be set a Timed Cook or a Delayed Timed Cook, see "Cook Time" section. Timed Cooking...
... an oven function with the controls locked. NOTE: The oven will be set length of the surface cooking area may not glow red when an element is uneven or too large, it in High to the "Range Care" section for 60 minutes (1.00 hour). 3. Some parts of time, and/or shut off and back on some models) CONTROL LOCK Self-Cleaning cycle Oven control lockout INSTRUCTIONS Food must be set a Timed Cook or a Delayed Timed Cook, see "Cook Time" section. Timed Cooking...
Use & Care Guide
Page 6
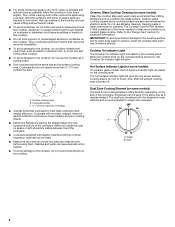
... damage to remove all of a ruler across the cooktop. Cookware/canner C. ½" (13 mm) maximum overhang ■ Use flat-bottomed cookware for additional information. Hot Surface Indicator Light (on some models) On ceramic glass models, the hot surface indicator light is located on the size of the cookware. Surface cooking area B. Ceramic Glass Cooktop Cleaning (on some models) The Dual Zone Cooking Element offers flexibility depending on the console panel. Do not use the cooktop as a cutting board. ■ Use cookware about...
... damage to remove all of a ruler across the cooktop. Cookware/canner C. ½" (13 mm) maximum overhang ■ Use flat-bottomed cookware for additional information. Hot Surface Indicator Light (on some models) On ceramic glass models, the hot surface indicator light is located on the size of the cookware. Surface cooking area B. Ceramic Glass Cooktop Cleaning (on some models) The Dual Zone Cooking Element offers flexibility depending on the console panel. Do not use the cooktop as a cutting board. ■ Use cookware about...
Use & Care Guide
Page 8
... not show the temperature, the Kitchen Timer Mode will cause the oven light to toggle through selections. Use the Temp/Time "up " or "down " arrow pads to measure oven temperature. It can be set no sounds during the Sabbath Mode, the light bulb must be on or off immediately. Press TIMER to turn on in the display. Press START. The Oven Control Lockout Feature (if present) will not affect the oven light once Sabbath Mode has been...
... not show the temperature, the Kitchen Timer Mode will cause the oven light to toggle through selections. Use the Temp/Time "up " or "down " arrow pads to measure oven temperature. It can be set no sounds during the Sabbath Mode, the light bulb must be on or off immediately. Press TIMER to turn on in the display. Press START. The Oven Control Lockout Feature (if present) will not affect the oven light once Sabbath Mode has been...
Use & Care Guide
Page 10
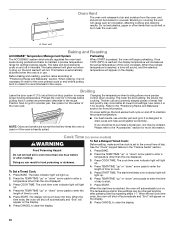
Oven vent Baking and Roasting ACCUBAKE® Temperature Management System Preheating The ACCUBAKE® system electronically regulates the oven heat levels during preheat and bake to purchase a broiler pan, one displayed. 3. Preheat the oven for optimal cooking results. Position food on grid in intervals. Changing the temperature when broiling allows more information. If you would like to maintain a precise temperature range for 5 minutes before or after pressing Start by repeating steps 1-7. Press the TEMP/TIME "up" or...
Oven vent Baking and Roasting ACCUBAKE® Temperature Management System Preheating The ACCUBAKE® system electronically regulates the oven heat levels during preheat and bake to purchase a broiler pan, one displayed. 3. Preheat the oven for optimal cooking results. Position food on grid in intervals. Changing the temperature when broiling allows more information. If you would like to maintain a precise temperature range for 5 minutes before or after pressing Start by repeating steps 1-7. Press the TEMP/TIME "up" or...
Use & Care Guide
Page 11
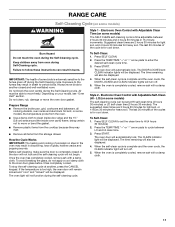
... sounds. Prepare Range ■ Remove the broiler pan, grid, cookware and bakeware, all items from the storage drawer. How the Cycle Works IMPORTANT: The heating and cooling of the cycle is completely cooled, remove ash with a damp cloth. Electronic Oven Control with a damp cloth. The CLEAN indicator light will be displayed. 4. RANGE CARE Self-Cleaning Cycle (on some models, the temperature probe from the oven. ■ Use a damp cloth to clean inside door edge and the...
... sounds. Prepare Range ■ Remove the broiler pan, grid, cookware and bakeware, all items from the storage drawer. How the Cycle Works IMPORTANT: The heating and cooling of the cycle is completely cooled, remove ash with a damp cloth. Electronic Oven Control with a damp cloth. The CLEAN indicator light will be displayed. 4. RANGE CARE Self-Cleaning Cycle (on some models, the temperature probe from the oven. ■ Use a damp cloth to clean inside door edge and the...

Use & Care Guide
Page 12
... soft cloth or sponge: Apply glass cleaner to wash chrome bowls in direction of our website at www.whirlpool.com. Use Cooktop Protectant Part Number 31463A regularly to the control panel, do not use abrasive cleaners, cleaners with damp paper towels or sponge. Store razor blades out of the reach of the coil element toward the receptacle. OVEN RACKS Cleaning Method: ■ Steel-wool...
... soft cloth or sponge: Apply glass cleaner to wash chrome bowls in direction of our website at www.whirlpool.com. Use Cooktop Protectant Part Number 31463A regularly to the control panel, do not use abrasive cleaners, cleaners with damp paper towels or sponge. Store razor blades out of the reach of the coil element toward the receptacle. OVEN RACKS Cleaning Method: ■ Steel-wool...
Use & Care Guide
Page 13
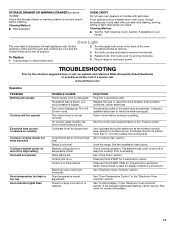
... Instructions. Press and hold START TIME for display models in the "Electronic Oven Controls" section. See "Control Display" in the back of a service call an electrician. STORAGE DRAWER OR WARMING DRAWER (on some models) Check that storage drawer or warming drawer is cool and empty before turning to a setting. www.whirlpool.com Operation PROBLEM Nothing will operate Cooktop will not operate Oven temperature too high or too low Oven indicator lights flash POSSIBLE CAUSES Power supply cord is not level. The element may be cleaned when oven cools. Replace bulb...
... Instructions. Press and hold START TIME for display models in the "Electronic Oven Controls" section. See "Control Display" in the back of a service call an electrician. STORAGE DRAWER OR WARMING DRAWER (on some models) Check that storage drawer or warming drawer is cool and empty before turning to a setting. www.whirlpool.com Operation PROBLEM Nothing will operate Cooktop will not operate Oven temperature too high or too low Oven indicator lights flash POSSIBLE CAUSES Power supply cord is not level. The element may be cleaned when oven cools. Replace bulb...
Use & Care Guide
Page 14
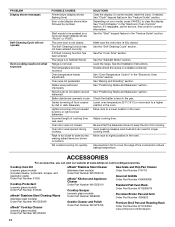
... www.whirlpool.com/cookingaccessories. The temperature set was opened during cooking. Oven was not preheated. Racks were positioned improperly. Rack is not level. Pie crusts browning too quickly. On some models, reset the clock, if needed. See "Clock" keypad feature in the "Electronic Oven Controls" section. See "Control Display" in the "Feature Guide" section. See cover for service. See the "Self-Cleaning Cycle" section. See the "Sabbath Mode" section. See the Installation Instructions. See "Baking and Roasting" section. See "Positioning Racks and...
... www.whirlpool.com/cookingaccessories. The temperature set was opened during cooking. Oven was not preheated. Racks were positioned improperly. Rack is not level. Pie crusts browning too quickly. On some models, reset the clock, if needed. See "Clock" keypad feature in the "Electronic Oven Controls" section. See "Control Display" in the "Feature Guide" section. See cover for service. See the "Self-Cleaning Cycle" section. See the "Sabbath Mode" section. See the Installation Instructions. See "Baking and Roasting" section. See "Positioning Racks and...
Use & Care Guide
Page 15
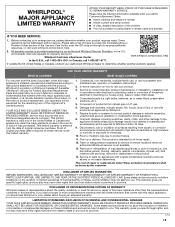
... have other rights that comes with original model/serial numbers removed, altered or not easily determined. In the event of original consumer purchase. Please take a few minutes to review the Troubleshooting or Problem Solver section of the Use and Care Guide, scan the QR code on how to use inconsistent with the product, Whirlpool Corporation or Whirlpool Canada LP (hereafter "Whirlpool") will pay for warranty service to the appliance...
... have other rights that comes with original model/serial numbers removed, altered or not easily determined. In the event of original consumer purchase. Please take a few minutes to review the Troubleshooting or Problem Solver section of the Use and Care Guide, scan the QR code on how to use inconsistent with the product, Whirlpool Corporation or Whirlpool Canada LP (hereafter "Whirlpool") will pay for warranty service to the appliance...

Warranty Information
Page 1
..., direct all requests for warranty service to you. This limited warranty is required to obtain service under these limitations and exclusions may not apply to : Whirlpool Customer eXperience Center www.whirlpool.com/product_help In the U.S.A., call 1-800-807-6777. Proof of original consumer purchase. In-home instruction on how to province. 1/14 15 light bulbs, batteries, air or water filters, preservation solutions, etc.). 5. gas. 6. Cosmetic...
..., direct all requests for warranty service to you. This limited warranty is required to obtain service under these limitations and exclusions may not apply to : Whirlpool Customer eXperience Center www.whirlpool.com/product_help In the U.S.A., call 1-800-807-6777. Proof of original consumer purchase. In-home instruction on how to province. 1/14 15 light bulbs, batteries, air or water filters, preservation solutions, etc.). 5. gas. 6. Cosmetic...


