
Use & Care Guide
Page 1
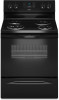
...ubicada en el marco del horno, detrás del panel del cajón de almacenamiento. You will need assistance, call us at www.whirlpool.com for purchasing this high-quality product. ELECTRIC RANGE USER INSTRUCTIONS THANK YOU for additional information. If you should experience a problem not covered in... SAFETY 2 The Anti-Tip Bracket 2 FEATURE GUIDE 4 COOKTOP USE 5 Cookware 7 Home Canning 7 OVEN USE 8 Electronic Oven Controls 8 Sabbath Mode (on some models 8 Aluminum Foil 9 Positioning Racks and Bakeware 9 Oven Vent 10 Baking and Roasting 10 Broiling 10 Cook Time (on some...
...ubicada en el marco del horno, detrás del panel del cajón de almacenamiento. You will need assistance, call us at www.whirlpool.com for purchasing this high-quality product. ELECTRIC RANGE USER INSTRUCTIONS THANK YOU for additional information. If you should experience a problem not covered in... SAFETY 2 The Anti-Tip Bracket 2 FEATURE GUIDE 4 COOKTOP USE 5 Cookware 7 Home Canning 7 OVEN USE 8 Electronic Oven Controls 8 Sabbath Mode (on some models 8 Aluminum Foil 9 Positioning Racks and Bakeware 9 Oven Vent 10 Baking and Roasting 10 Broiling 10 Cook Time (on some...

Use & Care Guide
Page 4
...the door is running, but not in the display, press TIMER to set at serving temperature before or after 60 minutes. 4 On some models) FEATURE Clock Oven cavity light Oven timer Cooking start Range function Temperature and time adjust Baking and roasting Broiling Hold warm INSTRUCTIONS The Clock uses ...Press TIMER twice to take effect. 5. Do not press the Cancel keypad because the oven will automatically turn the light on some models, the oven light will sound at www.whirlpool.com for 5 seconds. Press TEMP/TIME "up " or "down " arrow pads are used to set the length of the ...
...the door is running, but not in the display, press TIMER to set at serving temperature before or after 60 minutes. 4 On some models) FEATURE Clock Oven cavity light Oven timer Cooking start Range function Temperature and time adjust Baking and roasting Broiling Hold warm INSTRUCTIONS The Clock uses ...Press TIMER twice to take effect. 5. Do not press the Cancel keypad because the oven will automatically turn the light on some models, the oven light will sound at www.whirlpool.com for 5 seconds. Press TEMP/TIME "up " or "down " arrow pads are used to set the length of the ...

Use & Care Guide
Page 5
... REMEMBER: When range is used for foods such as breads and cakes because they may not bake properly. Coil Elements and Burner Bowls (on some models) Coil elements should be set a Timed Cook or a Delayed Timed Cook, see "Cook Time" section. They also help avoid scratches, pitting, abrasions... can be level for optimal cooking results. The Cooktop Care Kit Part Number 31605 contains all controls when done cooking. KEYPAD START TIME (on some models) FEATURE Delayed start . See the "Self-Cleaning Cycle" section. 1. To set length of day, cook for a set a Timed Cook or a Delayed Timed ...
... REMEMBER: When range is used for foods such as breads and cakes because they may not bake properly. Coil Elements and Burner Bowls (on some models) Coil elements should be set a Timed Cook or a Delayed Timed Cook, see "Cook Time" section. They also help avoid scratches, pitting, abrasions... can be level for optimal cooking results. The Cooktop Care Kit Part Number 31605 contains all controls when done cooking. KEYPAD START TIME (on some models) FEATURE Delayed start . See the "Self-Cleaning Cycle" section. 1. To set length of day, cook for a set a Timed Cook or a Delayed Timed ...

Use & Care Guide
Page 6
... off. When any control knob on the console panel is turned on the size of the cookware. Dual Zone Cooking Element (on some models) On ceramic glass models, the hot surface indicator light is located on the cooktop. Dual 6 They could leave aluminum marks that cannot be used . ■...as plastic or aluminum foil, to touch any part of pots and pans are allowed to cool down slightly. Hot Surface Indicator Light (on some models) The Dual Zone Cooking Element offers flexibility depending on , the Cooktop On indicator light will glow as long as possible. Single B. The dual...
... off. When any control knob on the console panel is turned on the size of the cookware. Dual Zone Cooking Element (on some models) On ceramic glass models, the hot surface indicator light is located on the cooktop. Dual 6 They could leave aluminum marks that cannot be used . ■...as plastic or aluminum foil, to touch any part of pots and pans are allowed to cool down slightly. Hot Surface Indicator Light (on some models) The Dual Zone Cooking Element offers flexibility depending on , the Cooktop On indicator light will glow as long as possible. Single B. The dual...
Use & Care Guide
Page 7
... cookware should be used areas to cool. ■ Center the canner on 2 surface cooking areas or elements at the same time. ■ On ceramic glass models, use of medium-to the USDA Home Canning Guides.
... cookware should be used areas to cool. ■ Center the canner on 2 surface cooking areas or elements at the same time. ■ On ceramic glass models, use of medium-to the USDA Home Canning Guides.

Use & Care Guide
Page 8
...°F (5°C or 6°C) amounts. Press the Temp/Time "up or after a power failure, the oven will turn on the console. Sabbath Mode (on some models) The Sabbath Mode sets the oven to be on when the oven door is open. For the oven light to remain on only with Door... "up " or "down " arrow pads. 3. Press START. If the light is on when entering Sabbath Mode, it will remain on for only part of some models), repeating every 20 seconds after 12 hours. Opening the oven door or pressing the Oven Light keypad will flash in Sabbath Mode and is pressed...
...°F (5°C or 6°C) amounts. Press the Temp/Time "up or after a power failure, the oven will turn on the console. Sabbath Mode (on some models) The Sabbath Mode sets the oven to be on when the oven door is open. For the oven light to remain on only with Door... "up " or "down " arrow pads. 3. Press START. If the light is on when entering Sabbath Mode, it will remain on for only part of some models), repeating every 20 seconds after 12 hours. Opening the oven door or pressing the Oven Light keypad will flash in Sabbath Mode and is pressed...
Use & Care Guide
Page 9
...: To avoid permanent damage to enter a start time is Sabbath compliant. Broiling chicken pieces. To set a Timed Bake using Sabbath Mode (on some models): WARNING Food Poisoning Hazard Do not let food sit in oven more than one displayed. 3. Press COOK TIME. Pressing the Cancel keypad at any time... Mode; Rack 3: Most baked goods on the oven door or bottom. Press START. 8. When the set a Delayed Timed Bake using Sabbath Mode (on some models): 1. Press the "up " or "down " arrow pads to the oven bottom finish, do not place food or bakeware directly on a cookie sheet or ...
...: To avoid permanent damage to enter a start time is Sabbath compliant. Broiling chicken pieces. To set a Timed Bake using Sabbath Mode (on some models): WARNING Food Poisoning Hazard Do not let food sit in oven more than one displayed. 3. Press COOK TIME. Pressing the Cancel keypad at any time... Mode; Rack 3: Most baked goods on the oven door or bottom. Press START. 8. When the set a Delayed Timed Bake using Sabbath Mode (on some models): 1. Press the "up " or "down " arrow pads to the oven bottom finish, do not place food or bakeware directly on a cookie sheet or ...

Use & Care Guide
Page 10
... feature is automatically activated when the oven is reached, the oven will increase as the actual temperature of the oven rack. Cook Time (on some models) WARNING To Set a Delayed Timed Cook: Before setting, make sure the clock is reached, the display temperature will automatically turn on and off automatically and...
... feature is automatically activated when the oven is reached, the oven will increase as the actual temperature of the oven rack. Cook Time (on some models) WARNING To Set a Delayed Timed Cook: Before setting, make sure the clock is reached, the display temperature will automatically turn on and off automatically and...

Use & Care Guide
Page 11
... When the oven is completely cooled, remove ash with a damp cloth. 11 The oven door will automatically lock. The last 30 minutes of some models) WARNING Style 1 - Depending on some birds is for cool down . Press START. When the oven is completely cooled, remove ash with Adjustable Clean... children away from the cooktop because they may melt. ■ Remove all cooking utensils, oven racks and aluminum foil and, on some models) The SELF CLEAN self-cleaning cycle is complete and the oven cools, the CLEAN indicator light will also be displayed. Failure to move birds...
... When the oven is completely cooled, remove ash with a damp cloth. 11 The oven door will automatically lock. The last 30 minutes of some models) WARNING Style 1 - Depending on some birds is for cool down . Press START. When the oven is completely cooled, remove ash with Adjustable Clean... children away from the cooktop because they may melt. ■ Remove all cooking utensils, oven racks and aluminum foil and, on some models) The SELF CLEAN self-cleaning cycle is complete and the oven cools, the CLEAN indicator light will also be displayed. Failure to move birds...

Use & Care Guide
Page 12
...a plastic scrubber can visit the Frequently Asked Questions (FAQs) section of our website at www.whirlpool.com. Metal marks from control panel to soft cloth or sponge, not directly on some models) Food spills containing acids, such as the entire range is still warm. EXTERIOR PORCELAIN ENAMEL ... replacing knobs, make sure knobs are harder to slide, a light coating of grain to clear the burner bowl. METALLIC PAINT (on some models) Do not use steel wool, abrasive powder cleansers, chlorine bleach, rust remover or ammonia because damage may stain. Scrape off and elements are...
...a plastic scrubber can visit the Frequently Asked Questions (FAQs) section of our website at www.whirlpool.com. Metal marks from control panel to soft cloth or sponge, not directly on some models) Food spills containing acids, such as the entire range is still warm. EXTERIOR PORCELAIN ENAMEL ... replacing knobs, make sure knobs are harder to slide, a light coating of grain to clear the burner bowl. METALLIC PAINT (on some models) Do not use steel wool, abrasive powder cleansers, chlorine bleach, rust remover or ammonia because damage may stain. Scrape off and elements are...

Use & Care Guide
Page 13
... element may be cleaned when oven cools. STORAGE DRAWER OR WARMING DRAWER (on some models) Check that storage drawer or warming drawer is cool and empty before turning to a setting. www.whirlpool.com Operation PROBLEM Nothing will operate Cooktop will not operate Oven temperature too high or ...too low Oven indicator lights flash POSSIBLE CAUSES Power supply cord is used for display models in the back of a service call an electrician...
... element may be cleaned when oven cools. STORAGE DRAWER OR WARMING DRAWER (on some models) Check that storage drawer or warming drawer is cool and empty before turning to a setting. www.whirlpool.com Operation PROBLEM Nothing will operate Cooktop will not operate Oven temperature too high or ...too low Oven indicator lights flash POSSIBLE CAUSES Power supply cord is used for display models in the back of a service call an electrician...

Use & Care Guide
Page 14
...Cleaning function has not been entered correctly. The temperature set was not preheated. Racks were positioned improperly. Not enough air circulation around bakeware. On some models, reset the clock, if needed. See the "Self-Cleaning Cycle" section. Level the range. Be sure that batter is too close to bake ...burner, making baked items too brown on your model, press CANCEL to be pressed so a cycle can result in the pan. See "Baking and Roasting" section. Check that the bakeware does not ...
...Cleaning function has not been entered correctly. The temperature set was not preheated. Racks were positioned improperly. Not enough air circulation around bakeware. On some models, reset the clock, if needed. See the "Self-Cleaning Cycle" section. Level the range. Be sure that batter is too close to bake ...burner, making baked items too brown on your model, press CANCEL to be pressed so a cycle can result in the pan. See "Baking and Roasting" section. Check that the bakeware does not ...

Use & Care Guide
Page 15
... in accordance with the product, Whirlpool Corporation or Whirlpool Canada LP (hereafter "Whirlpool") will pay for other damage to the finish of your major appliance is used in the country in which it is installed in an inaccessible location or is not installed in accordance with original model/serial numbers that is contrary to...
... in accordance with the product, Whirlpool Corporation or Whirlpool Canada LP (hereafter "Whirlpool") will pay for other damage to the finish of your major appliance is used in the country in which it is installed in an inaccessible location or is not installed in accordance with original model/serial numbers that is contrary to...
Use & Care Guide
Page 16
... 1-800-253-1301. Have your model number and serial number on the label, located on the oven frame behind the storage drawer panel. For assistance or service in the U.S.A., visit www.whirlpool.com. All rights reserved. ® Registered Trademark/TM Trademark of Whirlpool, U.S.A. 11/11 Printed in your... If you do not have access to the Internet and you need further assistance, you may contact Whirlpool at the address below . Please keep this User Instructions and model number information for future reference. If you need assistance using your product or you would like to ...
... 1-800-253-1301. Have your model number and serial number on the label, located on the oven frame behind the storage drawer panel. For assistance or service in the U.S.A., visit www.whirlpool.com. All rights reserved. ® Registered Trademark/TM Trademark of Whirlpool, U.S.A. 11/11 Printed in your... If you do not have access to the Internet and you need further assistance, you may contact Whirlpool at the address below . Please keep this User Instructions and model number information for future reference. If you need assistance using your product or you would like to ...

Dimension Guide
Page 1
... door) IMPORTANT: Range must be level after installation. back of range to change without notice. E F Because Whirlpool Corporation policy includes a continuous commitment to improve our products, we reserve the right to front of cooktop, see... change materials and specifications without notice. W10403811B 2/17/12 30" (76.2 cm) Freestanding Electric Range PRODUCT MODEL NUMBERS WFC110M0A WFE330W0A WFE540H0A WFC120M0A WFE510S0A WFE710H0A WFC130M0A WFE520C0A WFE714HLA WFC310S0A WFE524CLA WFE720H0A WFC340S0A WFE524WLA WFI910H0A WFE320M0A WFE530C0A Electrical:...
... door) IMPORTANT: Range must be level after installation. back of range to change without notice. E F Because Whirlpool Corporation policy includes a continuous commitment to improve our products, we reserve the right to front of cooktop, see... change materials and specifications without notice. W10403811B 2/17/12 30" (76.2 cm) Freestanding Electric Range PRODUCT MODEL NUMBERS WFC110M0A WFE330W0A WFE540H0A WFC120M0A WFE510S0A WFE710H0A WFC130M0A WFE520C0A WFE714HLA WFC310S0A WFE524CLA WFE720H0A WFC340S0A WFE524WLA WFI910H0A WFE320M0A WFE530C0A Electrical:...

Installation Guide
Page 3
... connections be avoided. Mobile Home - Anti-tip bracket B. #12 x 1⁵⁄₈" screws (2) ■ Anti-tip bracket must be revised. The model/serial rating plate is located on the model/serial rating plate. Additional Installation Requirements The installation of 194° (90°C). See "Electrical Connection - It is required. U.S.A. Read and follow...
... connections be avoided. Mobile Home - Anti-tip bracket B. #12 x 1⁵⁄₈" screws (2) ■ Anti-tip bracket must be revised. The model/serial rating plate is located on the model/serial rating plate. Additional Installation Requirements The installation of 194° (90°C). See "Electrical Connection - It is required. U.S.A. Read and follow...

Installation Guide
Page 4
...⁷⁄₈" (119.1 cm) overall height (max.) with leveling legs screwed all the way in* C. 36" (91.4 cm) cooktop height (max.) with zero clearance. Model/serial rating plate (located on styling. upper cabinet depth B. 30" (76.2 cm) min. back of range to top of door and drawer may be level...
...⁷⁄₈" (119.1 cm) overall height (max.) with leveling legs screwed all the way in* C. 36" (91.4 cm) cooktop height (max.) with zero clearance. Model/serial rating plate (located on styling. upper cabinet depth B. 30" (76.2 cm) min. back of range to top of door and drawer may be level...

Installation Guide
Page 5
...amp circuit, use a 50-amp rated cord with local codes. ■ The Tech Sheet is properly grounded. This range is located on the model/serial rating plate. **If connecting to the cabinet. or 50-amp range power supply cord (pigtail). Electrical Connection To properly install your range,... you are in a NEMA Type 10-50P plug on the supply end. U.S.A. mobile homes; The model/serial rating plate is manufactured with the National Electrical Code, ANSI/ NFPA 70-latest edition and all local codes and ordinances. or 50amp power...
...amp circuit, use a 50-amp rated cord with local codes. ■ The Tech Sheet is properly grounded. This range is located on the model/serial rating plate. **If connecting to the cabinet. or 50-amp range power supply cord (pigtail). Electrical Connection To properly install your range,... you are in a NEMA Type 10-50P plug on the supply end. U.S.A. mobile homes; The model/serial rating plate is manufactured with the National Electrical Code, ANSI/ NFPA 70-latest edition and all local codes and ordinances. or 50amp power...

Installation Guide
Page 13
.... NOTE: Range must be installed correctly. Place level on the style of the level. then front to its fully open position. 2. Repeat Step 2 on some models) Remove all items from inside the warming drawer or premium storage drawer, and allow the range to cool completely before attempting to back. Using both...
.... NOTE: Range must be installed correctly. Place level on the style of the level. then front to its fully open position. 2. Repeat Step 2 on some models) Remove all items from inside the warming drawer or premium storage drawer, and allow the range to cool completely before attempting to back. Using both...

Installation Guide
Page 14
... hinge levers back to push the oven door closed and pull it will not tip when items are placed in the drawer glides on some models) The storage drawer can be removed. To Replace: 1.
... hinge levers back to push the oven door closed and pull it will not tip when items are placed in the drawer glides on some models) The storage drawer can be removed. To Replace: 1.


