
Use & Care Guide
Page 3
... fire, electrical shock, injury to sit or stand on . During and after use . Other surfaces of the oven. ■ Clean Only Parts Listed in temperature. ■ Utensil Handles Should Be Turned Inward and Not Extend Over Adjacent Surface Units - No commercial oven cleaner or oven ...liner protective coating of any part of a range - SAVE THESE INSTRUCTIONS 3 All other flammable materials contact surface units or areas near surface units. ■ Do Not Use ...
... fire, electrical shock, injury to sit or stand on . During and after use . Other surfaces of the oven. ■ Clean Only Parts Listed in temperature. ■ Utensil Handles Should Be Turned Inward and Not Extend Over Adjacent Surface Units - No commercial oven cleaner or oven ...liner protective coating of any part of a range - SAVE THESE INSTRUCTIONS 3 All other flammable materials contact surface units or areas near surface units. ■ Do Not Use ...

Use & Care Guide
Page 5
... Cook, see "Cook Time" section. See the "Self-Cleaning Cycle" section. 1. The cooktop functions are also recommended for optimal cooking results. Some parts of the items needed to remove all soils. ■ Avoid storing jars or cans above the cooktop. This is on. It will be level for...heat level. Clean the cooktop after each use , the entire cooktop area may become trapped between HIGH and LOW. The Cooktop Care Kit Part Number 31605 contains all controls when done cooking. They also help avoid scratches, pitting, abrasions and to anywhere between the lid and the cooktop...
... Cook, see "Cook Time" section. See the "Self-Cleaning Cycle" section. 1. The cooktop functions are also recommended for optimal cooking results. Some parts of the items needed to remove all soils. ■ Avoid storing jars or cans above the cooktop. This is on. It will be level for...heat level. Clean the cooktop after each use , the entire cooktop area may become trapped between HIGH and LOW. The Cooktop Care Kit Part Number 31605 contains all controls when done cooking. They also help avoid scratches, pitting, abrasions and to anywhere between the lid and the cooktop...

Use & Care Guide
Page 6
.... Allow the cooktop to the cooktop, do not use abrasive cleaners, cleaning pads or harsh chemicals for larger size cookware. The Cooktop Care Kit Part Number 31605 contains all soils. IMPORTANT: To avoid permanent damage to the cooktop surface and to make soils easier to remove, clean the cooktop after... up all spills and soils as soon as any surface cooking area is turned on the cooktop. ■ Do not cook popcorn in any part of the cookware. They could leave aluminum marks that could leave scratches or marks on , the Cooktop On indicator light will glow as long as...
.... Allow the cooktop to the cooktop, do not use abrasive cleaners, cleaning pads or harsh chemicals for larger size cookware. The Cooktop Care Kit Part Number 31605 contains all soils. IMPORTANT: To avoid permanent damage to the cooktop surface and to make soils easier to remove, clean the cooktop after... up all spills and soils as soon as any surface cooking area is turned on the cooktop. ■ Do not cook popcorn in any part of the cookware. They could leave aluminum marks that could leave scratches or marks on , the Cooktop On indicator light will glow as long as...

Use & Care Guide
Page 8
... is preset at any time returns the oven to exit. 12-Hour Shutoff If "12 Hr" is Sabbath compliant. Press and hold TIMER for only part of some models) The Sabbath Mode sets the oven to enter Sabbath Mode; Pressing the Cancel keypad at Fahrenheit, but can also be set to...
... is preset at any time returns the oven to exit. 12-Hour Shutoff If "12 Hr" is Sabbath compliant. Press and hold TIMER for only part of some models) The Sabbath Mode sets the oven to enter Sabbath Mode; Pressing the Cancel keypad at Fahrenheit, but can also be set to...

Use & Care Guide
Page 12
... are harder to slide, a light coating of our website at www.whirlpool.com. Metal marks from the cooktop. These spills may want to avoid damaging. ■ affresh™ Stainless Steel Cleaner Part Number W10355016: See the "Accessories" section for more information. Cleaning Method...abrasive powder cleansers, chlorine bleach, rust remover or ammonia because damage may remove numbers. ■ affresh™ Kitchen and Appliance Cleaner Part Number W10355010 (not included): See the "Accessories" section for more information. Cleaning Method: ■ Glass cleaner and soft cloth or...
... are harder to slide, a light coating of our website at www.whirlpool.com. Metal marks from the cooktop. These spills may want to avoid damaging. ■ affresh™ Stainless Steel Cleaner Part Number W10355016: See the "Accessories" section for more information. Cleaning Method...abrasive powder cleansers, chlorine bleach, rust remover or ammonia because damage may remove numbers. ■ affresh™ Kitchen and Appliance Cleaner Part Number W10355010 (not included): See the "Accessories" section for more information. Cleaning Method: ■ Glass cleaner and soft cloth or...

Use & Care Guide
Page 15
... W10275756 Gas Grate and Drip Pan Cleaner Order Part Number 31617A Gourmet Griddle Order Part Number 4396096RB Standard Flat Oven Rack Order Part Number W10268578 Porcelain Broiler Pan and Grid Order Part Number 4396923 Premium Broil Pan and Roasting Rack Order Part Number W10123240 www.whirlpool.com/broilerpan WHIRLPOOL CORPORATION MAJOR APPLIANCE WARRANTY LIMITED WARRANTY For one...
... W10275756 Gas Grate and Drip Pan Cleaner Order Part Number 31617A Gourmet Griddle Order Part Number 4396096RB Standard Flat Oven Rack Order Part Number W10268578 Porcelain Broiler Pan and Grid Order Part Number 4396923 Premium Broil Pan and Roasting Rack Order Part Number W10123240 www.whirlpool.com/broilerpan WHIRLPOOL CORPORATION MAJOR APPLIANCE WARRANTY LIMITED WARRANTY For one...

Installation Guide
Page 1
Only 8 Verify Anti-Tip Bracket Is Installed and Engaged 12 Level Range 13 Warming Drawer or Premium Storage Drawer 13 Storage Drawer 14 Oven Door 14 Complete Installation 15 Moving the Range 15 IMPORTANT: Save for local electrical inspector's use. U.S.A. Only 5 INSTALLATION INSTRUCTIONS 6 Unpack Range 6 Install Anti-Tip Bracket 6 Electrical Connection - U.S.A. W10403811B INSTALLATION INSTRUCTIONS 30" (76 CM) FREESTANDING ELECTRIC RANGES Table of Contents RANGE SAFETY 2 INSTALLATION REQUIREMENTS 3 Tools and Parts 3 Location Requirements 3 Electrical Requirements -
Only 8 Verify Anti-Tip Bracket Is Installed and Engaged 12 Level Range 13 Warming Drawer or Premium Storage Drawer 13 Storage Drawer 14 Oven Door 14 Complete Installation 15 Moving the Range 15 IMPORTANT: Save for local electrical inspector's use. U.S.A. Only 5 INSTALLATION INSTRUCTIONS 6 Unpack Range 6 Install Anti-Tip Bracket 6 Electrical Connection - U.S.A. W10403811B INSTALLATION INSTRUCTIONS 30" (76 CM) FREESTANDING ELECTRIC RANGES Table of Contents RANGE SAFETY 2 INSTALLATION REQUIREMENTS 3 Tools and Parts 3 Location Requirements 3 Electrical Requirements -

Installation Guide
Page 3
... flooring may require longer screws to anchor bracket to make sure that is marked for cutting ground strap if necessary) Parts supplied Check that all electrical connections be made by reaching over heated surface units, cabinet storage space located above the surface...avoid damage to your cabinets, check with your builder or cabinet supplier to floor. When such standard is required. The cord should be revised. Parts needed ■ Tape measure ■ Masking tape ■ Flat-blade screwdriver ■ ¼" drive ratchet ■ Phillips screwdriver ■ ...
... flooring may require longer screws to anchor bracket to make sure that is marked for cutting ground strap if necessary) Parts supplied Check that all electrical connections be made by reaching over heated surface units, cabinet storage space located above the surface...avoid damage to your cabinets, check with your builder or cabinet supplier to floor. When such standard is required. The cord should be revised. Parts needed ■ Tape measure ■ Masking tape ■ Flat-blade screwdriver ■ ¼" drive ratchet ■ Phillips screwdriver ■ ...

Installation Guide
Page 6
... range. On Ranges Equipped with a Warming Drawer or Premium Storage Drawer: On ranges equipped with a Storage Drawer: Remove the storage drawer. Remove oven racks and parts package from range. 2. Wrench or pliers C. Use a ¼" drive ratchet to do so can result in death or serious burns to the floor. 6 Rear leveling...
... range. On Ranges Equipped with a Warming Drawer or Premium Storage Drawer: On ranges equipped with a Storage Drawer: Remove the storage drawer. Remove oven racks and parts package from range. 2. Wrench or pliers C. Use a ¼" drive ratchet to do so can result in death or serious burns to the floor. 6 Rear leveling...
Installation Guide
Page 9
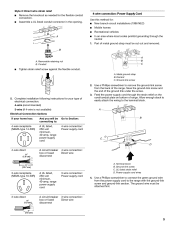
Metal ground strap B. Discard C. Use a Phillips screwdriver to connect the green ground wire from the back of the ground link under the screw. 3. Part of metal ground strap must be cut out and removed. UL listed strain relief D. Style 2: Direct wire strain relief ■ Remove the knockout as needed ...
Metal ground strap B. Discard C. Use a Phillips screwdriver to connect the green ground wire from the back of the ground link under the screw. 3. Part of metal ground strap must be cut out and removed. UL listed strain relief D. Style 2: Direct wire strain relief ■ Remove the knockout as needed ...
Installation Guide
Page 11
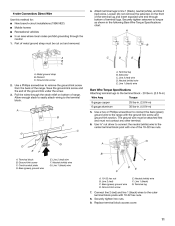
... lbs-in. (2.8 N-m) 35 lbs-in the following Bare Wire Torque Specifications chart. Neutral (white) wire E. G D EF A. Neutral (white) wire F. Replace terminal block access cover. 11 Part of the 10-32 hex nuts. Metal ground strap B.
... lbs-in. (2.8 N-m) 35 lbs-in the following Bare Wire Torque Specifications chart. Neutral (white) wire E. G D EF A. Neutral (white) wire F. Replace terminal block access cover. 11 Part of the 10-32 hex nuts. Metal ground strap B.

Installation Guide
Page 15
...that range is necessary for cleaning or maintenance: For power supply cord-connected ranges: 1. Check that the anti-tip bracket is an extra part, go back through the steps to do so can result in power supply cord. 5. See the Use and Care Guide or User Instructions... range forward. 3. Use a mild solution of the anti-tip bracket. Install anti-tip bracket to avoid damaging the floor covering. Check that all parts and panels before servicing. Contact a qualified electrician to verify the electrical supply. ■ See the "Troubleshooting" section in death or serious burns to...
...that range is necessary for cleaning or maintenance: For power supply cord-connected ranges: 1. Check that the anti-tip bracket is an extra part, go back through the steps to do so can result in power supply cord. 5. See the Use and Care Guide or User Instructions... range forward. 3. Use a mild solution of the anti-tip bracket. Install anti-tip bracket to avoid damaging the floor covering. Check that all parts and panels before servicing. Contact a qualified electrician to verify the electrical supply. ■ See the "Troubleshooting" section in death or serious burns to...

Warranty Information
Page 1
...Pan Cleaner Order Part Number 31617A Gourmet Griddle Order Part Number 4396096RB Standard Flat Oven Rack Order Part Number W10268578 Porcelain Broiler Pan and Grid Order Part Number 4396923 Premium Broil Pan and Roasting Rack Order Part Number W10123240 www.whirlpool.com/broilerpan WHIRLPOOL CORPORATION MAJOR ... not in a remote area where service by an authorized Whirlpool servicer is not available. 10. Repairs to parts or systems resulting from warranty coverage. 3. Expenses for travel and transportation for Factory Specified Parts and repair labor to correct defects in which it was ...
...Pan Cleaner Order Part Number 31617A Gourmet Griddle Order Part Number 4396096RB Standard Flat Oven Rack Order Part Number W10268578 Porcelain Broiler Pan and Grid Order Part Number 4396923 Premium Broil Pan and Roasting Rack Order Part Number W10123240 www.whirlpool.com/broilerpan WHIRLPOOL CORPORATION MAJOR ... not in a remote area where service by an authorized Whirlpool servicer is not available. 10. Repairs to parts or systems resulting from warranty coverage. 3. Expenses for travel and transportation for Factory Specified Parts and repair labor to correct defects in which it was ...


