

Installation Instructions
Page 2
Washer/Dryer Safety 2
Washer/Dryer Safety 2
Installation Instructions
Page 6
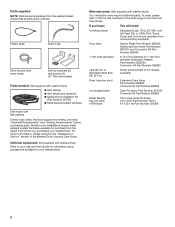
... Drain hose Silver double-wire hose clamp Anti-tip brackets (2) and screws (4) (27" [69 cm] models) Parts needed: (Not supplied with washer/dryer) n Vent clamps n Vent elbows and ductwork n Mobile Home Installation Kit (Part Number 346764) n Metal exhaust system hardware Inlet hoses with washer/dryer) Your installation may require additional parts. Mobile home installations require metal exhaust system hardware available for your washer/dryer. Alternate parts: (Not supplied with flat washers Check local codes, electrical...
... Drain hose Silver double-wire hose clamp Anti-tip brackets (2) and screws (4) (27" [69 cm] models) Parts needed: (Not supplied with washer/dryer) n Vent clamps n Vent elbows and ductwork n Mobile Home Installation Kit (Part Number 346764) n Metal exhaust system hardware Inlet hoses with washer/dryer) Your installation may require additional parts. Mobile home installations require metal exhaust system hardware available for your washer/dryer. Alternate parts: (Not supplied with flat washers Check local codes, electrical...
Installation Instructions
Page 7
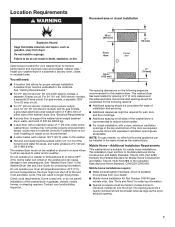
... Home Installation Kit Part Number 346764 (gas models only). Mobile Home - The opening . 7 Location Requirements Recessed area or closet installation 48 in.2 (310 cm2) 3" (76 mm) Front View Closet door Select proper location for your washer/dryer to introduce outside air into the dryer. See "Electrical Requirements." Recommended spacing should be installed in longer drying times. Some codes limit, or do not permit, installation of the washer/dryer in...
... Home Installation Kit Part Number 346764 (gas models only). Mobile Home - The opening . 7 Location Requirements Recessed area or closet installation 48 in.2 (310 cm2) 3" (76 mm) Front View Closet door Select proper location for your washer/dryer to introduce outside air into the dryer. See "Electrical Requirements." Recommended spacing should be installed in longer drying times. Some codes limit, or do not permit, installation of the washer/dryer in...
Installation Instructions
Page 10
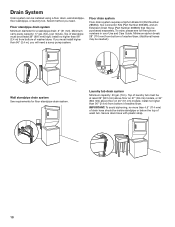
... of washer/dryer. To order, please see toll-free phone numbers in your Use and Care Guide. Secure drain hose with plastic strap. 10 If you will need . Top of laundry tub must install higher than 96" (2.4 m) from bottom of drain hose should be at least 39" (991 mm) high; Floor drain system Floor drain system requires a Siphon Break Kit (Part Number 285834), two Connector Kits (Part Number...
... of washer/dryer. To order, please see toll-free phone numbers in your Use and Care Guide. Secure drain hose with plastic strap. 10 If you will need . Top of laundry tub must install higher than 96" (2.4 m) from bottom of drain hose should be at least 39" (991 mm) high; Floor drain system Floor drain system requires a Siphon Break Kit (Part Number 285834), two Connector Kits (Part Number...
Installation Instructions
Page 11
... if you must end in a location where grounding through the neutral conductors. n This washer/dryer is adequate and in the "Electrical Connection" section. Grounding through the neutral is installed in ring terminals or spade terminals with upturned ends. n If codes permit and a separate ground wire is used when the appliance is prohibited for use an extension cord. n To be...
... if you must end in a location where grounding through the neutral conductors. n This washer/dryer is adequate and in the "Electrical Connection" section. Grounding through the neutral is installed in ring terminals or spade terminals with upturned ends. n If codes permit and a separate ground wire is used when the appliance is prohibited for use an extension cord. n To be...
Installation Instructions
Page 12
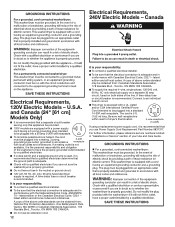
..., please reference service numbers located in "Assistance or Service" section of the customer to have a fuse in conformance with local codes and ordinances. U.S.A. A time-delay fuse or circuit breaker is recommended. n If codes permit and a separate ground wire is used, it is the personal responsibility and obligation of your responsibility: n To contact a qualified electrical installer. Canada Electrical Requirements, 120V Electric Models - If a mating...
..., please reference service numbers located in "Assistance or Service" section of the customer to have a fuse in conformance with local codes and ordinances. U.S.A. A time-delay fuse or circuit breaker is recommended. n If codes permit and a separate ground wire is used, it is the personal responsibility and obligation of your responsibility: n To contact a qualified electrical installer. Canada Electrical Requirements, 120V Electric Models - If a mating...
Installation Instructions
Page 13
... the ground path is located on the model/serial rating plate for use with propane gas with appropriate conversion. ■■ Your washer/dryer must have the properly grounded outlet installed by UL for use with local codes and ordinances. Install a shut-off valve. Securely tighten all gas connections. Examples of gas in accordance with natural gas. Failure to a gas pipe. Burner information is...
... the ground path is located on the model/serial rating plate for use with propane gas with appropriate conversion. ■■ Your washer/dryer must have the properly grounded outlet installed by UL for use with local codes and ordinances. Install a shut-off valve. Securely tighten all gas connections. Examples of gas in accordance with natural gas. Failure to a gas pipe. Burner information is...
Installation Instructions
Page 14
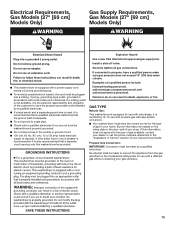
... Gas and Propane Installation Code. The location should be disconnected from the gas supply piping system during transport. †®TEFLON is acceptable for connecting the washer/dryer to reach for each 1,000 ft. (305 m) increase in elevation. E C A GAS SUPPLY CONNECTION REQUIREMENTS ■ Use the 1/2" NPT adapter between the gas supply line and the flexible gas connector on the model/serial number plate...
... Gas and Propane Installation Code. The location should be disconnected from the gas supply piping system during transport. †®TEFLON is acceptable for connecting the washer/dryer to reach for each 1,000 ft. (305 m) increase in elevation. E C A GAS SUPPLY CONNECTION REQUIREMENTS ■ Use the 1/2" NPT adapter between the gas supply line and the flexible gas connector on the model/serial number plate...

Installation Instructions
Page 18
... length so washer/dryer may be in a horizontal position. Attach direct wire strain relief A B C 4-Wire Direct Wire Connection IMPORTANT: A 4-wire connection is required for direct connection (251"mm) Unscrew the removable conduit connector (A) and any screws from end of wires into hooks. 2. Strip 5" (127 mm) of outer covering from a 3/4" (19 mm) UL Listed strain relief. Prepare to "3-Wire Direct Wire Connection...
... length so washer/dryer may be in a horizontal position. Attach direct wire strain relief A B C 4-Wire Direct Wire Connection IMPORTANT: A 4-wire connection is required for direct connection (251"mm) Unscrew the removable conduit connector (A) and any screws from end of wires into hooks. 2. Strip 5" (127 mm) of outer covering from a 3/4" (19 mm) UL Listed strain relief. Prepare to "3-Wire Direct Wire Connection...

Installation Instructions
Page 19
... Wire Connection IMPORTANT: Use where local codes permit connecting cabinet-ground conductor to "Venting Requirements." 19 Now, go to neutral wire. 1. Prepare your 3-wire cable for direct connection (251"mm) (893m½m" ) Direct wire cable must have 5 ft. (1.52 m) of direct wire cable to external ground conductor screw (A). Remove center screw B Connect ground wire (green or bare) (F) of extra length so washer/dryer...
... Wire Connection IMPORTANT: Use where local codes permit connecting cabinet-ground conductor to "Venting Requirements." 19 Now, go to neutral wire. 1. Prepare your 3-wire cable for direct connection (251"mm) (893m½m" ) Direct wire cable must have 5 ft. (1.52 m) of direct wire cable to external ground conductor screw (A). Remove center screw B Connect ground wire (green or bare) (F) of extra length so washer/dryer...
Installation Instructions
Page 26
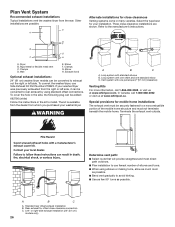
... (2" [51 mm] clearance) Venting Kits For more information, call 1-800-688-2002 or visit us at www.whirlpool.ca. Determine vent path: ■■ Select route that will provide straightest and most direct path outdoors. ■■ Plan installation to install. or right-side exhaust installation (24" [61 cm] models only) 26 To convert the washer/dryer, use fewest number of the mobile...
... (2" [51 mm] clearance) Venting Kits For more information, call 1-800-688-2002 or visit us at www.whirlpool.ca. Determine vent path: ■■ Select route that will provide straightest and most direct path outdoors. ■■ Plan installation to install. or right-side exhaust installation (24" [61 cm] models only) 26 To convert the washer/dryer, use fewest number of the mobile...
Installation Instructions
Page 28
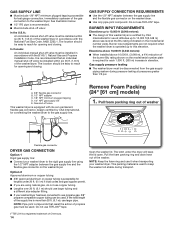
... the lower left (27" [69 cm] models) or lower center (24" [61 cm] models) portion of the rear of the 24" (61 cm) model will vary For floor drain installations, you will need additional parts with separate directions. Remove drain hose form (floor drain installations only) The appearance of the washer/ dryer. You may need to remove the drain hose form from damage due to...
... the lower left (27" [69 cm] models) or lower center (24" [61 cm] models) portion of the rear of the 24" (61 cm) model will vary For floor drain installations, you will need additional parts with separate directions. Remove drain hose form (floor drain installations only) The appearance of the washer/ dryer. You may need to remove the drain hose form from damage due to...
Installation Instructions
Page 29
... hose for future reference. Repeat with flat washers (not provided). Replace access panels upon completion of water hoses and vent. Insert washer into its final location and remove cardboard from under washer/dryer. Damage can result. Use pliers to washer correctly. Move washer/dryer to final location Outer Access Panel (27" [69 cm] model shown) Inner Access Panel (27" [69 cm] models only) If you must be connected to...
... hose for future reference. Repeat with flat washers (not provided). Replace access panels upon completion of water hoses and vent. Insert washer into its final location and remove cardboard from under washer/dryer. Damage can result. Use pliers to washer correctly. Move washer/dryer to final location Outer Access Panel (27" [69 cm] model shown) Inner Access Panel (27" [69 cm] models only) If you must be connected to...
Installation Instructions
Page 30
..."" (1143 mm) Secure drain hose to dryer A. It is used, be necessary to install and secure the drain hose into the provided plumbing/drain in the parts package. E. Do not use TEFLON® tape. 2. Use pipe-joint compound on water faucets to check for leaks Make Gas Connection (Gas 27" [69 cm] Models Only) 1. Secure drain hose Laundry Tub Standpipe Wall Remove red cap from the...
..."" (1143 mm) Secure drain hose to dryer A. It is used, be necessary to install and secure the drain hose into the provided plumbing/drain in the parts package. E. Do not use TEFLON® tape. 2. Use pipe-joint compound on water faucets to check for leaks Make Gas Connection (Gas 27" [69 cm] Models Only) 1. Secure drain hose Laundry Tub Standpipe Wall Remove red cap from the...

Installation Instructions
Page 31
...] model shown) Attach the flexible gas connector to crush or kink vent. Move washer/dryer to final location Move washer/dryer to final location, taking care not to the 1/2" NPT adapter. Open valve Open shut-off valve A B A. Check that vent is clean. valve is open when handle is in place, remove corner posts and cardboard from rear Using a 4" (102 mm) clamp, connect vent to exhaust...
...] model shown) Attach the flexible gas connector to crush or kink vent. Move washer/dryer to final location Move washer/dryer to final location, taking care not to the 1/2" NPT adapter. Open valve Open shut-off valve A B A. Check that vent is clean. valve is open when handle is in place, remove corner posts and cardboard from rear Using a 4" (102 mm) clamp, connect vent to exhaust...

Installation Instructions
Page 32
...) with a wood block or similar object that will support weight of front using the top right and bottom holes. Install Anti-Tip Brackets (27" [69 cm] Models Only) 1. With the washer/dryer in its final location, place anti-tip brackets at the lower left -hand bracket with a 1/4" (6.5 mm) nut driver or socket wrench and secure tightly to raise...
...) with a wood block or similar object that will support weight of front using the top right and bottom holes. Install Anti-Tip Brackets (27" [69 cm] Models Only) 1. With the washer/dryer in its final location, place anti-tip brackets at the lower left -hand bracket with a 1/4" (6.5 mm) nut driver or socket wrench and secure tightly to raise...
Installation Instructions
Page 33
See "Tools and Parts" for information on ordering. 1. Fasten Gas Washer/Dryer to the floor. Fasten washer/dryer to floor Plug In Washer/Dryer: 27" (69 cm) Electric Models with gas dryers must be securely fastened to Floor (Gas 27" [69 cm] Models Installed in Mobile Homes Only) 1. Mobile home installations require a Mobile Home Installation Kit. Plug into a grounded 3 or 4 prong outlet 33 For mobile home use: Washer/dryers with Power Cord and 24" (61 cm) 240V Electric Models In U.S.A.
See "Tools and Parts" for information on ordering. 1. Fasten Gas Washer/Dryer to the floor. Fasten washer/dryer to floor Plug In Washer/Dryer: 27" (69 cm) Electric Models with gas dryers must be securely fastened to Floor (Gas 27" [69 cm] Models Installed in Mobile Homes Only) 1. Mobile home installations require a Mobile Home Installation Kit. Plug into a grounded 3 or 4 prong outlet 33 For mobile home use: Washer/dryers with Power Cord and 24" (61 cm) 240V Electric Models In U.S.A.

Installation Instructions
Page 34
Plug into a grounded 4 prong outlet 1. Plug into a grounded 3 prong outlet 34 In Canada Plug In Washer/Dryer: 27" (69 cm) Gas Models 1.
Plug into a grounded 4 prong outlet 1. Plug into a grounded 3 prong outlet 34 In Canada Plug In Washer/Dryer: 27" (69 cm) Gas Models 1.

Installation Instructions
Page 35
... fuses or circuit breakers for use if the washer/dryer should be transported. ❑ Check the washer/dryer's final location. For direct wire installation (27" [69 cm] models only), turn off the dryer and check the following : • Controls are set the dryer on the washer/dryer. ❑ Read the Washer/Dryer Use and Care Guide. ❑ Wipe the dryer drum interior thoroughly with a damp cloth to see which step...
... fuses or circuit breakers for use if the washer/dryer should be transported. ❑ Check the washer/dryer's final location. For direct wire installation (27" [69 cm] models only), turn off the dryer and check the following : • Controls are set the dryer on the washer/dryer. ❑ Read the Washer/Dryer Use and Care Guide. ❑ Wipe the dryer drum interior thoroughly with a damp cloth to see which step...
Specification Sheet
Page 1
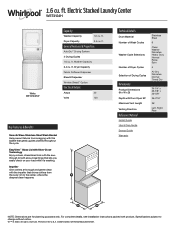
... that lets you easily check on your load while it's washing. D200104XXD. ft. Dryer Capacity 3.4 cu. Washer Capacity 3.4 cu. WET4124HSpecSheetV01. Impeller Give clothes a thorough and gentle clean with the impeller that drives clothes from snagging with slow-close hinge that gently guides clothes throughout the cycle. Specifications subject to the center, where the deepest clean happens. Electric Stacked Laundry Center WET4124H White WET4124HW Capacity Washer Capacity 1.6 cu. ft.
... that lets you easily check on your load while it's washing. D200104XXD. ft. Dryer Capacity 3.4 cu. Washer Capacity 3.4 cu. WET4124HSpecSheetV01. Impeller Give clothes a thorough and gentle clean with the impeller that drives clothes from snagging with slow-close hinge that gently guides clothes throughout the cycle. Specifications subject to the center, where the deepest clean happens. Electric Stacked Laundry Center WET4124H White WET4124HW Capacity Washer Capacity 1.6 cu. ft.

