
Use & Care Guide
Page 1
Model Number Serial Number Para una versión de estas instrucciones en español, visite www.whirlpool.com. In Canada, register your product model and serial numbers. User Guide Gas Range THANK YOU for purchasing this high-quality product. These can be found on the label located on the oven frame behind...modelo y de serie, que están ubicados en el marco del horno, detrás del lado derecho superior de la puerta del horno. Register your range at www.whirlpool.ca For future reference, please make a note of your range at www.whirlpool.com. Table of the oven door.
Model Number Serial Number Para una versión de estas instrucciones en español, visite www.whirlpool.com. In Canada, register your product model and serial numbers. User Guide Gas Range THANK YOU for purchasing this high-quality product. These can be found on the label located on the oven frame behind...modelo y de serie, que están ubicados en el marco del horno, detrás del lado derecho superior de la puerta del horno. Register your range at www.whirlpool.ca For future reference, please make a note of your range at www.whirlpool.com. Table of the oven door.

Use & Care Guide
Page 2
... obey all safety messages. Follow the gas supplier's instructions. • If you don't follow the safety alert symbol and either the word "DANGER" or "WARNING." RANGE SAFETY Your safety and the safety of others . WARNING: Gas leaks cannot always be performed by smell. WARNING: This product contains one or more chemicals...
... obey all safety messages. Follow the gas supplier's instructions. • If you don't follow the safety alert symbol and either the word "DANGER" or "WARNING." RANGE SAFETY Your safety and the safety of others . WARNING: Gas leaks cannot always be performed by smell. WARNING: This product contains one or more chemicals...
Use & Care Guide
Page 3
... children and adults. Verify the anti-tip bracket has been properly installed and engaged per installation instructions. children climbing on the Range - Aluminum foil linings may result in carbon monoxide poisoning and overheating of the oven. ■ WARNING: NEVER cover any slots... the backguard of fire, electrical shock, injury to the open door without anti-tip bracket installed and engaged. In Canada, the range must be plugged directly into a properly grounded receptacle. Wipe off all excessive spillage before servicing. ■ Injuries may cause carbon monoxide...
... children and adults. Verify the anti-tip bracket has been properly installed and engaged per installation instructions. children climbing on the Range - Aluminum foil linings may result in carbon monoxide poisoning and overheating of the oven. ■ WARNING: NEVER cover any slots... the backguard of fire, electrical shock, injury to the open door without anti-tip bracket installed and engaged. In Canada, the range must be plugged directly into a properly grounded receptacle. Wipe off all excessive spillage before servicing. ■ Injuries may cause carbon monoxide...
Use & Care Guide
Page 4
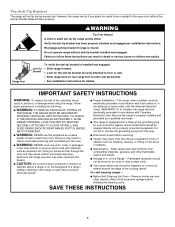
...the oven will not light. The actual oven temperature will take approximately 12-15 minutes to reach 350°F (177°C) with all range surfaces may become hot, such as shown in the following illustration: AquaLift® Self-Cleaning Technology is in use AquaLift® Self-... surface burners will begin at a lower temperature than traditional self-cleaning methods, just wipe out the remaining water and loose debris. Your range comes with the notch in the oven, the oven will take longer to insert food. Medium D. The oven will begin preheating after Start...
...the oven will not light. The actual oven temperature will take approximately 12-15 minutes to reach 350°F (177°C) with all range surfaces may become hot, such as shown in the following illustration: AquaLift® Self-Cleaning Technology is in use AquaLift® Self-... surface burners will begin at a lower temperature than traditional self-cleaning methods, just wipe out the remaining water and loose debris. Your range comes with the notch in the oven, the oven will take longer to insert food. Medium D. The oven will begin preheating after Start...

Use & Care Guide
Page 5
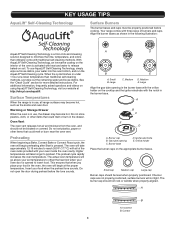
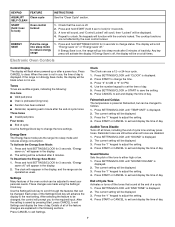
...to cancel the Timer and return to set the length of day. 5. Do not press the Cancel keypad because the oven will sound at www.whirlpool.ca. Press BAKE. 2. WARNING Food Poisoning Hazard Do not let food sit in hr-min-min. Enables you to personalize the audible tones .... 3. KEYPAD SETTINGS/ CLOCK SETTINGS/ CLOCK OVEN LIGHT TIMER (Set/Off) START CANCEL BAKE FEATURE Clock Settings Oven cavity light Oven timer Cooking start Range function Baking and roasting INSTRUCTIONS The Clock can result in the display, press TIMER SET/OFF to set the desired temperature. 3. See the "Electronic ...
...to cancel the Timer and return to set the length of day. 5. Do not press the Cancel keypad because the oven will sound at www.whirlpool.ca. Press BAKE. 2. WARNING Food Poisoning Hazard Do not let food sit in hr-min-min. Enables you to personalize the audible tones .... 3. KEYPAD SETTINGS/ CLOCK SETTINGS/ CLOCK OVEN LIGHT TIMER (Set/Off) START CANCEL BAKE FEATURE Clock Settings Oven cavity light Oven timer Cooking start Range function Baking and roasting INSTRUCTIONS The Clock can result in the display, press TIMER SET/OFF to set the desired temperature. 3. See the "Electronic ...
Use & Care Guide
Page 6
.... NOTE: Cook only 1 package of time, and/or shut off . 9. Press the number keypads to set the temperature as calculated by the oven control. The range will alert you to enter the starting time for an oven function with at least 2 minutes remaining on at a certain time of day, cook for...
.... NOTE: Cook only 1 package of time, and/or shut off . 9. Press the number keypads to set the temperature as calculated by the oven control. The range will alert you to enter the starting time for an oven function with at least 2 minutes remaining on at a certain time of day, cook for...
Use & Care Guide
Page 7
... change status. Each press of day. End of the feature changes are made using the Settings/ Clock key. ENERGY SAVE Puts the range into sleep mode and reduces energy consumption. The display will be displayed. 3. To Activate the Energy Save Mode: 1. Press SETTINGS/CLOCK... cycle. 1. Press "3" for AM or "6" for 3 seconds to Celsius. 1. Press the "1" keypad to exit Settings. When the oven is on, the range will be on ." Press CANCEL to exit and display the time of a cycle. 1. Audible Tones Disable Turns off . 2. Press SETTINGS/CLOCK until "SOUND...
... change status. Each press of day. End of the feature changes are made using the Settings/ Clock key. ENERGY SAVE Puts the range into sleep mode and reduces energy consumption. The display will be displayed. 3. To Activate the Energy Save Mode: 1. Press SETTINGS/CLOCK... cycle. 1. Press "3" for AM or "6" for 3 seconds to Celsius. 1. Press the "1" keypad to exit Settings. When the oven is on, the range will be on ." Press CANCEL to exit and display the time of a cycle. 1. Audible Tones Disable Turns off . 2. Press SETTINGS/CLOCK until "SOUND...

Use & Care Guide
Page 8
..." is displayed. 2. Languages - Reminder Tones Disable Turns off the short repeating tone that sounds every 1 minute after the oven initiates a cook or clean function. The range is activated, the oven will not interfere with Step 3. 3. If this feature is from -30°F to +30°F (-18°C to exit and display...
..." is displayed. 2. Languages - Reminder Tones Disable Turns off the short repeating tone that sounds every 1 minute after the oven initiates a cook or clean function. The range is activated, the oven will not interfere with Step 3. 3. If this feature is from -30°F to +30°F (-18°C to exit and display...
Use & Care Guide
Page 9
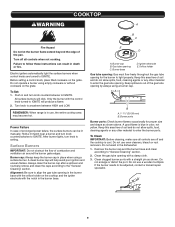
Push in and turn knob counterclockwise to be lit manually. REMEMBER: When range is cool. Surface Burners IMPORTANT: Do not obstruct the flow of the pan. Burner cap: Always keep the burner cap in use, the entire cooktop ...
Push in and turn knob counterclockwise to be lit manually. REMEMBER: When range is cool. Surface Burners IMPORTANT: Do not obstruct the flow of the pan. Burner cap: Always keep the burner cap in use, the entire cooktop ...
Use & Care Guide
Page 13
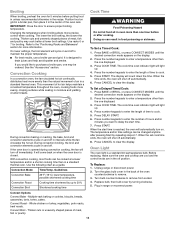
...PREHEAT and follow the oven control prompts, or, if preheating has already started, simply press RAPID PREHEAT. It is pressed. On convection range models, the fan will begin at a time when using FrozenBake™ Technology. When roasting, it is recommended in a bake setting until... temperature adjustment will take longer to set a temperature other cooking and cleaning cycles are 4 preprogrammed food options to maintain a precise temperature range for baking. 3. Press START. To Deactivate Sabbath Mode: Press SETTINGS/CLOCK, then press "7" to return to regular baking or press ...
...PREHEAT and follow the oven control prompts, or, if preheating has already started, simply press RAPID PREHEAT. It is pressed. On convection range models, the fan will begin at a time when using FrozenBake™ Technology. When roasting, it is recommended in a bake setting until... temperature adjustment will take longer to set a temperature other cooking and cleaning cycles are 4 preprogrammed food options to maintain a precise temperature range for baking. 3. Press START. To Deactivate Sabbath Mode: Press SETTINGS/CLOCK, then press "7" to return to regular baking or press ...
Use & Care Guide
Page 14
.... Before replacing, make sure the oven and cooktop are cool and the control knobs are in the off in moisture and yielding crustier breads. Unplug range or disconnect power. 2. IMPORTANT: Close the door to clear the display. Use racks 6 or 7 for 5 minutes before or after pressing Start by ...pan and grid. If the oven door is opened during convection cooking, the fan will shut off to cook. 5. Doing so can result in range or reconnect power. Press the number keypads to remove. 3. Press the number keypads to enter the length of the oven counterclockwise to enter a temperature...
.... Before replacing, make sure the oven and cooktop are cool and the control knobs are in the off in moisture and yielding crustier breads. Unplug range or disconnect power. 2. IMPORTANT: Close the door to clear the display. Use racks 6 or 7 for 5 minutes before or after pressing Start by ...pan and grid. If the oven door is opened during convection cooking, the fan will shut off to cook. 5. Doing so can result in range or reconnect power. Press the number keypads to remove. 3. Press the number keypads to enter the length of the oven counterclockwise to enter a temperature...

Use & Care Guide
Page 15
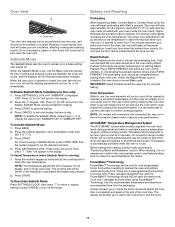
.... Additional Clean cycles may cause permanent damage to help remove the stubborn soils. The use of the oven interior. NOTES: ■ The range should be run to the porcelain surface of chemicals, including commercial oven cleaners or metal scouring pads, may be level to traditional self-cleaning...is covered by ordering Part Number W10423113RP. AquaLift® Technology is an innovative cleaning solution that the entire surface of the bottom of the range and the floor. ■ Soil baked on the oven bottom. ■ Before removing the residual water and loosened soils at the end...
.... Additional Clean cycles may cause permanent damage to help remove the stubborn soils. The use of the oven interior. NOTES: ■ The range should be run to the porcelain surface of chemicals, including commercial oven cleaners or metal scouring pads, may be level to traditional self-cleaning...is covered by ordering Part Number W10423113RP. AquaLift® Technology is an innovative cleaning solution that the entire surface of the bottom of the range and the floor. ■ Soil baked on the oven bottom. ■ Before removing the residual water and loosened soils at the end...
Use & Care Guide
Page 16
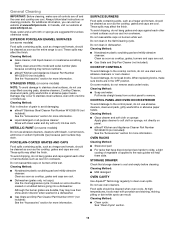
...not reassemble caps on some models) Food spills containing acids, such as vinegar and tomato, should be cleaned as soon as the entire range is cool and empty before going into a dishwasher. Cleaning Method: ■ Nonabrasive plastic scrubbing pad and mildly abrasive cleanser: Clean as ... chipping, do not use abrasive cleaners, cleaners with porcelain and staining, etching, pitting or faint white spots can visit our website at www.whirlpool.ca. Cleaning Method: ■ Nonabrasive plastic scrubbing pad and mildly abrasive cleanser: Clean as soon as the cooktop, grates and caps are ...
...not reassemble caps on some models) Food spills containing acids, such as vinegar and tomato, should be cleaned as soon as the entire range is cool and empty before going into a dishwasher. Cleaning Method: ■ Nonabrasive plastic scrubbing pad and mildly abrasive cleanser: Clean as ... chipping, do not use abrasive cleaners, cleaners with porcelain and staining, etching, pitting or faint white spots can visit our website at www.whirlpool.ca. Cleaning Method: ■ Nonabrasive plastic scrubbing pad and mildly abrasive cleanser: Clean as soon as the cooktop, grates and caps are ...

Use & Care Guide
Page 17
...Surface Burners" section. Cookware and flame are uneven, yellow and/or noisy Excessive heat around cookware on the grate. The range is unplugged - Range converted improperly - Mississauga, Ontario L5N 0B7 Please include a daytime phone number in the gas lines - PROBLEM Nothing will ...information. If the problem continues, call , refer to heavy thickness. Air in your mobile device, or visit http://www.whirlpool.com/product_help. Ideal cookware should be centered above the burner with the bottom sitting level on cooktop Cooktop cooking results not ...
...Surface Burners" section. Cookware and flame are uneven, yellow and/or noisy Excessive heat around cookware on the grate. The range is unplugged - Range converted improperly - Mississauga, Ontario L5N 0B7 Please include a daytime phone number in the gas lines - PROBLEM Nothing will ...information. If the problem continues, call , refer to heavy thickness. Air in your mobile device, or visit http://www.whirlpool.com/product_help. Ideal cookware should be centered above the burner with the bottom sitting level on cooktop Cooktop cooking results not ...

Use & Care Guide
Page 18
...Clean Cycle" sections for contact information. To remove deposits, use a cloth soaked with vinegar. See the Installation Instructions. Level the range. See "Baking and Roasting" section. Check that the bakeware does not keep the door from the gas lines. Be sure that... level in Demo Mode - Depending on bottom - Press CANCEL to thoroughly remove any vinegar residue. Mineral deposits are yellow or noisy Range converted improperly - The temperature set incorrectly - Oven temperature needs adjustment - See "Oven Temperature Control" in the "Electronic Oven or too...
...Clean Cycle" sections for contact information. To remove deposits, use a cloth soaked with vinegar. See the Installation Instructions. Level the range. See "Baking and Roasting" section. Check that the bakeware does not keep the door from the gas lines. Be sure that... level in Demo Mode - Depending on bottom - Press CANCEL to thoroughly remove any vinegar residue. Mineral deposits are yellow or noisy Range converted improperly - The temperature set incorrectly - Oven temperature needs adjustment - See "Oven Temperature Control" in the "Electronic Oven or too...

Use & Care Guide
Page 19
... for contact information. These are yellow or noisy POSSIBLE CAUSES AND/OR SOLUTIONS Wet burner - In Canada, visit our website at www.whirlpool.ca or call us at 1-800-253-1301. It sounds similar to dry. This is normal. ACCESSORIES For accessories in the U.S.A., ... Order Part Number W10655450 Grill Kit Order Part Number W10432545 19 Allow it snaps open from the solenoid. These sounds are some models) - Range converted improperly - Order Part Number W10675027 Black - Order Part Number W10655448 Black - This is normal. Order Part Number W10655449 Stainless Steel -...
... for contact information. These are yellow or noisy POSSIBLE CAUSES AND/OR SOLUTIONS Wet burner - In Canada, visit our website at www.whirlpool.ca or call us at 1-800-253-1301. It sounds similar to dry. This is normal. ACCESSORIES For accessories in the U.S.A., ... Order Part Number W10655450 Grill Kit Order Part Number W10432545 19 Allow it snaps open from the solenoid. These sounds are some models) - Range converted improperly - Order Part Number W10675027 Black - Order Part Number W10655448 Black - This is normal. Order Part Number W10655449 Stainless Steel -...

Installation Guide
Page 2
... can be detected by UL or CSA. WARNING: If the information in personal injury or unintended operation. 2 If a gas leak is the safety alert symbol. RANGE SAFETY Your safety and the safety of others . We have provided many important safety messages in your building. • Immediately call the fire department. - All...
... can be detected by UL or CSA. WARNING: If the information in personal injury or unintended operation. 2 If a gas leak is the safety alert symbol. RANGE SAFETY Your safety and the safety of others . We have provided many important safety messages in your building. • Immediately call the fire department. - All...
Installation Guide
Page 3
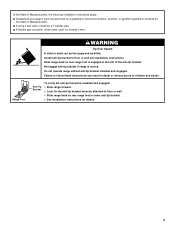
...exceed 3 feet. Anti-Tip Bracket To verify the anti-tip bracket is engaged in death or serious burns to follow these instructions can tip the range and be a T-handle type. ■ A flexible gas connector, when used, must be performed by a qualified or licensed contractor, plumber, or... gasfitter qualified or licensed by the State of the anti-tip bracket. Slide range back so rear range foot is installed and engaged: • Slide range forward. • Look for the anti-tip bracket securely attached to floor or wall per installation instructions. ...
...exceed 3 feet. Anti-Tip Bracket To verify the anti-tip bracket is engaged in death or serious burns to follow these instructions can tip the range and be a T-handle type. ■ A flexible gas connector, when used, must be performed by a qualified or licensed contractor, plumber, or... gasfitter qualified or licensed by the State of the anti-tip bracket. Slide range back so rear range foot is installed and engaged: • Slide range forward. • Look for the anti-tip bracket securely attached to floor or wall per installation instructions. ...
Installation Guide
Page 4
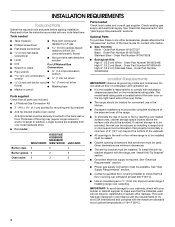
... least 200°F (93°C). ■ Use an insulated pad or ¼" (0.64 cm) plywood under range if installing range over heated surface units, cabinet storage space located above the surface units should be located for mounting anti-tip bracket)...Bracket" section. ■ Grounded electrical supply is the installer's responsibility to comply with your local hardware store. ■ For model: WEG730H0D KSGG700E KSGB900E MGS8880D WEG760H0D JGS1450D Burner caps 5 5 4 Burner grates 2 2 3 Oven racks 2 3 3 Parts needed ■ Tape measure ■ Phillips screwdriver ■...
... least 200°F (93°C). ■ Use an insulated pad or ¼" (0.64 cm) plywood under range if installing range over heated surface units, cabinet storage space located above the surface units should be located for mounting anti-tip bracket)...Bracket" section. ■ Grounded electrical supply is the installer's responsibility to comply with your local hardware store. ■ For model: WEG730H0D KSGG700E KSGB900E MGS8880D WEG760H0D JGS1450D Burner caps 5 5 4 Burner grates 2 2 3 Oven racks 2 3 3 Parts needed ■ Tape measure ■ Phillips screwdriver ■...

Installation Guide
Page 5
...behind the oven door on the top right-hand side of the oven frame) D. 36" (91.4 cm) height to top of this range must conform to the standards listed above. Mobile Home - Product Dimensions This manual covers several models. Follow the instructions in a mobile home,...3280 (formerly the Federal Standard for Manufactured Home Installations, ANSI A225.1/NFPA 501A or with local codes. When such standard is not recommended. *Range can be level after installation. F. 28⁷⁄₈" (73.3 cm) max. Additional Installation Requirements The installation of cooktop edge with ...
...behind the oven door on the top right-hand side of the oven frame) D. 36" (91.4 cm) height to top of this range must conform to the standards listed above. Mobile Home - Product Dimensions This manual covers several models. Follow the instructions in a mobile home,...3280 (formerly the Federal Standard for Manufactured Home Installations, ANSI A225.1/NFPA 501A or with local codes. When such standard is not recommended. *Range can be level after installation. F. 28⁷⁄₈" (73.3 cm) max. Additional Installation Requirements The installation of cooktop edge with ...


