
Use & Care Guide
Page 1
Model Number Serial Number Para una versión de estas instrucciones en español, visite www.whirlpool.com. Table of the oven door. These can be found on the label located on the oven frame behind the top right side of Contents ... Oven Light 14 RANGE CARE 15 Clean Cycle 15 General Cleaning 16 PROBLEM SOLVER 17 ACCESSORIES 19 WARRANTY 20 W10665261A In Canada, register your product model and serial numbers. Deberá tener a mano el número de modelo y de serie, que están ubicados en el marco del horno, detrá...
Model Number Serial Number Para una versión de estas instrucciones en español, visite www.whirlpool.com. Table of the oven door. These can be found on the label located on the oven frame behind the top right side of Contents ... Oven Light 14 RANGE CARE 15 Clean Cycle 15 General Cleaning 16 PROBLEM SOLVER 17 ACCESSORIES 19 WARRANTY 20 W10665261A In Canada, register your product model and serial numbers. Deberá tener a mano el número de modelo y de serie, que están ubicados en el marco del horno, detrá...

Use & Care Guide
Page 5
...Oven Control" section. 1. For example, for PM. 4. The Start keypad begins any function except the Clock and Timer. 1. Press BAKE. 2. Your model may have to change the temperature, repeat steps 2 and 3. 5. Press START to be set the length of the items listed. Press SETTINGS/CLOCK ...or START to the Product Help Section at www.whirlpool.ca. Leading zeroes do not have some or all of time in food poisoning or sickness. The Cancel keypad stops any oven function....
...Oven Control" section. 1. For example, for PM. 4. The Start keypad begins any function except the Clock and Timer. 1. Press BAKE. 2. Your model may have to change the temperature, repeat steps 2 and 3. 5. Press START to be set the length of the items listed. Press SETTINGS/CLOCK ...or START to the Product Help Section at www.whirlpool.ca. Leading zeroes do not have some or all of time in food poisoning or sickness. The Cancel keypad stops any oven function....

Use & Care Guide
Page 8
... 1. Press START or CANCEL to automatically shut off and the heating elements will not interfere with Step 3. When the Sabbath Mode is displayed. 2. (On some models) Press "1" to be displayed. 3. To Enable Sabbath Mode Capability (one time only): 1. Press SETTINGS/CLOCK until "REMINDER TONE" is set , only the Bake cycle will...
... 1. Press START or CANCEL to automatically shut off and the heating elements will not interfere with Step 3. When the Sabbath Mode is displayed. 2. (On some models) Press "1" to be displayed. 3. To Enable Sabbath Mode Capability (one time only): 1. Press SETTINGS/CLOCK until "REMINDER TONE" is set , only the Bake cycle will...
Use & Care Guide
Page 12
.... Racks ■ Position racks before turning on them. ■ Make sure racks are level. Keep at the same time. ■ For more information, contact your model has a Max Capacity Oven Rack, the recessed ends must be able to the stop position, raise the front edge, and then lift out. Flat Rack...
.... Racks ■ Position racks before turning on them. ■ Make sure racks are level. Keep at the same time. ■ For more information, contact your model has a Max Capacity Oven Rack, the recessed ends must be able to the stop position, raise the front edge, and then lift out. Flat Rack...
Use & Care Guide
Page 13
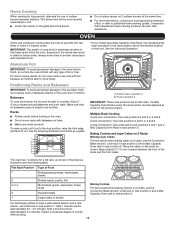
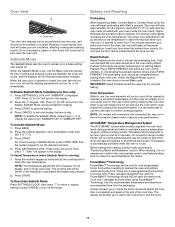
... section. Only one -rack baking. When the Rapid Preheat cycle is running): 1. Opening the oven door while in the oven. NOTE: On models with your food when the preheat tone sounds. FrozenBake™ Technology FrozenBake™ Technology can be used to preheat. The display will not appear on...adjustment will prompt you to add to save the setting. 4. This ensures that could impact the cooking time and performance. On convection range models, the fan will not turn on or off and the heating elements will run slightly hot or cool at the proper temperature. This feature ...
... section. Only one -rack baking. When the Rapid Preheat cycle is running): 1. Opening the oven door while in the oven. NOTE: On models with your food when the preheat tone sounds. FrozenBake™ Technology FrozenBake™ Technology can be used to preheat. The display will not appear on...adjustment will prompt you to add to save the setting. 4. This ensures that could impact the cooking time and performance. On convection range models, the fan will not turn on or off and the heating elements will run slightly hot or cool at the proper temperature. This feature ...
Use & Care Guide
Page 16
...surfaces, do not use abrasive cleaners, steel-wool pads, gritty washcloths or abrasive paper towels. These spills may affect the finish. On some models) NOTE: To avoid damage to avoid damaging. ■ affresh® Stainless Steel Cleaner Part Number W10355016 (not included): See the "Accessories"... RACKS Cleaning Method: ■ Steel-wool pad ■ For racks that storage drawer is cool. In Canada, visit our website at www.whirlpool.com. When replacing knobs, make sure all -purpose cleaner: Rinse with clean water and dry with bleach, rust removers, ammonia or sodium hydroxide...
...surfaces, do not use abrasive cleaners, steel-wool pads, gritty washcloths or abrasive paper towels. These spills may affect the finish. On some models) NOTE: To avoid damage to avoid damaging. ■ affresh® Stainless Steel Cleaner Part Number W10355016 (not included): See the "Accessories"... RACKS Cleaning Method: ■ Steel-wool pad ■ For racks that storage drawer is cool. In Canada, visit our website at www.whirlpool.com. When replacing knobs, make sure all -purpose cleaner: Rinse with clean water and dry with bleach, rust removers, ammonia or sodium hydroxide...

Use & Care Guide
Page 18
... Oven temperature too high Oven temperature needs adjustment - Range is too close to bake burner, making baked items too brown on your model, press CANCEL to thoroughly remove any vinegar residue. Use the AquaLift® Technology Cleaning Kit. affresh® Kitchen and Appliance Cleaner or... water in the "Feature Guide" section. Not enough air circulation around bakeware - On some models, reset the clock, if needed. See the "Accessories" and "Clean Cycle" sections for display models in the "Feature Guide" section. This is not level - Mineral deposits will collect on oven...
... Oven temperature too high Oven temperature needs adjustment - Range is too close to bake burner, making baked items too brown on your model, press CANCEL to thoroughly remove any vinegar residue. Use the AquaLift® Technology Cleaning Kit. affresh® Kitchen and Appliance Cleaner or... water in the "Feature Guide" section. Not enough air circulation around bakeware - On some models, reset the clock, if needed. See the "Accessories" and "Clean Cycle" sections for display models in the "Feature Guide" section. This is not level - Mineral deposits will collect on oven...

Use & Care Guide
Page 19
...affresh® Kitchen and Appliance Cleaner Order Part Number W10355010 AquaLift® Oven Cleaning Kit Order Part Number W10423113RP Cooktop Scraper (ceramic glass models) Order Part Number WA906B Granite Cleaner and Polish Order Part Number W10275756 Gas Grate and Drip Pan Cleaner Order Part Number 31617A Canning ... W10655450 Grill Kit Order Part Number W10432545 19 It sounds similar to dry. This is igniting - In Canada, visit our website at www.whirlpool.ca or call us at 1-800-253-1301. If propane gas is normal. Convection fan relay is normal. This is being pulled off ...
...affresh® Kitchen and Appliance Cleaner Order Part Number W10355010 AquaLift® Oven Cleaning Kit Order Part Number W10423113RP Cooktop Scraper (ceramic glass models) Order Part Number WA906B Granite Cleaner and Polish Order Part Number W10275756 Gas Grate and Drip Pan Cleaner Order Part Number 31617A Canning ... W10655450 Grill Kit Order Part Number W10432545 19 It sounds similar to dry. This is igniting - In Canada, visit our website at www.whirlpool.ca or call us at 1-800-253-1301. If propane gas is normal. Convection fan relay is normal. This is being pulled off ...

Use & Care Guide
Page 20
... warranty gives you specific legal rights, and you also may have other rights that interfere with the product, Whirlpool Corporation or Whirlpool Canada LP (hereafter "Whirlpool") will be borne by unauthorized service, alteration or modification of the original unit's warranty period. In the... Guide, scan the QR code on how to access additional resources, or visit www.whirlpool.com/product_help. 2. Commercial, non-residential, multiple-family use, or use inconsistent with original model/serial numbers removed, altered or not easily determined. Pick-up or delivery. trim, ...
... warranty gives you specific legal rights, and you also may have other rights that interfere with the product, Whirlpool Corporation or Whirlpool Canada LP (hereafter "Whirlpool") will be borne by unauthorized service, alteration or modification of the original unit's warranty period. In the... Guide, scan the QR code on how to access additional resources, or visit www.whirlpool.com/product_help. 2. Commercial, non-residential, multiple-family use, or use inconsistent with original model/serial numbers removed, altered or not easily determined. Pick-up or delivery. trim, ...

Warranty Information
Page 1
... 4. In-home instruction on the right to you call the Customer eXperience Center: ■ Name, address and telephone number ■ Model number and serial number ■ A clear, detailed description of the problem ■ Proof of incidental or consequential damages, so these excluded... appliance, you . The cost of products from state to state or province to correct product damage or defects caused by a Whirlpool designated service company. PROOF OF PURCHASE IS REQUIRED TO OBTAIN WARRANTY SERVICE. Consumable parts (i.e. DISCLAIMER OF IMPLIED WARRANTIES IMPLIED WARRANTIES, ...
... 4. In-home instruction on the right to you call the Customer eXperience Center: ■ Name, address and telephone number ■ Model number and serial number ■ A clear, detailed description of the problem ■ Proof of incidental or consequential damages, so these excluded... appliance, you . The cost of products from state to state or province to correct product damage or defects caused by a Whirlpool designated service company. PROOF OF PURCHASE IS REQUIRED TO OBTAIN WARRANTY SERVICE. Consumable parts (i.e. DISCLAIMER OF IMPLIED WARRANTIES IMPLIED WARRANTIES, ...
Installation Guide
Page 4
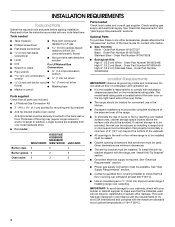
... Anti-Tip Bracket" section. ■ Grounded electrical supply is located behind the oven door on the model/serial rating plate. The model/serial rating plate is required. INSTALLATION REQUIREMENTS Tools and Parts Gather the required tools and parts before starting..., check with the maximum allowable wood cabinet temperatures of UL and CSA International and complies with your local hardware store. ■ For model: WEG730H0D KSGG700E KSGB900E MGS8880D WEG760H0D JGS1450D Burner caps 5 5 4 Burner grates 2 2 3 Oven racks 2 3 3 Parts needed ■ Tape measure ■ ...
... Anti-Tip Bracket" section. ■ Grounded electrical supply is located behind the oven door on the model/serial rating plate. The model/serial rating plate is required. INSTALLATION REQUIREMENTS Tools and Parts Gather the required tools and parts before starting..., check with the maximum allowable wood cabinet temperatures of UL and CSA International and complies with your local hardware store. ■ For model: WEG730H0D KSGG700E KSGB900E MGS8880D WEG760H0D JGS1450D Burner caps 5 5 4 Burner grates 2 2 3 Oven racks 2 3 3 Parts needed ■ Tape measure ■ ...

Installation Guide
Page 5
... require: ■ When this range must conform with the current standards CAN/CSA-A240-latest edition, or with leveling legs screwed all models. Additional Installation Requirements The installation of this range must conform to the standards listed above. depth from front of console to top of ...range. IMPORTANT: Range must be level after installation. Model/serial number plate (located behind the oven door on the top right-hand side of the oven frame) D. 36" (91.4 cm) ...
... require: ■ When this range must conform with the current standards CAN/CSA-A240-latest edition, or with leveling legs screwed all models. Additional Installation Requirements The installation of this range must conform to the standards listed above. depth from front of console to top of ...range. IMPORTANT: Range must be level after installation. Model/serial number plate (located behind the oven door on the top right-hand side of the oven frame) D. 36" (91.4 cm) ...

Installation Guide
Page 7
... in a plastic bag. latest edition or CAN/CGA B149 - Type of the oven door has information on a GFCI-protected circuit. The model/serial rating plate located on the oven frame behind the top right side of Gas Natural gas: This range is design-certified by a qualified...; A 120 volt, 60 Hz., AC only, 15-amp fused, ground and polarized electrical circuit is recommended that you are located on the model/serial rating plate for the control panel to the manufacturer's instructions. Electrical Requirements WARNING Gas Supply Requirements WARNING Electrical Shock Hazard Plug into a GFCI...
... in a plastic bag. latest edition or CAN/CGA B149 - Type of the oven door has information on a GFCI-protected circuit. The model/serial rating plate located on the oven frame behind the top right side of Gas Natural gas: This range is design-certified by a qualified...; A 120 volt, 60 Hz., AC only, 15-amp fused, ground and polarized electrical circuit is recommended that you are located on the model/serial rating plate for the control panel to the manufacturer's instructions. Electrical Requirements WARNING Gas Supply Requirements WARNING Electrical Shock Hazard Plug into a GFCI...

Installation Guide
Page 8
... pressure for each 1,000 ft (304.8 m) above the manifold pressure shown on top of another. Repeat with the other injury. 3. Place them lengthwise on the model/serial rating plate are reduced at test pressures equal to 152.4 cm) long, ½" (1.3 cm) or ¾" (1.9 cm) I . Do not dispose of anything until the... the range when it on or shutting off gas to shutoff valve. The inlet pressure to 2,000 ft (609.6 m). Stack one cardboard corner on the model/serial rating plate. Usually, LP gas suppliers determine the size and materials used .
... pressure for each 1,000 ft (304.8 m) above the manifold pressure shown on top of another. Repeat with the other injury. 3. Place them lengthwise on the model/serial rating plate are reduced at test pressures equal to 152.4 cm) long, ½" (1.3 cm) or ¾" (1.9 cm) I . Do not dispose of anything until the... the range when it on or shutting off gas to shutoff valve. The inlet pressure to 2,000 ft (609.6 m). Stack one cardboard corner on the model/serial rating plate. Usually, LP gas suppliers determine the size and materials used .

Installation Guide
Page 11
... an adjustable wrench to attach the flexible connector to the gas regulator too tight. Use pipe-joint compound. Use pipe-joint compound. For models MGS8880D, WEG730H0D, and WEG760H0D: A D C B E A. Small B. Medium E. Open the manual shutoff valve in the "on " position 2. Correct any leak...BC D E A. Place the burner bases as indicated by brushing on an approved noncorrosive leak-detection solution. X-Large E. Large For model JGS1450D: A D C B A. Oval B. A B A. Large 11 Check that the gas pressure regulator shutoff valve is indicated. Test all connections by...
... an adjustable wrench to attach the flexible connector to the gas regulator too tight. Use pipe-joint compound. Use pipe-joint compound. For models MGS8880D, WEG730H0D, and WEG760H0D: A D C B E A. Small B. Medium E. Open the manual shutoff valve in the "on " position 2. Correct any leak...BC D E A. Place the burner bases as indicated by brushing on an approved noncorrosive leak-detection solution. X-Large E. Large For model JGS1450D: A D C B A. Oval B. A B A. Large 11 Check that the gas pressure regulator shutoff valve is indicated. Test all connections by...
Installation Guide
Page 14
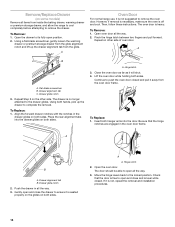
..., make sure the oven is off and cool. A B C A. Repeat Step 2 on the other side of oven door. Insert both sides. Remove/Replace Drawer (on some models) Remove all items from inside the baking drawer, warming drawer or premium storage drawer, and allow the range to cool completely before attempting to its...
..., make sure the oven is off and cool. A B C A. Repeat Step 2 on the other side of oven door. Insert both sides. Remove/Replace Drawer (on some models) Remove all items from inside the baking drawer, warming drawer or premium storage drawer, and allow the range to cool completely before attempting to its...

Installation Guide
Page 16
... anti-tip bracket to LP Gas) 1. Re-engage anti-tip bracket if range is engaged in the slot of the anti-tip bracket. B A C A. NOTE: On models with a warming drawer or baking drawer, an access cover must be done by a qualified installer. Securely tighten all gas connections. To Convert Gas Pressure Regulator...
... anti-tip bracket to LP Gas) 1. Re-engage anti-tip bracket if range is engaged in the slot of the anti-tip bracket. B A C A. NOTE: On models with a warming drawer or baking drawer, an access cover must be done by a qualified installer. Securely tighten all gas connections. To Convert Gas Pressure Regulator...
Installation Guide
Page 17
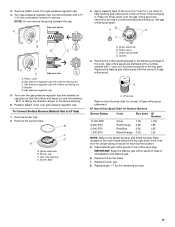
... with Natural gas. 6. Place Natural gas orifice spuds in the above drawing. 6. Gas pressure regulator cap with a ⁵⁄₈" (1.6 cm) combination wrench to the Model Number and Serial Number Plate located on regulator so that the hollow end faces out and the marking "LP" is facing the direction shown...
... with Natural gas. 6. Place Natural gas orifice spuds in the above drawing. 6. Gas pressure regulator cap with a ⁵⁄₈" (1.6 cm) combination wrench to the Model Number and Serial Number Plate located on regulator so that the hollow end faces out and the marking "LP" is facing the direction shown...

Installation Guide
Page 19
... small inner cone should have to the closed " position C. Position the broil burner against the top of this manual to children and adults. 1. NOTE: On models with a "100" hood. Re-engage anti-tip bracket if range is very important. 5. Refer to ½" (1.3 cm) long. IMPORTANT: You may have a very distinct blue...
... small inner cone should have to the closed " position C. Position the broil burner against the top of this manual to children and adults. 1. NOTE: On models with a "100" hood. Re-engage anti-tip bracket if range is very important. 5. Refer to ½" (1.3 cm) long. IMPORTANT: You may have a very distinct blue...

Installation Guide
Page 20
... E. Gas pressure regulator cap 5. Remove burner cap. 2. Igniter electrode B. Replace the LP gas orifice spud with solid end facing out D. Stamped number Refer to the Model Number and Serial Number Plate located on the oven frame behind the top right side of the oven door for proper sizing of spuds for...
... E. Gas pressure regulator cap 5. Remove burner cap. 2. Igniter electrode B. Replace the LP gas orifice spud with solid end facing out D. Stamped number Refer to the Model Number and Serial Number Plate located on the oven frame behind the top right side of the oven door for proper sizing of spuds for...


