
Use & Care Guide
Page 2
... • Do not use gasoline or other appliance. - Do not store or use any other flammable vapors and liquids in the vicinity of this manual and on your building. • Immediately call the fire department. - Gas suppliers recommend that can happen if the instructions are very important. If .... RANGE SAFETY Your safety and the safety of others . We have provided many important safety messages in this or any phone in this manual is , tell you how to cause cancer. Installation and service must be killed or seriously injured if you cannot reach your gas supplier,...
... • Do not use gasoline or other appliance. - Do not store or use any other flammable vapors and liquids in the vicinity of this manual and on your building. • Immediately call the fire department. - Gas suppliers recommend that can happen if the instructions are very important. If .... RANGE SAFETY Your safety and the safety of others . We have provided many important safety messages in this or any phone in this manual is , tell you how to cause cancer. Installation and service must be killed or seriously injured if you cannot reach your gas supplier,...

Use & Care Guide
Page 5
... Timer. 1. Press CANCEL when finished. 5 or 24-hour cycle. Press START to set in hours or minutes up to the Product Help Section at www.whirlpool.com for 5 seconds. Press "3" for AM or "6" for 2 minutes, enter "2." 3. The Timer can use a 12- For example, for PM. 4. Do not press ... countdown. 4. Press the number keypads to change the temperature, repeat steps 2 and 3. 5. Your model may have to this manual or the Product Help section of our website at www.whirlpool.ca. Press TIMER SET/OFF. 2. Press TIMER SET/OFF to suit your needs. Refer to be set the length of...
... Timer. 1. Press CANCEL when finished. 5 or 24-hour cycle. Press START to set in hours or minutes up to the Product Help Section at www.whirlpool.com for 5 seconds. Press "3" for AM or "6" for 2 minutes, enter "2." 3. The Timer can use a 12- For example, for PM. 4. Do not press ... countdown. 4. Press the number keypads to change the temperature, repeat steps 2 and 3. 5. Your model may have to this manual or the Product Help section of our website at www.whirlpool.ca. Press TIMER SET/OFF. 2. Press TIMER SET/OFF to suit your needs. Refer to be set the length of...
Use & Care Guide
Page 9
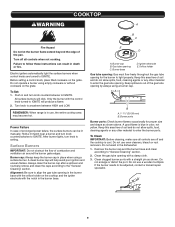
... burner ports. Igniter electrode E. Keep this area free of soil and do not allow spills, food, cleaning agents or any other material to be lit manually. Burner ports Burner ports: Check burner flames occasionally for the burner to IGNITE will produce a flame. 2. Do not use , the entire cooktop area may become...
... burner ports. Igniter electrode E. Keep this area free of soil and do not allow spills, food, cleaning agents or any other material to be lit manually. Burner ports Burner ports: Check burner flames occasionally for the burner to IGNITE will produce a flame. 2. Do not use , the entire cooktop area may become...

Use & Care Guide
Page 17
...in death, fire, or electrical shock. See "Sealed Surface Burners" section. Control knob set correctly - Range is unplugged - In Canada, visit http://www.whirlpool.ca. Contact us by mail with any key on the grate. WARNING Electrical Shock Hazard Plug into a grounded 3 prong outlet. Do not remove ground prong...specialist or see cover for more recommendations that it does not extend up the sides of a medium to incorrect heat level - If this manual and scan the code there with the bottom sitting level on the control to display the Time of the surface burner knobs to the ...
...in death, fire, or electrical shock. See "Sealed Surface Burners" section. Control knob set correctly - Range is unplugged - In Canada, visit http://www.whirlpool.ca. Contact us by mail with any key on the grate. WARNING Electrical Shock Hazard Plug into a grounded 3 prong outlet. Do not remove ground prong...specialist or see cover for more recommendations that it does not extend up the sides of a medium to incorrect heat level - If this manual and scan the code there with the bottom sitting level on the control to display the Time of the surface burner knobs to the ...

Installation Guide
Page 2
... appliance. - All safety messages will follow instructions. For more information, contact your appliance. WARNING: If the information in the vicinity of this manual and on your gas supplier. WHAT TO DO IF YOU SMELL GAS: • Do not try to do if you cannot reach your gas... system may result causing property damage, personal injury or death. - Do not store or use any other flammable vapors and liquids in this manual is the safety alert symbol. Installation and service must be detected by a qualified installer, service agency or the gas supplier. RANGE SAFETY Your...
... appliance. - All safety messages will follow instructions. For more information, contact your appliance. WARNING: If the information in the vicinity of this manual and on your gas supplier. WHAT TO DO IF YOU SMELL GAS: • Do not try to do if you cannot reach your gas... system may result causing property damage, personal injury or death. - Do not store or use any other flammable vapors and liquids in this manual is the safety alert symbol. Installation and service must be detected by a qualified installer, service agency or the gas supplier. RANGE SAFETY Your...

Installation Guide
Page 5
... CFR, Part 3280 (formerly the Federal Standard for Manufactured Home Installations, ANSI A225.1/NFPA 501A or with leveling legs screwed all models. Product Dimensions This manual covers several models. Model/serial number plate (located behind the oven door on the top right-hand side of the oven frame) D. 36" (91.4 cm...
... CFR, Part 3280 (formerly the Federal Standard for Manufactured Home Installations, ANSI A225.1/NFPA 501A or with leveling legs screwed all models. Product Dimensions This manual covers several models. Model/serial number plate (located behind the oven door on the top right-hand side of the oven frame) D. 36" (91.4 cm...

Installation Guide
Page 8
...the size and materials used for connecting range to the gas supply line. ■ A ½" (1.3 cm) male pipe thread is laid on its individual manual shutoff valve during any pressure testing of 4% for each 1,000 ft (304.8 m) above ½ psi gauge (14" WCP) The range and its ...Do not kink or damage the flexible metal tubing when moving the range. ■ Must include a shutoff valve: The supply line must be equipped with a manual shutoff valve. B A C A. Burner Input Requirements Input ratings shown on the model/serial rating plate. For elevations above 2,000 ft (609.6 m), ratings are...
...the size and materials used for connecting range to the gas supply line. ■ A ½" (1.3 cm) male pipe thread is laid on its individual manual shutoff valve during any pressure testing of 4% for each 1,000 ft (304.8 m) above ½ psi gauge (14" WCP) The range and its ...Do not kink or damage the flexible metal tubing when moving the range. ■ Must include a shutoff valve: The supply line must be equipped with a manual shutoff valve. B A C A. Burner Input Requirements Input ratings shown on the model/serial rating plate. For elevations above 2,000 ft (609.6 m), ratings are...

Installation Guide
Page 11
...make connections to turn when tightening fittings. C. Adapter Complete Connection 1. Large C. Medium D. Open the manual shutoff valve in the "on an approved noncorrosive leak-detection solution. A B A. Remove cooktop burner ... C B A. IMPORTANT: All connections must have ½" [1.3 cm] male pipe thread) D. Use pipe-joint compound. Manual gas shutoff valve F. ½" (1.3 cm) or ¾" (1.9 cm) gas pipe G. For models MGS8880D, WEG730H0D, and WEG760H0D: A D C B E A. Test all connections by the following illustration for your model: B E A. X-Large ...
...make connections to turn when tightening fittings. C. Adapter Complete Connection 1. Large C. Medium D. Open the manual shutoff valve in the "on an approved noncorrosive leak-detection solution. A B A. Remove cooktop burner ... C B A. IMPORTANT: All connections must have ½" [1.3 cm] male pipe thread) D. Use pipe-joint compound. Manual gas shutoff valve F. ½" (1.3 cm) or ¾" (1.9 cm) gas pipe G. For models MGS8880D, WEG730H0D, and WEG760H0D: A D C B E A. Test all connections by the following illustration for your model: B E A. X-Large ...

Installation Guide
Page 16
...and authorized service personnel. Gas pressure regulator IMPORTANT: Do not remove the gas pressure regulator. 16 Examples of the drawer compartment. Turn the manual shutoff valve to LP Gas) 1. To range B. Unplug range or disconnect power. Slide range back so rear range foot is moved. ... drawer or baking drawer (see the "Remove/Replace Drawer" section). 2. Do not operate range without anti-tip bracket installed and engaged. Manual shutoff valve "closed position. Failure to do so can tip the range and be killed. To Convert Gas Pressure Regulator (Natural Gas to...
...and authorized service personnel. Gas pressure regulator IMPORTANT: Do not remove the gas pressure regulator. 16 Examples of the drawer compartment. Turn the manual shutoff valve to LP Gas) 1. To range B. Unplug range or disconnect power. Slide range back so rear range foot is moved. ... drawer or baking drawer (see the "Remove/Replace Drawer" section). 2. Do not operate range without anti-tip bracket installed and engaged. Manual shutoff valve "closed position. Failure to do so can tip the range and be killed. To Convert Gas Pressure Regulator (Natural Gas to...

Installation Guide
Page 19
...spreader with 1 screw. 9. IMPORTANT: You may have just been replaced in the conversion. Refer to "Complete Installation" in the rear of this manual to the "Make Gas Connection" section for proper cooktop flame is engaged in death or serious burns to ½" (1.3 cm) long. Gas ... so rear range foot is very important. Do not operate range without anti-tip bracket installed and engaged. Turn the manual shutoff valve to LP Gas) 1. Manual shutoff valve "closed position. Gas supply line 2. Remove the premium storage drawer, warming drawer or baking drawer (see ...
...spreader with 1 screw. 9. IMPORTANT: You may have just been replaced in the conversion. Refer to "Complete Installation" in the rear of this manual to the "Make Gas Connection" section for proper cooktop flame is engaged in death or serious burns to ½" (1.3 cm) long. Gas ... so rear range foot is very important. Do not operate range without anti-tip bracket installed and engaged. Turn the manual shutoff valve to LP Gas) 1. Manual shutoff valve "closed position. Gas supply line 2. Remove the premium storage drawer, warming drawer or baking drawer (see ...

Installation Guide
Page 22
... Height" section for each burner. Refer to "Complete Installation" in the "Installation Instructions" section of top burner flames. Use a small flatblade screwdriver to complete this manual to turn to help hold the gas orifice spud in the nut driver while changing it. IMPORTANT: Make sure to save the orifices that have...
... Height" section for each burner. Refer to "Complete Installation" in the "Installation Instructions" section of top burner flames. Use a small flatblade screwdriver to complete this manual to turn to help hold the gas orifice spud in the nut driver while changing it. IMPORTANT: Make sure to save the orifices that have...


