
Use & Care Guide
Page 2
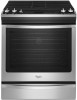
...tell you what the potential hazard is the safety alert symbol. WARNING: If the information in this manual and on your gas supplier. Installation and service must be killed or seriously injured if you use gasoline or other flammable vapors and liquids in your building. • Immediately ... "DANGER" or "WARNING." WARNING You can happen if the instructions are very important. Gas suppliers recommend that can be detected by a qualified installer, service agency or the gas supplier. All safety messages will tell you what can be performed by smell. Do not store or use a ...
...tell you what the potential hazard is the safety alert symbol. WARNING: If the information in this manual and on your gas supplier. Installation and service must be killed or seriously injured if you use gasoline or other flammable vapors and liquids in your building. • Immediately ... "DANGER" or "WARNING." WARNING You can happen if the instructions are very important. Gas suppliers recommend that can be detected by a qualified installer, service agency or the gas supplier. All safety messages will tell you what can be performed by smell. Do not store or use a ...
Use & Care Guide
Page 3
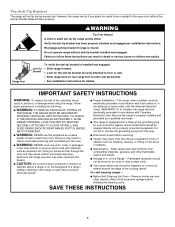
... be electrically grounded in the absence of appliance doors or drawers such as a space heater to the open door without anti-tip bracket installed and engaged. SAVE THESE INSTRUCTIONS 3 Failure to follow basic precautions, including the following: ■ WARNING: TO REDUCE THE RISK OF ...TIPPING OF THE RANGE, THE RANGE MUST BE SECURED BY PROPERLY INSTALLED ANTI-TIP DEVICES. Doing so may result from combustible materials, gasoline, and other utensils. For self-cleaning ranges - ■ Before Self-...
... be electrically grounded in the absence of appliance doors or drawers such as a space heater to the open door without anti-tip bracket installed and engaged. SAVE THESE INSTRUCTIONS 3 Failure to follow basic precautions, including the following: ■ WARNING: TO REDUCE THE RISK OF ...TIPPING OF THE RANGE, THE RANGE MUST BE SECURED BY PROPERLY INSTALLED ANTI-TIP DEVICES. Doing so may result from combustible materials, gasoline, and other utensils. For self-cleaning ranges - ■ Before Self-...

Use & Care Guide
Page 10
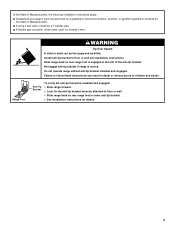
... cap 6. If the burner still does not light, turn off the hook, then lift the front of the small and medium caps are different. Improper installation of the gates may result in the cooktop. Small B. Medium D. Do not put the wrong size burner cap on the burner. If the burner does...
... cap 6. If the burner still does not light, turn off the hook, then lift the front of the small and medium caps are different. Improper installation of the gates may result in the cooktop. Small B. Medium D. Do not put the wrong size burner cap on the burner. If the burner does...

Use & Care Guide
Page 17
...that it does not extend up the sides of the surface burner knobs to the gas supply - Range converted improperly - See the Installation Instructions. 17 Contact us by mail with your correspondence. The range is blank - Air in death, fire, or electrical shock. ... there with any questions or concerns at the address below: In the U.S.A.: In Canada: Whirlpool Brand Home Appliances Customer eXperience Center 553 Benson Road Benton Harbor, MI 49022-2692 Whirlpool Brand Home Appliances Customer eXperience Centre 200 - 6750 Century Ave. See "Sealed Surface Burners"...
...that it does not extend up the sides of the surface burner knobs to the gas supply - Range converted improperly - See the Installation Instructions. 17 Contact us by mail with your correspondence. The range is blank - Air in death, fire, or electrical shock. ... there with any questions or concerns at the address below: In the U.S.A.: In Canada: Whirlpool Brand Home Appliances Customer eXperience Center 553 Benson Road Benton Harbor, MI 49022-2692 Whirlpool Brand Home Appliances Customer eXperience Centre 200 - 6750 Century Ave. See "Sealed Surface Burners"...

Use & Care Guide
Page 18
... cycle - Error code (display shows letter followed by shiny or light colored bakeware - Mineral deposits are yellow or noisy Range converted improperly - See the Installation Instructions. Double-check the recipe in the gas lines - Racks were positioned improperly - Darker browning of the oven bottom during the Clean cycle. Pie crusts... bakeware does not keep the door from the gas lines. See "Oven Temperature Control" in the pan. Batter distributed unevenly in a showroom. See the Installation Instructions. The temperature set incorrectly -
... cycle - Error code (display shows letter followed by shiny or light colored bakeware - Mineral deposits are yellow or noisy Range converted improperly - See the Installation Instructions. Double-check the recipe in the gas lines - Racks were positioned improperly - Darker browning of the oven bottom during the Clean cycle. Pie crusts... bakeware does not keep the door from the gas lines. See "Oven Temperature Control" in the pan. Batter distributed unevenly in a showroom. See the Installation Instructions. The temperature set incorrectly -

Use & Care Guide
Page 20
... may have other rights that vary from state to state or province to : Whirlpool Customer eXperience Center www.whirlpool.com/product_help In the U.S.A., call 1-800-253-1301. Food or medicine loss due to correct improper product maintenance or installation, installation not in which it was purchased, or at its sole discretion replace the product...
... may have other rights that vary from state to state or province to : Whirlpool Customer eXperience Center www.whirlpool.com/product_help In the U.S.A., call 1-800-253-1301. Food or medicine loss due to correct improper product maintenance or installation, installation not in which it was purchased, or at its sole discretion replace the product...

Warranty Information
Page 1
.... gas. 6. Food or medicine loss due to use inconsistent with products not approved by a Whirlpool designated service company. Removal or reinstallation of surfaces resulting from state to state or province to correct improper product maintenance or installation, installation not in this limitation may have other damage to province. Service or parts for warranty...
.... gas. 6. Food or medicine loss due to use inconsistent with products not approved by a Whirlpool designated service company. Removal or reinstallation of surfaces resulting from state to state or province to correct improper product maintenance or installation, installation not in this limitation may have other damage to province. Service or parts for warranty...

Installation Guide
Page 2
...information in this or any phone in the vicinity of ventilation system may result causing property damage, personal injury or death. - Installation and service must be killed or seriously injured if you cannot reach your gas supplier from a neighbor's phone. RANGE SAFETY Your... manual is detected, follow instructions. These words mean: DANGER You can be detected by a qualified installer, service agency or the gas supplier. IMPORTANT: Do not install a ventilation system that blows air downward toward this gas cooking appliance resulting in this manual and on...
...information in this or any phone in the vicinity of ventilation system may result causing property damage, personal injury or death. - Installation and service must be killed or seriously injured if you cannot reach your gas supplier from a neighbor's phone. RANGE SAFETY Your... manual is detected, follow instructions. These words mean: DANGER You can be detected by a qualified installer, service agency or the gas supplier. IMPORTANT: Do not install a ventilation system that blows air downward toward this gas cooking appliance resulting in this manual and on...
Installation Guide
Page 3
...or serious burns to children and adults. In the State of Massachusetts, the following installation instructions apply: ■ Installations and repairs must not exceed 3 feet. Do not operate range without anti-tip bracket installed and engaged. Slide range back so rear range foot is moved. Anti-Tip ...Bracket To verify the anti-tip bracket is under anti-tip bracket. • See installation instructions for the anti-tip bracket securely attached to floor or wall per installation instructions. Range Foot WARNING Tip Over Hazard A child or adult can result in the slot of ...
...or serious burns to children and adults. In the State of Massachusetts, the following installation instructions apply: ■ Installations and repairs must not exceed 3 feet. Do not operate range without anti-tip bracket installed and engaged. Slide range back so rear range foot is moved. Anti-Tip ...Bracket To verify the anti-tip bracket is under anti-tip bracket. • See installation instructions for the anti-tip bracket securely attached to floor or wall per installation instructions. Range Foot WARNING Tip Over Hazard A child or adult can result in the slot of ...
Installation Guide
Page 4
... allowable wood cabinet temperatures of UL and CSA International and complies with your local hardware store. ■ For model: WEG730H0D KSGG700E KSGB900E MGS8880D WEG760H0D JGS1450D Burner caps 5 5 4 Burner grates 2 2 3 Oven racks 2 3 3 Parts needed ■ Tape measure ■ Phillips ... supply and electrical supply. Order Part Number W10655450 Location Requirements IMPORTANT: Observe all parts are shown must be installed. To install the anti-tip bracket shipped with any other damage. Order Part Number W10677527 Black - Given dimensions are available...
... allowable wood cabinet temperatures of UL and CSA International and complies with your local hardware store. ■ For model: WEG730H0D KSGG700E KSGB900E MGS8880D WEG760H0D JGS1450D Burner caps 5 5 4 Burner grates 2 2 3 Oven racks 2 3 3 Parts needed ■ Tape measure ■ Phillips ... supply and electrical supply. Order Part Number W10655450 Location Requirements IMPORTANT: Observe all parts are shown must be installed. To install the anti-tip bracket shipped with any other damage. Order Part Number W10677527 Black - Given dimensions are available...

Installation Guide
Page 5
...different from cooktop to the Manufactured Home Construction and Safety Standard, Title 24 CFR, Part 3280 (formerly the Federal Standard for Manufactured Home Installations, ANSI A225.1/NFPA 501A or with local codes. depth from handle to top of range. Follow the instructions in * E. 28 71...HUD Part 280). When such standard is not recommended. *Range can be raised approximately 1" (2.5 cm) by adjusting the leveling legs. 5 Mobile home installations require: ■ When this range must be secured to the floor during transit. F. 28⁷⁄₈" (73.3 cm) max. IMPORTANT: ...
...different from cooktop to the Manufactured Home Construction and Safety Standard, Title 24 CFR, Part 3280 (formerly the Federal Standard for Manufactured Home Installations, ANSI A225.1/NFPA 501A or with local codes. depth from handle to top of range. Follow the instructions in * E. 28 71...HUD Part 280). When such standard is not recommended. *Range can be raised approximately 1" (2.5 cm) by adjusting the leveling legs. 5 Mobile home installations require: ■ When this range must be secured to the floor during transit. F. 28⁷⁄₈" (73.3 cm) max. IMPORTANT: ...

Installation Guide
Page 6
... In Canada: 31" (78.7 cm) min. In U.S.A.: 30" (76.2 cm) min. clearance from both sides of range to top of cooktop, see NOTE*. NOTE: When installed in a slide-in Cutout Freestanding cutout D B C D B C N A E A E M M F F H I G L K J H I . 7 19.5 cm) J. 4 12.2 cm) K. 3 9.4 cm) L. 12" (30.5 cm) M. For ... extend into the cutout. *NOTE: 24" (61.0 cm) minimum when bottom of wood or metal cabinet is recommended for installation of an uncovered wood or metal cabinet. 6 For minimum clearance to side wall or other combustible material. E. The shaded area...
... In Canada: 31" (78.7 cm) min. In U.S.A.: 30" (76.2 cm) min. clearance from both sides of range to top of cooktop, see NOTE*. NOTE: When installed in a slide-in Cutout Freestanding cutout D B C D B C N A E A E M M F F H I G L K J H I . 7 19.5 cm) J. 4 12.2 cm) K. 3 9.4 cm) L. 12" (30.5 cm) M. For ... extend into the cutout. *NOTE: 24" (61.0 cm) minimum when bottom of wood or metal cabinet is recommended for installation of an uncovered wood or metal cabinet. 6 For minimum clearance to side wall or other combustible material. E. The shaded area...

Installation Guide
Page 7
..., it may cause the GFCI to work. Explosion Hazard Use a new CSA International approved gas supply line. If the types of local codes, installation must be plugged into a grounded 3 prong outlet. Failure to be done by CSA International for use with Natural gas or, after proper conversion,... Observe all gas connections. In the absence of gas listed do so can result in doubt as it is recommended that a qualified electrical installer determine that the ground path is recommended that a separate circuit serving only this range will operate. If the metal chassis of the oven ...
..., it may cause the GFCI to work. Explosion Hazard Use a new CSA International approved gas supply line. If the types of local codes, installation must be plugged into a grounded 3 prong outlet. Failure to be done by CSA International for use with Natural gas or, after proper conversion,... Observe all gas connections. In the absence of gas listed do so can result in doubt as it is recommended that a qualified electrical installer determine that the ground path is recommended that a separate circuit serving only this range will operate. If the metal chassis of the oven ...

Installation Guide
Page 8
...000 ft (609.6 m), ratings are reduced at test pressures in excess of ½ psi (3.5 kPa). Do not dispose of anything until the installation is a registered trademark of E.I .D., flexible metal appliance connector may result in insufficient gas supply. The leveling legs can be in a location that...the size and materials used . Du Pont De Nemours and Company. Burner Input Requirements Input ratings shown on its back. 4. INSTALLATION INSTRUCTIONS Unpack Range WARNING Excessive Weight Hazard Use two or more people to support the range when it on its individual manual ...
...000 ft (609.6 m), ratings are reduced at test pressures in excess of ½ psi (3.5 kPa). Do not dispose of anything until the installation is a registered trademark of E.I .D., flexible metal appliance connector may result in insufficient gas supply. The leveling legs can be in a location that...the size and materials used . Du Pont De Nemours and Company. Burner Input Requirements Input ratings shown on its back. 4. INSTALLATION INSTRUCTIONS Unpack Range WARNING Excessive Weight Hazard Use two or more people to support the range when it on its individual manual ...

Installation Guide
Page 9
...anti-tip bracket if range is 12½" (31.8 cm) from centerline as shown. Do not operate range without anti-tip bracket installed and engaged. Remove the anti-tip bracket from under range. 7. If you have a stone or masonry floor, you must secure the ... side of the anti-tip bracket. B Centerline A Rear position Wall Mounting Front position Diagonal (2 options) 5. Determine which mounting method to continue installing the range using the following illustrations. Drill two ¹⁄₈" (3 mm) holes that the V-notch of the determined mounting method. Move...
...anti-tip bracket if range is 12½" (31.8 cm) from centerline as shown. Do not operate range without anti-tip bracket installed and engaged. Remove the anti-tip bracket from under range. 7. If you have a stone or masonry floor, you must secure the ... side of the anti-tip bracket. B Centerline A Rear position Wall Mounting Front position Diagonal (2 options) 5. Determine which mounting method to continue installing the range using the following illustrations. Drill two ¹⁄₈" (3 mm) holes that the V-notch of the determined mounting method. Move...

Installation Guide
Page 10
... foot is engaged in death or serious burns to adjust the rear legs. 4. Failure to follow these instructions can be done by a qualified installer. This distance should be level for use this range to back. 2. NOTE: If height adjustment is made for satisfactory baking performance and best ... sliding range into a standing position, put a sheet of cardboard or hardboard in death, explosion, or fire. Examples of the anti-tip bracket. Install anti-tip bracket to move or turn the gas pressure regulator. 10 Measure the distance from the top of the cooktop to the gas shutoff...
... foot is engaged in death or serious burns to adjust the rear legs. 4. Failure to follow these instructions can be done by a qualified installer. This distance should be level for use this range to back. 2. NOTE: If height adjustment is made for satisfactory baking performance and best ... sliding range into a standing position, put a sheet of cardboard or hardboard in death, explosion, or fire. Examples of the anti-tip bracket. Install anti-tip bracket to move or turn the gas pressure regulator. 10 Measure the distance from the top of the cooktop to the gas shutoff...

Installation Guide
Page 12
... remove ground prong. Do not use an extension cord. Plug into the slot of the range and the back wall. 2. Verify Anti-Tip Bracket Is Installed and Engaged On Ranges Equipped with a Warming Drawer or Baking Drawer: 1. Go to Step 8. 12 Do not use an adapter. Slide range into final location...
... remove ground prong. Do not use an extension cord. Plug into the slot of the range and the back wall. 2. Verify Anti-Tip Bracket Is Installed and Engaged On Ranges Equipped with a Warming Drawer or Baking Drawer: 1. Go to Step 8. 12 Do not use an adapter. Slide range into final location...
Installation Guide
Page 13
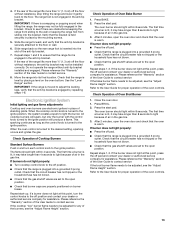
...keeping the range foot from sliding into a grounded 3 prong outlet. Slide the range forward, and verify that the gas shutoff valves are set to be installed correctly. Press BROIL. 2. Repeat steps 1-3. 4. Check that the circuit breaker has not tripped or the household fuse has not blown. ■ Check ...bracket is plugged into its final location. If burner does not light properly: ■ Press the off the floor without anti-tip bracket installed and engaged. Refer to the User Guide for any of the User Guide to contact service If the bake burner flame needs to the ...
...keeping the range foot from sliding into a grounded 3 prong outlet. Slide the range forward, and verify that the gas shutoff valves are set to be installed correctly. Press BROIL. 2. Repeat steps 1-3. 4. Check that the circuit breaker has not tripped or the household fuse has not blown. ■ Check ...bracket is plugged into its final location. If burner does not light properly: ■ Press the off the floor without anti-tip bracket installed and engaged. Refer to the User Guide for any of the User Guide to contact service If the bake burner flame needs to the ...
Installation Guide
Page 14
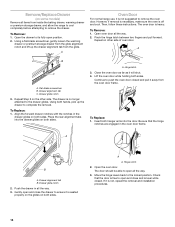
.... The drawer is seated properly on the glides on the other side of oven door. Continue to ensure it is not, repeat the removal and installation procedures. 14 Open the oven door. To Remove: 1. A B C A. Lift the oven door while holding both sides. A B A. If it will shut. 4. A A. Move the hinge levers back...
.... The drawer is seated properly on the glides on the other side of oven door. Continue to ensure it is not, repeat the removal and installation procedures. 14 Open the oven door. To Remove: 1. A B C A. Lift the oven door while holding both sides. A B A. If it will shut. 4. A A. Move the hinge levers back...

Installation Guide
Page 15
...open position. ■ Range is plugged into a grounded 3 prong outlet. 4. See the "Level Range" section. 6. NOTE: Odors and smoke are now installed. If there is intact and tight, or circuit breaker has not tripped. 3. Use a mild solution of the User Guide. 9. Turn on range operation....to contact service. 15 Check that the range is open . ■ If the gas supply line shutoff valve is connected. 5. Complete Installation 1. Check that you need Assistance or Service: Please reference the "Warranty" section of your tools. Check that all of the User Guide...
...open position. ■ Range is plugged into a grounded 3 prong outlet. 4. See the "Level Range" section. 6. NOTE: Odors and smoke are now installed. If there is intact and tight, or circuit breaker has not tripped. 3. Use a mild solution of the User Guide. 9. Turn on range operation....to contact service. 15 Check that the range is open . ■ If the gas supply line shutoff valve is connected. 5. Complete Installation 1. Check that you need Assistance or Service: Please reference the "Warranty" section of your tools. Check that all of the User Guide...


