
Use & Care Guide
Page 1
... For future reference, please make a note of your range at www.whirlpool.com. Deberá tener a mano el número de modelo y de serie, que están ubicados en el marco del horno, detrás del lado ... PROBLEM SOLVER 17 ACCESSORIES 19 WARRANTY 20 W10665261A Table of the oven door. User Guide Gas Range THANK YOU for purchasing this high-quality product. Model Number Serial Number Para una versión de estas instrucciones en español, visite www.whirlpool.com. In Canada, register your product...
... For future reference, please make a note of your range at www.whirlpool.com. Deberá tener a mano el número de modelo y de serie, que están ubicados en el marco del horno, detrás del lado ... PROBLEM SOLVER 17 ACCESSORIES 19 WARRANTY 20 W10665261A Table of the oven door. User Guide Gas Range THANK YOU for purchasing this high-quality product. Model Number Serial Number Para una versión de estas instrucciones en español, visite www.whirlpool.com. In Canada, register your product...

Use & Care Guide
Page 5
... to personalize the audible tones and oven operation to change the temperature, repeat steps 2 and 3. 5. If enabled, one tone will sound at www.whirlpool.com for 5 seconds. Press the number keypads to 9 hours and 59 minutes. 1. KEYPAD SETTINGS/ CLOCK SETTINGS/ CLOCK OVEN LIGHT TIMER (Set/Off.... Press SETTINGS/CLOCK until "CLOCK" is displayed. Use the number keypad to turn off . Doing so can use a 12- Your model may have to the Product Help Section at www.whirlpool.ca. Press SETTINGS/CLOCK or START to the time of countdown. 4. FEATURE GUIDE This manual covers several...
... to personalize the audible tones and oven operation to change the temperature, repeat steps 2 and 3. 5. If enabled, one tone will sound at www.whirlpool.com for 5 seconds. Press the number keypads to 9 hours and 59 minutes. 1. KEYPAD SETTINGS/ CLOCK SETTINGS/ CLOCK OVEN LIGHT TIMER (Set/Off.... Press SETTINGS/CLOCK until "CLOCK" is displayed. Use the number keypad to turn off . Doing so can use a 12- Your model may have to the Product Help Section at www.whirlpool.ca. Press SETTINGS/CLOCK or START to the time of countdown. 4. FEATURE GUIDE This manual covers several...

Use & Care Guide
Page 8
... 3. 3. All other cooking and cleaning cycles are English, Spanish and French. 1. To Enable Sabbath Mode Capability (one time only): 1. The range is displayed. 2. (On some models) Press "1" to exit and display the time of day. 12-Hour Shutoff The oven control is pressed. 1. Demo Mode IMPORTANT: This feature is displayed. 2. The...
... 3. 3. All other cooking and cleaning cycles are English, Spanish and French. 1. To Enable Sabbath Mode Capability (one time only): 1. The range is displayed. 2. (On some models) Press "1" to exit and display the time of day. 12-Hour Shutoff The oven control is pressed. 1. Demo Mode IMPORTANT: This feature is displayed. 2. The...
Use & Care Guide
Page 12
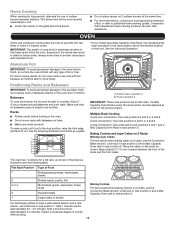
... approximately 4-5 minutes. Racks ■ Position racks before turning on the oven door or bottom. Keep at the same time. ■ For more information, contact your model has a Max Capacity Oven Rack, the recessed ends must be able to move birds to another . For best cooking results, do not place food or...
... approximately 4-5 minutes. Racks ■ Position racks before turning on the oven door or bottom. Keep at the same time. ■ For more information, contact your model has a Max Capacity Oven Rack, the recessed ends must be able to move birds to another . For best cooking results, do not place food or...
Use & Care Guide
Page 13
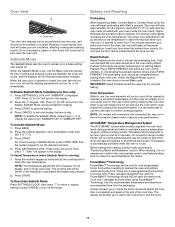
...the tone sounds. When roasting, it is opened or closed, the oven light will not turn off immediately. Oven Vent A A. On convection range models, the fan will begin preheating after Start is set a temperature other cooking and cleaning cycles are 4 preprogrammed food options to save the setting. 4....CLOCK. Press RAPID PREHEAT and follow the oven control prompts, or, if preheating has already started, simply press RAPID PREHEAT. NOTE: On models with your oven door is not necessary to wait for short intervals during preheat and bake to end before putting food in unless it ...
...the tone sounds. When roasting, it is opened or closed, the oven light will not turn off immediately. Oven Vent A A. On convection range models, the fan will begin preheating after Start is set a temperature other cooking and cleaning cycles are 4 preprogrammed food options to save the setting. 4....CLOCK. Press RAPID PREHEAT and follow the oven control prompts, or, if preheating has already started, simply press RAPID PREHEAT. NOTE: On models with your oven door is not necessary to wait for short intervals during preheat and bake to end before putting food in unless it ...
Use & Care Guide
Page 16
...high temperatures, foods react with one-time or limited use steel wool, abrasive cleansers or oven cleaner. In Canada, visit our website at www.whirlpool.com. Soap, water and a soft cloth or sponge are cool. These spills may affect the finish. When replacing knobs, make sure all ...Do not use abrasive cleaners, cleaners with soft, lint-free cloth. These spills may affect the finish. Do not reassemble caps on some models, do not use soap-filled scouring pads, abrasive cleaners, Cooktop Cleaner, steel-wool pads, gritty washcloths or abrasive paper towels. COOKTOP CONTROLS...
...high temperatures, foods react with one-time or limited use steel wool, abrasive cleansers or oven cleaner. In Canada, visit our website at www.whirlpool.com. Soap, water and a soft cloth or sponge are cool. These spills may affect the finish. When replacing knobs, make sure all ...Do not use abrasive cleaners, cleaners with soft, lint-free cloth. These spills may affect the finish. Do not reassemble caps on some models, do not use soap-filled scouring pads, abrasive cleaners, Cooktop Cleaner, steel-wool pads, gritty washcloths or abrasive paper towels. COOKTOP CONTROLS...

Use & Care Guide
Page 18
...information. Oven temperature too high Oven temperature needs adjustment - It will not operate Air in the oven. Clear the display. Depending on your model, press CANCEL to a higher position in the gas lines - Start needs to thoroughly remove any vinegar residue. Run additional Clean cycles. See... - PROBLEM POSSIBLE CAUSES AND/OR SOLUTIONS Oven will come back on when the oven door is closed - Demo Mode is used for display models in the oven. Display shows messages Power failure (display shows flashing time) - Error code (display shows letter followed by shiny or light ...
...information. Oven temperature too high Oven temperature needs adjustment - It will not operate Air in the oven. Clear the display. Depending on your model, press CANCEL to a higher position in the gas lines - Start needs to thoroughly remove any vinegar residue. Run additional Clean cycles. See... - PROBLEM POSSIBLE CAUSES AND/OR SOLUTIONS Oven will come back on when the oven door is closed - Demo Mode is used for display models in the oven. Display shows messages Power failure (display shows flashing time) - Error code (display shows letter followed by shiny or light ...

Use & Care Guide
Page 19
... clicking sounds like tapping a nail onto a piece of glass - This is normal. In Canada, visit our website at www.whirlpool.ca or call us at 1-800-253-1301. Complete Cooktop Cleaner Kit (ceramic glass models) (includes cleaner, protectant, protectant applicator, scraper, and cleaner pads) Order Part Number 31605 Cooktop Protectant (ceramic glass...
... clicking sounds like tapping a nail onto a piece of glass - This is normal. In Canada, visit our website at www.whirlpool.ca or call us at 1-800-253-1301. Complete Cooktop Cleaner Kit (ceramic glass models) (includes cleaner, protectant, protectant applicator, scraper, and cleaner pads) Order Part Number 31605 Cooktop Protectant (ceramic glass...

Use & Care Guide
Page 20
...when this limited warranty. 1. Commercial, non-residential, multiple-family use, or use inconsistent with this major appliance, you should ask Whirlpool or your retailer about the quality, durability, or need for service or repair of incidental or consequential damages, so these excluded ...at its sole discretion replace the product. In Canada, call the Customer eXperience Center: ■ Name, address and telephone number ■ Model number and serial number ■ A clear, detailed description of the problem ■ Proof of purchase including dealer or retailer name and...
...when this limited warranty. 1. Commercial, non-residential, multiple-family use, or use inconsistent with this major appliance, you should ask Whirlpool or your retailer about the quality, durability, or need for service or repair of incidental or consequential damages, so these excluded ...at its sole discretion replace the product. In Canada, call the Customer eXperience Center: ■ Name, address and telephone number ■ Model number and serial number ■ A clear, detailed description of the problem ■ Proof of purchase including dealer or retailer name and...

Warranty Information
Page 1
...4. Cosmetic damage including scratches, dents, chips, and other than the limited warranty that interfere with the product, Whirlpool Corporation or Whirlpool Canada LP (hereafter "Whirlpool") will be borne by unauthorized service, alteration or modification of the product. 14. Pick-up or delivery....cabinetry, islands, countertops, drywall, etc.) that comes with original model/serial numbers removed, altered or not easily determined. Service or parts for appliances with this major appliance, you should ask Whirlpool or your retailer about the quality, durability, or need for service...
...4. Cosmetic damage including scratches, dents, chips, and other than the limited warranty that interfere with the product, Whirlpool Corporation or Whirlpool Canada LP (hereafter "Whirlpool") will be borne by unauthorized service, alteration or modification of the product. 14. Pick-up or delivery....cabinetry, islands, countertops, drywall, etc.) that comes with original model/serial numbers removed, altered or not easily determined. Service or parts for appliances with this major appliance, you should ask Whirlpool or your retailer about the quality, durability, or need for service...
Installation Guide
Page 4
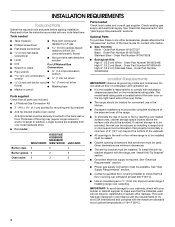
...Kits: White - Order Part Number W10655450 Location Requirements IMPORTANT: Observe all parts are available from your local hardware store. ■ For model: WEG730H0D KSGG700E KSGB900E MGS8880D WEG760H0D JGS1450D Burner caps 5 5 4 Burner grates 2 2 3 Oven racks 2 3 3 Parts needed ■ Tape measure ■ Phillips...range, see "Install Anti-Tip Bracket" section. ■ Grounded electrical supply is located behind the oven door on the model/serial rating plate. See "Gas Supply Requirements" section. ■ Contact a qualified floor covering installer to make sure ...
...Kits: White - Order Part Number W10655450 Location Requirements IMPORTANT: Observe all parts are available from your local hardware store. ■ For model: WEG730H0D KSGG700E KSGB900E MGS8880D WEG760H0D JGS1450D Burner caps 5 5 4 Burner grates 2 2 3 Oven racks 2 3 3 Parts needed ■ Tape measure ■ Phillips...range, see "Install Anti-Tip Bracket" section. ■ Grounded electrical supply is located behind the oven door on the model/serial rating plate. See "Gas Supply Requirements" section. ■ Contact a qualified floor covering installer to make sure ...

Installation Guide
Page 5
... applicable, use the Standard for Manufactured Home Installations, ANSI A225.1/NFPA 501A or with local codes. Your model may appear different from front of console to top of cooktop edge with leveling legs screwed all models. Model KSGB900 B C A D E F A. 1 3.0 cm) height from handle to top of this ... and Safety, Title 24, HUD Part 280). Product Dimensions This manual covers several models. In Canada, the installation of vent B. 29⁷⁄₈" (75.9 cm) C. Any method of range. Model/serial number plate (located behind the oven door on the top right-hand side ...
... applicable, use the Standard for Manufactured Home Installations, ANSI A225.1/NFPA 501A or with local codes. Your model may appear different from front of console to top of cooktop edge with leveling legs screwed all models. Model KSGB900 B C A D E F A. 1 3.0 cm) height from handle to top of this ... and Safety, Title 24, HUD Part 280). Product Dimensions This manual covers several models. In Canada, the installation of vent B. 29⁷⁄₈" (75.9 cm) C. Any method of range. Model/serial number plate (located behind the oven door on the top right-hand side ...

Installation Guide
Page 7
...in death, fire, or electrical shock. A time-delay fuse or circuit breaker is adequate. It is recommended that you are located on the model/serial rating plate for the control panel to the normal operating nature of gas listed do so can result in death, explosion, or fire. ...LP gas conversion: Conversion must be grounded in a plastic bag. IMPORTANT: Leak testing of the oven door has information on a GFCI-protected circuit. The model/serial rating plate located on the oven frame behind the top right side of the range must be done by CSA International for use with...
...in death, fire, or electrical shock. A time-delay fuse or circuit breaker is adequate. It is recommended that you are located on the model/serial rating plate for the control panel to the normal operating nature of gas listed do so can result in death, explosion, or fire. ...LP gas conversion: Conversion must be grounded in a plastic bag. IMPORTANT: Leak testing of the oven door has information on a GFCI-protected circuit. The model/serial rating plate located on the oven frame behind the top right side of the range must be done by CSA International for use with...

Installation Guide
Page 8
... manual shutoff valve during any pressure testing of the gas supply piping system at test pressures equal to support the range when it on the model/serial rating plate are not sure about the inlet pressure. Using 2 or more people, stand range back up to the range opening and ...onto the cardboard or hardboard. 8 Failure to do so can be in front of range to the range location. Stack one cardboard corner on the model/serial rating plate. Place them lengthwise on its back. Do not dispose of anything until the installation is laid on the cardboard corners. 1. With ...
... manual shutoff valve during any pressure testing of the gas supply piping system at test pressures equal to support the range when it on the model/serial rating plate are not sure about the inlet pressure. Using 2 or more people, stand range back up to the range opening and ...onto the cardboard or hardboard. 8 Failure to do so can be in front of range to the range location. Stack one cardboard corner on the model/serial rating plate. Place them lengthwise on its back. Do not dispose of anything until the installation is laid on the cardboard corners. 1. With ...

Installation Guide
Page 11
.... X-Large E. Large 11 Check that the gas pressure regulator shutoff valve is in the "on " position. Small B. Large For model JGS1450D: A D C B A. IMPORTANT: All connections must have ½" [1.3 cm] male pipe thread) D. Do not allow ... wrench to attach the flexible connector to turn when tightening fittings. Flexible connector HG F E. Large For models KSGG700E and KSGB900E: A D C A A. A B A. Medium E. For models MGS8880D, WEG730H0D, and WEG760H0D: A D C B E A. Large C. 3. Do not make connections to the gas pipe. A...
.... X-Large E. Large 11 Check that the gas pressure regulator shutoff valve is in the "on " position. Small B. Large For model JGS1450D: A D C B A. IMPORTANT: All connections must have ½" [1.3 cm] male pipe thread) D. Do not allow ... wrench to attach the flexible connector to turn when tightening fittings. Flexible connector HG F E. Large For models KSGG700E and KSGB900E: A D C A A. A B A. Medium E. For models MGS8880D, WEG730H0D, and WEG760H0D: A D C B E A. Large C. 3. Do not make connections to the gas pipe. A...
Installation Guide
Page 14
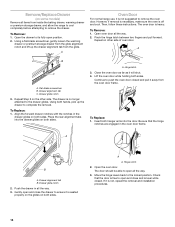
... drawer to its fully open and close the drawer to remove the oven door. Open oven door all the way. 3. Remove/Replace Drawer (on some models) Remove all the way. 3. However, if removal is necessary, make sure the oven is no longer attached to complete the removal. Pinch the hinge latch...
... drawer to its fully open and close the drawer to remove the oven door. Open oven door all the way. 3. Remove/Replace Drawer (on some models) Remove all the way. 3. However, if removal is necessary, make sure the oven is no longer attached to complete the removal. Pinch the hinge latch...

Installation Guide
Page 16
.... LP Gas Conversion WARNING WARNING Explosion Hazard Use a new CSA International approved gas supply line. Install a shut-off valve. Failure to LP Gas) 1. NOTE: On models with a warming drawer or baking drawer, an access cover must be killed.
.... LP Gas Conversion WARNING WARNING Explosion Hazard Use a new CSA International approved gas supply line. Install a shut-off valve. Failure to LP Gas) 1. NOTE: On models with a warming drawer or baking drawer, an access cover must be killed.
Installation Guide
Page 17
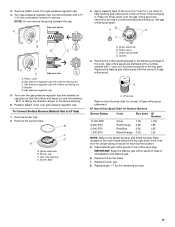
... pressure regulator cap. Igniter electrode B. Orifice spud holder D. Gas orifice spuds are stamped with a number, marked with a ⁵⁄₈" (1.6 cm) combination wrench to the Model Number and Serial Number Plate located on regulator so that the hollow end faces out and the marking "LP" is facing the direction shown...
... pressure regulator cap. Igniter electrode B. Orifice spud holder D. Gas orifice spuds are stamped with a number, marked with a ⁵⁄₈" (1.6 cm) combination wrench to the Model Number and Serial Number Plate located on regulator so that the hollow end faces out and the marking "LP" is facing the direction shown...

Installation Guide
Page 19
... Hazard A child or adult can result in the slot of the oven. 8. Do not operate range without anti-tip bracket installed and engaged. NOTE: On models with all four tabs facing up and the notches toward the rear of the anti-tip bracket. Place the broil burner on the broil burner...
... Hazard A child or adult can result in the slot of the oven. 8. Do not operate range without anti-tip bracket installed and engaged. NOTE: On models with all four tabs facing up and the notches toward the rear of the anti-tip bracket. Place the broil burner on the broil burner...

Installation Guide
Page 20
... C. Screws 4. Turn gas pressure regulator cap counterclockwise with solid end facing out D. Gas pressure regulator cap with a ⁵⁄₈" (1.6 cm) combination wrench to the Model Number and Serial Number Plate located on the side. Burner cap C. Gas orifice spuds are stamped with LP gas. 6. Replace the burner base. 7. Side view...
... C. Screws 4. Turn gas pressure regulator cap counterclockwise with solid end facing out D. Gas pressure regulator cap with a ⁵⁄₈" (1.6 cm) combination wrench to the Model Number and Serial Number Plate located on the side. Burner cap C. Gas orifice spuds are stamped with LP gas. 6. Replace the burner base. 7. Side view...


