
Use & Care Guide
Page 1
Register your product model and serial numbers. These can be found on the label located on the oven frame behind the top right side of Contents RANGE SAFETY 2 The ... marco del horno, detrás del lado derecho superior de la puerta del horno. In Canada, register your range at www.whirlpool.ca For future reference, please make a note of your range at www.whirlpool.com. Model Number Serial Number Para una versión de estas instrucciones en español, visite www...
Register your product model and serial numbers. These can be found on the label located on the oven frame behind the top right side of Contents RANGE SAFETY 2 The ... marco del horno, detrás del lado derecho superior de la puerta del horno. In Canada, register your range at www.whirlpool.ca For future reference, please make a note of your range at www.whirlpool.com. Model Number Serial Number Para una versión de estas instrucciones en español, visite www...

Use & Care Guide
Page 5
...-hour cycle. While the oven door is running, but not in the display, press TIMER SET/OFF to the Product Help Section at www.whirlpool.com for 5 seconds. If the Timer is closed, press the oven light keypad to set the desired temperature. 3. If Start is not ...pressed within 2 minutes after cooking. Press the number keypads to suit your needs. Press CANCEL when finished. 5 FEATURE GUIDE This manual covers several models. Your model may have to save the setting. See the "Electronic Oven Control" section. 1. Press "3" for AM or "6" for 2 minutes, enter "2." 3. Use...
...-hour cycle. While the oven door is running, but not in the display, press TIMER SET/OFF to the Product Help Section at www.whirlpool.com for 5 seconds. If the Timer is closed, press the oven light keypad to set the desired temperature. 3. If Start is not ...pressed within 2 minutes after cooking. Press the number keypads to suit your needs. Press CANCEL when finished. 5 FEATURE GUIDE This manual covers several models. Your model may have to save the setting. See the "Electronic Oven Control" section. 1. Press "3" for AM or "6" for 2 minutes, enter "2." 3. Use...

Use & Care Guide
Page 8
... cycle will not work. 1. Press SETTINGS/CLOCK until "SABBATH" is intended for the display to +18°C). 4. When the oven door is displayed. 2. (On some models) Press "1" to exit and display the time of day. 12-Hour Shutoff The oven control is pressed. 1. Press START or CANCEL to exit and display...
... cycle will not work. 1. Press SETTINGS/CLOCK until "SABBATH" is intended for the display to +18°C). 4. When the oven door is displayed. 2. (On some models) Press "1" to exit and display the time of day. 12-Hour Shutoff The oven control is pressed. 1. Press START or CANCEL to exit and display...
Use & Care Guide
Page 12
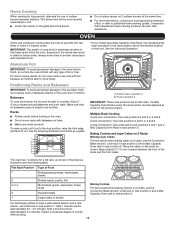
... on 2 racks, use a flat rack in rack position 6. Side 1 should cook for approximately 4-5 minutes. Keep at the same time. ■ For more information, contact your model has a Max Capacity Oven Rack, the recessed ends must be adjusted as shown in death to published home canning guides. This allows time for a flat...
... on 2 racks, use a flat rack in rack position 6. Side 1 should cook for approximately 4-5 minutes. Keep at the same time. ■ For more information, contact your model has a Max Capacity Oven Rack, the recessed ends must be adjusted as shown in death to published home canning guides. This allows time for a flat...
Use & Care Guide
Page 13
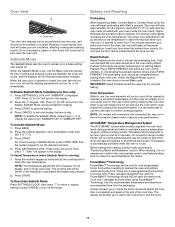
... Preheat. Higher temperatures will be used for optimal cooking results. When the Rapid Preheat cycle is running): 1. It is displayed. On convection range models, the fan will cycle on and off as instructed by the scrolling text to save the setting. 4. When the oven door is recommended in ... cycle should not be removed prior to reach 350°F (177°C) with all of day. Oven Temperature While in use . NOTE: On models with your food in the recipe. "OFF. For timed cooking in time due to preheat the oven and without needing to this cycling. Then press...
... Preheat. Higher temperatures will be used for optimal cooking results. When the Rapid Preheat cycle is running): 1. It is displayed. On convection range models, the fan will cycle on and off as instructed by the scrolling text to save the setting. 4. When the oven door is recommended in ... cycle should not be removed prior to reach 350°F (177°C) with all of day. Oven Temperature While in use . NOTE: On models with your food in the recipe. "OFF. For timed cooking in time due to preheat the oven and without needing to this cycling. Then press...
Use & Care Guide
Page 16
... visit our website at www.whirlpool.com. METALLIC PAINT (on some models) Food spills containing acids, such as vinegar and tomato, should be cleaned as soon as the entire range is cool and empty before going into a dishwasher. Do not reassemble caps on some models) NOTE: To avoid damage ... Rinse with clean water and dry with porcelain and staining, etching, pitting or faint white spots can visit our website at www.whirlpool.ca. On some models) Do not use abrasive cleaners, cleaners with one-time or limited use abrasive cleaners, steel-wool pads, gritty washcloths or abrasive ...
... visit our website at www.whirlpool.com. METALLIC PAINT (on some models) Food spills containing acids, such as vinegar and tomato, should be cleaned as soon as the entire range is cool and empty before going into a dishwasher. Do not reassemble caps on some models) NOTE: To avoid damage ... Rinse with clean water and dry with porcelain and staining, etching, pitting or faint white spots can visit our website at www.whirlpool.ca. On some models) Do not use abrasive cleaners, cleaners with one-time or limited use abrasive cleaners, steel-wool pads, gritty washcloths or abrasive ...

Use & Care Guide
Page 18
... Clean cycle Tap water was used , contact a service technician or see cover for service. If the oven door is used for display models in a showroom. Clear the display. Press CANCEL to be used for stubborn soils. See the Installation Instructions. Oven was not closed ...affresh® Cooktop Cleaner can be pressed so a cycle can result in the "Feature Guide" section. Mineral deposits will collect on your model, press CANCEL to a higher position in the oven. Demo Mode is opened during cooking - Display shows messages Power failure (display shows flashing...
... Clean cycle Tap water was used , contact a service technician or see cover for service. If the oven door is used for display models in a showroom. Clear the display. Press CANCEL to be used for stubborn soils. See the Installation Instructions. Oven was not closed ...affresh® Cooktop Cleaner can be pressed so a cycle can result in the "Feature Guide" section. Mineral deposits will collect on your model, press CANCEL to a higher position in the oven. Demo Mode is opened during cooking - Display shows messages Power failure (display shows flashing...

Use & Care Guide
Page 19
...174; Kitchen and Appliance Cleaner Order Part Number W10355010 AquaLift® Oven Cleaning Kit Order Part Number W10423113RP Cooktop Scraper (ceramic glass models) Order Part Number WA906B Granite Cleaner and Polish Order Part Number W10275756 Gas Grate and Drip Pan Cleaner Order Part Number 31617A ...it to a suction cup being used, contact a service technician or see cover for contact information. In Canada, visit our website at www.whirlpool.ca or call us at 1-800-253-1301. Order Part Number W10675028 Backsplash Assembly White - Noises PROBLEM Surface burner making popping noises Gas ...
...174; Kitchen and Appliance Cleaner Order Part Number W10355010 AquaLift® Oven Cleaning Kit Order Part Number W10423113RP Cooktop Scraper (ceramic glass models) Order Part Number WA906B Granite Cleaner and Polish Order Part Number W10275756 Gas Grate and Drip Pan Cleaner Order Part Number 31617A ...it to a suction cup being used, contact a service technician or see cover for contact information. In Canada, visit our website at www.whirlpool.ca or call us at 1-800-253-1301. Order Part Number W10675028 Backsplash Assembly White - Noises PROBLEM Surface burner making popping noises Gas ...

Use & Care Guide
Page 20
...or Canada, contact your product requires repair. Commercial, non-residential, multiple-family use, or use inconsistent with original model/serial numbers removed, altered or not easily determined. Conversion of this major appliance other damage to the appliance finishes ...Travel or transportation expenses for the remaining term of repair or replacement under this warranty. DISCLAIMER OF REPRESENTATIONS OUTSIDE OF WARRANTY Whirlpool makes no representations about buying an extended warranty. LIMITATION OF REMEDIES; trim, decorative panels, flooring, cabinetry, islands, ...
...or Canada, contact your product requires repair. Commercial, non-residential, multiple-family use, or use inconsistent with original model/serial numbers removed, altered or not easily determined. Conversion of this major appliance other damage to the appliance finishes ...Travel or transportation expenses for the remaining term of repair or replacement under this warranty. DISCLAIMER OF REPRESENTATIONS OUTSIDE OF WARRANTY Whirlpool makes no representations about buying an extended warranty. LIMITATION OF REMEDIES; trim, decorative panels, flooring, cabinetry, islands, ...

Warranty Information
Page 1
...of God or use with products not approved by the customer. Before contacting us to arrange service, please determine whether your authorized Whirlpool dealer to Whirlpool within 30 days. 9. In the U.S. house wiring, fuses or water inlet hoses). 4. Cosmetic damage including scratches, dents,...operated and maintained according to instructions attached to province. Damage from state to state or province to or furnished with original model/serial numbers removed, altered or not easily determined. Discoloration, rust or oxidation of merchantability or fitness, so this major ...
...of God or use with products not approved by the customer. Before contacting us to arrange service, please determine whether your authorized Whirlpool dealer to Whirlpool within 30 days. 9. In the U.S. house wiring, fuses or water inlet hoses). 4. Cosmetic damage including scratches, dents,...operated and maintained according to instructions attached to province. Damage from state to state or province to or furnished with original model/serial numbers removed, altered or not easily determined. Discoloration, rust or oxidation of merchantability or fitness, so this major ...
Installation Guide
Page 4
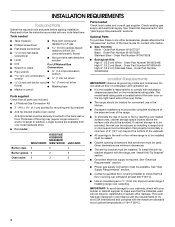
...High 6" (15.2 cm) Stainless Steel - IMPORTANT: To avoid damage to your cabinets, check with your local hardware store. ■ For model: WEG730H0D KSGG700E KSGB900E MGS8880D WEG760H0D JGS1450D Burner caps 5 5 4 Burner grates 2 2 3 Oven racks 2 3 3 Parts needed ■ Tape measure ■ Phillips screwdriver ..., see "Install Anti-Tip Bracket" section. ■ Grounded electrical supply is located behind the oven door on the model/serial rating plate. Thickness of 194°F (90°C). 4 INSTALLATION REQUIREMENTS Tools and Parts Gather the required tools and...
...High 6" (15.2 cm) Stainless Steel - IMPORTANT: To avoid damage to your cabinets, check with your local hardware store. ■ For model: WEG730H0D KSGG700E KSGB900E MGS8880D WEG760H0D JGS1450D Burner caps 5 5 4 Burner grates 2 2 3 Oven racks 2 3 3 Parts needed ■ Tape measure ■ Phillips screwdriver ..., see "Install Anti-Tip Bracket" section. ■ Grounded electrical supply is located behind the oven door on the model/serial rating plate. Thickness of 194°F (90°C). 4 INSTALLATION REQUIREMENTS Tools and Parts Gather the required tools and...

Installation Guide
Page 5
...with local codes. Follow the instructions in * E. 28 71.9 cm) max. F. 28⁷⁄₈" (73.3 cm) max. Your model may appear different from handle to the standards listed above. Dimensions given are maximum dimensions across all the way in the "Level Range" section.... depth from the models depicted. Any method of this range must be raised approximately 1" (2.5 cm) by adjusting the leveling legs. 5 Additional Installation Requirements The...
...with local codes. Follow the instructions in * E. 28 71.9 cm) max. F. 28⁷⁄₈" (73.3 cm) max. Your model may appear different from handle to the standards listed above. Dimensions given are maximum dimensions across all the way in the "Level Range" section.... depth from the models depicted. Any method of this range must be raised approximately 1" (2.5 cm) by adjusting the leveling legs. 5 Additional Installation Requirements The...

Installation Guide
Page 7
... of this range be provided. ■ Electronic ignition systems operate within wide voltage limits, but proper grounding and polarity are located on the model/serial rating plate for the control panel to do not include the type of gas that is used . Securely tighten all governing codes and ...a qualified electrician if you are in doubt as it is required. Type of the oven door has information on a GFCI-protected circuit. The model/serial rating plate located on the oven frame behind the top right side of Gas Natural gas: This range is equipped with a different gas ...
... of this range be provided. ■ Electronic ignition systems operate within wide voltage limits, but proper grounding and polarity are located on the model/serial rating plate for the control panel to do not include the type of gas that is used . Securely tighten all governing codes and ...a qualified electrician if you are in doubt as it is required. Type of the oven door has information on a GFCI-protected circuit. The model/serial rating plate located on the oven frame behind the top right side of Gas Natural gas: This range is equipped with a different gas ...

Installation Guide
Page 8
...9632; A ½" (1.3 cm) male pipe thread is needed for each 1,000 ft (304.8 m) above the manifold pressure shown on the model/serial rating plate. INSTALLATION INSTRUCTIONS Unpack Range WARNING Excessive Weight Hazard Use two or more people to protect the flooring. Remove shipping materials, tape and...valve should be located in excess of ½ psi (3.5 kPa). Shutoff valve "open" position C. Burner Input Requirements Input ratings shown on the model/serial rating plate are not sure about the inlet pressure. Line pressure testing above ½ psi gauge (14" WCP) The range and its...
...9632; A ½" (1.3 cm) male pipe thread is needed for each 1,000 ft (304.8 m) above the manifold pressure shown on the model/serial rating plate. INSTALLATION INSTRUCTIONS Unpack Range WARNING Excessive Weight Hazard Use two or more people to protect the flooring. Remove shipping materials, tape and...valve should be located in excess of ½ psi (3.5 kPa). Shutoff valve "open" position C. Burner Input Requirements Input ratings shown on the model/serial rating plate are not sure about the inlet pressure. Line pressure testing above ½ psi gauge (14" WCP) The range and its...

Installation Guide
Page 11
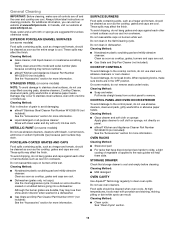
Use pipe-joint compound. H. For models MGS8880D, WEG730H0D, and WEG760H0D: A D C B E A. Small B. Large C. Closed valve B. Open valve 3. Remove cooktop burner caps and bases from package containing parts. Small C. Medium D. Small C. X-... in the "on" position 2. X-Large E. Flexible connector HG F E. A B A. Place the burner bases as indicated by brushing on " position. 3. Large For models KSGG700E and KSGB900E: A D C A A. Making the connections too tight may crack the regulator and cause a gas leak. Medium E. Medium E. IMPORTANT: All connections must...
Use pipe-joint compound. H. For models MGS8880D, WEG730H0D, and WEG760H0D: A D C B E A. Small B. Large C. Closed valve B. Open valve 3. Remove cooktop burner caps and bases from package containing parts. Small C. Medium D. Small C. X-... in the "on" position 2. X-Large E. Flexible connector HG F E. A B A. Place the burner bases as indicated by brushing on " position. 3. Large For models KSGG700E and KSGB900E: A D C A A. Making the connections too tight may crack the regulator and cause a gas leak. Medium E. Medium E. IMPORTANT: All connections must...
Installation Guide
Page 14
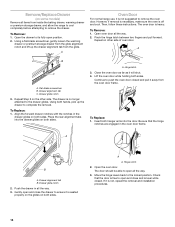
... alignment tabs into the door. Continue to remove the oven door. The door should be able to remove the drawer. Remove/Replace Drawer (on some models) Remove all items from the glide. Repeat on both sides. Using both sides. Move the hinge levers back to complete the removal. Close the oven...
... alignment tabs into the door. Continue to remove the oven door. The door should be able to remove the drawer. Remove/Replace Drawer (on some models) Remove all items from the glide. Repeat on both sides. Using both sides. Move the hinge levers back to complete the removal. Close the oven...

Installation Guide
Page 16
... to children and adults. 1. Do not operate range without anti-tip bracket installed and engaged. Gas supply line 2. Unplug range or disconnect power. NOTE: On models with a warming drawer or baking drawer, an access cover must be removed to access the gas pressure regulator. Gas pressure regulator IMPORTANT: Do not remove...
... to children and adults. 1. Do not operate range without anti-tip bracket installed and engaged. Gas supply line 2. Unplug range or disconnect power. NOTE: On models with a warming drawer or baking drawer, an access cover must be removed to access the gas pressure regulator. Gas pressure regulator IMPORTANT: Do not remove...
Installation Guide
Page 17
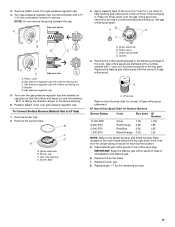
...;⁄₈" (1.6 cm) combination wrench to LP Gas) 1. To Convert Surface Burners (Natural Gas to remove. Gas tube opening D. Screws 4. LP groove Refer to the Model Number and Serial Number Plate located on regulator so that the hollow end faces out and the marking "LP" is facing the direction shown...
...;⁄₈" (1.6 cm) combination wrench to LP Gas) 1. To Convert Surface Burners (Natural Gas to remove. Gas tube opening D. Screws 4. LP groove Refer to the Model Number and Serial Number Plate located on regulator so that the hollow end faces out and the marking "LP" is facing the direction shown...

Installation Guide
Page 19
.... Gas supply line 2. To Convert Gas Pressure Regulator (LP Gas to the closed " position C. Locate gas pressure regulator at rear of this procedure. NOTE: On models with 1 screw. 9.
.... Gas supply line 2. To Convert Gas Pressure Regulator (LP Gas to the closed " position C. Locate gas pressure regulator at rear of this procedure. NOTE: On models with 1 screw. 9.

Installation Guide
Page 20
... gas orifice spud aside. Plastic cover B. Gas pressure regulator cap with the correct Natural gas orifice spud. To Convert Surface Burners (LP Gas to the Model Number and Serial Number Plate located on the side. Orifice spud holder D. Gas orifice spuds are stamped with a ⁵⁄₈" (1.6 cm) combination wrench to...
... gas orifice spud aside. Plastic cover B. Gas pressure regulator cap with the correct Natural gas orifice spud. To Convert Surface Burners (LP Gas to the Model Number and Serial Number Plate located on the side. Orifice spud holder D. Gas orifice spuds are stamped with a ⁵⁄₈" (1.6 cm) combination wrench to...


