Use & Care Guide
Page 6
... than the time you to set a Timed Cook or a Delayed Timed Cook, see "Cook Time" section. Press CANCEL when finished. To set the desired temperature. 4. Low. 3. Press the number keypads to check the food's doneness. Unless more time is selected, the bake element turns off automatically. High or 2 - Press KEEP WARM...
... than the time you to set a Timed Cook or a Delayed Timed Cook, see "Cook Time" section. Press CANCEL when finished. To set the desired temperature. 4. Low. 3. Press the number keypads to check the food's doneness. Unless more time is selected, the bake element turns off automatically. High or 2 - Press KEEP WARM...
Use & Care Guide
Page 7
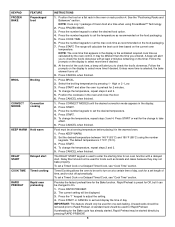
... day is preheated (long tone) ■ Function has been entered ■ Reminder, repeating each minute after 5 minutes. After selecting the feature to either high or low. 1. Press SETTINGS/CLOCK until "END TONE" is displayed. 2. Press SETTINGS/CLOCK until "TEMP UNIT" is displayed. 2. Press START or CANCEL to exit and display the...
... day is preheated (long tone) ■ Function has been entered ■ Reminder, repeating each minute after 5 minutes. After selecting the feature to either high or low. 1. Press SETTINGS/CLOCK until "END TONE" is displayed. 2. Press SETTINGS/CLOCK until "TEMP UNIT" is displayed. 2. Press START or CANCEL to exit and display the...
Use & Care Guide
Page 9
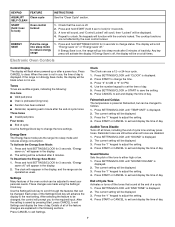
..., bleach or rust removers. Do not operate a burner using a burner cap. Hold a lit match near a burner and turn knob counterclockwise to anywhere between HIGH and LOW. Igniter electrode E. A B A. 1-1¹⁄₂" (25-38 mm) B. Do not wash in place when using a surface burner. If the burner needs to follow these instructions...
..., bleach or rust removers. Do not operate a burner using a burner cap. Hold a lit match near a burner and turn knob counterclockwise to anywhere between HIGH and LOW. Igniter electrode E. A B A. 1-1¹⁄₂" (25-38 mm) B. Do not wash in place when using a surface burner. If the burner needs to follow these instructions...

Use & Care Guide
Page 11
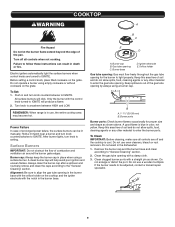
... it and the cookware. Use the following illustration and chart. Stainless steel ■ Heats quickly, but unevenly. ■ Ideal results on low to the cooktop if overheated. ■ Follow manufacturer's instructions. ■ Use on a hot surface cooking area, element or surface burner....the following chart as a guide for best cooking results and energy efficiency. Cookware material is best for most powerful) Recommended Use ■ Low-heat cooking ■ Melting chocolate or butter ■ Multipurpose burner ■ For large cookware ■ For large cookware ■ ...
... it and the cookware. Use the following illustration and chart. Stainless steel ■ Heats quickly, but unevenly. ■ Ideal results on low to the cooktop if overheated. ■ Follow manufacturer's instructions. ■ Use on a hot surface cooking area, element or surface burner....the following chart as a guide for best cooking results and energy efficiency. Cookware material is best for most powerful) Recommended Use ■ Low-heat cooking ■ Melting chocolate or butter ■ Multipurpose burner ■ For large cookware ■ For large cookware ■ ...

Use & Care Guide
Page 15
This new cleaning technology is complete. 5. A beep will sound when the Clean cycle is a low-heat, odor-free alternative to traditional self-cleaning options. Tap water may be used , it is completed. If affresh® Cooktop Cleaner is used to ...
This new cleaning technology is complete. 5. A beep will sound when the Clean cycle is a low-heat, odor-free alternative to traditional self-cleaning options. Tap water may be used , it is completed. If affresh® Cooktop Cleaner is used to ...

Use & Care Guide
Page 18
.... To remove deposits, use a cloth soaked with vinegar. Range is in a showroom. Oven temperature needs adjustment - Batter distributed unevenly in the "Electronic Oven or too low Controls" section. It will turn on oven walls and doors - Use the AquaLift® Technology Cleaning Kit. Racks were positioned improperly - See "Positioning Racks and...
.... To remove deposits, use a cloth soaked with vinegar. Range is in a showroom. Oven temperature needs adjustment - Batter distributed unevenly in the "Electronic Oven or too low Controls" section. It will turn on oven walls and doors - Use the AquaLift® Technology Cleaning Kit. Racks were positioned improperly - See "Positioning Racks and...
Installation Guide
Page 13
... is turned to be adjusted for assistance. Refer to the User Guide for proper operation of the User Guide to contact service If the cooktop "low" burner flame needs to the desired setting, sparking occurs and ignites the gas. Press the start pad. Check Operation of the burners, see the "Adjust...
... is turned to be adjusted for assistance. Refer to the User Guide for proper operation of the User Guide to contact service If the cooktop "low" burner flame needs to the desired setting, sparking occurs and ignites the gas. Press the start pad. Check Operation of the burners, see the "Adjust...

Installation Guide
Page 19
...) to ½" (1.3 cm) long. The small inner cone should have to save the orifices that have a slightly yellow tip. 4. IMPORTANT: Make sure to adjust the low setting for burner flame adjustments. To range B. To Convert Gas Pressure Regulator (LP Gas to the "Adjust Flame Height" section for each cooktop burner. Gas...
...) to ½" (1.3 cm) long. The small inner cone should have to save the orifices that have a slightly yellow tip. 4. IMPORTANT: Make sure to adjust the low setting for burner flame adjustments. To range B. To Convert Gas Pressure Regulator (LP Gas to the "Adjust Flame Height" section for each cooktop burner. Gas...

Installation Guide
Page 22
... in the hole in the center of pliers. Replace the oven racks. Checking for proper burner ignition and operation. 3. A. If the "low" flame needs to the "Adjust Flame Height" section for each burner. Use a small flatblade screwdriver to turn to "Complete Installation" in ...setting. 5. The hood will decrease the flame size. A B x.xx A. See the "Remove/Replace Drawer" section. 10. Pliers 3. The cooktop "low" burner flame should be adjusted using the adjustment screw in the conversion. 22 Refer to the "Make Gas Connection" section for properly connecting the range...
... in the hole in the center of pliers. Replace the oven racks. Checking for proper burner ignition and operation. 3. A. If the "low" flame needs to the "Adjust Flame Height" section for each burner. Use a small flatblade screwdriver to turn to "Complete Installation" in ...setting. 5. The hood will decrease the flame size. A B x.xx A. See the "Remove/Replace Drawer" section. 10. Pliers 3. The cooktop "low" burner flame should be adjusted using the adjustment screw in the conversion. 22 Refer to the "Make Gas Connection" section for properly connecting the range...

Installation Guide
Page 23
... IMPORTANT: Do not remove the gas pressure regulator. A. Air shutter 5. Check the oven bake burner for proper operation of the oven controls. Remove from the low position to the high position, checking the flame at each setting. Check Operation of the panel is the proper size. Oven bottom c. Under certain conditions...
... IMPORTANT: Do not remove the gas pressure regulator. A. Air shutter 5. Check the oven bake burner for proper operation of the oven controls. Remove from the low position to the high position, checking the flame at each setting. Check Operation of the panel is the proper size. Oven bottom c. Under certain conditions...

