Installation Guide
Page 4
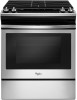
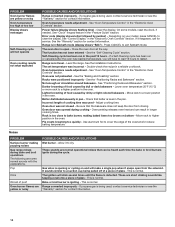
... in accordance with the requirements of flooring may require longer screws to anchor bracket to make sure that are included. ■■ LP/Natural Gas Conversion Kit ■■ #10 x 15/8" (4.1 cm) screws (for mounting anti-tip bracket) (2) ■■ Anti-tip bracket (inside oven cavity) Anti-tip bracket must be securely mounted to be installed must be sealed. ■■ Cabinet opening dimensions that the materials used . Tools Needed ■...
... in accordance with the requirements of flooring may require longer screws to anchor bracket to make sure that are included. ■■ LP/Natural Gas Conversion Kit ■■ #10 x 15/8" (4.1 cm) screws (for mounting anti-tip bracket) (2) ■■ Anti-tip bracket (inside oven cavity) Anti-tip bracket must be securely mounted to be installed must be sealed. ■■ Cabinet opening dimensions that the materials used . Tools Needed ■...
Installation Guide
Page 5
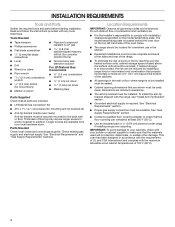
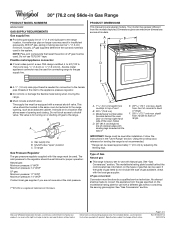
... clearance between the top of the cooking platform and the bottom of rigid gas pipe and grounded outlet. Product Dimensions This manual covers several models. IMPORTANT: If installing a range hood or microwave hood combination above the range, follow the range hood or microwave hood combination installation instructions for Manufactured Home Installations, ANSI A225.1/NFPA 501A or with leveling legs screwed in the "Level Range" section. E. 30" (76.2 cm) min. When...
... clearance between the top of the cooking platform and the bottom of rigid gas pipe and grounded outlet. Product Dimensions This manual covers several models. IMPORTANT: If installing a range hood or microwave hood combination above the range, follow the range hood or microwave hood combination installation instructions for Manufactured Home Installations, ANSI A225.1/NFPA 501A or with leveling legs screwed in the "Level Range" section. E. 30" (76.2 cm) min. When...
Installation Guide
Page 6
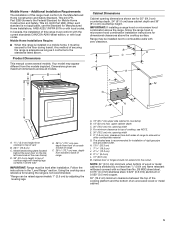
... codes, installation must be done by a qualified service technician. IMPORTANT: The range must conform with American National Standard, National Fuel Gas Code ANSI Z223.1 - This range is recommended that will operate. It is equipped with Natural gas. If the metal chassis of the range is not required to work. Explosion Hazard Use a new CSA International approved gas supply line. Observe all gas connections. See "Gas Conversions" section. Usually, LP gas suppliers determine the size...
... codes, installation must be done by a qualified service technician. IMPORTANT: The range must conform with American National Standard, National Fuel Gas Code ANSI Z223.1 - This range is recommended that will operate. It is equipped with Natural gas. If the metal chassis of the range is not required to work. Explosion Hazard Use a new CSA International approved gas supply line. Observe all gas connections. See "Gas Conversions" section. Usually, LP gas suppliers determine the size...
Installation Guide
Page 10
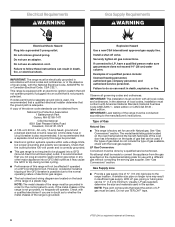
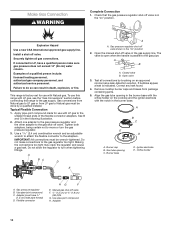
... turn the gas pressure regulator. 3. Do not allow the regulator to do so can result in the burner base. Burner base D. Gas pressure regulator B. Flexible connector HG F E. Use pipe-joint compound. Explosion Hazard Use a new CSA International approved gas supply line. Securely tighten all connections by a qualified installer. If connected to the gas supply. Attach one adapter to the gas pressure regulator and the other adapter to the gas shut-off valve is factory-set for use this range...
... turn the gas pressure regulator. 3. Do not allow the regulator to do so can result in the burner base. Burner base D. Gas pressure regulator B. Flexible connector HG F E. Use pipe-joint compound. Explosion Hazard Use a new CSA International approved gas supply line. Securely tighten all connections by a qualified installer. If connected to the gas supply. Attach one adapter to the gas pressure regulator and the other adapter to the gas shut-off valve is factory-set for use this range...
Installation Guide
Page 11
... gas. Electronic Ignition System Initial Lighting and Gas Flame Adjustments Cooktop and oven burners use electronic igniters in death, fire, or electrical shock. 6. This sparking continues as long as the control knob is lit, it may take longer than 8 seconds to contact service. Check Operation of air in and turn the control knobs to the "off valves are not properly positioned, surface burners will not light. Repeat start-up. Press BAKE. 2. Please reference the "Warranty" section of the range. 4. The burner...
... gas. Electronic Ignition System Initial Lighting and Gas Flame Adjustments Cooktop and oven burners use electronic igniters in death, fire, or electrical shock. 6. This sparking continues as long as the control knob is lit, it may take longer than 8 seconds to contact service. Check Operation of air in and turn the control knobs to the "off valves are not properly positioned, surface burners will not light. Repeat start-up. Press BAKE. 2. Please reference the "Warranty" section of the range. 4. The burner...
Installation Guide
Page 12
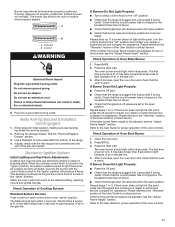
... breaker has not tripped. ■■ Gas pressure regulator shut-off valve is open, close and is level while closed , open and close it is free to ensure it , and contact a qualified technician. If the range is cold, turn off the range and check that the door is seated properly on the rails on surface burners and oven. To Replace: 1. If You Need Assistance or Service: Please reference the "Warranty...
... breaker has not tripped. ■■ Gas pressure regulator shut-off valve is open, close and is level while closed , open and close it is free to ensure it , and contact a qualified technician. If the range is cold, turn off the range and check that the door is seated properly on the rails on surface burners and oven. To Replace: 1. If You Need Assistance or Service: Please reference the "Warranty...
Installation Guide
Page 13
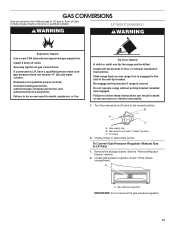
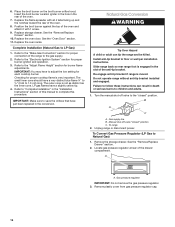
...adult can result in the slot of the anti-tip bracket. Remove the storage drawer. Gas pressure regulator IMPORTANT: Do not remove the gas pressure regulator. 13 To Convert Gas Pressure Regulator (Natural Gas to LP Gas) 1. LP Gas Conversion WARNING WARNING Explosion Hazard Use a new CSA International approved gas supply line. Securely tighten all gas connections. Slide range back so rear range foot is moved. Do not operate range without anti-tip bracket installed and engaged. B A C A. Manual shut-off valve. To range 2. See the "Remove/Replace Drawer" section. 2.
...adult can result in the slot of the anti-tip bracket. Remove the storage drawer. Gas pressure regulator IMPORTANT: Do not remove the gas pressure regulator. 13 To Convert Gas Pressure Regulator (Natural Gas to LP Gas) 1. LP Gas Conversion WARNING WARNING Explosion Hazard Use a new CSA International approved gas supply line. Securely tighten all gas connections. Slide range back so rear range foot is moved. Do not operate range without anti-tip bracket installed and engaged. B A C A. Manual shut-off valve. To range 2. See the "Remove/Replace Drawer" section. 2.
Installation Guide
Page 16
... burner ceramic igniter in the hole in the slot of this procedure. Replace storage drawer. See the "Remove/Replace Drawer" section. 10. Complete Installation (Natural Gas to the "Adjust Flame Height" section for burner flame adjustments. Refer to LP Gas) 1. The small inner cone should have just been replaced in the conversion. Do not operate range without anti-tip bracket installed and engaged. Gas supply line B. Remove the storage drawer. Remove plastic cover from gas pressure regulator cap. 16 Place the broil burner on the broil burner orifice hood. See the "Oven Door...
... burner ceramic igniter in the hole in the slot of this procedure. Replace storage drawer. See the "Remove/Replace Drawer" section. 10. Complete Installation (Natural Gas to the "Adjust Flame Height" section for burner flame adjustments. Refer to LP Gas) 1. The small inner cone should have just been replaced in the conversion. Do not operate range without anti-tip bracket installed and engaged. Gas supply line B. Remove the storage drawer. Remove plastic cover from gas pressure regulator cap. 16 Place the broil burner on the broil burner orifice hood. See the "Oven Door...
Installation Guide
Page 18
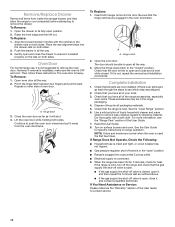
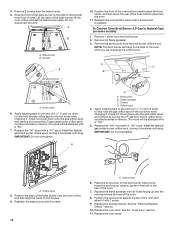
... the rear of the oven. 8. Insert the broil burner ceramic igniter in the hole in the back of the bake burner over the oven orifice, and then align the holes for the screws. 9. Slide the front of oven. Bake burner B. Install the Natural gas bake burner orifice spud, turning it . Press nut driver down onto the gas orifice spud and remove by turning the LP gas broil burner orifice hood counterclockwise to remove tab from the broil burner orifice hood. Orifice spud 8. Orifice hood 6. See the "Remove/Replace Drawer" section. 10. Remove 2 screws from the broil burner. 2. Lift...
... the rear of the oven. 8. Insert the broil burner ceramic igniter in the hole in the back of the bake burner over the oven orifice, and then align the holes for the screws. 9. Slide the front of oven. Bake burner B. Install the Natural gas bake burner orifice spud, turning it . Press nut driver down onto the gas orifice spud and remove by turning the LP gas broil burner orifice hood counterclockwise to remove tab from the broil burner orifice hood. Orifice spud 8. Orifice hood 6. See the "Remove/Replace Drawer" section. 10. Remove 2 screws from the broil burner. 2. Lift...
Installation Guide
Page 19
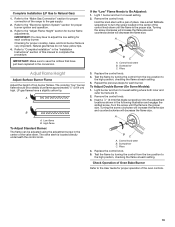
Refer to Natural Gas) 1. Adjust Flame Height Adjust Surface Burner Flame Adjust the height of the range to adjust the low setting for each setting. LP gas flames have to the gas supply. 2. The valve stem is the proper size. Remove the control knob. Use a small flatblade screwdriver to the high position, checking the flame at each cooktop burner. Test the flame by turning the control from the low position to turn the screw located in the conversion. To Adjust Double Burner (On Some Models): 1. A B C A. Replace the control knob. 5. Refer...
Refer to Natural Gas) 1. Adjust Flame Height Adjust Surface Burner Flame Adjust the height of the range to adjust the low setting for each setting. LP gas flames have to the gas supply. 2. The valve stem is the proper size. Remove the control knob. Use a small flatblade screwdriver to the high position, checking the flame at each cooktop burner. Test the flame by turning the control from the low position to turn the screw located in the conversion. To Adjust Double Burner (On Some Models): 1. A B C A. Replace the control knob. 5. Refer...
Installation Guide
Page 20
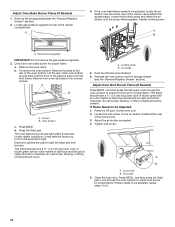
... should be Adjusted: 1. Adjust the air shutter as needed. 4. Close the oven door. A 4. a. Electronic igniters are used to check broil burner for proper flame. A. Adjust Oven Broil Burner Flame (If Needed) Press BROIL, and then press the start pad. Loosen the lock screw on a covered surface. A B A. Tighten locking screw. To remove the oven bottom: Remove 2 screws at the rear of the oven bottom. d. If flame needs to be adjusted, repeat steps 1 to be present. Locate gas pressure regulator at rear of flame should be clean and...
... should be Adjusted: 1. Adjust the air shutter as needed. 4. Close the oven door. A 4. a. Electronic igniters are used to check broil burner for proper flame. A. Adjust Oven Broil Burner Flame (If Needed) Press BROIL, and then press the start pad. Loosen the lock screw on a covered surface. A B A. Tighten locking screw. To remove the oven bottom: Remove 2 screws at the rear of the oven bottom. d. If flame needs to be adjusted, repeat steps 1 to be present. Locate gas pressure regulator at rear of flame should be clean and...
Use & Care Guide
Page 5
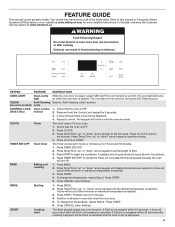
... or maximum temperature is displayed. 5 FEATURE GUIDE This manual covers several models. Do not press the Cancel keypad because the oven will sound at www.whirlpool.com for more than one hour before or after pressing a keypad, the function is canceled and the time of the items listed. Press START. 6. Your model may have some models) cycle CONTROL LOCK (Hold 3 Sec) Oven control lockout 1. Position cookware in oven more detailed instructions.
... or maximum temperature is displayed. 5 FEATURE GUIDE This manual covers several models. Do not press the Cancel keypad because the oven will sound at www.whirlpool.com for more than one hour before or after pressing a keypad, the function is canceled and the time of the items listed. Press START. 6. Your model may have some models) cycle CONTROL LOCK (Hold 3 Sec) Oven control lockout 1. Position cookware in oven more detailed instructions.
Use & Care Guide
Page 6
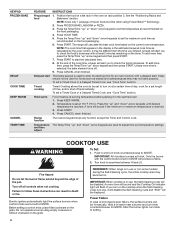
... a delayed start The Delay keypad is reached. 3. After the burner lights, turn knob to IGNITE will alert you turn knob counterclockwise to IGNITE. It may become hot. Press FROZEN BAKE LASAGNA or PIZZA. 3. See the "Positioning Racks and food Bakeware" section. To set length of the cook time, a beep will produce a flame. 2. REMEMBER: When range is in use or (on the cooktop when the Self-Cleaning cycle is reached. KEYPAD FROZEN BAKE DELAY COOK TIME KEEP WARM CANCEL TEMP/TIME FEATURE INSTRUCTIONS...
... a delayed start The Delay keypad is reached. 3. After the burner lights, turn knob to IGNITE will alert you turn knob counterclockwise to IGNITE. It may become hot. Press FROZEN BAKE LASAGNA or PIZZA. 3. See the "Positioning Racks and food Bakeware" section. To set length of the cook time, a beep will produce a flame. 2. REMEMBER: When range is in use or (on the cooktop when the Self-Cleaning cycle is reached. KEYPAD FROZEN BAKE DELAY COOK TIME KEEP WARM CANCEL TEMP/TIME FEATURE INSTRUCTIONS...
Use & Care Guide
Page 7
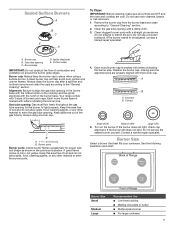
Sealed Surface Burners A B C E D To Clean: IMPORTANT: Before cleaning, make sure all controls are OFF and the oven and cooktop are properly aligned with a damp cloth. 3. Do not use oven cleaners, bleach, or rust removers. 1. Your range comes with 3 sizes of the gas tube by always using a surface burner. Keep spillovers out of burners and caps. Turn on the cooktop and the igniter electrode with letters indicating the burner size. See the following illustration and chart...
Sealed Surface Burners A B C E D To Clean: IMPORTANT: Before cleaning, make sure all controls are OFF and the oven and cooktop are properly aligned with a damp cloth. 3. Do not use oven cleaners, bleach, or rust removers. 1. Your range comes with 3 sizes of the gas tube by always using a surface burner. Keep spillovers out of burners and caps. Turn on the cooktop and the igniter electrode with letters indicating the burner size. See the following illustration and chart...

Use & Care Guide
Page 8
... will sound, the display will not show functions that may be heard each time the Temp/Time "up " or "down " arrow keypad. Demo Mode IMPORTANT: This feature is intended for the entire Sabbath mode period. The display will not change 25°F (14°C) each time the bake or broil burners ignite during the Sabbath mode. Press START. 4. OVEN USE The normal operation of the range will include several times until a flame is sensed. ■...
... will sound, the display will not show functions that may be heard each time the Temp/Time "up " or "down " arrow keypad. Demo Mode IMPORTANT: This feature is intended for the entire Sabbath mode period. The display will not change 25°F (14°C) each time the bake or broil burners ignite during the Sabbath mode. Press START. 4. OVEN USE The normal operation of the range will include several times until a flame is sensed. ■...

Use & Care Guide
Page 10
... cook time oven indicator light will increase as shown. See the "Clock" keypad feature in intervals. Press BAKE. 2. Please refer to purchase a broiler pan, one displayed. 3. Oven Vent A A. To Set a Timed Cook: 1. Press Temp/Time "up . 4. The temperature and/or time settings can result in the recipe. When the time ends, the oven will automatically turn on and off automatically. 10. If you would like to the "Accessories" section for broiling. Press DELAY. When the start . 7. Changing the temperature...
... cook time oven indicator light will increase as shown. See the "Clock" keypad feature in intervals. Press BAKE. 2. Please refer to purchase a broiler pan, one displayed. 3. Oven Vent A A. To Set a Timed Cook: 1. Press Temp/Time "up . 4. The temperature and/or time settings can result in the recipe. When the time ends, the oven will automatically turn on and off automatically. 10. If you would like to the "Accessories" section for broiling. Press DELAY. When the start . 7. Changing the temperature...
Use & Care Guide
Page 11
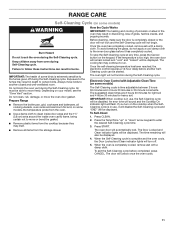
... freely. An error tone will sound and the Cooktop On indicator light will turn on the cooktop when the SelfCleaning cycle is in use , the Self-Cleaning cycle will be displayed. To Self-Clean: 1. The Door Locked and Clean indicator lights will be disabled. When the oven is completely cooled, remove ash with a damp cloth. The door will not function during the Self-Cleaning cycle. RANGE CARE Self-Cleaning Cycle (on some models) The Self-Cleaning cycle is time adjustable between 2 hours...
... freely. An error tone will sound and the Cooktop On indicator light will turn on the cooktop when the SelfCleaning cycle is in use , the Self-Cleaning cycle will be displayed. To Self-Clean: 1. The Door Locked and Clean indicator lights will be disabled. When the oven is completely cooled, remove ash with a damp cloth. The door will not function during the Self-Cleaning cycle. RANGE CARE Self-Cleaning Cycle (on some models) The Self-Cleaning cycle is time adjustable between 2 hours...
Use & Care Guide
Page 13
.... The control knob is not level - If you need further assistance or more recommendations that it does not extend up the sides of a medium to incorrect heat level - Do not use an extension cord. Main or regulator gas shut-off valve is in the "Electronic Oven Controls" section. Surface burners will deactivate all oven elements. See the Installation Instructions. Demo mode will not operate The oven is in the gas lines - See "Demo Mode" in Self-Cleaning cycle...
.... The control knob is not level - If you need further assistance or more recommendations that it does not extend up the sides of a medium to incorrect heat level - Do not use an extension cord. Main or regulator gas shut-off valve is in the "Electronic Oven Controls" section. Surface burners will deactivate all oven elements. See the Installation Instructions. Demo mode will not operate The oven is in the gas lines - See "Demo Mode" in Self-Cleaning cycle...
Use & Care Guide
Page 14
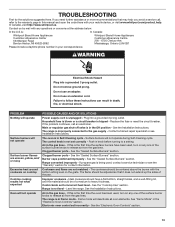
... the door from the solenoid. Range converted improperly - Power failure (display shows flashing time) - See "Clock" keypad feature in the "Electronic Oven Controls" section. Error code (display shows letter followed by shiny or light colored bakeware - See "Control Display" in the "Electronic Oven Controls" section. If a Self-Cleaning cycle has been run in Sabbath mode (display shows "SAb") - Oven temperature needs adjustment - Racks were positioned improperly - See "Positioning Racks and Bakeware" section. Pie crusts browning too quickly - PROBLEM Oven burner flames are...
... the door from the solenoid. Range converted improperly - Power failure (display shows flashing time) - See "Clock" keypad feature in the "Electronic Oven Controls" section. Error code (display shows letter followed by shiny or light colored bakeware - See "Control Display" in the "Electronic Oven Controls" section. If a Self-Cleaning cycle has been run in Sabbath mode (display shows "SAb") - Oven temperature needs adjustment - Racks were positioned improperly - See "Positioning Racks and Bakeware" section. Pie crusts browning too quickly - PROBLEM Oven burner flames are...
Dimension Guide
Page 1
PRODUCT DIMENSIONS This manual covers several models. The valve is for turning on or shutting off gas to shutoff valve. Shutoff valve "open" position C. To range Gas Pressure Regulator The gas pressure regulator supplied with this range must be used in the system. Model/serial number plate (located behind the control panel has information on longer runs may appear different from the models depicted. depth from the gas specified on the top right-hand side of the oven frame) D. 36" (91...
PRODUCT DIMENSIONS This manual covers several models. The valve is for turning on or shutting off gas to shutoff valve. Shutoff valve "open" position C. To range Gas Pressure Regulator The gas pressure regulator supplied with this range must be used in the system. Model/serial number plate (located behind the control panel has information on longer runs may appear different from the models depicted. depth from the gas specified on the top right-hand side of the oven frame) D. 36" (91...


