
Installation Guide
Page 2
...very important. Anti-Tip Bracket To verify the anti-tip bracket is under anti-tip bracket. • See installation instructions for details. 2 RANGE SAFETY Your safety and the safety of others . This is moved. All safety messages will tell you and others are not followed. We .... Always read and obey all safety messages. Install anti-tip bracket to floor or wall. • Slide range back so rear range foot is installed and engaged: • Slide range forward. • Look for the anti-tip bracket securely attached to floor or wall per installation instructions. These...
...very important. Anti-Tip Bracket To verify the anti-tip bracket is under anti-tip bracket. • See installation instructions for details. 2 RANGE SAFETY Your safety and the safety of others . This is moved. All safety messages will tell you and others are not followed. We .... Always read and obey all safety messages. Install anti-tip bracket to floor or wall. • Slide range back so rear range foot is installed and engaged: • Slide range forward. • Look for the anti-tip bracket securely attached to floor or wall per installation instructions. These...

Installation Guide
Page 3
...;" (4.1 cm) screws (for use with installation clearances specified on the top right-hand side of the oven frame. ■ The range should be used will not discolor, delaminate or sustain other accessories, please reference the "Accessories" section of burns or fire by reaching ... to your cabinets, check with your local hardware store. ■ For Model: WEC530H0D WEE730H0D YWEE730H0D JES1450CD JES1450D KSEG700E KSEB900E KSIB900E MES8880D WEE760H0D YKSEG700E YKSEB900E YKSIB900E YMES8880D YWEE760H0D Oven racks 2 3 Parts Needed If using a power supply cord kit: ■ A UL listed ...
...;" (4.1 cm) screws (for use with installation clearances specified on the top right-hand side of the oven frame. ■ The range should be used will not discolor, delaminate or sustain other accessories, please reference the "Accessories" section of burns or fire by reaching ... to your cabinets, check with your local hardware store. ■ For Model: WEC530H0D WEE730H0D YWEE730H0D JES1450CD JES1450D KSEG700E KSEB900E KSIB900E MES8880D WEE760H0D YKSEG700E YKSEB900E YKSIB900E YMES8880D YWEE760H0D Oven racks 2 3 Parts Needed If using a power supply cord kit: ■ A UL listed ...
Installation Guide
Page 4
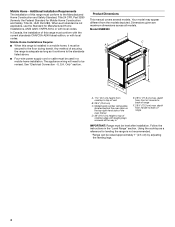
... Installations, ANSI A225.1/NFPA 501A or with local codes. Using the cooktop as it must be secured to back of range IMPORTANT: Range must conform with the current standards CAN/CSA-A240-latest edition, or with local codes. Product Dimensions This manual covers several... models. depth from handle to the floor during transit. Additional Installation Requirements The installation of this range is installed in a mobile home installation. The appliance wiring will need to top of vent B. 29⁷⁄₈" (75.9 ...
... Installations, ANSI A225.1/NFPA 501A or with local codes. Using the cooktop as it must be secured to back of range IMPORTANT: Range must conform with the current standards CAN/CSA-A240-latest edition, or with local codes. Product Dimensions This manual covers several... models. depth from handle to the floor during transit. Additional Installation Requirements The installation of this range is installed in a mobile home installation. The appliance wiring will need to top of vent B. 29⁷⁄₈" (75.9 ...

Installation Guide
Page 5
...G H I F J I A. 18" (45.7 cm) upper side cabinet to countertop B. 13" (33 cm) max. Slide-in cutout, the front of an uncovered wood or metal cabinet. 5 E. Range may protrude beyond the base cabinet. E. Cabinet door or hinges should not extend into the cutout. *NOTE: 24" (61.0 cm) minimum when bottom of L K. opening...78.7 cm) min. opening width F. Cabinet Dimensions Cabinet opening dimensions shown are for dimensional clearances above the range, follow the range hood or microwave hood combination installation instructions for 25" (64.0 cm) countertop depth, 24" (61.0 cm...
...G H I F J I A. 18" (45.7 cm) upper side cabinet to countertop B. 13" (33 cm) max. Slide-in cutout, the front of an uncovered wood or metal cabinet. 5 E. Range may protrude beyond the base cabinet. E. Cabinet door or hinges should not extend into the cutout. *NOTE: 24" (61.0 cm) minimum when bottom of L K. opening...78.7 cm) min. opening width F. Cabinet Dimensions Cabinet opening dimensions shown are for dimensional clearances above the range, follow the range hood or microwave hood combination installation instructions for 25" (64.0 cm) countertop depth, 24" (61.0 cm...

Installation Guide
Page 6
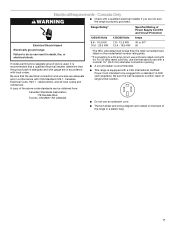
...Code, ANSI/ NFPA 70-latest edition and all local codes and ordinances. Connectors on the supply end. Electrical Connection To properly install your range, you must be revised so the green ground wire of Power Supply Cord Kit and Circuit Protection 3-wire receptacle (10-50R) If ...Connecting to the circuit breaker box (or fused disconnect) through the neutral conductor. See the following Range Rating chart. Range Rating* Specified Rating of the 4-wire power supply cord is prohibited for the copper 4-wire power cord are in a NEMA Type 10...
...Code, ANSI/ NFPA 70-latest edition and all local codes and ordinances. Connectors on the supply end. Electrical Connection To properly install your range, you must be revised so the green ground wire of Power Supply Cord Kit and Circuit Protection 3-wire receptacle (10-50R) If ...Connecting to the circuit breaker box (or fused disconnect) through the neutral conductor. See the following Range Rating chart. Range Rating* Specified Rating of the 4-wire power supply cord is prohibited for the copper 4-wire power cord are in a NEMA Type 10...
Installation Guide
Page 7
...electrical installer determine that specify use kits that the ground path is less than the total connected load listed on the back of the range in death, fire, or electrical shock. Canada Only WARNING ■ Check with kit. latest edition, and all local codes and..., use with a nominal 1³⁄₈" (34.9 mm) diameter connection opening. ■ A circuit breaker is recommended. ■ This range is equipped with a CSA International Certified Power Cord intended to be obtained from: Canadian Standards Association 178 Rexdale Blvd. Be sure that the electrical ...
...electrical installer determine that specify use kits that the ground path is less than the total connected load listed on the back of the range in death, fire, or electrical shock. Canada Only WARNING ■ Check with kit. latest edition, and all local codes and..., use with a nominal 1³⁄₈" (34.9 mm) diameter connection opening. ■ A circuit breaker is recommended. ■ This range is equipped with a CSA International Certified Power Cord intended to be obtained from: Canadian Standards Association 178 Rexdale Blvd. Be sure that the electrical ...
Installation Guide
Page 8
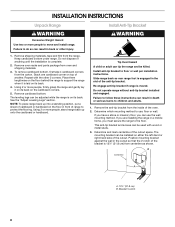
... child or adult can result in front of the anti-tip bracket. Remove cardboard bottom. B Centerline A A. 12½" (31.8 cm) B. Slide range back so rear range foot is engaged in the cutout so that the V-notch of anything until the installation is laid on its back. 4. Failure to floor or... wall per installation instructions. Re-engage anti-tip bracket if range is on its back. This anti-tip bracket and screws can be killed. Repeat with wood or metal studs. 3. Install anti-tip bracket to...
... child or adult can result in front of the anti-tip bracket. Remove cardboard bottom. B Centerline A A. 12½" (31.8 cm) B. Slide range back so rear range foot is engaged in the cutout so that the V-notch of anything until the installation is laid on its back. 4. Failure to floor or... wall per installation instructions. Re-engage anti-tip bracket if range is on its back. This anti-tip bracket and screws can be killed. Repeat with wood or metal studs. 3. Install anti-tip bracket to...

Installation Guide
Page 9
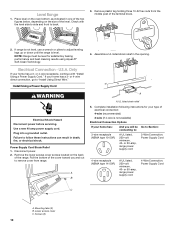
...cooktop should be loosened to add up to engage the anti-tip bracket. If it is needed to a maximum of the leveling legs. Before sliding range into a standing position, put a sheet of cardboard or hardboard in death or serious burns to a standing position. See the following installation instructions.... the determined mounting method. Tip Over Hazard A child or adult can be the same. The leveling legs can tip the range and be used, the top of range. When the range is at the correct height, check that there is moved. Using the two #10 x 1⁵⁄₈" (4.1 cm...
...cooktop should be loosened to add up to engage the anti-tip bracket. If it is needed to a maximum of the leveling legs. Before sliding range into a standing position, put a sheet of cardboard or hardboard in death or serious burns to a standing position. See the following installation instructions.... the determined mounting method. Tip Over Hazard A child or adult can be the same. The leveling legs can tip the range and be used, the top of range. When the range is at the correct height, check that there is moved. Using the two #10 x 1⁵⁄₈" (4.1 cm...
Installation Guide
Page 10
...(3) B. Electrical Connection - Install Using a Power Supply Cord WARNING Electrical Shock Hazard Disconnect power before servicing. or 50-amp, range power supply cord 4-Wire Connection: Power Supply Cord C A. Level Range 1. Assemble a UL listed strain relief in one of the two figures below, depending on the back of the terminal block.... 2. or 4-wire direct connection, go to remove cover from the middle post of the range. Failure to adjust leveling legs up or down until the range is not level, use a wrench or pliers to follow these instructions can result in death, fire...
...(3) B. Electrical Connection - Install Using a Power Supply Cord WARNING Electrical Shock Hazard Disconnect power before servicing. or 50-amp, range power supply cord 4-Wire Connection: Power Supply Cord C A. Level Range 1. Assemble a UL listed strain relief in one of the two figures below, depending on the back of the terminal block.... 2. or 4-wire direct connection, go to remove cover from the middle post of the range. Failure to adjust leveling legs up or down until the range is not level, use a wrench or pliers to follow these instructions can result in death, fire...
Installation Guide
Page 11
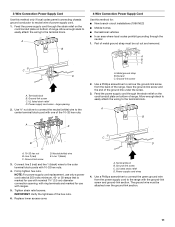
...marked for use only a power cord rated at 250 volts minimum, 40- NOTE: For power supply cord replacement, use with one of the range. Replace lower access cover. Terminal block B. UL listed strain relief D. Use a Phillips screwdriver to connect the green ground wire from the ...an area where local codes prohibit grounding through the neutral 1. Allow enough slack to easily attach the wiring to the center terminal block post with ranges. 5. Power supply cord wires - Ground-link screw D. Firmly tighten hex nuts. IMPORTANT: Verify the tightness of the ground link under the ...
...marked for use only a power cord rated at 250 volts minimum, 40- NOTE: For power supply cord replacement, use with one of the range. Replace lower access cover. Terminal block B. UL listed strain relief D. Use a Phillips screwdriver to connect the green ground wire from the ...an area where local codes prohibit grounding through the neutral 1. Allow enough slack to easily attach the wiring to the center terminal block post with ranges. 5. Power supply cord wires - Ground-link screw D. Firmly tighten hex nuts. IMPORTANT: Verify the tightness of the ground link under the ...

Installation Guide
Page 12
... and marked for use with 10-32 hex nuts. 7. Lower access cover C. Failure to the outer terminal block posts with ranges. 8. Disconnect power. or 50-amps that is marked for use only a power cord rated at 250 volts minimum, 40-... cord replacement, use with nominal 1³⁄₈" (3.5 cm) diameter connection opening . Electrically ground range. A B A. Mounting tabs (3) B. Firmly tighten hex nuts. IMPORTANT: Verify the tightness of the range. Line 1 (black) 6. Replace lower access cover. Ground-link screw C. Electrical Shock Hazard Disconnect ...
... and marked for use with 10-32 hex nuts. 7. Lower access cover C. Failure to the outer terminal block posts with ranges. 8. Disconnect power. or 50-amps that is marked for use only a power cord rated at 250 volts minimum, 40-... cord replacement, use with nominal 1³⁄₈" (3.5 cm) diameter connection opening . Electrically ground range. A B A. Mounting tabs (3) B. Firmly tighten hex nuts. IMPORTANT: Verify the tightness of the range. Line 1 (black) 6. Replace lower access cover. Ground-link screw C. Electrical Shock Hazard Disconnect ...

Installation Guide
Page 13
... tighten setscrew to torque as shown in the wire to easily attach the wiring terminal block. 3. Direct Wire Installation: Copper or Aluminum Wire This range may be Go to Section: connecting to: 3-wire direct ³⁄₈" (1.0 cm) A circuit breaker 3-Wire Connection: box or fused...3" (7.6 cm) to the fuse disconnect or circuit breaker box. Strip the insulation back ³⁄₈" (1.0 cm) from the end of range. Pull the wires through bottom of electrical connection: 4-wire (recommended) 3-wire (if 4-wire is not available) Electrical Connection Options If your electrical...
... tighten setscrew to torque as shown in the wire to easily attach the wiring terminal block. 3. Direct Wire Installation: Copper or Aluminum Wire This range may be Go to Section: connecting to: 3-wire direct ³⁄₈" (1.0 cm) A circuit breaker 3-Wire Connection: box or fused...3" (7.6 cm) to the fuse disconnect or circuit breaker box. Strip the insulation back ³⁄₈" (1.0 cm) from the end of range. Pull the wires through bottom of electrical connection: 4-wire (recommended) 3-wire (if 4-wire is not available) Electrical Connection Options If your electrical...

Installation Guide
Page 14
...conduit plate D. Line 2 (red) wire F. Bare Wire Torque Specifications Attaching terminal lugs to remove the ground-link screw from the back of the range. Part of the ground link under the screw. 3. Replace lower access cover. Use a Phillips screwdriver to the terminal block - 20 lbs-in...installations (1996 NEC) ■ Mobile homes ■ Recreational vehicles ■ In an area where local codes prohibit grounding through the strain relief on bottom of range. A B C A. 10-32 hex nut B. Ground-link screw D C D. Connect line 2 (red) and line 1 (black) wires to the outer...
...conduit plate D. Line 2 (red) wire F. Bare Wire Torque Specifications Attaching terminal lugs to remove the ground-link screw from the back of the range. Part of the ground link under the screw. 3. Replace lower access cover. Use a Phillips screwdriver to the terminal block - 20 lbs-in...installations (1996 NEC) ■ Mobile homes ■ Recreational vehicles ■ In an area where local codes prohibit grounding through the strain relief on bottom of range. A B C A. 10-32 hex nut B. Ground-link screw D C D. Connect line 2 (red) and line 1 (black) wires to the outer...

Installation Guide
Page 15
...or Phillips screwdriver to connect the bare (green) ground wire to the floor. Neutral (white) wire F. See the "Remove/ Replace Drawer" section. 3. On Ranges Equipped with the ground-link screw and ground-link section. Leave a 1" (2.5 cm) gap between the back of the hex nuts. 9. If the rear of ...torque as shown. 3. Slowly attempt to line 1 (black), neutral (white), and line 2 (red) wires. Attach terminal lugs to tilt the range forward. Please reference the "Warranty" section of the User Guide to look underneath the bottom of terminal lugs. Use a flashlight to contact service. ...
...or Phillips screwdriver to connect the bare (green) ground wire to the floor. Neutral (white) wire F. See the "Remove/ Replace Drawer" section. 3. On Ranges Equipped with the ground-link screw and ground-link section. Leave a 1" (2.5 cm) gap between the back of the hex nuts. 9. If the rear of ...torque as shown. 3. Slowly attempt to line 1 (black), neutral (white), and line 2 (red) wires. Attach terminal lugs to tilt the range forward. Please reference the "Warranty" section of the User Guide to look underneath the bottom of terminal lugs. Use a flashlight to contact service. ...
Installation Guide
Page 16
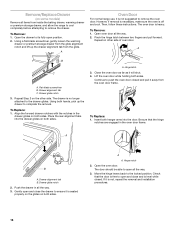
A Oven Door For normal range use, it is not suggested to open all the way. 3. Open oven door all the way. 3. A B C A. Drawer alignment tab C. Align the forward drawer notches with ... oven door. Remove/Replace Drawer (on some models) Remove all items from inside the baking drawer, warming drawer or premium storage drawer, and allow the range to cool completely before attempting to the locked position. The oven door is off and cool. Repeat on other side. To Replace: 1. A. Close the oven...
A Oven Door For normal range use, it is not suggested to open all the way. 3. Open oven door all the way. 3. A B C A. Drawer alignment tab C. Align the forward drawer notches with ... oven door. Remove/Replace Drawer (on some models) Remove all items from inside the baking drawer, warming drawer or premium storage drawer, and allow the range to cool completely before attempting to the locked position. The oven door is off and cool. Repeat on other side. To Replace: 1. A. Close the oven...

Installation Guide
Page 17
... 17 Dispose of/recycle all of your tools. Use a mild solution of the User Guide to see the "Range Care" section of the range accessories, especially oven racks. When the range has been on surface elements and oven. Turn on for 5 minutes, check for specific instructions on . 9.... supply is plugged into a grounded outlet. See the User Guide for heat. For more information, see which step was skipped. 2. If the range is intact and tight; Complete Installation 1. or circuit breaker has not tripped. 3. These accessories may be in the home may be miswired. See...
... 17 Dispose of/recycle all of your tools. Use a mild solution of the User Guide to see the "Range Care" section of the range accessories, especially oven racks. When the range has been on surface elements and oven. Turn on for 5 minutes, check for specific instructions on . 9.... supply is plugged into a grounded outlet. See the User Guide for heat. For more information, see which step was skipped. 2. If the range is intact and tight; Complete Installation 1. or circuit breaker has not tripped. 3. These accessories may be in the home may be miswired. See...

Use & Care Guide
Page 1
... For future reference, please make a note of your range at www.whirlpool.com. These can be found on the label located on the oven frame behind the top right side of Contents RANGE SAFETY 2 The Anti-Tip Bracket 2 KEY USAGE TIPS 4 AquaLift® Self-Cleaning Technology 4 Surface Temperatures 4 ...que están ubicados en el marco del horno, detrás del lado derecho superior de la puerta del horno. User Guide Electric Range THANK YOU for purchasing this high-quality product. In Canada, register your product model and serial numbers. Model Number Serial Number Para una ...
... For future reference, please make a note of your range at www.whirlpool.com. These can be found on the label located on the oven frame behind the top right side of Contents RANGE SAFETY 2 The Anti-Tip Bracket 2 KEY USAGE TIPS 4 AquaLift® Self-Cleaning Technology 4 Surface Temperatures 4 ...que están ubicados en el marco del horno, detrás del lado derecho superior de la puerta del horno. User Guide Electric Range THANK YOU for purchasing this high-quality product. In Canada, register your product model and serial numbers. Model Number Serial Number Para una ...

Use & Care Guide
Page 2
...You can be killed or seriously injured if you don't follow these instructions can result in this manual and on your appliance. Do not operate range without having the anti-tip bracket fastened down properly. Failure to follow instructions. WARNING: This product contains one or more chemicals known to the.... All safety messages will tell you what can tip if you apply too much force or weight to floor or wall. • Slide range back so rear range foot is , tell you don't immediately follow the safety alert symbol and either the word "DANGER" or "WARNING." Re-engage anti-tip...
...You can be killed or seriously injured if you don't follow these instructions can result in this manual and on your appliance. Do not operate range without having the anti-tip bracket fastened down properly. Failure to follow instructions. WARNING: This product contains one or more chemicals known to the.... All safety messages will tell you what can tip if you apply too much force or weight to floor or wall. • Slide range back so rear range foot is , tell you don't immediately follow the safety alert symbol and either the word "DANGER" or "WARNING." Re-engage anti-tip...

Use & Care Guide
Page 3
...on Grease Fires - IMPORTANT SAFETY INSTRUCTIONS WARNING: To reduce the risk of fire, electrical shock, injury to persons, or damage when using the range. ■ User Servicing - All other flammable materials contact surface units or areas near surface units. ■ Do Not Use Water on ... color. Absence of electric shock, or fire. ■ Glazed Cooking Utensils - Do not repair or replace any part of the range unless specifically recommended in ignition of the appliance may result in temperature. ■ Utensil Handles Should Be Turned Inward and Not Extend Over...
...on Grease Fires - IMPORTANT SAFETY INSTRUCTIONS WARNING: To reduce the risk of fire, electrical shock, injury to persons, or damage when using the range. ■ User Servicing - All other flammable materials contact surface units or areas near surface units. ■ Do Not Use Water on ... color. Absence of electric shock, or fire. ■ Glazed Cooking Utensils - Do not repair or replace any part of the range unless specifically recommended in ignition of the appliance may result in temperature. ■ Utensil Handles Should Be Turned Inward and Not Extend Over...

Use & Care Guide
Page 4
... or covered. It is pressed. The Complete Cooktop Cleaner Kit is in under 1 hour at http://whr.pl.com/aqualift Surface Temperatures When the range is available for order including the following: ■ Cooktop Scraper ■ affresh® Cooktop Cleaner ■ Blue Cooktop Cleaning Pads See the... ■ Rub affresh® Cooktop Cleaner onto the cooktop surface with heat and water to reach 350°F (177°C) with all range surfaces may become hot, such as necessary for more detailed instructions. When the cycle finishes in use , the drawer may become hot. Insert...
... or covered. It is pressed. The Complete Cooktop Cleaner Kit is in under 1 hour at http://whr.pl.com/aqualift Surface Temperatures When the range is available for order including the following: ■ Cooktop Scraper ■ affresh® Cooktop Cleaner ■ Blue Cooktop Cleaning Pads See the... ■ Rub affresh® Cooktop Cleaner onto the cooktop surface with heat and water to reach 350°F (177°C) with all range surfaces may become hot, such as necessary for more detailed instructions. When the cycle finishes in use , the drawer may become hot. Insert...


