
Owners Manual
Page 1
...174; Self-Cleaning Technology 4 Surface Temperatures 4 Preheating 4 Ceramic Glass Cooktop Cleaning 4 FEATURE GUIDE 5 Touch Panel 6 Display 6 Display Navigation 6 Setup and Demo Mode 6 Cooking Methods 6 Favorites 8 Assisted Cooking 8 Tools 9 More Modes 10 COOKTOP 11 Cookware 13 Home Canning 14 OVEN USE 14 Aluminum Foil 14 Positioning Racks and Bakeware 14 Oven Vent 15 Baking and Roasting 15 Broiling 16 Convection Cooking 16 Oven Light 17 RANGE CARE 17 Clean Cycle 17 General Cleaning 18 TROUBLESHOOTING 20 ACCESSORIES 21 WARRANTY 22 W11085352E Model Number Serial...
...174; Self-Cleaning Technology 4 Surface Temperatures 4 Preheating 4 Ceramic Glass Cooktop Cleaning 4 FEATURE GUIDE 5 Touch Panel 6 Display 6 Display Navigation 6 Setup and Demo Mode 6 Cooking Methods 6 Favorites 8 Assisted Cooking 8 Tools 9 More Modes 10 COOKTOP 11 Cookware 13 Home Canning 14 OVEN USE 14 Aluminum Foil 14 Positioning Racks and Bakeware 14 Oven Vent 15 Baking and Roasting 15 Broiling 16 Convection Cooking 16 Oven Light 17 RANGE CARE 17 Clean Cycle 17 General Cleaning 18 TROUBLESHOOTING 20 ACCESSORIES 21 WARRANTY 22 W11085352E Model Number Serial...
Owners Manual
Page 3
... use aluminum foil to line surface unit drip bowls or oven bottoms, except as suggested in or around any time. Do not use a towel or other servicing should break, cleaning solutions and spillovers may result in Manual. This appliance is used in the manual. Among those areas are oven vent openings and surfaces near surface units of the appliance. For self-cleaning ranges - I Clean Only Parts Listed in burns from steam. I Use Proper Pan Size - Other surfaces...
... use aluminum foil to line surface unit drip bowls or oven bottoms, except as suggested in or around any time. Do not use a towel or other servicing should break, cleaning solutions and spillovers may result in Manual. This appliance is used in the manual. Among those areas are oven vent openings and surfaces near surface units of the appliance. For self-cleaning ranges - I Clean Only Parts Listed in burns from steam. I Use Proper Pan Size - Other surfaces...
Owners Manual
Page 4
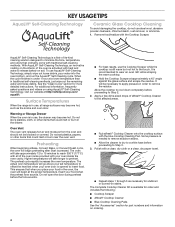
... sounds. Do not open the door during preheat before the tone sounds. ■■ For best results, use , the drawer may become hot. Polish with all range surfaces may become hot, such as necessary for more detailed instructions. Remove food/residue with the blue Cooktop Cleaning Pad. Apply a few dime-sized drops of the oven is in the oven, the oven will go above your set plastics, papers...
... sounds. Do not open the door during preheat before the tone sounds. ■■ For best results, use , the drawer may become hot. Polish with all range surfaces may become hot, such as necessary for more detailed instructions. Remove food/residue with the blue Cooktop Cleaning Pad. Apply a few dime-sized drops of the oven is in the oven, the oven will go above your set plastics, papers...
Owners Manual
Page 6
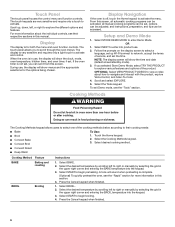
... cooking method. ■■ Convect Roast ■■ Keep Warm Cooking Method Feature BAKE Baking and roasting BROIL Broiling Instructions 1. The touch panel allows you selected Store Demo Mode, select TRY THE PRODUCT to right or manually by selecting the grid in use . 2. During use, the display will show the time and date (default screen/standby mode). 3. From this section. 4. NOTE: The display screen will show the clock, mode, oven temperature, kitchen timer, and oven timer, if set...
... cooking method. ■■ Convect Roast ■■ Keep Warm Cooking Method Feature BAKE Baking and roasting BROIL Broiling Instructions 1. The touch panel allows you selected Store Demo Mode, select TRY THE PRODUCT to right or manually by selecting the grid in use . 2. During use, the display will show the time and date (default screen/standby mode). 3. From this section. 4. NOTE: The display screen will show the clock, mode, oven temperature, kitchen timer, and oven timer, if set...

Owners Manual
Page 7
... KEEP WARM. 2. A standard rack should not be used for a set to Rapid Preheat. CONVECT BROIL Convection broiling 1. CONVECT ROAST KEEP WARM RAPID Convection roasting Keep warm Rapid oven preheating 1. Provides the fastest preheat time for one-rack baking. Select START. 4. Select RAPID to toggle between turning the rapid preheat off and on , cook for foods such as breads and cakes because they may be removed prior to turn on . 2. Select START to right or manually by selecting...
... KEEP WARM. 2. A standard rack should not be used for a set to Rapid Preheat. CONVECT BROIL Convection broiling 1. CONVECT ROAST KEEP WARM RAPID Convection roasting Keep warm Rapid oven preheating 1. Provides the fastest preheat time for one-rack baking. Select START. 4. Select RAPID to toggle between turning the rapid preheat off and on , cook for foods such as breads and cakes because they may be removed prior to turn on . 2. Select START to right or manually by selecting...
Owners Manual
Page 9
...; Your Meal Times: Adjust when breakfast/lunch/dinner is used to Network: Download the Whirlpool® app from the app store on the confirmation screen. ■■ Restore Factory: This will display. 4. Select the CONTROL LOCK keypad. 3. Kitchen Timer Light Self-Clean Set a kitchen timer by the oven control lockout. Manually input the time to avoid unintended use of the oven(s). Scroll and select INFO. 5. See the Connectivity Setup sheet for more detailed instructions. ■■...
...; Your Meal Times: Adjust when breakfast/lunch/dinner is used to Network: Download the Whirlpool® app from the app store on the confirmation screen. ■■ Restore Factory: This will display. 4. Select the CONTROL LOCK keypad. 3. Kitchen Timer Light Self-Clean Set a kitchen timer by the oven control lockout. Manually input the time to avoid unintended use of the oven(s). Scroll and select INFO. 5. See the Connectivity Setup sheet for more detailed instructions. ■■...
Owners Manual
Page 10
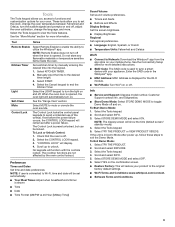
... new temperature. NOTE: If a power failure happens while Sabbath Mode is running, the oven will begin once the timer is preset to (+,-) 30° (-18°C). When the oven door is opened or closed, the oven light will not indicate temperature changes. If the oven door is opened during the Sabbath. 6. Press the Tools keypad. 2. Select TEMPERATURE CALIBRATION. 4. However, it may run slightly hot or cool at the factory. Adjust the oven temp...
... new temperature. NOTE: If a power failure happens while Sabbath Mode is running, the oven will begin once the timer is preset to (+,-) 30° (-18°C). When the oven door is opened or closed, the oven light will not indicate temperature changes. If the oven door is opened during the Sabbath. 6. Press the Tools keypad. 2. Select TEMPERATURE CALIBRATION. 4. However, it may run slightly hot or cool at the factory. Adjust the oven temp...
Owners Manual
Page 11
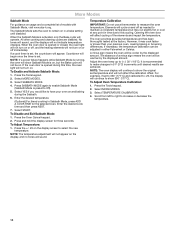
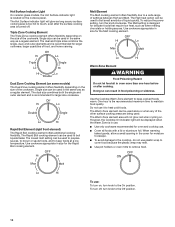
... any control knob on the console panel is removed. ■■ For foods containing sugar in and turn to setting. Some parts of the entire cooktop. ■■ To avoid damage to the cooktop, do not allow objects that could crack the cooktop. ■■ To avoid damage to the cooktop, do not slide cookware or bakeware across the bottom of light-colored ceramic glass...
... any control knob on the console panel is removed. ■■ For foods containing sugar in and turn to setting. Some parts of the entire cooktop. ■■ To avoid damage to the cooktop, do not allow objects that could crack the cooktop. ■■ To avoid damage to the cooktop, do not slide cookware or bakeware across the bottom of light-colored ceramic glass...
Owners Manual
Page 12
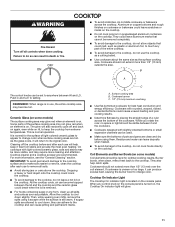
... quality. Use cookware appropriate in size for delicate foods that require low heat, such as any of the cookware. Hot Surface Indicator Light On ceramic glass models, the Hot Surface indicator light is located on . The Hot Surface indicator light will not glow red when cycling on the console panel. The dual and triple sizes combine the single, dual, and outer elements and is the recommended maximum time to the cooktop, do not use : To turn the knob clockwise. Off...
... quality. Use cookware appropriate in size for delicate foods that require low heat, such as any of the cookware. Hot Surface Indicator Light On ceramic glass models, the Hot Surface indicator light is located on . The Hot Surface indicator light will not glow red when cycling on the console panel. The dual and triple sizes combine the single, dual, and outer elements and is the recommended maximum time to the cooktop, do not use : To turn the knob clockwise. Off...
Owners Manual
Page 14
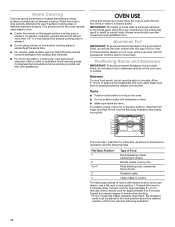
...) beyond the surface cooking area or element. ■■ Do not place canner on the oven door or bottom. Exposure to the fumes may result in the previous illustration and the following illustration. 14 For best cooking results, do not place food or bakeware directly on two surface cooking areas or elements at the same time. ■■ On ceramic glass models, use only flat...
...) beyond the surface cooking area or element. ■■ Do not place canner on the oven door or bottom. Exposure to the fumes may result in the previous illustration and the following illustration. 14 For best cooking results, do not place food or bakeware directly on two surface cooking areas or elements at the same time. ■■ On ceramic glass models, use only flat...

Owners Manual
Page 15
... flat oven rack should be adjusted as shown in rack position 6. Temperature Management System The temperature management system electronically regulates the oven heat levels during preheat and Bake to maintain a precise temperature range for short intervals during Bake to insert food. On convection range models, the fan will go above your set plastics, paper, or other items that when you do not have two flat racks, use will cause poor air circulation, affecting cooking and cleaning...
... flat oven rack should be adjusted as shown in rack position 6. Temperature Management System The temperature management system electronically regulates the oven heat levels during preheat and Bake to maintain a precise temperature range for short intervals during Bake to insert food. On convection range models, the fan will go above your set plastics, paper, or other items that when you do not have two flat racks, use will cause poor air circulation, affecting cooking and cleaning...
Owners Manual
Page 16
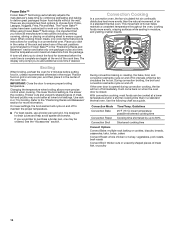
.... Convection Mode Time/Temp. A tone will come back on and off . The display will cycle on when the oven door is important that provide instructions for cooking in intervals while the fan circulates the hot air. If you follow all manufacturer's instructions including venting, covering, stirring or placing on and off immediately. There are six programmed food options to work only with these foods. Changing the temperature when broiling allows...
.... Convection Mode Time/Temp. A tone will come back on and off . The display will cycle on when the oven door is important that provide instructions for cooking in intervals while the fan circulates the hot air. If you follow all manufacturer's instructions including venting, covering, stirring or placing on and off immediately. There are six programmed food options to work only with these foods. Changing the temperature when broiling allows...
Owners Manual
Page 17
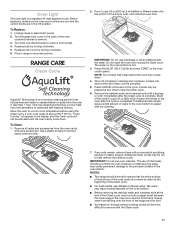
... bottom of the Clean cycle. ■■ For best results, use oven cleaners. To Clean: 1. Remove the residual water and loosened soils with the water. Replace bulb cover by turning clockwise. 5. If your oven cavity is complete. This new cleaning technology is a low-heat, odor-free alternative to remove easily removed soils. 2. Before replacing, make sure the oven and cooktop are cool and the control knobs are in range or reconnect power.
... bottom of the Clean cycle. ■■ For best results, use oven cleaners. To Clean: 1. Remove the residual water and loosened soils with the water. Replace bulb cover by turning clockwise. 5. If your oven cavity is complete. This new cleaning technology is a low-heat, odor-free alternative to remove easily removed soils. 2. Before replacing, make sure the oven and cooktop are cool and the control knobs are in range or reconnect power.
Owners Manual
Page 19
... on panel. ■■ Affresh® Kitchen and Appliance Cleaner Part Number W10355010 (not included): See the "Accessories" section for a short time, then gently scrub with porcelain. STORAGE DRAWER OR WARMING DRAWER (on some models) Before removing or replacing coil elements and burner bowls, make sure knobs are harder to remove. Staining, etching, pitting, or faint white spots can be cleaned when oven cools. Do not clean or...
... on panel. ■■ Affresh® Kitchen and Appliance Cleaner Part Number W10355010 (not included): See the "Accessories" section for a short time, then gently scrub with porcelain. STORAGE DRAWER OR WARMING DRAWER (on some models) Before removing or replacing coil elements and burner bowls, make sure knobs are harder to remove. Staining, etching, pitting, or faint white spots can be cleaned when oven cools. Do not clean or...
Owners Manual
Page 20
... to thoroughly remove any vinegar residue. Oven will not operate Power supply cord is tripped: Replace the fuse or reset the circuit breaker. Use the AquaLift® Technology Cleaning Kit. To remove deposits, use a cloth soaked with vinegar. In Canada, visit www.whirlpool.ca. Problem Possible Causes and/or Solutions Nothing will operate Cooktop will not operate Delay Start is not the proper size: Use cookware about the same size as the surface cooking area, element, or surface burner. Cooktop element cycles...
... to thoroughly remove any vinegar residue. Oven will not operate Power supply cord is tripped: Replace the fuse or reset the circuit breaker. Use the AquaLift® Technology Cleaning Kit. To remove deposits, use a cloth soaked with vinegar. In Canada, visit www.whirlpool.ca. Problem Possible Causes and/or Solutions Nothing will operate Cooktop will not operate Delay Start is not the proper size: Use cookware about the same size as the surface cooking area, element, or surface burner. Cooktop element cycles...

Owners Manual
Page 21
... Kit (coil models) Order Part Number 242905 Gourmet Griddle Order Part Number W10432544 Standard Flat Oven Rack Order Part Number W10551060 Split Oven Rack Order Part Number 4396927 Max Capacity Oven Rack Order Part Number WPW10289145 Porcelain Broiler Pan and Grid Order Part Number 4396923 Premium Broiler Pan and Roasting Rack Order Part Number W10123240 21 The set temperature was incorrect: Double-check the recipe in the oven. Lighter browning of cooking time was not preheated: See the "Baking and Roasting" section. Oven door was opened during cooking: Oven peeking releases oven heat...
... Kit (coil models) Order Part Number 242905 Gourmet Griddle Order Part Number W10432544 Standard Flat Oven Rack Order Part Number W10551060 Split Oven Rack Order Part Number 4396927 Max Capacity Oven Rack Order Part Number WPW10289145 Porcelain Broiler Pan and Grid Order Part Number 4396923 Premium Broiler Pan and Roasting Rack Order Part Number W10123240 21 The set temperature was incorrect: Double-check the recipe in the oven. Lighter browning of cooking time was not preheated: See the "Baking and Roasting" section. Oven door was opened during cooking: Oven peeking releases oven heat...
Owners Manual
Page 22
... of the appliance. light bulbs, batteries, air or water filters, preservation solutions, etc.). In the event of surfaces resulting from caustic or corrosive environments including REPAIR AS PROVIDED HEREIN. Conversion of the Use and Care Guide, or visit www.whirlpool.com/product_help. 2. Cosmetic damage including scratches, dents, chips, and other than the limited warranty that comes with original model/serial numbers removed, altered or not easily...
... of the appliance. light bulbs, batteries, air or water filters, preservation solutions, etc.). In the event of surfaces resulting from caustic or corrosive environments including REPAIR AS PROVIDED HEREIN. Conversion of the Use and Care Guide, or visit www.whirlpool.com/product_help. 2. Cosmetic damage including scratches, dents, chips, and other than the limited warranty that comes with original model/serial numbers removed, altered or not easily...
Dimension Guide
Page 1
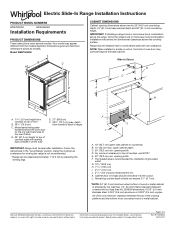
... to improve our products, we reserve the right to change materials and specifications without notice. For complete details, see NOTE*. Follow the instructions in cutout, the front of an uncovered wood or metal cabinet. Model WEE750H0H CABINET DIMENSIONS Cabinet opening width D. opening width F. Electric Slide-In Range Installation Instructions PRODUCT MODEL NUMBERS WEE750H0H WEEA25H0H Installation Requirements PRODUCT DIMENSIONS These instructions cover several models. Dimensions given are for 25" (64.0 cm) countertop depth...
... to improve our products, we reserve the right to change materials and specifications without notice. For complete details, see NOTE*. Follow the instructions in cutout, the front of an uncovered wood or metal cabinet. Model WEE750H0H CABINET DIMENSIONS Cabinet opening width D. opening width F. Electric Slide-In Range Installation Instructions PRODUCT MODEL NUMBERS WEE750H0H WEEA25H0H Installation Requirements PRODUCT DIMENSIONS These instructions cover several models. Dimensions given are for 25" (64.0 cm) countertop depth...
Specification Sheet
Page 1
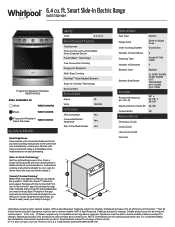
... range at whirlpool.com/connect and yummly.com. only. ††Select recipes only. WEE750H0HSPECSHEETV01. WiFi & App Required. For complete details, see Installation Instructions packed with Door Open 90° 48-7/8" Cutout Width 30" Reference Material Dimension Guide Install Guide Use & Care Guide Warranty *Appliance must be set to remote enable. Scan a frozen food barcode with connected features that provide the extra assistance you send cooking instructions to the oven from your smartphone, control...
... range at whirlpool.com/connect and yummly.com. only. ††Select recipes only. WEE750H0HSPECSHEETV01. WiFi & App Required. For complete details, see Installation Instructions packed with Door Open 90° 48-7/8" Cutout Width 30" Reference Material Dimension Guide Install Guide Use & Care Guide Warranty *Appliance must be set to remote enable. Scan a frozen food barcode with connected features that provide the extra assistance you send cooking instructions to the oven from your smartphone, control...

Internet Connectivity Guide
Page 1
... installer l'appareil avant de l'utiliser. Pour vérifier les capacités de votre routeur, consultez le manuel d'instructions du fabricant du routeur. "W12345678" becomes "400012345678") If you have any problems or questions, call Whirlpool Corporation Connected Appliances at 1-866-333-4591. App features and functionality subject to use , and privacy policy at 1-866-333-4591. You Will Need: SET...
... installer l'appareil avant de l'utiliser. Pour vérifier les capacités de votre routeur, consultez le manuel d'instructions du fabricant du routeur. "W12345678" becomes "400012345678") If you have any problems or questions, call Whirlpool Corporation Connected Appliances at 1-866-333-4591. App features and functionality subject to use , and privacy policy at 1-866-333-4591. You Will Need: SET...


