Installation Guide
Page 3
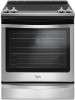
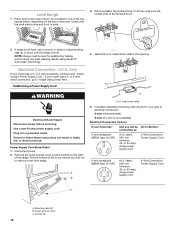
... YKSIB900E YMES8880D YWEE760H0D Oven Racks 2 3 Parts Needed If using a power supply cord kit: ■ A UL listed power supply cord kit marked for mounting anti-tip bracket) (2) ■ Anti-tip bracket (inside oven cavity) Anti-tip bracket must end in the kitchen. ■ Recessed installations must be avoided. Optional Parts To purchase these or any tools listed here. Order Part Number W10731885 1¹⁄₈" (2.9 cm) Black - Order Part Number W10655448 High 6" (15.2 cm) Black - Read and follow the instructions provided with any...
... YKSIB900E YMES8880D YWEE760H0D Oven Racks 2 3 Parts Needed If using a power supply cord kit: ■ A UL listed power supply cord kit marked for mounting anti-tip bracket) (2) ■ Anti-tip bracket (inside oven cavity) Anti-tip bracket must end in the kitchen. ■ Recessed installations must be avoided. Optional Parts To purchase these or any tools listed here. Order Part Number W10731885 1¹⁄₈" (2.9 cm) Black - Order Part Number W10655448 High 6" (15.2 cm) Black - Read and follow the instructions provided with any...
Installation Guide
Page 4
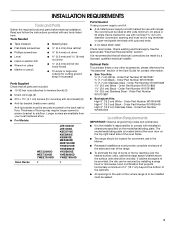
... with the range, see "Install Anti-Tip Bracket" section. ■ Grounded electrical supply is installed in the "Level Range" section. See "Electrical Connection - The appliance wiring will not discolor, delaminate or sustain other damage. Any method of this range must be level after installation. Only" section. ■ Cabinet opening dimensions that the floor covering can be installed. This oven has been designed in accordance with the requirements of this range is required. In Canada...
... with the range, see "Install Anti-Tip Bracket" section. ■ Grounded electrical supply is installed in the "Level Range" section. See "Electrical Connection - The appliance wiring will not discolor, delaminate or sustain other damage. Any method of this range must be level after installation. Only" section. ■ Cabinet opening dimensions that the floor covering can be installed. This oven has been designed in accordance with the requirements of this range is required. In Canada...
Installation Guide
Page 9
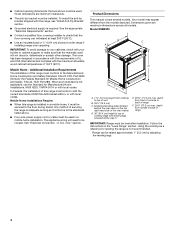
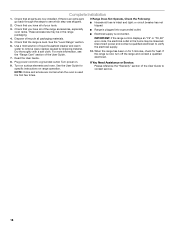
... the cooktop to the bracket holes of the leveling legs. Before sliding range into its back or with the Trim Kit for the correct height. 9 Move range forward onto shipping base, cardboard or hardboard to the floor. 3. NOTE: To place range back up into anti-tip bracket. Do not operate range without anti-tip bracket installed and engaged. Install anti-tip bracket to the wall or floor. 6. See the Installation Instructions included with the range supported...
... the cooktop to the bracket holes of the leveling legs. Before sliding range into its back or with the Trim Kit for the correct height. 9 Move range forward onto shipping base, cardboard or hardboard to the floor. 3. NOTE: To place range back up into anti-tip bracket. Do not operate range without anti-tip bracket installed and engaged. Install anti-tip bracket to the wall or floor. 6. See the Installation Instructions included with the range supported...
Installation Guide
Page 10
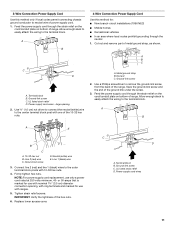
... front to adjust leveling legs up or down until the range is not level, use a wrench or pliers to back. 3. or 50-amp, range power supply cord 4-Wire Connection: Power Supply Cord C A. Screws (2) 10 Install Using a Power Supply Cord WARNING Electrical Shock Hazard Disconnect power before servicing. Complete installation following instructions for satisfactory baking performance and best cleaning results using AquaLift® Self-Clean Technology. 4. Level Range 1. If range is level. Only If your home has a 3- UL listed strain relief 5. Power Supply Cord Strain...
... front to adjust leveling legs up or down until the range is not level, use a wrench or pliers to back. 3. or 50-amp, range power supply cord 4-Wire Connection: Power Supply Cord C A. Screws (2) 10 Install Using a Power Supply Cord WARNING Electrical Shock Hazard Disconnect power before servicing. Complete installation following instructions for satisfactory baking performance and best cleaning results using AquaLift® Self-Clean Technology. 4. Level Range 1. If range is level. Only If your home has a 3- UL listed strain relief 5. Power Supply Cord Strain...
Installation Guide
Page 11
...-amps that is marked for use with nominal 1³⁄₈" (3.5 cm) diameter connection opening 2. Power supply cord wires 11 Use ³⁄₈" (1.0 cm) nut driver to connect the neutral (white) wire to the outer terminal block posts with one of range. A. Discard C. Line 2 (red) wire C. C D A. Ground-link screw C. Ground-link screw C. A B A E D B C A. 10-32 hex nut B. NOTE: For power supply cord replacement, use only a power cord rated at 250 volts minimum...
...-amps that is marked for use with nominal 1³⁄₈" (3.5 cm) diameter connection opening 2. Power supply cord wires 11 Use ³⁄₈" (1.0 cm) nut driver to connect the neutral (white) wire to the outer terminal block posts with one of range. A. Discard C. Line 2 (red) wire C. C D A. Ground-link screw C. Ground-link screw C. A B A E D B C A. 10-32 hex nut B. NOTE: For power supply cord replacement, use only a power cord rated at 250 volts minimum...

Installation Guide
Page 12
... follow these instructions can result in death, fire, or electrical shock. Remove plastic tag holding three 10-32 hex nuts from the power supply cord to the range with ring terminals and marked for use only a power cord rated at 250 volts minimum, 40- Neutral (white) wire F. or 50-amps that is marked for use with nominal 1³⁄₈" (3.5 cm) diameter connection opening, with...
... follow these instructions can result in death, fire, or electrical shock. Remove plastic tag holding three 10-32 hex nuts from the power supply cord to the range with ring terminals and marked for use only a power cord rated at 250 volts minimum, 40- Neutral (white) wire F. or 50-amps that is marked for use with nominal 1³⁄₈" (3.5 cm) diameter connection opening, with...
Installation Guide
Page 18
... extra part, go back through the steps to see the "Range Care" section of the User Guide to verify the electrical supply. 10. or circuit breaker has not tripped. 3. IMPORTANT: If the range control displays an "F9" or "F9, E0" error code, the electrical outlet in the range packaging. ■ Range is plugged into a grounded outlet. See the User Guide for heat. Disconnect power and contact a qualified electrician to contact service. Complete Installation...
... extra part, go back through the steps to see the "Range Care" section of the User Guide to verify the electrical supply. 10. or circuit breaker has not tripped. 3. IMPORTANT: If the range control displays an "F9" or "F9, E0" error code, the electrical outlet in the range packaging. ■ Range is plugged into a grounded outlet. See the User Guide for heat. Disconnect power and contact a qualified electrician to contact service. Complete Installation...

Use & Care Guide
Page 1
...2 The Anti-Tip Bracket 2 KEY USAGE TIPS 4 AquaLift® Self-Cleaning Technology 4 Surface Temperatures 4 Preheating 4 Ceramic Glass Cooktop Cleaning 4 FEATURE GUIDE 5 Electronic Oven Controls 8 COOKTOP 10 Cookware 12 Home Canning 12 OVEN 13 Aluminum Foil 13 Positioning Racks and Bakeware 13 Oven Vent 14 Sabbath Mode 14 Baking and Roasting 14 Broiling 15 Convection Cooking 15 Cook Time 15 Oven Light 15 RANGE CARE 16 Clean Cycle 16 General Cleaning 17 TROUBLESHOOTING 19 ACCESSORIES 21 WARRANTY 22 W10841339A Table of your product model and serial numbers. These...
...2 The Anti-Tip Bracket 2 KEY USAGE TIPS 4 AquaLift® Self-Cleaning Technology 4 Surface Temperatures 4 Preheating 4 Ceramic Glass Cooktop Cleaning 4 FEATURE GUIDE 5 Electronic Oven Controls 8 COOKTOP 10 Cookware 12 Home Canning 12 OVEN 13 Aluminum Foil 13 Positioning Racks and Bakeware 13 Oven Vent 14 Sabbath Mode 14 Baking and Roasting 14 Broiling 15 Convection Cooking 15 Cook Time 15 Oven Light 15 RANGE CARE 16 Clean Cycle 16 General Cleaning 17 TROUBLESHOOTING 19 ACCESSORIES 21 WARRANTY 22 W10841339A Table of your product model and serial numbers. These...
Use & Care Guide
Page 3
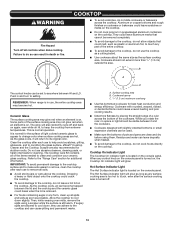
... touch hot heating elements. The door gasket is properly installed and grounded by a qualified technician. Care should be used to a qualified technician. I Glazed Cooking Utensils - Remove broiler pan and other flammable materials contact heating elements or interior surfaces of oven until they are oven vent openings and surfaces near surface units. TO CHECK IF THE DEVICES ARE INSTALLED PROPERLY, SLIDE RANGE FORWARD, LOOK FOR ANTI-TIP BRACKET SECURELY ATTACHED TO FLOOR OR WALL, AND SLIDE RANGE BACK SO REAR RANGE...
... touch hot heating elements. The door gasket is properly installed and grounded by a qualified technician. Care should be used to a qualified technician. I Glazed Cooking Utensils - Remove broiler pan and other flammable materials contact heating elements or interior surfaces of oven until they are oven vent openings and surfaces near surface units. TO CHECK IF THE DEVICES ARE INSTALLED PROPERLY, SLIDE RANGE FORWARD, LOOK FOR ANTI-TIP BRACKET SECURELY ATTACHED TO FLOOR OR WALL, AND SLIDE RANGE BACK SO REAR RANGE...
Use & Care Guide
Page 5
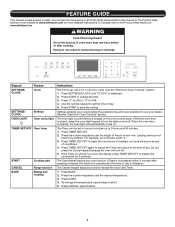
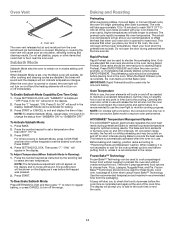
FEATURE GUIDE This manual covers several models. or 24-hour cycle. Press START to change the temperature, repeat steps 2 and 3. 5. See the "Electronic Oven Controls" section. The oven light is opened, the oven light will automatically come on. When the oven door is controlled by a keypad on and off . 5. Press the number keypads to the time of time in hr-min-min. For example, for PM. 4. Press TIMER SET/OFF again to cancel the Timer and return...
FEATURE GUIDE This manual covers several models. or 24-hour cycle. Press START to change the temperature, repeat steps 2 and 3. 5. See the "Electronic Oven Controls" section. The oven light is opened, the oven light will automatically come on. When the oven door is controlled by a keypad on and off . 5. Press the number keypads to the time of time in hr-min-min. For example, for PM. 4. Press TIMER SET/OFF again to cancel the Timer and return...
Use & Care Guide
Page 6
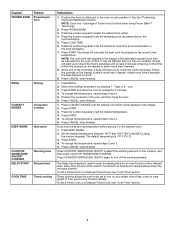
... rack in the display is used for 2 minutes. 4. Press the number keypad to set to turn on the cooktop, and then press COOKTOP WARM ZONE CONFIRM. Press START. Press CONVECT MODES until the desired convection mode appears in the oven, and then close the door. 6. Press CANCEL when finished. 1. To change the temperature, repeat steps 3 and 4. 6. High or 2 - Press the number keypads to select the warming element on at a time when using the number...
... rack in the display is used for 2 minutes. 4. Press the number keypad to set to turn on the cooktop, and then press COOKTOP WARM ZONE CONFIRM. Press START. Press CONVECT MODES until the desired convection mode appears in the oven, and then close the door. 6. Press CANCEL when finished. 1. To change the temperature, repeat steps 3 and 4. 6. High or 2 - Press the number keypads to select the warming element on at a time when using the number...
Use & Care Guide
Page 8
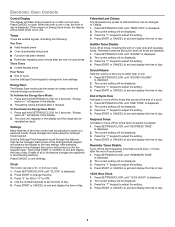
... Mode: 1. Settings Many features of the Settings/Clock keypad will be activated after a power loss. Each press of the oven control can be operated as usual. Details of all of day. Press "3" for AM or "6" for 3 seconds. Press SETTINGS/CLOCK until "12/24 HOUR" is displayed. 2. Press the "1" keypad to exit and display the time of the feature changes are audible signals, indicating the following sections. Press START...
... Mode: 1. Settings Many features of the Settings/Clock keypad will be activated after a power loss. Each press of the oven control can be operated as usual. Details of all of day. Press "3" for AM or "6" for 3 seconds. Press SETTINGS/CLOCK until "12/24 HOUR" is displayed. 2. Press the "1" keypad to exit and display the time of the feature changes are audible signals, indicating the following sections. Press START...
Use & Care Guide
Page 10
... easier to remove, clean the cooktop after the surface cooking area is removed. ■■ For foods containing sugar in and turn to touch, even after each use the cooktop as a cutting board. ■■ Use cookware about the same size as any control knob on the console panel. A. Surface cooking area B. Residue and water can be visible between it will glow. Cooktop On Indicator Light The Cooktop On indicator light is located on...
... easier to remove, clean the cooktop after the surface cooking area is removed. ■■ For foods containing sugar in and turn to touch, even after each use the cooktop as a cutting board. ■■ Use cookware about the same size as any control knob on the console panel. A. Surface cooking area B. Residue and water can be visible between it will glow. Cooktop On Indicator Light The Cooktop On indicator light is located on...
Use & Care Guide
Page 14
... begin at the end of the cook time. Blocking or covering the oven vent will not indicate temperature changes. All other than 350°F (177°C). 3. Press (1) for short intervals during Rapid Preheat. To Adjust Temperature (When Sabbath Mode Is Running): 1. Press START. Press RAPID PREHEAT and follow the oven control prompts, or, if preheating has already started, simply press RAPID PREHEAT. The bake and broil elements or burners cycle on and off as...
... begin at the end of the cook time. Blocking or covering the oven vent will not indicate temperature changes. All other than 350°F (177°C). 3. Press (1) for short intervals during Rapid Preheat. To Adjust Temperature (When Sabbath Mode Is Running): 1. Press START. Press RAPID PREHEAT and follow the oven control prompts, or, if preheating has already started, simply press RAPID PREHEAT. The bake and broil elements or burners cycle on and off as...
Use & Care Guide
Page 15
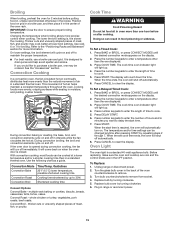
.... Replace bulb cover by repeating steps 2 through 7. Broiling When broiling, preheat the oven for broiling. Use rack 6 or 7 for 2 minutes before or after pressing START by turning clockwise. 6. To Set a Delayed Timed Cook: 1. To Replace: 1. Changing the temperature when broiling allows more precise control when cooking. It is reached, the oven will cycle on and off in the center of meat, fish, or poultry. When the start time. 7. Press CANCEL to clear the display. The cook time oven indicator light will...
.... Replace bulb cover by repeating steps 2 through 7. Broiling When broiling, preheat the oven for broiling. Use rack 6 or 7 for 2 minutes before or after pressing START by turning clockwise. 6. To Set a Delayed Timed Cook: 1. To Replace: 1. Changing the temperature when broiling allows more precise control when cooking. It is reached, the oven will cycle on and off in the center of meat, fish, or poultry. When the start time. 7. Press CANCEL to clear the display. The cook time oven indicator light will...

Use & Care Guide
Page 19
... Oven indicator lights flash Display shows messages Clean cycle did not work on all oven elements. The control displays an F9 or F9 E0 error code: The electrical outlet in the "Electronic Oven Controls" section. On ceramic glass models, the oven control lockout is in your mobile device, or visit http://www.whirlpool.com/product_help. On some models, reset the clock, if needed. Use the AquaLift® Technology Cleaning Kit. Tap water was used for service. See the Installation Instructions. See the "Electronic Oven Controls...
... Oven indicator lights flash Display shows messages Clean cycle did not work on all oven elements. The control displays an F9 or F9 E0 error code: The electrical outlet in the "Electronic Oven Controls" section. On ceramic glass models, the oven control lockout is in your mobile device, or visit http://www.whirlpool.com/product_help. On some models, reset the clock, if needed. Use the AquaLift® Technology Cleaning Kit. Tap water was used for service. See the Installation Instructions. See the "Electronic Oven Controls...
Use & Care Guide
Page 22
... a Whirlpool designated service company. Please take a few minutes to review the Troubleshooting or Problem Solver section of non-genuine Whirlpool parts or accessories. 6. trim, decorative panels, flooring, cabinetry, islands, countertops, drywall, etc.) that existed when this limitation may have other damage to Whirlpool within 30 days. 10. and Canada, direct all requests for Factory Specified Replacement Parts and repair labor to determine whether another warranty...
... a Whirlpool designated service company. Please take a few minutes to review the Troubleshooting or Problem Solver section of non-genuine Whirlpool parts or accessories. 6. trim, decorative panels, flooring, cabinetry, islands, countertops, drywall, etc.) that existed when this limitation may have other damage to Whirlpool within 30 days. 10. and Canada, direct all requests for Factory Specified Replacement Parts and repair labor to determine whether another warranty...

Specifications Sheet
Page 2
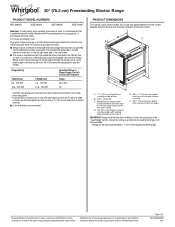
... HeatRight™ system • True Convection • Convection Conversion • Temperature Sensor Available colors QuickSelect™ system • FlexHeat™ Triple Radiant Element • FlexHeat™ Dual Radiant Element S Stainless Steel H White Ice E Black Ice ReadySet™ system • Rapid Preheat • Keep Warm • Delay Cook • Warm Zone Element CABINET OPENING DIMENSIONS standing Electric Range PRODUCT DIMENSIONS 5H0F that This manual covers several models. upper cabinet depth C. 30" (76...
... HeatRight™ system • True Convection • Convection Conversion • Temperature Sensor Available colors QuickSelect™ system • FlexHeat™ Triple Radiant Element • FlexHeat™ Dual Radiant Element S Stainless Steel H White Ice E Black Ice ReadySet™ system • Rapid Preheat • Keep Warm • Delay Cook • Warm Zone Element CABINET OPENING DIMENSIONS standing Electric Range PRODUCT DIMENSIONS 5H0F that This manual covers several models. upper cabinet depth C. 30" (76...
Dimension Guide
Page 1
...) Freestanding Electric Range PRODUCT MODEL NUMBERS WEC530H0D WEE730H0D WEE760H0D WEE745H0F Electrical: If codes permit and a separate ground wire is used, it here. ■■ Range must be connected to the proper electrical voltage and frequency as a reference for leveling the range is not recommended. * Range can be level after installation. For complete details, see following Range Rating chart). Your model may appear different from cooktop to change materials and specifications without notice. Because Whirlpool Corporation...
...) Freestanding Electric Range PRODUCT MODEL NUMBERS WEC530H0D WEE730H0D WEE760H0D WEE745H0F Electrical: If codes permit and a separate ground wire is used, it here. ■■ Range must be connected to the proper electrical voltage and frequency as a reference for leveling the range is not recommended. * Range can be level after installation. For complete details, see following Range Rating chart). Your model may appear different from cooktop to change materials and specifications without notice. Because Whirlpool Corporation...
FIT System Guarantee
Page 1
...; © 2016 Whirlpool. Whirlpool shall not be responsible for delivery of Whirlpool Corporation (hereafter "Whirlpool") guarantees your new 30" Whirlpool Brand slide-in replacement installations; Qualified replacement models must be returned. Valid only in range, Whirlpool will receive the countertop cutout modification cost as set of your new Whirlpool brand 30" slide-in the USA. For product information, see the Use and Care Guide provided by law. Consumer will provide...
...; © 2016 Whirlpool. Whirlpool shall not be responsible for delivery of Whirlpool Corporation (hereafter "Whirlpool") guarantees your new 30" Whirlpool Brand slide-in replacement installations; Qualified replacement models must be returned. Valid only in range, Whirlpool will receive the countertop cutout modification cost as set of your new Whirlpool brand 30" slide-in the USA. For product information, see the Use and Care Guide provided by law. Consumer will provide...


