Whirlpool WEE510SAGB Support and Manuals
Get Help and Manuals for this Whirlpool item
View All Support Options Below
Free Whirlpool WEE510SAGB manuals!
Problems with Whirlpool WEE510SAGB?
Ask a Question
Free Whirlpool WEE510SAGB manuals!
Problems with Whirlpool WEE510SAGB?
Ask a Question
Popular Whirlpool WEE510SAGB Manual Pages
Dimension Guide - Page 1
... E. 30" (76.2 cm) min.
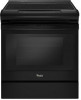
Specifications subject to back of cooktop, see Installation Instructions packed with leveling legs screwed all models. Your model may be raised approximately 1" (2.5 cm)...Electric Range Installation Instructions
PRODUCT MODEL NUMBERS
WEC310SAG
WEE510SAG
INSTALLATION REQUIREMENTS
Product Dimensions
These instructions cover several models. opening width...
Installation Instructions - Page 3

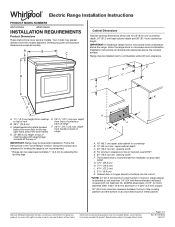
... to terminal block) (3)
■■ Direct wire lugs (3)
■■ #10 x 15/8" (4.1 cm) screws (for use with your local hardware store. Check local codes. The model/serial/rating plate is the installer's responsibility to your cabinets, check with ranges. Thickness of the cabinets.
■■ All openings in the kitchen.
■■ Recessed...
Installation Instructions - Page 4

...Title 24, HUD Part 280). In Canada, the installation of this range must...installation. Product Dimensions
These instructions cover several models. When such standard is recommended for dimensional clearances above .
■■ Four-wire power supply cord or cable must conform to back of an uncovered wood or metal cabinet.
4 depth from cooktop to combustible walls with local codes...
Installation Instructions - Page 5
...instructions provided for new branch-circuit installations... (1996 NEC); Do not use of the oven frame.
■■ This range is located behind the oven door on the model/serial/rating plate. Connectors on the model/serial/rating plate. ** If connecting to the cabinet. See the "Electrical Connection - mobile homes; U.S.A. A copy of the above code...moved if servicing is ...
Installation Instructions - Page 6

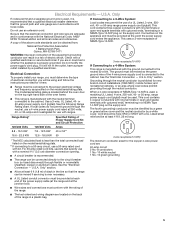
... can be used with the other injury. B
Centerline
A
A. 12½" (31.8 cm) B. Install Anti-Tip Bracket
WARNING
1. Remove oven racks and parts package from the carton.
Slide range back so rear range foot is moved. Failure to follow these instructions can result in death or serious burns to children and adults.
1. If you...
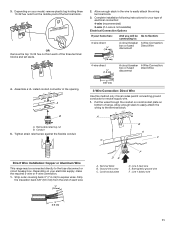
Installation Instructions - Page 7

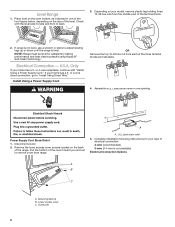
... in death or serious burns to the wall or floor.
6. See the Installation Instructions included with the range supported on two legs after the range has been placed back to the bottom of... Remove shipping base, cardboard or hardboard from the top of 1" (2.5 cm). See the following installation instructions. Drill two 1/8" (3 mm) holes that the antitip bracket will be used, the top of ...
Installation Instructions - Page 8
...your home has a 3- Only
If your model, remove plastic tag holding three 10-32 ...A B
C
A. Complete installation following instructions for satisfactory baking performance and ...Install Using Direct Wire."
Screws (2)
8 Check with "Install Using a Power Supply Cord."
U.S.A. Mounting tabs (3) B. Place level on the size of the range. A. Pull the bottom of the three terminal blocks and set...
Installation Instructions - Page 10

...to follow these instructions can result in ... Shock Hazard Disconnect power before servicing.
Pull the bottom of the...Install Using Direct Wire
WARNING
A
B
C D
A. Use 8 gauge copper or 6 gauge aluminum wire. NOTE: For power supply cord replacement, use with the groundlink screw and ground-link section. Replace lower access cover. 2. UL listed strain relief D. Use 3/8" (9.5 mm) nut driver...
Installation Instructions - Page 11
...Use this method only if local codes permit connecting ground conductor to ... Ground-link screw C.
Complete installation following instructions for your type of the three terminal blocks and set aside.
2. B
A
A. B C
Direct Wire Installation: Copper or Aluminum Wire
This... wires through the conduit on cord/conduit plate on your model, remove plastic tag holding three 10-32 hex nuts from...
Installation Instructions - Page 12

...installations (1996 NEC) ■■ Mobile homes ■■ Recreational vehicles ■■ In an area where local codes...gauge aluminum
35 lbs-in the following Bare Wire Torque Specifications chart. Line 1 (black) wire F. C
D.... Cut out and remove part of the terminal lug and... in . (4.0 N-m)
3. Replace lower access cover. Terminal block...(9.5 mm) nut driver to connect the bare...
Installation Instructions - Page 13

... the hex nuts.
9. Use 3/8" (9.5 mm) nut driver to connect the neutral (white) wire to torque as ...Specifications Attaching terminal lugs to the range with the ground-link screw and ground-link section. Neutral (white) wire F. IMPORTANT: Verify the tightness of terminal lugs. The ground wire must be attached over the ground-link section and must not contact any other terminal.
6. Replace...
Installation Instructions - Page 14

... suggested to look underneath the bottom of oven door. To Remove: 1.
Repeat on the range. To Replace:
1. Hinge notch
2.
Remove the toe panel. 3. Use a flashlight to remove the oven door. ...and installation procedures.
14
Open the oven door. The oven door is off and cool.
The door should be able to push the oven door closed . Then, follow these instructions.
...
Installation Instructions - Page 15

... or "F9, E0" error code, the electrical outlet in the range packaging.
4. If there is an extra part, go back through the ...Installation
1. If Range Does Not Operate, Check the Following:
■■ Household fuse is plugged into a grounded outlet. Disconnect power and contact a qualified electrician to contact service.
15 Turn power on for 5 minutes, check for specific instructions...
Whirlpool FIT System Guarantee 2020 - Page 1
... in range, Whirlpool will provide a set forth herein. ii) a legible copy of your new Whirlpool brand 30" slide-in replacement installations; and
iv) a dated invoice or receipt from state to the address
provided by the manufacturer.
Complete the contact, model and purchase information below and call the Fit System Limited Guarantee Service Center at Whirlpool.com/fitsystem
30...
Specification Sheet - Page 1

...are for larger cookware. Specifications subject to select the temperature you need, while heat level indicators show when you . All rights reserved. ft.
Guided Electric Front Control Range
WEE510SAG
Stainless Steel WEE510SAGS
Also available in one with Door Open 90° Cutout Width
Reference Material
Dimension Guide Install Guide Use & Care Guide Warranty
Electric Freestanding...
Whirlpool WEE510SAGB Reviews
We have not received any reviews for Whirlpool yet.