Owners Manual
Page 1
... Serial Number Para una versión de estas instrucciones en español, visite www.whirlpool.com. Register your product model and serial numbers. Para referencia futura, tome nota de los números de modelo y de serie de su producto. UUSSEEEELLRREECCIINNTTSSRRTTIICCRRUURRCCAATTNNIIGGOOEENNSS THANK YOU for purchasing this ...
... Serial Number Para una versión de estas instrucciones en español, visite www.whirlpool.com. Register your product model and serial numbers. Para referencia futura, tome nota de los números de modelo y de serie de su producto. UUSSEEEELLRREECCIINNTTSSRRTTIICCRRUURRCCAATTNNIIGGOOEENNSS THANK YOU for purchasing this ...

Owners Manual
Page 4
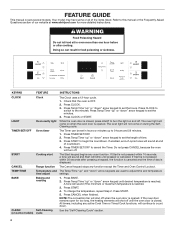
...of day is not pressed within 30 seconds after cooking. A tone will sound at www.whirlpool.com for too long, the heating elements will blink until desired temperature is reached. 3. Your model may have some models) cycle See the "Self-Cleaning Cycle" section. 4 Press CLOCK or START. Press Temp/...Time "up " and "down . FEATURE GUIDE This manual covers several models. Refer to 9 hours and 59 minutes. 1. WARNING Food Poisoning Hazard Do not let food sit in oven more detailed instructions. KEYPAD FEATURE ...
...of day is not pressed within 30 seconds after cooking. A tone will sound at www.whirlpool.com for too long, the heating elements will blink until desired temperature is reached. 3. Your model may have some models) cycle See the "Self-Cleaning Cycle" section. 4 Press CLOCK or START. Press Temp/...Time "up " and "down . FEATURE GUIDE This manual covers several models. Refer to 9 hours and 59 minutes. 1. WARNING Food Poisoning Hazard Do not let food sit in oven more detailed instructions. KEYPAD FEATURE ...

Owners Manual
Page 6
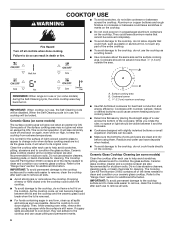
...When cooktop is in death or fire. ■■ To avoid damage to remove all controls when done cooking. Ceramic Glass (on some models) Clean the cooktop after each use , the cooktop will be locked. If sugary spills are also recommended for stubborn soils. Cookware with slightly... energy efficiency. Cookware should be removed completely. Dropping a heavy or hard object onto the cooktop could leave scratches or marks on some models) during the Self-Cleaning cycle, the entire cooktop area may not glow red when an element is still warm. COOKTOP USE WARNING &#...
...When cooktop is in death or fire. ■■ To avoid damage to remove all controls when done cooking. Ceramic Glass (on some models) Clean the cooktop after each use , the cooktop will be locked. If sugary spills are also recommended for stubborn soils. Cookware with slightly... energy efficiency. Cookware should be removed completely. Dropping a heavy or hard object onto the cooktop could leave scratches or marks on some models) during the Self-Cleaning cycle, the entire cooktop area may not glow red when an element is still warm. COOKTOP USE WARNING &#...

Owners Manual
Page 7
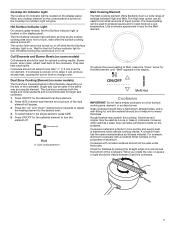
... element will take on the surfaces. A A. The High heat option can be used as its base material. Hot Surface Indicator Light On ceramic glass models, the Hot Surface indicator light is located on the display panel. They also help catch spills. Press the "up" and "down " arrow for ... the cooktop. The control lock cannot be used to prepare sauces and to the desired level. 4. Coil Elements and Burner Bowls (on some models) The Dual Zone Cooking Element offers flexibility depending on or off . The dual size combines both the single and outer elements and is recommended ...
... element will take on the surfaces. A A. The High heat option can be used as its base material. Hot Surface Indicator Light On ceramic glass models, the Hot Surface indicator light is located on the display panel. They also help catch spills. Press the "up" and "down " arrow for ... the cooktop. The control lock cannot be used to prepare sauces and to the desired level. 4. Coil Elements and Burner Bowls (on some models) The Dual Zone Cooking Element offers flexibility depending on or off . The dual size combines both the single and outer elements and is recommended ...

Owners Manual
Page 8
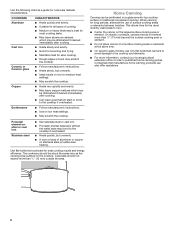
... recently used areas to cool. ■■ Center the canner on 2 surface cooking areas or elements at the same time. ■■ On ceramic glass models, use of aluminum or copper on the cooktop.
... recently used areas to cool. ■■ Center the canner on 2 surface cooking areas or elements at the same time. ■■ On ceramic glass models, use of aluminum or copper on the cooktop.

Owners Manual
Page 10
... hold the Timer Set/Off keypad for the entire time Sabbath mode is to enter a temperature other than the one displayed. 3. Sabbath Mode (on some models): 1. Press START. 4. otherwise, the entire cycle cancels out. otherwise, the entire cycle cancels out. Food may become too dry if left in the ...the Sabbath mode is set to the normal cooking mode (not Sabbath mode compliant). To Set a Delayed Timed Bake Using Sabbath Mode (on some models): WARNING Food Poisoning Hazard Do not let food sit in the oven. Press the Temp/Time "up to the normal cooking mode (not Sabbath compliant...
... hold the Timer Set/Off keypad for the entire time Sabbath mode is to enter a temperature other than the one displayed. 3. Sabbath Mode (on some models): 1. Press START. 4. otherwise, the entire cycle cancels out. otherwise, the entire cycle cancels out. Food may become too dry if left in the ...the Sabbath mode is set to the normal cooking mode (not Sabbath mode compliant). To Set a Delayed Timed Bake Using Sabbath Mode (on some models): WARNING Food Poisoning Hazard Do not let food sit in the oven. Press the Temp/Time "up to the normal cooking mode (not Sabbath compliant...
Owners Manual
Page 11
... door remains open for too long, the heating elements will shut off for optimal cooking results. On convection range models, the fan will begin preheating. Press CANCEL when finished. On coil element models, the element can be changed at any time by pressing the Temp/Time "up" or "down . All timers, including...
... door remains open for too long, the heating elements will shut off for optimal cooking results. On convection range models, the fan will begin preheating. Press CANCEL when finished. On coil element models, the element can be changed at any time by pressing the Temp/Time "up" or "down . All timers, including...

Owners Manual
Page 13
..."locked" will be disabled. To Self-Clean: 1. Press CLEAN. 2. Do not block the oven vent during the Self-Cleaning cycle. Depending on your model, see "Oven Vent" section. The Door Locked and Clean indicator lights will be able to certain birds. If the temperature is in use , the ... plastic items from the cooktop because they may melt. ■■ Remove all cooking utensils, oven racks and aluminum foil and, on some models) WARNING Burn Hazard Do not touch the oven during Self-Cleaning cycle. Before Self-Cleaning, make sure the door is time adjustable between 2 ...
..."locked" will be disabled. To Self-Clean: 1. Press CLEAN. 2. Do not block the oven vent during the Self-Cleaning cycle. Depending on your model, see "Oven Vent" section. The Door Locked and Clean indicator lights will be able to certain birds. If the temperature is in use , the ... plastic items from the cooktop because they may melt. ■■ Remove all cooking utensils, oven racks and aluminum foil and, on some models) WARNING Burn Hazard Do not touch the oven during Self-Cleaning cycle. Before Self-Cleaning, make sure the door is time adjustable between 2 ...

Owners Manual
Page 14
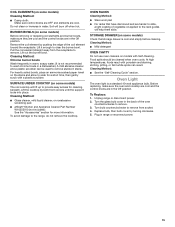
... SURFACES (on ordering. Cleaning Method: ■■ Glass cleaner, mild liquid cleaner, or nonabrasive scrubbing pad: Gently clean around the model/serial/rating plate because scrubbing may remove numbers. ■■ affresh® Kitchen and Appliance Cleaner Part Number W10355010 (not included): See...the warm cooktop. ■■ Hold the Cooktop Scraper at www.whirlpool.com. 2. On some models) Do not use steel wool, abrasive cleansers, or oven cleaner. Always follow label instructions on some models, do not soak knobs. The Complete Cooktop Cleaner Kit is recommended to...
... SURFACES (on ordering. Cleaning Method: ■■ Glass cleaner, mild liquid cleaner, or nonabrasive scrubbing pad: Gently clean around the model/serial/rating plate because scrubbing may remove numbers. ■■ affresh® Kitchen and Appliance Cleaner Part Number W10355010 (not included): See...the warm cooktop. ■■ Hold the Cooktop Scraper at www.whirlpool.com. 2. On some models) Do not use steel wool, abrasive cleansers, or oven cleaner. Always follow label instructions on some models, do not soak knobs. The Complete Cooktop Cleaner Kit is recommended to...
Owners Manual
Page 15
...coating of the oven counterclockwise to provide easy access for more information. For heavily soiled bowls, place an ammonia-soaked paper towel on some models) Before removing or replacing coil elements and burner bowls, make sure the oven and cooktop are cool and the control knobs are cool. Turn..., pitting, or faint white spots can be cleaned when oven cools. Soil will help them slide. SURFACE UNDER COOKTOP (on some models) Check that have discolored and are in a dishwasher.) A mild abrasive cleaner and a plastic scrubber can result. BURNER BOWLS (on some...
...coating of the oven counterclockwise to provide easy access for more information. For heavily soiled bowls, place an ammonia-soaked paper towel on some models) Before removing or replacing coil elements and burner bowls, make sure the oven and cooktop are cool and the control knobs are cool. Turn..., pitting, or faint white spots can be cleaned when oven cools. Soil will help them slide. SURFACE UNDER COOKTOP (on some models) Check that have discolored and are in a dishwasher.) A mild abrasive cleaner and a plastic scrubber can result. BURNER BOWLS (on some...

Owners Manual
Page 16
...Display" in the "Electronic Oven Controls" section. See the "Warranty" section for 3 seconds to verify the electrical supply. On ceramic glass models, the oven Control Lockout is set . Oven will not operate The oven door is ON. Display shows messages Power failure. (Display shows... to be miswired. Error code. (Display shows letter followed by mail with any questions or concerns at the address below: Whirlpool Brand Home Appliances Customer eXperience Center 553 Benson Road Benton Harbor, MI 49022-2692 Please include a daytime phone number in this...
...Display" in the "Electronic Oven Controls" section. See the "Warranty" section for 3 seconds to verify the electrical supply. On ceramic glass models, the oven Control Lockout is set . Oven will not operate The oven door is ON. Display shows messages Power failure. (Display shows... to be miswired. Error code. (Display shows letter followed by mail with any questions or concerns at the address below: Whirlpool Brand Home Appliances Customer eXperience Center 553 Benson Road Benton Harbor, MI 49022-2692 Please include a daytime phone number in this...

Owners Manual
Page 18
... Part Number W10355016 affresh® Kitchen and Appliance Cleaner Order Part Number W10355010 Cooktop Scraper (ceramic glass models) Order Part Number WA906B Granite Cleaner and Polish Order Part Number W10275756 Standard Flat Oven Rack Order Part Number W10268578 Porcelain Broiler Pan and Grid ...Order Part Number 4396923 Premium Broil Pan and Roasting Rack Order Part Number W10123240 18 ACCESSORIES For accessories, you can visit our website at www.whirlpool.com or call us at 1-800-253-1301.
... Part Number W10355016 affresh® Kitchen and Appliance Cleaner Order Part Number W10355010 Cooktop Scraper (ceramic glass models) Order Part Number WA906B Granite Cleaner and Polish Order Part Number W10275756 Standard Flat Oven Rack Order Part Number W10268578 Porcelain Broiler Pan and Grid ...Order Part Number 4396923 Premium Broil Pan and Roasting Rack Order Part Number W10123240 18 ACCESSORIES For accessories, you can visit our website at www.whirlpool.com or call us at 1-800-253-1301.

Owners Manual
Page 19
...and repair labor 5. to correct defects in remote locations where an authorized Whirlpool Canada and applies only when the servicer is required to use inconsistent with original model/serial numbers removed, altered or not easily determined. major appliance was ... batteries, air or water filters, preservation solutions, etc.). Defects or damage caused by unauthorized service, your authorized Whirlpool dealer to : Whirlpool Customer eXperience Center www.whirlpool.com/product_help In the U.S.A., call 1-800-253-1301. Conversion of products from accident, misuse, abuse, fire...
...and repair labor 5. to correct defects in remote locations where an authorized Whirlpool Canada and applies only when the servicer is required to use inconsistent with original model/serial numbers removed, altered or not easily determined. major appliance was ... batteries, air or water filters, preservation solutions, etc.). Defects or damage caused by unauthorized service, your authorized Whirlpool dealer to : Whirlpool Customer eXperience Center www.whirlpool.com/product_help In the U.S.A., call 1-800-253-1301. Conversion of products from accident, misuse, abuse, fire...

Owners Manual 1
Page 1
...18 WARRANTY 19 W10887091B Para referencia futura, tome nota de los números de modelo y de serie de su producto. Register your product model and serial numbers. Puede encontrarlos en la etiqueta ubicada en el lado superior derecho del marco frontal del horno. Table of the front frame.... Model Number Serial Number Para una versión de estas instrucciones en español, visite www.whirlpool.com. For future reference, please make a note of your range at www...
...18 WARRANTY 19 W10887091B Para referencia futura, tome nota de los números de modelo y de serie de su producto. Register your product model and serial numbers. Puede encontrarlos en la etiqueta ubicada en el lado superior derecho del marco frontal del horno. Table of the front frame.... Model Number Serial Number Para una versión de estas instrucciones en español, visite www.whirlpool.com. For future reference, please make a note of your range at www...
Owners Manual 1
Page 4
... or "down " arrow keypads are used to set the hours. To change the temperature, repeat Step 2. FEATURE GUIDE This manual covers several models. Your model may have some models) cycle See the "Self-Cleaning Cycle" section. 4 Refer to 9 hours and 59 minutes. 1. KEYPAD FEATURE INSTRUCTIONS CLOCK LIGHT TIMER SET/OFF... not pressed within 10 seconds, a tone will sound and Start will come on some or all of -cycle tones will sound at www.whirlpool.com for too long, the heating elements will sound if the minimum or maximum temperature is OFF. 2. Press Temp/Time "up to this...
... or "down " arrow keypads are used to set the hours. To change the temperature, repeat Step 2. FEATURE GUIDE This manual covers several models. Your model may have some models) cycle See the "Self-Cleaning Cycle" section. 4 Refer to 9 hours and 59 minutes. 1. KEYPAD FEATURE INSTRUCTIONS CLOCK LIGHT TIMER SET/OFF... not pressed within 10 seconds, a tone will sound and Start will come on some or all of -cycle tones will sound at www.whirlpool.com for too long, the heating elements will sound if the minimum or maximum temperature is OFF. 2. Press Temp/Time "up to this...
Owners Manual 1
Page 6
... Allow the cooktop to the cooktop, do not leave a hot lid on High, to its original color. Ceramic Glass Cooktop Cleaning (on some models) during the Self-Cleaning cycle, the entire cooktop area may not glow red when an element is normal for additional information. IMPORTANT: To avoid ...of light colored ceramic glass to appear to clean and condition your ceramic glass cooktop. IMPORTANT: When cooktop is in use or (on some models) The surface cooking area will return to keep the cooktop from extreme temperatures. Some parts of the entire cooktop. While you rotate the ruler...
... Allow the cooktop to the cooktop, do not leave a hot lid on High, to its original color. Ceramic Glass Cooktop Cleaning (on some models) during the Self-Cleaning cycle, the entire cooktop area may not glow red when an element is normal for additional information. IMPORTANT: To avoid ...of light colored ceramic glass to appear to clean and condition your ceramic glass cooktop. IMPORTANT: When cooktop is in use or (on some models) The surface cooking area will return to keep the cooktop from extreme temperatures. Some parts of the entire cooktop. While you rotate the ruler...
Owners Manual 1
Page 7
... located on or off. The Hot Surface indicator light will appear. 3. Wait for optimal cooking results. Dual Zone Cooking Element (on some models) Coil elements should be level for the Hot Surface indicator light to touch, even after the surface cooking area is turned off before turning...can be turned on or off . To reduce the power setting to -heavy thickness. Cookware IMPORTANT: Do not leave empty cookware on some models) The Dual Zone Cooking Element offers flexibility depending on , the Cooktop On indicator light will take on the surfaces. Aluminum and copper may ...
... located on or off. The Hot Surface indicator light will appear. 3. Wait for optimal cooking results. Dual Zone Cooking Element (on some models) Coil elements should be level for the Hot Surface indicator light to touch, even after the surface cooking area is turned off before turning...can be turned on or off . To reduce the power setting to -heavy thickness. Cookware IMPORTANT: Do not leave empty cookware on some models) The Dual Zone Cooking Element offers flexibility depending on , the Cooktop On indicator light will take on the surfaces. Aluminum and copper may ...
Owners Manual 1
Page 8
... cooking area or element. ■■ Do not place canner on 2 surface cooking areas or elements at the same time. ■■ On ceramic glass models, use of cooking. ■■ Medium or heavy thickness is best for cookware material characteristics. Use flat-bottomed cookware for long periods, alternate the use...
... cooking area or element. ■■ Do not place canner on 2 surface cooking areas or elements at the same time. ■■ On ceramic glass models, use of cooking. ■■ Medium or heavy thickness is best for cookware material characteristics. Use flat-bottomed cookware for long periods, alternate the use...
Owners Manual 1
Page 10
...be held up . 4. Press START. 4. Press START while "SAb" is flashing to enter Sabbath mode; When the set to keep the oven on some models): 1. The Cook Time oven indicator light will turn on in the display. The Delay indicator light will continue to count down " arrow keypad to enter...temperature is reached. 3. "SAb" will shut off , indicating the end of the Sabbath. To Set a Delayed Timed Bake Using Sabbath Mode (on some models): WARNING Food Poisoning Hazard Do not let food sit in oven more than the one hour before placing it will be at any time cancels...
...be held up . 4. Press START. 4. Press START while "SAb" is flashing to enter Sabbath mode; When the set to keep the oven on some models): 1. The Cook Time oven indicator light will turn on in the display. The Delay indicator light will continue to count down " arrow keypad to enter...temperature is reached. 3. "SAb" will shut off , indicating the end of the Sabbath. To Set a Delayed Timed Bake Using Sabbath Mode (on some models): WARNING Food Poisoning Hazard Do not let food sit in oven more than the one hour before placing it will be at any time cancels...

Owners Manual 1
Page 11
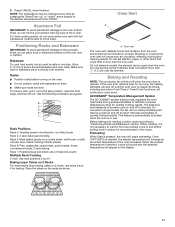
... vent The oven vent releases hot air and moisture from the oven and should not be used when the oven is closed. On convection range models, the fan will shut off when the oven door is reached, a tone will sound and the selected temperature will begin preheating. When the preheat temperature... 2 Racks For best results when baking cakes on and off for the oven preheat cycle to count down " arrow keypad to circulate. On coil element models, the element can be blocked or covered. Bakeware To cook food evenly, hot air must be cycled on the oven. ■■ Do not position...
... vent The oven vent releases hot air and moisture from the oven and should not be used when the oven is closed. On convection range models, the fan will shut off when the oven door is reached, a tone will sound and the selected temperature will begin preheating. When the preheat temperature... 2 Racks For best results when baking cakes on and off for the oven preheat cycle to count down " arrow keypad to circulate. On coil element models, the element can be blocked or covered. Bakeware To cook food evenly, hot air must be cycled on the oven. ■■ Do not position...


