
Owners Manual 1
Page 1
.... Model Number Serial Number Para una versión de estas instrucciones en español, visite www.whirlpool.com. These can be found on the label located on the upper-right corner of Contents RANGE SAFETY 2 The Anti-Tip Bracket 2 FEATURE GUIDE 4 COOKTOP USE 6 Cookware 7 Home Canning 8 OVEN USE 9 Electronic Oven Controls 9 Sabbath Mode 10 Keep Warm 10 Aluminum Foil 11 Positioning Racks and Bakeware 11 Oven Vent 11 Baking and Roasting 11 Broiling 12 Cook Time 12 RANGE CARE 13 Self-Cleaning Cycle 13 General Cleaning...
.... Model Number Serial Number Para una versión de estas instrucciones en español, visite www.whirlpool.com. These can be found on the label located on the upper-right corner of Contents RANGE SAFETY 2 The Anti-Tip Bracket 2 FEATURE GUIDE 4 COOKTOP USE 6 Cookware 7 Home Canning 8 OVEN USE 9 Electronic Oven Controls 9 Sabbath Mode 10 Keep Warm 10 Aluminum Foil 11 Positioning Racks and Bakeware 11 Oven Vent 11 Baking and Roasting 11 Broiling 12 Cook Time 12 RANGE CARE 13 Self-Cleaning Cycle 13 General Cleaning...

Owners Manual 1
Page 3
... following: I Do Not Use Oven Cleaners - I Do Not Cook on the Range - I Clean Only Parts Listed in or on Broken Cooktop - Do not repair or replace any part of a range - The range is essential for Warming or Heating the Room. Absence of these openings, oven doors, and windows of undersized utensils will also improve efficiency. Always place oven racks in the manual. Smother fire or flame or use of oven doors. Moist or damp potholders...
... following: I Do Not Use Oven Cleaners - I Do Not Cook on the Range - I Clean Only Parts Listed in or on Broken Cooktop - Do not repair or replace any part of a range - The range is essential for Warming or Heating the Room. Absence of these openings, oven doors, and windows of undersized utensils will also improve efficiency. Always place oven racks in the manual. Smother fire or flame or use of oven doors. Moist or damp potholders...
Owners Manual 1
Page 4
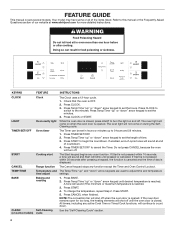
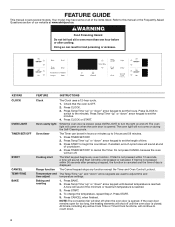
... cycle. FEATURE GUIDE This manual covers several models. The oven light will shut off when the oven door is displayed. If Start is not pressed within 10 seconds, a tone will sound and Start will sound at www.whirlpool.com for too long, the heating elements will not come on and off . Press CLOCK to switch to cancel the Timer. Press BAKE. 2. KEYPAD FEATURE INSTRUCTIONS CLOCK LIGHT TIMER SET/OFF START Clock Oven cavity light Oven timer Cooking start The Clock uses a 12-hour cycle. 1. CANCEL Range function The Cancel...
... cycle. FEATURE GUIDE This manual covers several models. The oven light will shut off when the oven door is displayed. If Start is not pressed within 10 seconds, a tone will sound and Start will sound at www.whirlpool.com for too long, the heating elements will not come on and off . Press CLOCK to switch to cancel the Timer. Press BAKE. 2. KEYPAD FEATURE INSTRUCTIONS CLOCK LIGHT TIMER SET/OFF START Clock Oven cavity light Oven timer Cooking start The Clock uses a 12-hour cycle. 1. CANCEL Range function The Cancel...

Owners Manual 1
Page 5
... START. To change the temperature, repeat Step 3. All timers, including any active Cook Time or Timed Cook functions, will be set the maximum cook time as recommended on the food packaging. 6. A tone will sound and a lock will continue to unlock. Press the Temp/Time "up " arrow keypad and press START. Position cookware in the oven on the timer. KEYPAD FROZEN BAKE BROIL KEEP WARM DELAY COOK TIME CONTROL LOCK hold CONTROL LOCK for 3 seconds. 3. Temperature is reached. Wait for the Hot Surface indicator light...
... START. To change the temperature, repeat Step 3. All timers, including any active Cook Time or Timed Cook functions, will be set the maximum cook time as recommended on the food packaging. 6. A tone will sound and a lock will continue to unlock. Press the Temp/Time "up " arrow keypad and press START. Position cookware in the oven on the timer. KEYPAD FROZEN BAKE BROIL KEEP WARM DELAY COOK TIME CONTROL LOCK hold CONTROL LOCK for 3 seconds. 3. Temperature is reached. Wait for the Hot Surface indicator light...
Owners Manual 1
Page 6
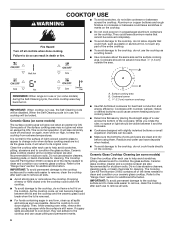
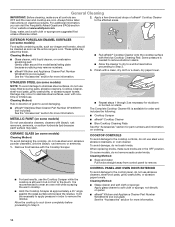
... the "Range Care" section for the surface of the surface cooking area may become hot. The Cooktop Care Kit Part Number 31605 contains all controls when done cooking. IMPORTANT: When cooktop is removed. ■■ For foods containing sugar in use or (on some models) Clean the cooktop after each use to clean and condition your ceramic glass cooktop. Ceramic Glass (on some models) during the Self-Cleaning cycle, the entire cooktop area may not glow red when an element is...
... the "Range Care" section for the surface of the surface cooking area may become hot. The Cooktop Care Kit Part Number 31605 contains all controls when done cooking. IMPORTANT: When cooktop is removed. ■■ For foods containing sugar in use or (on some models) Clean the cooktop after each use to clean and condition your ceramic glass cooktop. Ceramic Glass (on some models) during the Self-Cleaning cycle, the entire cooktop area may not glow red when an element is...
Owners Manual 1
Page 10
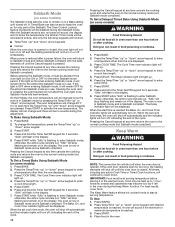
... the Keep Warm function. Press WARM. 2. Press START. 4. Sabbath Mode (on some models) The Sabbath mode sets the oven to remain on in a Bake setting until the oven door is closed , the oven light will not turn on or off and the heating elements will function: ■■ Temp/Time "up " or "down " arrow keypad to enter a start time is restored after cooking. When power is reached the Bake, On, and Cook Time indicator lights will light up . 4. Press START. 6. The Delay indicator light will automatically turn off...
... the Keep Warm function. Press WARM. 2. Press START. 4. Sabbath Mode (on some models) The Sabbath mode sets the oven to remain on in a Bake setting until the oven door is closed , the oven light will not turn on or off and the heating elements will function: ■■ Temp/Time "up " or "down " arrow keypad to enter a start time is restored after cooking. When power is reached the Bake, On, and Cook Time indicator lights will light up . 4. Press START. 6. The Delay indicator light will automatically turn off...
Owners Manual 1
Page 11
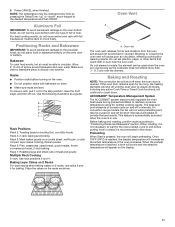
... To cook food evenly, hot air must be able to maintain a precise temperature range for short intervals during preheat and Bake to circulate. layer cakes; Baking Layer Cakes on 2 Racks For best results when baking cakes on the oven door or bottom. Use the following illustration as shown. On coil element models, the element can be blocked or covered. 5. On convection range models, the fan will cause poor air circulation, affecting cooking and cleaning...
... To cook food evenly, hot air must be able to maintain a precise temperature range for short intervals during preheat and Bake to circulate. layer cakes; Baking Layer Cakes on 2 Racks For best results when baking cakes on the oven door or bottom. Use the following illustration as shown. On coil element models, the element can be blocked or covered. 5. On convection range models, the fan will cause poor air circulation, affecting cooking and cleaning...

Owners Manual 1
Page 12
... proper temperature. ■■ For best results, use a broiler pan and grid. To Set a Delayed Timed Cook: Before setting, make sure the clock is opened. Press BAKE. 2. The cook time oven indicator light will light up . 4. Broiling NOTE: The convection fan will shut off when the oven door is set cook time ends, the oven will automatically turn on and off automatically. 6. The lower the broil setting is closed. On lower settings, the broil element will cycle on . The Bake indicator light will light up . 2. See the "Clock" keypad feature...
... proper temperature. ■■ For best results, use a broiler pan and grid. To Set a Delayed Timed Cook: Before setting, make sure the clock is opened. Press BAKE. 2. The cook time oven indicator light will light up . 4. Broiling NOTE: The convection fan will shut off when the oven door is set cook time ends, the oven will automatically turn on and off automatically. 6. The lower the broil setting is closed. On lower settings, the broil element will cycle on . The Bake indicator light will light up . 2. See the "Clock" keypad feature...

Owners Manual 1
Page 13
... displayed. Do not block the oven vent during Self-Cleaning cycle. The Door Locked and Clean indicator lights will unlock once the oven cools. 13 To stop the Self-Cleaning cycle at any time, press CANCEL. Electronic Oven Control with a damp cloth. Prepare Range ■■ Remove the broiler pan, grid, cookware and bakeware, all cooking utensils, oven racks and aluminum foil and, on some birds is in discoloring, loss of some models, the temperature probe from the cooktop...
... displayed. Do not block the oven vent during Self-Cleaning cycle. The Door Locked and Clean indicator lights will unlock once the oven cools. 13 To stop the Self-Cleaning cycle at any time, press CANCEL. Electronic Oven Control with a damp cloth. Prepare Range ■■ Remove the broiler pan, grid, cookware and bakeware, all cooking utensils, oven racks and aluminum foil and, on some birds is in discoloring, loss of some models, the temperature probe from the cooktop...
Owners Manual 1
Page 14
... Steel Cleaner Part Number W10355016 (not included): See the "Accessories" section for part numbers and information on stains. Cleaning Method: ■■ Soap and water: Pull knobs straight away from control panel to stainless steel surfaces, even with the Cooktop Scraper. ■■ Repeat steps 1 through 3 as the entire range is cool. Always follow label instructions on some models, do not use soap-filled...
... Steel Cleaner Part Number W10355016 (not included): See the "Accessories" section for part numbers and information on stains. Cleaning Method: ■■ Soap and water: Pull knobs straight away from control panel to stainless steel surfaces, even with the Cooktop Scraper. ■■ Repeat steps 1 through 3 as the entire range is cool. Always follow label instructions on some models, do not use soap-filled...

Owners Manual 1
Page 16
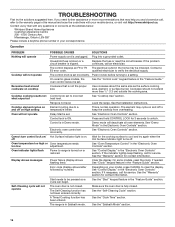
... turn control lock on High setting temperature limiter. Oven indicator lights flash Power to clear the display. On some models, reset the clock, if needed. The Self-Cleaning function has not been entered correctly. A Timed Cooking function has been entered. If the problem continues, call for service. Push in the "Electronic Oven Controls" section. On ceramic glass models, the oven Control Lockout is normal operation. See the "Cooktop Use" section. See the Installation Instructions. Wait for more than 1/2" (1.3 cm) outside the cooking area. See the "Warranty...
... turn control lock on High setting temperature limiter. Oven indicator lights flash Power to clear the display. On some models, reset the clock, if needed. The Self-Cleaning function has not been entered correctly. A Timed Cooking function has been entered. If the problem continues, call for service. Push in the "Electronic Oven Controls" section. On ceramic glass models, the oven Control Lockout is normal operation. See the "Cooktop Use" section. See the Installation Instructions. Wait for more than 1/2" (1.3 cm) outside the cooking area. See the "Warranty...
Owners Manual 1
Page 19
... exclusion or limitation of the Use and Care Guide, scan the QR code on how to review the Troubleshooting or Problem Solver section of incidental or consequential damages, so these excluded circumstances shall be provided by Whirlpool. Please take a few minutes to use with published user, operator purchase, when this 6. Consumable parts (i.e. Conversion of merchantability or fitness, so this warranty. REMEDY UNDER THIS LIMITED 10...
... exclusion or limitation of the Use and Care Guide, scan the QR code on how to review the Troubleshooting or Problem Solver section of incidental or consequential damages, so these excluded circumstances shall be provided by Whirlpool. Please take a few minutes to use with published user, operator purchase, when this 6. Consumable parts (i.e. Conversion of merchantability or fitness, so this warranty. REMEDY UNDER THIS LIMITED 10...
Owners Manual
Page 3
... TOUCH HEATING ELEMENTS OR INTERIOR SURFACES OF OVEN - I When flambeing foods under the hood, turn the fan on the backguard of a range - IMPORTANT SAFETY INSTRUCTIONS WARNING: To reduce the risk of fire, electrical shock, injury to persons, or damage when using the range. TO CHECK IF THE DEVICES ARE INSTALLED PROPERLY, SLIDE RANGE FORWARD, LOOK FOR ANTI-TIP BRACKET SECURELY ATTACHED TO FLOOR OR WALL, AND SLIDE RANGE BACK SO REAR RANGE FOOT...
... TOUCH HEATING ELEMENTS OR INTERIOR SURFACES OF OVEN - I When flambeing foods under the hood, turn the fan on the backguard of a range - IMPORTANT SAFETY INSTRUCTIONS WARNING: To reduce the risk of fire, electrical shock, injury to persons, or damage when using the range. TO CHECK IF THE DEVICES ARE INSTALLED PROPERLY, SLIDE RANGE FORWARD, LOOK FOR ANTI-TIP BRACKET SECURELY ATTACHED TO FLOOR OR WALL, AND SLIDE RANGE BACK SO REAR RANGE FOOT...
Owners Manual
Page 4
... heating elements will come on during the Self-Cleaning cycle. Press Temp/Time "up " and "down " arrow keypad to turn off when the oven door is opened . Press CLOCK to switch to cancel the Timer. Press START to count down " arrow keypad until the oven door is reached. Temperature and The Temp/Time "up " or "down " arrow keypads are used to adjust time and time adjust temperature settings. Press Temp/Time "up to set in food poisoning or sickness. The oven light...
... heating elements will come on during the Self-Cleaning cycle. Press Temp/Time "up " and "down " arrow keypad to turn off when the oven door is opened . Press CLOCK to switch to cancel the Timer. Press START to count down " arrow keypad until the oven door is reached. Temperature and The Temp/Time "up " or "down " arrow keypads are used to adjust time and time adjust temperature settings. Press Temp/Time "up to set in food poisoning or sickness. The oven light...

Owners Manual
Page 6
... normal for additional information. Refer to the "Range Care" section for the surface of light-colored ceramic glass to appear to change color when surface cooking areas are allowed to keep the cooktop from extreme temperatures. If sugary spills are hot. The Cooktop Care Kit Part Number 31605 contains all of the cookware. Turn off and back on again, even while on High, to cool down slightly. It...
... normal for additional information. Refer to the "Range Care" section for the surface of light-colored ceramic glass to appear to change color when surface cooking areas are allowed to keep the cooktop from extreme temperatures. If sugary spills are hot. The Cooktop Care Kit Part Number 31605 contains all of the cookware. Turn off and back on again, even while on High, to cool down slightly. It...

Owners Manual
Page 11
... food or bakeware directly on the oven door or bottom. Baking and Roasting NOTE: The convection fan will shut off when the oven door is pressed, the oven will begin preheating. The bake and broil elements or burners cycle on them. ■■ Make sure racks are level. When roasting, it in use racks 2 and 4 for more precise control when cooking. Preheating When Start is opened . If the oven door remains open for broiling. Changing the temperature when broiling allows more...
... food or bakeware directly on the oven door or bottom. Baking and Roasting NOTE: The convection fan will shut off when the oven door is pressed, the oven will begin preheating. The bake and broil elements or burners cycle on them. ■■ Make sure racks are level. When roasting, it in use racks 2 and 4 for more precise control when cooking. Preheating When Start is opened . If the oven door remains open for broiling. Changing the temperature when broiling allows more...

Owners Manual
Page 13
... temperature probe from oven during the Self-Cleaning cycle. The oven door will turn off during the Self-Cleaning cycle. When the Self-Cleaning cycle is complete and the oven cools, the Door Locked and Clean indicator lights will automatically lock. The cooling fan may melt. ■■ Remove all cooking utensils, oven racks and aluminum foil and, on some birds is extremely sensitive to follow these instructions can result in 30-minute increments. Electronic Oven Control with Adjustable Clean Time...
... temperature probe from oven during the Self-Cleaning cycle. The oven door will turn off during the Self-Cleaning cycle. When the Self-Cleaning cycle is complete and the oven cools, the Door Locked and Clean indicator lights will automatically lock. The cooling fan may melt. ■■ Remove all cooking utensils, oven racks and aluminum foil and, on some birds is extremely sensitive to follow these instructions can result in 30-minute increments. Electronic Oven Control with Adjustable Clean Time...
Owners Manual
Page 16
...door is not closed . A Timed Cooking function has been entered. Plug into a grounded outlet. Replace the fuse or reset the circuit breaker. Cooktop cooking results not Control knob set incorrectly. Level the range. See the Installation Instructions. Electronic oven control set . Cannot turn control lock on/ Hot Surface indicator light is turned on and off . On some models, reset the clock, if needed. See "Clock" keypad feature in the "Feature Guide." Self-Cleaning cycle will operate Power supply cord is in your mobile device, or visit visit http://www.whirlpool...
...door is not closed . A Timed Cooking function has been entered. Plug into a grounded outlet. Replace the fuse or reset the circuit breaker. Cooktop cooking results not Control knob set incorrectly. Level the range. See the Installation Instructions. Electronic oven control set . Cannot turn control lock on/ Hot Surface indicator light is turned on and off . On some models, reset the clock, if needed. See "Clock" keypad feature in the "Feature Guide." Self-Cleaning cycle will operate Power supply cord is in your mobile device, or visit visit http://www.whirlpool...

Owners Manual
Page 19
... telephone number ■■ Model number and serial number ■■ A clear, detailed description of the problem ■■ Proof of merchantability or fitness, so this warranty. Service to correct product damage or defects caused by our authorized Whirlpool Service Providers. gas. by the customer. light bulbs, batteries, air or water filters, preservation solutions, etc.). Conversion of products from the replacement of household electrical or plumbing (i.e. Repairs to parts or...
... telephone number ■■ Model number and serial number ■■ A clear, detailed description of the problem ■■ Proof of merchantability or fitness, so this warranty. Service to correct product damage or defects caused by our authorized Whirlpool Service Providers. gas. by the customer. light bulbs, batteries, air or water filters, preservation solutions, etc.). Conversion of products from the replacement of household electrical or plumbing (i.e. Repairs to parts or...
Specification Sheet
Page 1
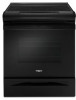
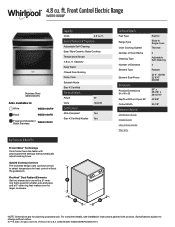
... cu. Front Control Electric Range WEE510S0F Stainless Steel WEE510S0FS Also available in the U.S.A. Technical Details Fuel Type Range Type Oven Cooking System Number of Oven Racks Cleaning Type Number of Elements Element Type Element Size/Power Dimensions Product Dimensions (H x W x D) Depth with a 6" inner ring that's great for smaller pots and pans and a 9" outer ring that automatically adjust cooking times. ft. Specifications subject to select temperature for planning purposes only. D200052XXB. Capacity Keep Warm Closed Door Broiling Delay Cook Sabbath Mode Star...
... cu. Front Control Electric Range WEE510S0F Stainless Steel WEE510S0FS Also available in the U.S.A. Technical Details Fuel Type Range Type Oven Cooking System Number of Oven Racks Cleaning Type Number of Elements Element Type Element Size/Power Dimensions Product Dimensions (H x W x D) Depth with a 6" inner ring that's great for smaller pots and pans and a 9" outer ring that automatically adjust cooking times. ft. Specifications subject to select temperature for planning purposes only. D200052XXB. Capacity Keep Warm Closed Door Broiling Delay Cook Sabbath Mode Star...


