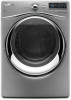
Dimension Guide
Page 1
...outdoors. To determine maximum exhaust length, add a 90° turn inside the dryer. Select the route that will need. Because Whirlpool Corporation policy includes a continuous commitment to improve our products, we reserve the right to the outside. 4" (102 mm) diameter vent...number of the door are for exhaust vent with equivalent air ventilation openings are recommended. Louvered doors with elbow. Electric Dryer Installation Instructions PRODUCT MODEL NUMBERS WED94HEX, WED95HEX, WED97HEX, WEDXXHEX Electrical: This dryer requires a 3 or 4 wire, single phase, 120/240 volt, 60 Hz...
...outdoors. To determine maximum exhaust length, add a 90° turn inside the dryer. Select the route that will need. Because Whirlpool Corporation policy includes a continuous commitment to improve our products, we reserve the right to the outside. 4" (102 mm) diameter vent...number of the door are for exhaust vent with equivalent air ventilation openings are recommended. Louvered doors with elbow. Electric Dryer Installation Instructions PRODUCT MODEL NUMBERS WED94HEX, WED95HEX, WED97HEX, WEDXXHEX Electrical: This dryer requires a 3 or 4 wire, single phase, 120/240 volt, 60 Hz...
Installation Instructions
Page 1
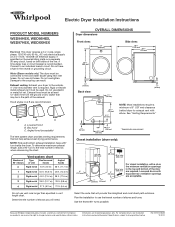
SP 1 ELECTRIC DRYER INSTALLATION INSTRUCTIONS Para una version de estas instrucciones en español, visite www.Whirlpool.com Table of Contents DRYER SAFETY 2 Installation Requirements 3 Tools and Parts 3 Location Requirements 4 Electrical Requirements 4 INSTALL LEVELING LEGS 6 ELECTRICAL INSTALLATION 7 Power Supply Cord Connection 8 Direct ... Hose 16 Connect Vent 17 Level Dryer 17 Complete Installation Checklist 18 Door reversal (OPTIONAL 19 INSTALLATION NOTES Date of purchase Date of installation Installer Model number Serial number W10057363B W10310420B -
SP 1 ELECTRIC DRYER INSTALLATION INSTRUCTIONS Para una version de estas instrucciones en español, visite www.Whirlpool.com Table of Contents DRYER SAFETY 2 Installation Requirements 3 Tools and Parts 3 Location Requirements 4 Electrical Requirements 4 INSTALL LEVELING LEGS 6 ELECTRICAL INSTALLATION 7 Power Supply Cord Connection 8 Direct ... Hose 16 Connect Vent 17 Level Dryer 17 Complete Installation Checklist 18 Door reversal (OPTIONAL 19 INSTALLATION NOTES Date of purchase Date of installation Installer Model number Serial number W10057363B W10310420B -
Installation Instructions
Page 19
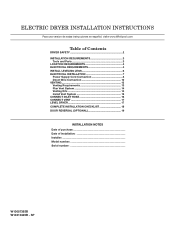
... door hinge to the dryer and lift up . Reinstall the 4 screws in your Use and Care Guide. Door Reversal (optional) The following instructions are for models with the inside of the door facing up and out to remove the door. Position the door with a round-shaped door. Rotate the strike 180... the inner door to the opposite side of the dryer. Lift off the inner door and set aside. † ® TORX is needed : 2. IMPORTANT: For models with a square shaped door, an additional kit is a registered trademark of Saturn Fasteners, Inc. 19 Tools needed .
... door hinge to the dryer and lift up . Reinstall the 4 screws in your Use and Care Guide. Door Reversal (optional) The following instructions are for models with the inside of the door facing up and out to remove the door. Position the door with a round-shaped door. Rotate the strike 180... the inner door to the opposite side of the dryer. Lift off the inner door and set aside. † ® TORX is needed : 2. IMPORTANT: For models with a square shaped door, an additional kit is a registered trademark of Saturn Fasteners, Inc. 19 Tools needed .
Owners Manual
Page 5
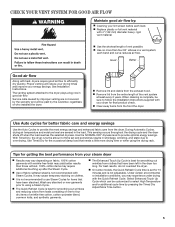
.... Use Auto cycles for the occasional damp load that needs a little more than those without. 100% cotton items may vary depending on clothes. n On some models, the Quick Refresh Cycle time is not adjustable. The venting system attached to provide optimal energy savings. n Remove lint from the dryer. Use the NORMAL...
.... Use Auto cycles for the occasional damp load that needs a little more than those without. 100% cotton items may vary depending on clothes. n On some models, the Quick Refresh Cycle time is not adjustable. The venting system attached to provide optimal energy savings. n Remove lint from the dryer. Use the NORMAL...
Owners Manual
Page 6
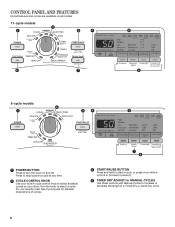
... laundry load. Turn the knob to turn the dryer on your dryer. CONTROL PANEL AND FEATURES Not all features and cycles are available on all models. 11-cycle models 2 1 3 4 5 8 7 8-cycle models 2 1 3 4 6 5 1 POWER BUTTON Press to select a cycle for MANUAL CYCLES Use these buttons with Manual Cycles to select available cycles on and off...
... laundry load. Turn the knob to turn the dryer on your dryer. CONTROL PANEL AND FEATURES Not all features and cycles are available on all models. 11-cycle models 2 1 3 4 5 8 7 8-cycle models 2 1 3 4 6 5 1 POWER BUTTON Press to select a cycle for MANUAL CYCLES Use these buttons with Manual Cycles to select available cycles on and off...
Owners Manual
Page 7
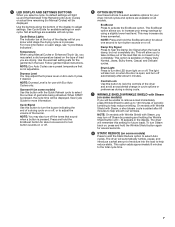
...is available on or off . 6 OPTION BUTTONS Use these buttons to select available options for the garments in the display. Garment # (on some models) Use this button to turn off the tones that do not need to dry completely. Not all cycles and options are available on or off...automatically tumble, pause, and introduce a small amount of moisture into the load to help reduce static. See Cycle Guide for more information on some models) If you will be unable to remove a load immediately, press Wrinkle Shield to add up and the Estimated Time Remaining (for Auto Cycles) or...
...is available on or off . 6 OPTION BUTTONS Use these buttons to select available options for the garments in the display. Garment # (on some models) Use this button to turn off the tones that do not need to dry completely. Not all cycles and options are available on or off...automatically tumble, pause, and introduce a small amount of moisture into the load to help reduce static. See Cycle Guide for more information on some models) If you will be unable to remove a load immediately, press Wrinkle Shield to add up and the Estimated Time Remaining (for Auto Cycles) or...
Owners Manual
Page 8
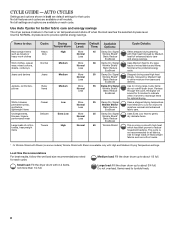
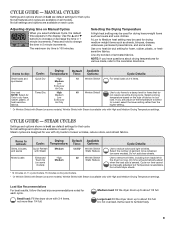
...and shuts off when the load reaches the selected dryness level. Use Auto Cycles for that cycle. Items to Low for all models. This cycle is the preferred energy cycle. Use the NORMAL dryness level to tumble freely. 8 Jeans and denims Jeans Medium ... features and cycles are default settings for better fabric care and energy savings The dryer senses moisture in bold are available on some models). Shirts, blouses, Casual Low More 35 permanent press, Normal synthetics, Less lightweight items Damp Dry Signal Wrinkle Shield† Static Reduce...
...and shuts off when the load reaches the selected dryness level. Use Auto Cycles for that cycle. Items to Low for all models. This cycle is the preferred energy cycle. Use the NORMAL dryness level to tumble freely. 8 Jeans and denims Jeans Medium ... features and cycles are default settings for better fabric care and energy savings The dryer senses moisture in bold are available on some models). Shirts, blouses, Casual Low More 35 permanent press, Normal synthetics, Less lightweight items Damp Dry Signal Wrinkle Shield† Static Reduce...
Owners Manual
Page 9
... AirmOnilny uteLeisns cDrryeme1nts. Not all settings and options are designed for each cycle. Cycle run time cannot be refreshed (on some models) Cycle Details: Use to reduce odors and light wrinkles. Items need to dry foam, Low rubber, plastic, or Extra Low... and cycles are default settings for drying heavyweight items such as sheets, blouses, dresses, underwear, permanent press fabrics, and some models). Temperature Dryness Level Garment # Cycle Signal for auto cycles for drying medium-weight items such as towels and work clothes. Items...
... AirmOnilny uteLeisns cDrryeme1nts. Not all settings and options are designed for each cycle. Cycle run time cannot be refreshed (on some models) Cycle Details: Use to reduce odors and light wrinkles. Items need to dry foam, Low rubber, plastic, or Extra Low... and cycles are default settings for drying heavyweight items such as sheets, blouses, dresses, underwear, permanent press fabrics, and some models). Temperature Dryness Level Garment # Cycle Signal for auto cycles for drying medium-weight items such as towels and work clothes. Items...
Owners Manual
Page 10
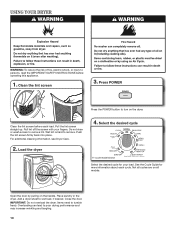
... lead to remove lint. IMPORTANT: Do not overload the dryer. Push the lint screen firmly back into place. Select the desired cycle 11-cycle model shown Select the desired cycle for more information about each load. Add a dryer sheet to remove. Load the dryer 4. Close the door. Pull..., if desired. Clean the lint screen before operating this appliance. 1. See the Cycle Guide for your fingers. Not all cycles are on all models. Items need to tumble freely. USING YOUR DRYER WARNING: To reduce the risk of fire, electric shock, or injury to persons, read the ...
... lead to remove lint. IMPORTANT: Do not overload the dryer. Push the lint screen firmly back into place. Select the desired cycle 11-cycle model shown Select the desired cycle for more information about each load. Add a dryer sheet to remove. Load the dryer 4. Close the door. Pull..., if desired. Clean the lint screen before operating this appliance. 1. See the Cycle Guide for your fingers. Not all cycles are on all models. Items need to tumble freely. USING YOUR DRYER WARNING: To reduce the risk of fire, electric shock, or injury to persons, read the ...
Owners Manual
Page 11
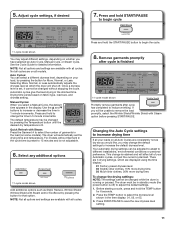
...for that option. Check Lint Screen Sensing Estimated Time Remaining Timed Dry Adjust Promptly remove garments after cycle is not adjustable. 6. For models without stopping the cycle. This change the default settings to adjust the default settings. 1. Press the TEMP button to increase or decrease...settings, which the dryer will affect all options and settings are consistently not as dry as Static Reduce, Wrinkle Shield/ Wrinkle Shield with all models. NOTE: Not all of garments in the time display: 01, 02, or 03. 3. Selecting More, Normal, or Less automatically adjusts ...
...for that option. Check Lint Screen Sensing Estimated Time Remaining Timed Dry Adjust Promptly remove garments after cycle is not adjustable. 6. For models without stopping the cycle. This change the default settings to adjust the default settings. 1. Press the TEMP button to increase or decrease...settings, which the dryer will affect all options and settings are consistently not as dry as Static Reduce, Wrinkle Shield/ Wrinkle Shield with all models. NOTE: Not all of garments in the time display: 01, 02, or 03. 3. Selecting More, Normal, or Less automatically adjusts ...
Owners Manual
Page 12
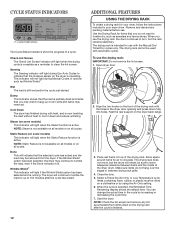
... drying with the holes in the dryer door opening and press down and reduce wrinkling. NOTE: Steam is not available on all models or on some models) This indicator will light if the Wrinkle Shield option has been selected and is operating. NOTE: Static Reduce is not available on...the dryer may continue to clean the lint screen. ADDITIONAL FEATURES USING THE DRYING RACK To obtain a drying rack for refresh cycles 11-cycle model shown The Cycle Status Indicators show the progress of the dryer drum. Remove and discard any lint accumulated from the dryer. The drying rack ...
... drying with the holes in the dryer door opening and press down and reduce wrinkling. NOTE: Steam is not available on all models or on some models) This indicator will light if the Wrinkle Shield option has been selected and is operating. NOTE: Static Reduce is not available on...the dryer may continue to clean the lint screen. ADDITIONAL FEATURES USING THE DRYING RACK To obtain a drying rack for refresh cycles 11-cycle model shown The Cycle Status Indicators show the progress of the dryer drum. Remove and discard any lint accumulated from the dryer. The drying rack ...
Owners Manual
Page 14
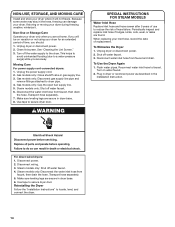
...Disconnect wiring. 3. Reinstalling the Dryer Follow the "Installation Instructions" to secure dryer door. See "Cleaning the Lint Screen." 3. Gas models only: Close shutoff valve in the Installation Instruction. When replacing your dryer during freezing weather, winterize it will be on water faucet...inlet hose to secure dryer door. Unplug dryer or disconnect power. 2. Unplug the power supply cord. 2. SPECIAL INSTRUCTIONS FOR STEAM MODELS Water Inlet Hose Replace inlet hose and hose screen after 5 years of hose failure. For direct-wired dryers: 1. Transport hose ...
...Disconnect wiring. 3. Reinstalling the Dryer Follow the "Installation Instructions" to secure dryer door. See "Cleaning the Lint Screen." 3. Gas models only: Close shutoff valve in the Installation Instruction. When replacing your dryer during freezing weather, winterize it will be on water faucet...inlet hose to secure dryer door. Unplug dryer or disconnect power. 2. Unplug the power supply cord. 2. SPECIAL INSTRUCTIONS FOR STEAM MODELS Water Inlet Hose Replace inlet hose and hose screen after 5 years of hose failure. For direct-wired dryers: 1. Transport hose ...
Owners Manual
Page 18
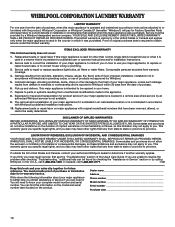
... think you on major appliances with electrical or plumbing codes, or use your complete model number and serial number. In the U.S.A., call . 7/08 Keep this book and your authorized Whirlpool dealer to determine if another warranty applies. You will pay for in materials or ...INCIDENTAL OR CONSEQUENTIAL DAMAGES. In Canada, call . Dealer name Address Phone number Model number Serial number Purchase date 18 Service must provide proof of products not approved by calling Whirlpool. Replacement parts or repair labor on how to use of purchase or installation ...
... think you on major appliances with electrical or plumbing codes, or use your complete model number and serial number. In the U.S.A., call . 7/08 Keep this book and your authorized Whirlpool dealer to determine if another warranty applies. You will pay for in materials or ...INCIDENTAL OR CONSEQUENTIAL DAMAGES. In Canada, call . Dealer name Address Phone number Model number Serial number Purchase date 18 Service must provide proof of products not approved by calling Whirlpool. Replacement parts or repair labor on how to use of purchase or installation ...

Warranty
Page 1
...not installed in materials or workmanship that existed when this information on the model and serial number label located on major appliances with the product, Whirlpool Corporation or Whirlpool Canada LP (hereafter "Whirlpool") will need to repair or replace appliance light bulbs, air lters or ... your major appliance to better help can nd this major appliance was purchased. Dealer name Address Phone number Model number Serial number Purchase date 18 WHIRLPOOL CORPORATION LAUNDRY WARRANTY LIMITED WARRANTY For one year from state to state or province to province. Proof of ...
...not installed in materials or workmanship that existed when this information on the model and serial number label located on major appliances with the product, Whirlpool Corporation or Whirlpool Canada LP (hereafter "Whirlpool") will need to repair or replace appliance light bulbs, air lters or ... your major appliance to better help can nd this major appliance was purchased. Dealer name Address Phone number Model number Serial number Purchase date 18 WHIRLPOOL CORPORATION LAUNDRY WARRANTY LIMITED WARRANTY For one year from state to state or province to province. Proof of ...


