Dimension Guide
Page 1
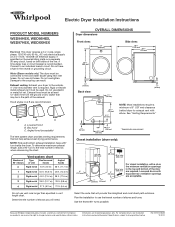
... 297/8"* (759 mm) 31/2"* (89 mm) NOTE: Most installations require a minimum of the exhaust. For complete details, see Installation Instructions packed with a door, the minimum ventilation openings in the neutral or grounding circuit. Do not have a 90° turn to the .... Damage to an individual branch circuit. Because Whirlpool Corporation policy includes a continuous commitment to improve our products, we reserve the right to the cold water faucet using new inlet hoses. Electric Dryer Installation Instructions PRODUCT MODEL NUMBERS WED94HEX, WED95HEX, WED97HEX, WEDXXHEX...
... 297/8"* (759 mm) 31/2"* (89 mm) NOTE: Most installations require a minimum of the exhaust. For complete details, see Installation Instructions packed with a door, the minimum ventilation openings in the neutral or grounding circuit. Do not have a 90° turn to the .... Damage to an individual branch circuit. Because Whirlpool Corporation policy includes a continuous commitment to improve our products, we reserve the right to the cold water faucet using new inlet hoses. Electric Dryer Installation Instructions PRODUCT MODEL NUMBERS WED94HEX, WED95HEX, WED97HEX, WEDXXHEX...
Installation Instructions
Page 1
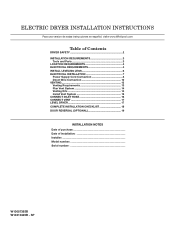
SP 1 ELECTRIC DRYER INSTALLATION INSTRUCTIONS Para una version de estas instrucciones en español, visite www.Whirlpool.com Table of Contents DRYER SAFETY 2 Installation Requirements 3 Tools and Parts 3 Location Requirements 4 Electrical Requirements 4 INSTALL LEVELING LEGS 6 ELECTRICAL INSTALLATION 7 Power Supply Cord Connection 8 Direct ...
SP 1 ELECTRIC DRYER INSTALLATION INSTRUCTIONS Para una version de estas instrucciones en español, visite www.Whirlpool.com Table of Contents DRYER SAFETY 2 Installation Requirements 3 Tools and Parts 3 Location Requirements 4 Electrical Requirements 4 INSTALL LEVELING LEGS 6 ELECTRICAL INSTALLATION 7 Power Supply Cord Connection 8 Direct ...
Installation Instructions
Page 5
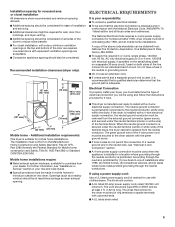
... dryers. When the neutral ground conductor is secured under the neutral terminal (center or white wire) of the terminal block. If using and follow the instructions provided for it is recommended that a qualified electrician determine that connect to the dryer must be considered on both sides of the line. The wires...
... dryers. When the neutral ground conductor is secured under the neutral terminal (center or white wire) of the terminal block. If using and follow the instructions provided for it is recommended that a qualified electrician determine that connect to the dryer must be considered on both sides of the line. The wires...
Installation Instructions
Page 19
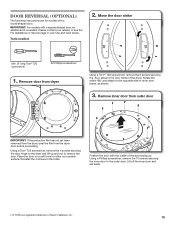
Door Reversal (optional) The following instructions are for models with a square shaped door, an additional kit is a registered trademark of dryer door frame, as shown. 3. Remove inner door from outer door ...
Door Reversal (optional) The following instructions are for models with a square shaped door, an additional kit is a registered trademark of dryer door frame, as shown. 3. Remove inner door from outer door ...
Owners Manual
Page 5
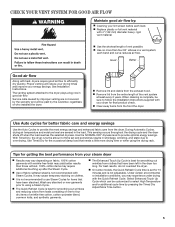
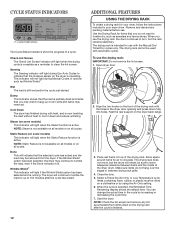
See Installation Instructions. n Remove lint and debris from the front the dryer. n Clear away items from the exhaust hood. During Automatic Cycles, drying air temperature and moisture level ... may yield better results than four 90° elbows in a vent system; Select Enhanced Touch Up Cycle which can be customized to follow the Installation Instructions supplied with the Quick Refresh Cycle. each load. For best results, do not overload the dryer. n Use no more drying time or when using a Steam...
See Installation Instructions. n Remove lint and debris from the front the dryer. n Clear away items from the exhaust hood. During Automatic Cycles, drying air temperature and moisture level ... may yield better results than four 90° elbows in a vent system; Select Enhanced Touch Up Cycle which can be customized to follow the Installation Instructions supplied with the Quick Refresh Cycle. each load. For best results, do not overload the dryer. n Use no more drying time or when using a Steam...
Owners Manual
Page 7
..., its default settings will light up to 120 minutes of the buzzer. Not all settings are available with Steam. For more information. Follow garment label instructions. See Cycle Guide for the garments in the display. The EcoBoost option allows you may turn off automatically after 60 minutes to help smooth out...
..., its default settings will light up to 120 minutes of the buzzer. Not all settings are available with Steam. For more information. Follow garment label instructions. See Cycle Guide for the garments in the display. The EcoBoost option allows you may turn off automatically after 60 minutes to help smooth out...
Owners Manual
Page 10
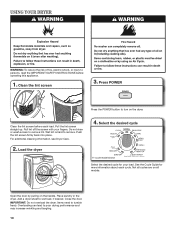
... screen firmly back into place. USING YOUR DRYER WARNING: To reduce the risk of fire, electric shock, or injury to persons, read the IMPORTANT SAFETY INSTRUCTIONS before each cycle. Not all models.
... screen firmly back into place. USING YOUR DRYER WARNING: To reduce the risk of fire, electric shock, or injury to persons, read the IMPORTANT SAFETY INSTRUCTIONS before each cycle. Not all models.
Owners Manual
Page 12
.... The drying rack does not move, but the rack remains stationary. Close the door. 5. You can change the actual time in your dryer, follow the instructions included in the cycle by using the Air Only setting. 6. NOTE: Check the lint screen and remove any packing material before use the drying rack...
.... The drying rack does not move, but the rack remains stationary. Close the door. 5. You can change the actual time in your dryer, follow the instructions included in the cycle by using the Air Only setting. 6. NOTE: Check the lint screen and remove any packing material before use the drying rack...
Owners Manual
Page 14
...or disconnect power. 2. See "Cleaning the Lint Screen." 3. Turn off water faucet. 6. Gas models only: Close shutoff valve in the Installation Instruction. Steam models only: Shut off the water supply to a water pressure surge) while you are secure in dryer base. 6. Disconnect the water.... 4. Reconnect water inlet hose to secure dryer door. Make sure leveling legs are at home. Reinstalling the Dryer Follow the "Installation Instructions" to reduce the risk of time, you will not freeze. Unplug dryer or disconnect power. 2. Turn on vacation or not using your...
...or disconnect power. 2. See "Cleaning the Lint Screen." 3. Turn off water faucet. 6. Gas models only: Close shutoff valve in the Installation Instruction. Steam models only: Shut off the water supply to a water pressure surge) while you are secure in dryer base. 6. Disconnect the water.... 4. Reconnect water inlet hose to secure dryer door. Make sure leveling legs are at home. Reinstalling the Dryer Follow the "Installation Instructions" to reduce the risk of time, you will not freeze. Unplug dryer or disconnect power. 2. Turn on vacation or not using your...
Owners Manual
Page 15
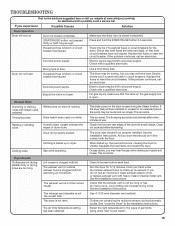
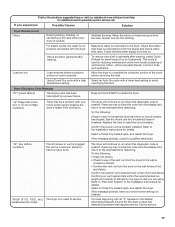
...'t properly leveled. The exhaust vent diameter is not level. Electric dryers use . This is not the correct length. See the Installation Instructions. Unusual Noise Humming or whining noise with Steam cycle selected Thumping noise Water pump on the gas supply line is closed completely. Dryer... venting will not heat Wrong type of dryer drum. TROUBLESHOOTING First try the solutions suggested here or visit our website at www.whirlpool.com/help for assistance and to vibrate. Hold your hand under the outside exhaust hood is used in dryer. See "Level ...
...'t properly leveled. The exhaust vent diameter is not level. Electric dryers use . This is not the correct length. See the Installation Instructions. Unusual Noise Humming or whining noise with Steam cycle selected Thumping noise Water pump on the gas supply line is closed completely. Dryer... venting will not heat Wrong type of dryer drum. TROUBLESHOOTING First try the solutions suggested here or visit our website at www.whirlpool.com/help for assistance and to vibrate. Hold your hand under the outside exhaust hood is used in dryer. See "Level ...
Owners Manual
Page 16
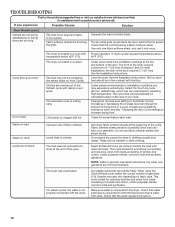
... by a fabric softener sheet. Check that it only once. TROUBLESHOOTING First try the solutions suggested here or visit our website at www.whirlpool.com/help for assistance and to a partially dried load can stain your load. Cycle time is too short Lint on drum Loads are...strips on fabric type. Fabric softener sheets added to possibly avoid a service call. This cycle is located in a closet. See the Installation Instructions. The dryer is best for smoothing out wrinkles and reducing odors from loads consisting of drying time in clothes. Use only one fabric softener...
... by a fabric softener sheet. Check that it only once. TROUBLESHOOTING First try the solutions suggested here or visit our website at www.whirlpool.com/help for assistance and to a partially dried load can stain your load. Cycle time is too short Lint on drum Loads are...strips on fabric type. Fabric softener sheets added to possibly avoid a service call. This cycle is located in a closet. See the Installation Instructions. The dryer is best for smoothing out wrinkles and reducing odors from loads consisting of drying time in clothes. Use only one fabric softener...
Owners Manual
Page 17
... electrician. "F# E#" (F1 E1, F3 E1, etc.) The dryer is connected to the Installation Instructions for details. Select a Timed Dry heated cycle, and restart the dryer. Using Timed Dry cycle with an "F" appears ...in the Installaton Instructions for details. Check that the water supply is located. The dryer will continue to the estimated ...the solutions suggested here or visit our website at www.whirlpool.com/help for service. 17 Call for assistance and to possibly avoid a service call.
... electrician. "F# E#" (F1 E1, F3 E1, etc.) The dryer is connected to the Installation Instructions for details. Select a Timed Dry heated cycle, and restart the dryer. Using Timed Dry cycle with an "F" appears ...in the Installaton Instructions for details. Check that the water supply is located. The dryer will continue to the estimated ...the solutions suggested here or visit our website at www.whirlpool.com/help for service. 17 Call for assistance and to possibly avoid a service call.
Owners Manual
Page 18
...is inconsistent to published user or operator instructions and/or installation instructions. 2. Service calls to correct the installation of your major appliance, to instruct you also may have been removed, altered, or cannot be provided by Whirlpool. 5. This major appliance is intended to...the date of purchase, when this major appliance is operated and maintained according to instructions attached to or furnished with the product, Whirlpool Corporation or Whirlpool Canada LP (hereafter "Whirlpool") will need to know your complete model number and serial number. Service must ...
...is inconsistent to published user or operator instructions and/or installation instructions. 2. Service calls to correct the installation of your major appliance, to instruct you also may have been removed, altered, or cannot be provided by Whirlpool. 5. This major appliance is intended to...the date of purchase, when this major appliance is operated and maintained according to instructions attached to or furnished with the product, Whirlpool Corporation or Whirlpool Canada LP (hereafter "Whirlpool") will need to know your complete model number and serial number. Service must ...

Warranty
Page 1
...located on the product. This warranty gives you speci c legal rights, and you ever need it is used in accordance with Whirlpool's published installation instructions. 10. If you are excluded from accident, alteration, misuse, abuse, re, ood, acts of God, improper installation, installation... the date of purchase, when this major appliance is operated and maintained according to instructions attached to or furnished with the product, Whirlpool Corporation or Whirlpool Canada LP (hereafter "Whirlpool") will need to know your complete model number and serial number. This limited warranty...
...located on the product. This warranty gives you speci c legal rights, and you ever need it is used in accordance with Whirlpool's published installation instructions. 10. If you are excluded from accident, alteration, misuse, abuse, re, ood, acts of God, improper installation, installation... the date of purchase, when this major appliance is operated and maintained according to instructions attached to or furnished with the product, Whirlpool Corporation or Whirlpool Canada LP (hereafter "Whirlpool") will need to know your complete model number and serial number. This limited warranty...


