Owners Manual
Page 2
... pedestals are trained to your nearest designated service centre. Accessory Stack Kit Door Reversal Kit Back Guard Optional Exhaust Installation Dryer can write to Whirlpool Corporation with : ■ Use and maintenance procedures ■ Accessory and repair parts sales ■ Referrals to order replacement parts, we recommend that you need help us at : Customer Interaction Centre Whirlpool Canada LP 1901 Minnesota Court Mississauga, Ontario L5N 3A7 Please include a daytime phone number...
... pedestals are trained to your nearest designated service centre. Accessory Stack Kit Door Reversal Kit Back Guard Optional Exhaust Installation Dryer can write to Whirlpool Corporation with : ■ Use and maintenance procedures ■ Accessory and repair parts sales ■ Referrals to order replacement parts, we recommend that you need help us at : Customer Interaction Centre Whirlpool Canada LP 1901 Minnesota Court Mississauga, Ontario L5N 3A7 Please include a daytime phone number...
Owners Manual
Page 7
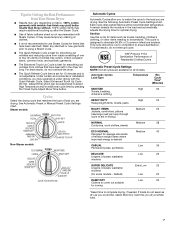
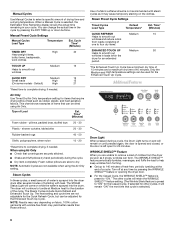
... to select High Temperature and/or additional cycle time by pressing the Timed Cycle Adjust More Time button. This cycle should be run to completion to complete drying, if needed. Steam models Non-Steam models Cycle Control knob Automatic Cycles Automatic Cycles allow you to match the cycle to eliminate 99.9% of Residential Clothes Dryers Automatic Preset Cycle Settings NOTE: Not all cycles are drying. Tips for Getting the Best Performance from Your Steam Dryer ■ Results may...
... to select High Temperature and/or additional cycle time by pressing the Timed Cycle Adjust More Time button. This cycle should be run to completion to complete drying, if needed. Steam models Non-Steam models Cycle Control knob Automatic Cycles Automatic Cycles allow you to match the cycle to eliminate 99.9% of Residential Clothes Dryers Automatic Preset Cycle Settings NOTE: Not all cycles are drying. Tips for Getting the Best Performance from Your Steam Dryer ■ Results may...
Owners Manual
Page 8
..., bulky items, bedspreads, work clothes TOUCH UP Helps to smooth out wrinkles in loads left open for other cycles will come on the clothes. Type of drying time and a drying temperature. shower curtains, tablecloths 20 - 30 Rubber-backed rugs 40 - 50 Olefin, polypropylene, sheer nylon 10 - 20 *Reset time to complete drying, if needed . Foam rubber pillows are not available when using the Air Only setting. The Steam Cycles include Quick Refresh...
..., bulky items, bedspreads, work clothes TOUCH UP Helps to smooth out wrinkles in loads left open for other cycles will come on the clothes. Type of drying time and a drying temperature. shower curtains, tablecloths 20 - 30 Rubber-backed rugs 40 - 50 Olefin, polypropylene, sheer nylon 10 - 20 *Reset time to complete drying, if needed . Foam rubber pillows are not available when using the Air Only setting. The Steam Cycles include Quick Refresh...

Owners Manual
Page 10
... to dry drum. Dry unstable dye items inside out to avoid transfer of clean cloths or towels to the stained area and rub with your load is located in the door opening of combustion and ventilation air. 3. Because some water may discolor the dryer interior. Roll lint off while the screen is hard to a residue buildup. Unplug dryer or disconnect power. 2. DRYER CARE Cleaning the Dryer Location Keep dryer area clear and free...
... to dry drum. Dry unstable dye items inside out to avoid transfer of clean cloths or towels to the stained area and rub with your load is located in the door opening of combustion and ventilation air. 3. Because some water may discolor the dryer interior. Roll lint off while the screen is hard to a residue buildup. Unplug dryer or disconnect power. 2. DRYER CARE Cleaning the Dryer Location Keep dryer area clear and free...

Owners Manual
Page 11
..., or that both circuit breakers have not tripped. To winterize dryer 1. Turn on inside the dryer drum when you open the door. There may require pressing and holding the Start button for 2-5 seconds. ■ Has a household fuse blown, or has a circuit breaker tripped? Replace the fuse or reset the circuit breaker. Use a time-delay fuse. 11 Moving care For power supply cord-connected dryers: 1. Make sure leveling legs are secure in death or electrical shock. 1. Plug in dryer base. 5. For...
..., or that both circuit breakers have not tripped. To winterize dryer 1. Turn on inside the dryer drum when you open the door. There may require pressing and holding the Start button for 2-5 seconds. ■ Has a household fuse blown, or has a circuit breaker tripped? Replace the fuse or reset the circuit breaker. Use a time-delay fuse. 11 Moving care For power supply cord-connected dryers: 1. Make sure leveling legs are secure in death or electrical shock. 1. Plug in dryer base. 5. For...
Owners Manual
Page 12
... START to vibrate. Try the following: Check to dry quickly? Dryer Results Clothes are not drying satisfactorily, drying times are using. See "Additional Features." ■ Is the load too large and heavy to see if the vent run length and number of elbows for service. See the Installation Instructions. ■ Are fabric softener sheets blocking the grille? Check that the exhaust vent is too hot ■ Is the lint screen clogged with lint? Long venting will continue to run cleaned...
... START to vibrate. Try the following: Check to dry quickly? Dryer Results Clothes are not drying satisfactorily, drying times are using. See "Additional Features." ■ Is the load too large and heavy to see if the vent run length and number of elbows for service. See the Installation Instructions. ■ Are fabric softener sheets blocking the grille? Check that the exhaust vent is too hot ■ Is the lint screen clogged with lint? Long venting will continue to run cleaned...
Owners Manual
Page 13
... the exhaust vent diameter the correct size? Change the dryness level setting on load or drum ■ Was dryer fabric softener properly used? Select Enhanced Touch Up Cycle to the dryer. Make sure water is best for most installations, the rear of the cycle. Check that water inlet hose is located? Failure to both the faucet and dryer's water inlet valve. Level the dryer. Drum stains are gone from the area, rewash and dry the clothing...
... the exhaust vent diameter the correct size? Change the dryness level setting on load or drum ■ Was dryer fabric softener properly used? Select Enhanced Touch Up Cycle to the dryer. Make sure water is best for most installations, the rear of the cycle. Check that water inlet hose is located? Failure to both the faucet and dryer's water inlet valve. Level the dryer. Drum stains are gone from the area, rewash and dry the clothing...
Owners Manual
Page 14
... need repair service, first see the "Troubleshooting" section of your major appliance, to instruct you on major appliances with original model/serial numbers that have other rights that existed when this major appliance was purchased. If you . ITEMS EXCLUDED FROM WARRANTY This limited warranty does not cover: 1. Service calls to correct the installation of the Use & Care Guide. This major appliance is intended to be easily determined. Replacement parts...
... need repair service, first see the "Troubleshooting" section of your major appliance, to instruct you on major appliances with original model/serial numbers that have other rights that existed when this major appliance was purchased. If you . ITEMS EXCLUDED FROM WARRANTY This limited warranty does not cover: 1. Service calls to correct the installation of the Use & Care Guide. This major appliance is intended to be easily determined. Replacement parts...

Installation Instructions
Page 2
.... Parts needed Check local codes. Inlet hose with dryer if installing on a pedestal. Check that opens to 1" (25 mm) or hex-head socket wrench (for adjusting dryer feet) ■ Level ■ Wire stripper (direct wire installations) ■ Vent clamps Parts supplied Non-Steam Models ■ Caulking gun and compound (for purchase from the dealer from dryer drum. Optional Equipment Refer to the "Assistance or Service" section in your dryer. 2 Short inlet hose D. Check existing electrical supply...
.... Parts needed Check local codes. Inlet hose with dryer if installing on a pedestal. Check that opens to 1" (25 mm) or hex-head socket wrench (for adjusting dryer feet) ■ Level ■ Wire stripper (direct wire installations) ■ Vent clamps Parts supplied Non-Steam Models ■ Caulking gun and compound (for purchase from the dealer from dryer drum. Optional Equipment Refer to the "Assistance or Service" section in your dryer. 2 Short inlet hose D. Check existing electrical supply...
Installation Instructions
Page 3
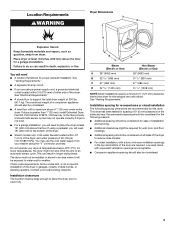
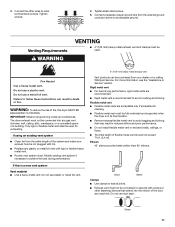
... will need ■ A location that allows for this dryer. Contact your washer using the "Y" connector provided. See "Venting Requirements." ■ A separate 30-amp circuit. ■ If you will need 18" (460 mm) to reduce noise transfer. ■ For closet installation, with a maximum slope of the door are recommended for proper exhaust installation. You may not operate correctly if dryer is greater than 1" (25 mm), install Extended Dryer Feet Kit, Part Number 279810. Check code requirements. Installation...
... will need ■ A location that allows for this dryer. Contact your washer using the "Y" connector provided. See "Venting Requirements." ■ A separate 30-amp circuit. ■ If you will need 18" (460 mm) to reduce noise transfer. ■ For closet installation, with a maximum slope of the door are recommended for proper exhaust installation. You may not operate correctly if dryer is greater than 1" (25 mm), install Extended Dryer Feet Kit, Part Number 279810. Check code requirements. Installation...
Installation Instructions
Page 5
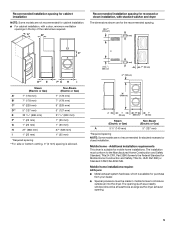
... 24, HUD Part 280) or Standard CAN/CSA-Z240 MH. Mobile home - The installation must conform to introduce outside air into the dryer. Recommended installation spacing for cabinet installation NOTE: Some models are not recommended for cabinet installation. ■ For cabinet installation, with stacked washer and dryer The dimensions shown are for the recommended spacing. 48 in.2 * (310 cm2) 3"* (76 mm) C* D** E F* G H I Steam (Electric or Gas) A* 7" (178...
... 24, HUD Part 280) or Standard CAN/CSA-Z240 MH. Mobile home - The installation must conform to introduce outside air into the dryer. Recommended installation spacing for cabinet installation NOTE: Some models are not recommended for cabinet installation. ■ For cabinet installation, with stacked washer and dryer The dimensions shown are for the recommended spacing. 48 in.2 * (310 cm2) 3"* (76 mm) C* D** E F* G H I Steam (Electric or Gas) A* 7" (178...

Installation Instructions
Page 6
.... Electrical Connection To properly install your outlet looks like this : 4-wire receptacle (14-30R) Then choose a 4-wire power supply cord with clothes dryers. U.S.A. A timedelay fuse or circuit breaker is permanently connected to an individual branch circuit. Do not have four 10-gauge copper wires and match a 4-wire receptacle of the terminal block. If the dryer is prohibited. If using and follow the instructions provided for homes built after 1996, and all local codes...
.... Electrical Connection To properly install your outlet looks like this : 4-wire receptacle (14-30R) Then choose a 4-wire power supply cord with clothes dryers. U.S.A. A timedelay fuse or circuit breaker is permanently connected to an individual branch circuit. Do not have four 10-gauge copper wires and match a 4-wire receptacle of the terminal block. If the dryer is prohibited. If using and follow the instructions provided for homes built after 1996, and all local codes...

Installation Instructions
Page 9
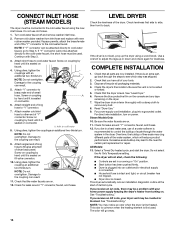
... turned ends E. ¾" (19 mm) UL listed strain relief F. Neutral ground wire D. 4-wire connection: Direct wire IMPORTANT: A 4-wire connection is required for mobile homes and where local codes do not permit the use of 3-wire connections. (251"mm) Direct wire cable must have completed your electrical connection. Cut 11/2" (38 mm) from external ground conductor screw. Neutral ground wire F. Insert tab of dryer rear panel. B D E A A. Shape ends of wires into slot of terminal block cover into a hook...
... turned ends E. ¾" (19 mm) UL listed strain relief F. Neutral ground wire D. 4-wire connection: Direct wire IMPORTANT: A 4-wire connection is required for mobile homes and where local codes do not permit the use of 3-wire connections. (251"mm) Direct wire cable must have completed your electrical connection. Cut 11/2" (38 mm) from external ground conductor screw. Neutral ground wire F. Insert tab of dryer rear panel. B D E A A. Shape ends of wires into slot of terminal block cover into a hook...

Installation Instructions
Page 10
...to "Venting Requirements." 3-wire connection: Direct wire Use where local codes permit connecting cabinet-ground conductor to the terminal block, place the hooked end of terminal block (hook facing right). External ground conductor screw B. Grounding path determined by a qualified electrician 10 2. C A B D B D E E A. Neutral wire (white or center wire) E. ¾" (19 mm) UL listed strain relief 3. Insert tab of terminal block cover into slot of power supply cord to "Venting Requirements." A. Connect neutral wire (white or center wire) of dryer rear panel. Neutral ground wire...
...to "Venting Requirements." 3-wire connection: Direct wire Use where local codes permit connecting cabinet-ground conductor to the terminal block, place the hooked end of terminal block (hook facing right). External ground conductor screw B. Grounding path determined by a qualified electrician 10 2. C A B D B D E E A. Neutral wire (white or center wire) E. ¾" (19 mm) UL listed strain relief 3. Insert tab of terminal block cover into slot of power supply cord to "Venting Requirements." A. Connect neutral wire (white or center wire) of dryer rear panel. Neutral ground wire...
Installation Instructions
Page 11
... extended and supported when the dryer is not plugged with lint. ■ Replace any gas vent, chimney, wall, ceiling, attic, crawlspace, or a concealed space of fire, this is recommended to outer terminal block screws. For more information, see the "Assistance or Service" section. Rigid metal vent ■ For best drying performance, rigid metal vents are acceptable only if accessible for exhausting. Do not use a metal foil...
... extended and supported when the dryer is not plugged with lint. ■ Replace any gas vent, chimney, wall, ceiling, attic, crawlspace, or a concealed space of fire, this is recommended to outer terminal block screws. For more information, see the "Assistance or Service" section. Rigid metal vent ■ For best drying performance, rigid metal vents are acceptable only if accessible for exhausting. Do not use a metal foil...
Installation Instructions
Page 12
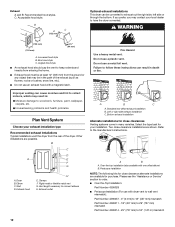
... connect elbows H. B A 4" C (102 mm) Optional exhaust installations This dryer can be at least 12" (305 mm) from the rear of the exhaust (such as flowers, rocks or bushes, snow line, etc.). ■ Do not use with one offset elbow) B. Other installations are possible. Over-the-top installation (also available with dryer vent to wall vent mismatch): Part Number 4396037 - 0" (0 mm) to 18" (457 mm) mismatch Part Number...
... connect elbows H. B A 4" C (102 mm) Optional exhaust installations This dryer can be at least 12" (305 mm) from the rear of the exhaust (such as flowers, rocks or bushes, snow line, etc.). ■ Do not use with one offset elbow) B. Other installations are possible. Over-the-top installation (also available with dryer vent to wall vent mismatch): Part Number 4396037 - 0" (0 mm) to 18" (457 mm) mismatch Part Number...

Installation Instructions
Page 13
... to its final location. Find the diamond marking. 4. Place cardboard under each of the 2 dryer back corners. See illustration. 3. Once the exhaust vent connection is clean. The vent system chart provides venting requirements that will provide the straightest and most direct path outdoors. ■ Plan the installation to use the fewest number of elbows and turns. ■ When using elbows or making turns, allow as much...
... to its final location. Find the diamond marking. 4. Place cardboard under each of the 2 dryer back corners. See illustration. 3. Once the exhaust vent connection is clean. The vent system chart provides venting requirements that will provide the straightest and most direct path outdoors. ■ Plan the installation to use the fewest number of elbows and turns. ■ When using elbows or making turns, allow as much...
Installation Instructions
Page 14
... a problem with Step 3. 3. Remove old rubber washer from turning on . 12. If the dryer is seated on the dryer. 7. Wipe the dryer drum interior thoroughly with new rubber washer provided. Select a Timed Dry heated cycle, and start of your tools. 3. If the dryer will not start, check the following: ■ Controls are on . If you receive an AF code, your home power supply keeping the dryer's heater from inlet hose and replace with a damp cloth...
... a problem with Step 3. 3. Remove old rubber washer from turning on . 12. If the dryer is seated on the dryer. 7. Wipe the dryer drum interior thoroughly with new rubber washer provided. Select a Timed Dry heated cycle, and start of your tools. 3. If the dryer will not start, check the following: ■ Controls are on . If you receive an AF code, your home power supply keeping the dryer's heater from inlet hose and replace with a damp cloth...

Installation Instructions
Page 15
... drum will not run cleaned. ■ "E" Variable (E1, E2, E3) service codes: Call for details. ■ Select a Timed Dry heated cycle, and restart the dryer. Replace the fuse or reset the circuit breaker. Do not use a metal foil vent. Dryer Operation Dryer will turn, but you do not feel air movement, clean exhaust system of a service call... Check that both fuses are too long, or load is present. Use a time-delay fuse. Replace the fuse or reset the circuit breaker. Refer to "Electrical Connection" for 5-10 minutes. Dryer Results Clothes are...
... drum will not run cleaned. ■ "E" Variable (E1, E2, E3) service codes: Call for details. ■ Select a Timed Dry heated cycle, and restart the dryer. Replace the fuse or reset the circuit breaker. Do not use a metal foil vent. Dryer Operation Dryer will turn, but you do not feel air movement, clean exhaust system of a service call... Check that both fuses are too long, or load is present. Use a time-delay fuse. Replace the fuse or reset the circuit breaker. Refer to "Electrical Connection" for 5-10 minutes. Dryer Results Clothes are...
Parts Diagram
Page 6
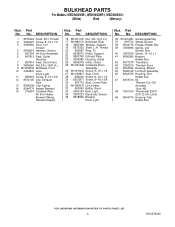
... Door, Lint Screen 4 3406653 Harness, Sensor 5 697354 Air Duct Assembly 6 697813 Seal, Outlet Housing 7 697814 Seal, Drum Front 8 3934666 Nut,3/8 x 16(R.H.) 9 W10252304 Bulkhead, Front 10 3402841 Lens, Drum Light 11 489463 Screw, 8−18 x 3/8 12 8572105 Clip, Exhaust Pipe 13 8066208 Clip−Spring 14 8544771 Heater Element 15 279457 Terminal Wire Kit (For Heater Element Wiring Harness Repair) Illus. Part No. DESCRIPTION 16 W10001120 Nut, 3/8−16 (L.H.) 17 W10080170 Bulkhead, Rear 18...
... Door, Lint Screen 4 3406653 Harness, Sensor 5 697354 Air Duct Assembly 6 697813 Seal, Outlet Housing 7 697814 Seal, Drum Front 8 3934666 Nut,3/8 x 16(R.H.) 9 W10252304 Bulkhead, Front 10 3402841 Lens, Drum Light 11 489463 Screw, 8−18 x 3/8 12 8572105 Clip, Exhaust Pipe 13 8066208 Clip−Spring 14 8544771 Heater Element 15 279457 Terminal Wire Kit (For Heater Element Wiring Harness Repair) Illus. Part No. DESCRIPTION 16 W10001120 Nut, 3/8−16 (L.H.) 17 W10080170 Bulkhead, Rear 18...


