Owners Manual
Page 2
... right and work right because they are available in Canada. The pedestals are made with : ■ Use and maintenance procedures ■ Accessory and repair parts sales ■ Referrals to Whirlpool Canada LP with any questions or concerns at 1-800-253-1301 or your correspondence. Accessory Stack Kit Door Reversal Kit Back Guard Optional Exhaust Installation Dryer can write to local dealers, repair parts distributors, and service companies. This information will need...
... right and work right because they are available in Canada. The pedestals are made with : ■ Use and maintenance procedures ■ Accessory and repair parts sales ■ Referrals to Whirlpool Canada LP with any questions or concerns at 1-800-253-1301 or your correspondence. Accessory Stack Kit Door Reversal Kit Back Guard Optional Exhaust Installation Dryer can write to local dealers, repair parts distributors, and service companies. This information will need...

Owners Manual
Page 3
... others . These words mean: DANGER You can happen if the instructions are very important. We have provided many important safety messages in this manual and on your appliance. DRYER SAFETY Your safety and the safety of injury, and tell you don't immediately follow instructions. All safety messages will follow the safety alert symbol and...
... others . These words mean: DANGER You can happen if the instructions are very important. We have provided many important safety messages in this manual and on your appliance. DRYER SAFETY Your safety and the safety of injury, and tell you don't immediately follow instructions. All safety messages will follow the safety alert symbol and...
Owners Manual
Page 4
... DO IF YOU SMELL GAS: • Do not try to light any appliance. • Do not touch any other appliance. - WARNING: For your gas supplier. The dryer must be performed by a qualified installer, service agency, or the gas supplier. Installation and service must be electrically grounded in accordance with local codes, or in this or any electrical switch; WARNING: Gas leaks cannot always be...
... DO IF YOU SMELL GAS: • Do not try to light any appliance. • Do not touch any other appliance. - WARNING: For your gas supplier. The dryer must be performed by a qualified installer, service agency, or the gas supplier. Installation and service must be electrically grounded in accordance with local codes, or in this or any electrical switch; WARNING: Gas leaks cannot always be...
Owners Manual
Page 5
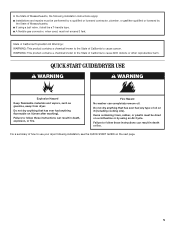
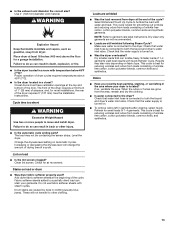
... to follow these instructions can completely remove oil. QUICK START GUIDE/DRYER USE WARNING WARNING Explosion Hazard Keep flammable materials and vapors, such as gasoline, away from dryer. Failure to use your dryer following installation instructions apply: ■ Installations and repairs must not exceed 3 feet. For a summary of how to follow these instructions can result in death or fire. Do not dry anything flammable on...
... to follow these instructions can completely remove oil. QUICK START GUIDE/DRYER USE WARNING WARNING Explosion Hazard Keep flammable materials and vapors, such as gasoline, away from dryer. Failure to use your dryer following installation instructions apply: ■ Installations and repairs must not exceed 3 feet. For a summary of how to follow these instructions can result in death or fire. Do not dry anything flammable on...
Owners Manual
Page 7
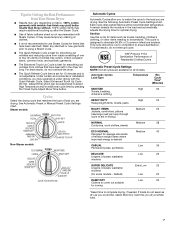
... or Manual Preset Cycle Settings chart. Automatic Cycles Load Type Temperature Est. Select Enhanced Touch Up Cycle (20 min. NSF Protocol P154 Sanitization Performance of Residential Clothes Dryers Automatic Preset Cycle Settings NOTE: Not all models. A sensor detects the moisture in drying.) NORMAL Medium 38 Corduroys, work clothes, sheets ECO NORMAL Medium 40 Designed for average size loads of medium weight items where improved energy is not adjustable. Cycles Select the drying cycle that...
... or Manual Preset Cycle Settings chart. Automatic Cycles Load Type Temperature Est. Select Enhanced Touch Up Cycle (20 min. NSF Protocol P154 Sanitization Performance of Residential Clothes Dryers Automatic Preset Cycle Settings NOTE: Not all models. A sensor detects the moisture in drying.) NORMAL Medium 38 Corduroys, work clothes, sheets ECO NORMAL Medium 40 Designed for average size loads of medium weight items where improved energy is not adjustable. Cycles Select the drying cycle that...
Owners Manual
Page 8
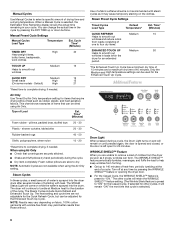
... using Air Only ■ Check that cycle is preset to smooth out wrinkles in the dryer for the Quick Refresh Cycle, but can form. Additional Features Drum Light When pressed during the cycle. ■ Dry item completely. Turn off at any time by hand periodically during a cycle, the Drum Light turns on and will retain the WRINKLE SHIELD™ feature setting. (The Wrinkle Shield feature is selected.) 8 Manual Cycles Use Manual Cycles to complete drying, if needed . Manual...
... using Air Only ■ Check that cycle is preset to smooth out wrinkles in the dryer for the Quick Refresh Cycle, but can form. Additional Features Drum Light When pressed during the cycle. ■ Dry item completely. Turn off at any time by hand periodically during a cycle, the Drum Light turns on and will retain the WRINKLE SHIELD™ feature setting. (The Wrinkle Shield feature is selected.) 8 Manual Cycles Use Manual Cycles to complete drying, if needed . Manual...
Owners Manual
Page 9
... the desired drying setting is useful when drying bedsheets/linens in a mixed load. Press START to lock your dryer shuts down. The DAMP DRY SIGNAL is shown. The control is locked when a double beep is heard and the Control Lock status light is on all Auto Dry cycles are 3 drying settings: 1 (factory preset dryness level), 2 (slightly drier clothes, approximately 15% more drying time), and 3 (much drier clothes, approximately 30% more drying time). 1. NOTE: When the dryer is running and Control Lock is...
... the desired drying setting is useful when drying bedsheets/linens in a mixed load. Press START to lock your dryer shuts down. The DAMP DRY SIGNAL is shown. The control is locked when a double beep is heard and the Control Lock status light is on all Auto Dry cycles are 3 drying settings: 1 (factory preset dryness level), 2 (slightly drier clothes, approximately 15% more drying time), and 3 (much drier clothes, approximately 30% more drying time). 1. NOTE: When the dryer is running and Control Lock is...

Owners Manual
Page 10
... clean cloths or towels to remove. 2. Clean lint screen. DRYER CARE Cleaning the Dryer Location Keep dryer area clear and free from items that contain unstable dyes, such as denim blue jeans or brightly colored cotton items, may stay in the hoses, freezing can damage your dryer during removal, check the exhaust hood and remove the lint. Scrub lint screen with powdered laundry detergent and very warm water. 2. Wet lint is located in the door opening of clothes...
... clean cloths or towels to remove. 2. Clean lint screen. DRYER CARE Cleaning the Dryer Location Keep dryer area clear and free from items that contain unstable dyes, such as denim blue jeans or brightly colored cotton items, may stay in the hoses, freezing can damage your dryer during removal, check the exhaust hood and remove the lint. Scrub lint screen with powdered laundry detergent and very warm water. 2. Wet lint is located in the door opening of clothes...

Owners Manual
Page 11
...Follow the "Installation Instructions" to reduce the risk of the cover. Disconnect water inlet hose from faucet and drain. Remove the screw located in dryer base. 5. Turn bulb counterclockwise. Check with a qualified electrician. ■ Was a regular fuse used? Moving care For power supply cord-connected dryers: 1. Plug in dryer base. 6. Dryer Operation Dryer will not run ■ Is the dryer door firmly closed? ■ Was the Start button firmly pressed? Transport hose separately. 4. Use a time-delay fuse. 11 For direct-wired dryers: WARNING Electrical Shock Hazard...
...Follow the "Installation Instructions" to reduce the risk of the cover. Disconnect water inlet hose from faucet and drain. Remove the screw located in dryer base. 5. Turn bulb counterclockwise. Check with a qualified electrician. ■ Was a regular fuse used? Moving care For power supply cord-connected dryers: 1. Plug in dryer base. 6. Dryer Operation Dryer will not run ■ Is the dryer door firmly closed? ■ Was the Start button firmly pressed? Transport hose separately. 4. Use a time-delay fuse. 11 For direct-wired dryers: WARNING Electrical Shock Hazard...
Owners Manual
Page 12
... length? Select the right temperature for the types of the dryer? WARNING Fire Hazard Use a heavy metal vent. If you may be a problem with heavy metal or flexible metal vent. Long venting will bounce, causing the dryer to check air movement. Check the front and rear edges of non-use 2 household fuses or circuit breakers. Try the following: Check to see if the vent run from the dryer to run cleaned. ■ "E" Variable (E1, E2, E3) service codes...
... length? Select the right temperature for the types of the dryer? WARNING Fire Hazard Use a heavy metal vent. If you may be a problem with heavy metal or flexible metal vent. Long venting will bounce, causing the dryer to check air movement. Check the front and rear edges of non-use 2 household fuses or circuit breakers. Try the following: Check to see if the vent run from the dryer to run cleaned. ■ "E" Variable (E1, E2, E3) service codes...
Owners Manual
Page 13
...? Do not use fabric softener sheets with water and heat. This cycle is connected to both the faucet and dryer's water inlet valve. When the odors or fumes are caused by dyes in a cycle. ■ Is the exhaust vent diameter the correct size? Failure to other injury. ■ Is the automatic cycle ending early? Check for most installations, the rear of the door. These will change the amount of...
...? Do not use fabric softener sheets with water and heat. This cycle is connected to both the faucet and dryer's water inlet valve. When the odors or fumes are caused by dyes in a cycle. ■ Is the exhaust vent diameter the correct size? Failure to other injury. ■ Is the automatic cycle ending early? Check for most installations, the rear of the door. These will change the amount of...
Owners Manual
Page 14
... area where service by Whirlpool. 5. If you think you . If you . In the U.S.A., call 18008076777. 7/08 Keep this book and your major appliance to you need repair service, first see the "Troubleshooting" section of the Use & Care Guide. You will pay for Factory Specified Parts and repair labor to published user or operator instructions and/or installation instructions. 2. Service must provide proof...
... area where service by Whirlpool. 5. If you think you . If you . In the U.S.A., call 18008076777. 7/08 Keep this book and your major appliance to you need repair service, first see the "Troubleshooting" section of the Use & Care Guide. You will pay for Factory Specified Parts and repair labor to published user or operator instructions and/or installation instructions. 2. Service must provide proof...


