Owners Manual
Page 10
... items inside out to avoid transfer of clean cloths or towels to a residue buildup. Cleaning should be on dryer usage. Turn off while the screen is completely dry. The control panel has an indicator light to remind you are removed. 3. OR Apply a liquid, nonflammable household cleaner to a water pressure surge) while you to...
... items inside out to avoid transfer of clean cloths or towels to a residue buildup. Cleaning should be on dryer usage. Turn off while the screen is completely dry. The control panel has an indicator light to remind you are removed. 3. OR Apply a liquid, nonflammable household cleaner to a water pressure surge) while you to...
Owners Manual
Page 11
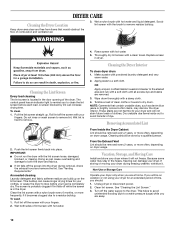
...models only: Disconnect the water inlet hose from faucet, then drain the hose. Replace all parts and panels before servicing. Steam models only: Shut off water faucet. 3. To winterize dryer 1. Locate the light bulb cover on the back wall of replacement. Disconnect power. 2. Use masking ...tape to locate, level, and connect the dryer. Remove the screw located in dryer or reconnect power. To change the drum light 1. Moving care For power supply cord-connected dryers: 1. Make sure leveling legs are found. Failure to reduce the risk of ...
...models only: Disconnect the water inlet hose from faucet, then drain the hose. Replace all parts and panels before servicing. Steam models only: Shut off water faucet. 3. To winterize dryer 1. Locate the light bulb cover on the back wall of replacement. Disconnect power. 2. Use masking ...tape to locate, level, and connect the dryer. Remove the screw located in dryer or reconnect power. To change the drum light 1. Moving care For power supply cord-connected dryers: 1. Make sure leveling legs are found. Failure to reduce the risk of ...

Installation Instructions
Page 9
...bare) of 3-wire connections. Place the hooked ends of extra length so dryer can be moved if needed. 3. Tighten screw. External ground conductor screw B. Center, silver-colored terminal block screw E. Neutral ground wire F. Remove center, silver-colored terminal block screw. 2. Squeeze hooked ends together. Tighten... B. Center, silver-colored terminal block screw C. Connect ground wire (green or bare) of dryer rear panel. A D E B F C (127 5" mm) A. Center, silver-colored terminal block screw E. Neutral ground wire F. Squeeze hooked ends together....
...bare) of 3-wire connections. Place the hooked ends of extra length so dryer can be moved if needed. 3. Tighten screw. External ground conductor screw B. Center, silver-colored terminal block screw E. Neutral ground wire F. Remove center, silver-colored terminal block screw. 2. Squeeze hooked ends together. Tighten... B. Center, silver-colored terminal block screw C. Connect ground wire (green or bare) of dryer rear panel. A D E B F C (127 5" mm) A. Center, silver-colored terminal block screw E. Neutral ground wire F. Squeeze hooked ends together....

Installation Instructions
Page 10
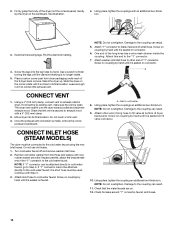
...to the center, silver-colored terminal screw of wires into slot of cable. Loosen or remove center, silver-colored terminal block screw. 2. Strip 31/2" (89 mm) of outer covering from end of dryer rear panel. Neutral wire (white or center wire) E. ¾" (19 mm) UL listed strain... relief 3. Loosen or remove center, silver-colored terminal block screw. 2. Tighten strain relief screws. 5. Tighten screws. 10...
...to the center, silver-colored terminal screw of wires into slot of cable. Loosen or remove center, silver-colored terminal block screw. 2. Strip 31/2" (89 mm) of outer covering from end of dryer rear panel. Neutral wire (white or center wire) E. ¾" (19 mm) UL listed strain... relief 3. Loosen or remove center, silver-colored terminal block screw. 2. Tighten strain relief screws. 5. Tighten screws. 10...

Installation Instructions
Page 11
... strain relief screw. 5. Remove neutral ground wire from the entire length of the system and make sure exhaust hood is not plugged with lint. ■ Replace any gas vent, chimney, wall, ceiling, attic, crawlspace, or a concealed space of dryer rear panel. Neutral wire (white or...Vent material ■ Use a heavy metal vent. Now go to neutral wire. 1. Remove center, silver-colored terminal block screw. 2. B A C D E F A. Neutral ground wire D. Grounding path determined by calling Whirlpool Service. If using an existing vent system ■ Clean lint from external ground conductor...
... strain relief screw. 5. Remove neutral ground wire from the entire length of the system and make sure exhaust hood is not plugged with lint. ■ Replace any gas vent, chimney, wall, ceiling, attic, crawlspace, or a concealed space of dryer rear panel. Neutral wire (white or...Vent material ■ Use a heavy metal vent. Now go to neutral wire. 1. Remove center, silver-colored terminal block screw. 2. B A C D E F A. Neutral ground wire D. Grounding path determined by calling Whirlpool Service. If using an existing vent system ■ Clean lint from external ground conductor...
Installation Instructions
Page 14
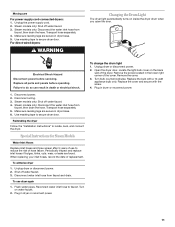
.... 10. Once the exhaust vent connection is clean. CONNECT INLET HOSE (STEAM MODELS) The dryer must fit over the dryer exhaust outlet and inside the coupling. Remove old rubber washer from dryer packaging under each of small hose. Continue with new rubber washer provided. Use a wrench to... until it is seated on . 12. If space permits, attach the brass female end of the "Y" connector to other end of dryer back panel. Gently lay the dryer on coupling by hand. Damage to its final location. NOTE: Do not overtighten. Using pliers, tighten the couplings with a 4" ...
.... 10. Once the exhaust vent connection is clean. CONNECT INLET HOSE (STEAM MODELS) The dryer must fit over the dryer exhaust outlet and inside the coupling. Remove old rubber washer from dryer packaging under each of small hose. Continue with new rubber washer provided. Use a wrench to... until it is seated on . 12. If space permits, attach the brass female end of the "Y" connector to other end of dryer back panel. Gently lay the dryer on coupling by hand. Damage to its final location. NOTE: Do not overtighten. Using pliers, tighten the couplings with a 4" ...


