Whirlpool WED97HEXL Support Question
Whirlpool WED97HEXL Support Question
Find answers below for this question about Whirlpool WED97HEXL.Need a Whirlpool WED97HEXL manual? We have 3 online manuals for this item!
Question posted by deowen on December 21st, 2014
How To Remove The Top Panel.
How is the top panel removed?
Current Answers
Answer #1: Posted by TommyKervz on December 22nd, 2014 4:46 AM
TommyKervz

Member since:
January 10th, 2013 Points: 17,776,823

Member since:
January 10th, 2013 Points: 17,776,823
follow the instructions on the video below
Related Whirlpool WED97HEXL Manual Pages
Dimension Guide - Page 1
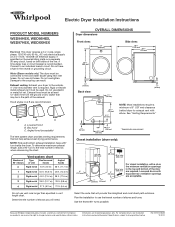
...on a separate 30-amp circuit, fused on both sides of 5" (127 mm) clearance behind dryer for planning purposes only. Damage to an individual branch circuit.
Determine the number of elbows when ... to the outside. 4" (102 mm) diameter vent is recommended. Water (Steam models only): The dryer must be used. Select the route that will need.
A time-delay fuse or circuit breaker is ...
Installation Instructions - Page 2
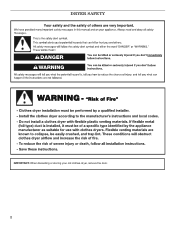
DRYER SAFETY
IMPORTANT: When discarding or storing your old clothes dryer, remove the door. 2
Installation Instructions - Page 5
...not use with clothes dryers. If the dryer is permanently connected to the dryer cabinet with a 4-wire electrical supply connection, the neutral ground conductor must be removed from the external ground... Part 280) or Standard CAN/CSA-Z240 MH.
Additional installation requirements:
This dryer is suitable for mobile home installations. Mobile home installations require:
■■...
Installation Instructions - Page 6
...
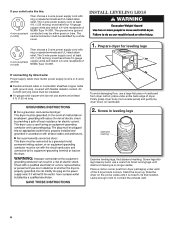
diamond marking
Examine leveling legs, find diamond marking. Place a carton corner post from dryer carton; Prepare dryer for leveling legs
If connecting by a white cover.
3-wire receptacle (10-30R)
Then...or spade terminals and UL listed strain relief. Firmly grasp dryer body (not console panel) and gently lay dryer down on the corner posts until diamond marking is close to connect ...
Installation Instructions - Page 7

....
1.
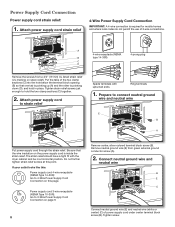
This connection may be used with either a power supply cord or a direct wire connection. Power supply cord 3-wire receptacle (NEMA Type 10-30R). Remove hold-down screw and terminal block cover.
7 Remove terminal block cover
4-wire direct connection: Go to Direct Wire Connection.
3-wire direct connection: Go to Power Supply Cord Connection.
2.
Installation Instructions - Page 8
... strain relief.
A
4-wire receptacle (NEMA
4-prong plug
B
type 14-30R)
C D
Remove the screws from green external ground conductor screw (A).
2. Prepare to 3-Wire Power Supply Cord ...Spade terminals with the dryer cabinet and be in place. Remove neutral ground wire (E) from a 3/4" (19 mm) UL listed strain relief (UL marking on page 9.
8
Remove center, silver-colored terminal...
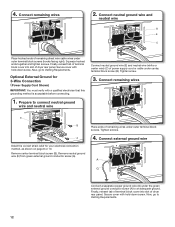
Installation Instructions - Page 9
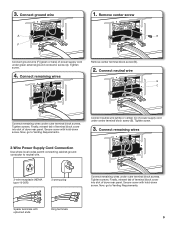
Connect remaining wires
Remove center terminal block screw (B).
2. Connect neutral wire
B
C
Connect remaining wires under outer ...under outer terminal block screws. Tighten screw.
4. Finally, reinsert tab of terminal block cover into slot of dryer rear panel. Secure cover with hold -down screw. Secure cover with upturned ends
Ring terminals
9 Finally, reinsert tab of terminal...
Installation Instructions - Page 10

...dryer may be in a horizontal position. Remove center terminal block screw (B). Remove neutral ground wire (E) from end of outer covering from green external ground conductor screw (A). Attach direct wire strain relief
A
B C
Unscrew the removable... through the hole below the terminal block opening , screw the removable conduit connector (A) onto the strain relief threads and tighten securely....
Installation Instructions - Page 11
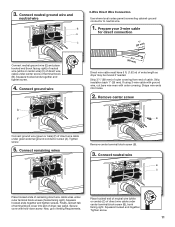
...Connect ground wire
(893m½m" )
Direct wire cable must have 5 ft. (1.52 m) of cable. Remove center screw
A
F
B
Connect ground wire (green or bare) (F) of direct wire cable under center ...end of neutral wire (white or center) (C) of direct wire cable under center screw of dryer rear panel. 3. Strip insulation back 1" (25 mm). Shape wire ends into slot of terminal block (B)....
Installation Instructions - Page 12
... outer terminal block screws (hooks facing right). Finally, reinsert tab of terminal block cover into slot of dryer rear panel. Secure cover with hold -down screw. Tighten screw.
3. Connect external ground wire
Install the correct strain.... Prepare to Venting Requirements.
12
Remove neutral ground wire (E) from green external ground conductor screw (A). Now, go to an adequate ground....
Installation Instructions - Page 13

... accessible to clean)
■■ Must be fully extended and supported in final dryer location.
■■ Remove excess to avoid sagging and kinking that extend into any object
that may be used...home. ■■ Must be at least 12" (305 mm) from entire length of fire, this dryer MUST BE
EXHAUSTED OUTDOORS. Rigid metal vent:
■■ Recommended for exhausting.
4" (102 mm)
...
Installation Instructions - Page 15
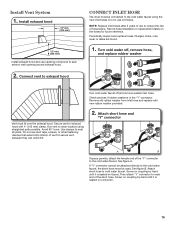
NOTE: Replace inlet hoses after 5 years of the short hose. Remove old rubber washer from inlet hose and replace with 4" (102 mm) clamp. Vent must be used.
Then attach "Y" connector to dryer location using the new inlet hoses. Do not use to seal exterior wall opening around exhaust hood.
2. Check and see if...
Installation Instructions - Page 16
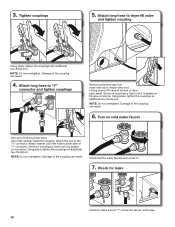
...hose to fill valve at bottom of "Y" connector. Attach other side of dryer back panel.
Damage to other end of the long hose has a wire mesh strainer...cold water faucet
One end of long hose to "Y"
connector and tighten couplings
Remove protective cap from water inlet valve. Attach this end to dryer fill valve
and tighten coupling
A
Using pliers, tighten the couplings with additional ...
Installation Instructions - Page 17
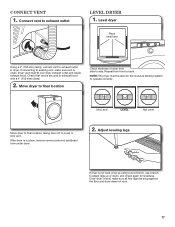
... level here
Using a 4" (102 mm) clamp, connect vent to operate correctly. Adjust leveling legs
If dryer is not level, prop up using a wood block, use wrench to adjust legs up or down, and check again for the moisture sensing system to exhaust outlet in place, remove corner posts and cardboard from under...
Installation Instructions - Page 18
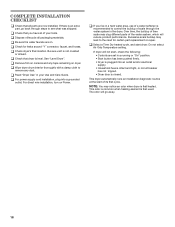
...dryer's final location. q Remove film on console and any dust. For direct wire installation, turn on Power. q If you have all of /recycle all packaging materials.
This odor is common when heating element is recommended to the need for leaks around "Y" connector, faucet, and hoses. q Read "Dryer Use" in the dryer... replacement or repair. q Wipe dryer drum interior thoroughly with a damp...
Installation Instructions - Page 19
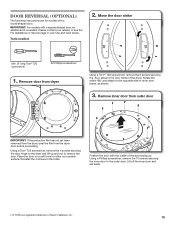
...: If the protective film has not yet been removed from the dryer, peel the film from dryer
Using a Torx®† T25 screwdriver, remove the 2 screws securing the door strike to the dryer and lift up . Using a Phillips screwdriver, remove the 10 screws securing the inner door to remove the door. Lift off the inner door and...
Installation Instructions - Page 20

... the figure A above. Reverse outer window assembly
Handle
A A
B
Using a Phillips screwdriver, remove the 2 screws from the outer window retainer and rotate the outer window assembly clockwise until the ...square notches line up and off the window (A). Handle B
Using a Phillips screwdriver, remove the 4 screws from trim ring
5.
Then lift out the outer window and retainer up ...
Installation Instructions - Page 21

.... Using a Phillips screwdriver, secure with the tabs on the opposite sides from which they were removed.
21 Remove hinge and latch
Latch
Notches
A
Hinge
Using a Torx® T25 screwdriver, remove the 3 Torx screws securing the latch plate and latch backing plate and the 5 screws holding the hinge assembly in figure A. Using a Torx®...
Installation Instructions - Page 22

Insert the tabs on the dryer. 9. Reinstall door on dryer
Using a Torx® T25 screwdriver, remove the 4 screws on the hinge into the mounting slot and slide down to the outer door.
10. Secure ...top tab. Reinstall inner door assembly
Bottom of door
Position the door with the 4 Torx® T25 screws removed earlier.
† ® TORX is a registered trademark of the door facing up.
Warranty - Page 1
... Factory Speci ed Parts and repair labor to correct defects in -warranty service. WHIRLPOOL CORPORATION LAUNDRY WARRANTY
LIMITED WARRANTY
For one year from the date of purchase, when this major appliance is... service if you also may not apply to obtain service under this limitation may have been removed, altered, or cannot be found by checking the "Assistance or Service" section or by an...
Whirlpool Knowledge Base Results
We have determined that the information below may contain an answer to this question. If you find an answer, please remember to return to this page and add it here using the "I KNOW THE ANSWER!" button above. It's that easy to earn points!-
How do I care for the controls on my gas modular downdraft cooktop?
...? Always follow label instructions on cleaning products NOTE: Do not use on my gas modular downdraft cooktop? How do I use oven cleaners, bleach, or rust removers to help you clean your control knobs and... -
What is the Child Lock on my SpeedCook microwave oven with convection, and how does it work?
Two tones will sound, and the display will be removed from the display. Child Lock activation is possible only when the oven is in my microwave? How ...If any controls are touched while the Child Lock is active, the "Child Lock is the Cancel pad on the control panel. Two tones will sound, and the padlock icon will show the padlock icon. The only control that will function while ... -
Nothing operates on my microwave oven
... Washer or Dryer Refrigerator or Freezer Dishwasher Electric Range, Oven or Cooktop Gas Range, Oven or Cooktop Microwave Trash Compactor Window Air Conditioner Hot Water Dispenser Vent Hood Ice Machine Commercial Laundry Vacuum Cleaner ...tips To deactivate Child Lock (on the control panel. Remove spacer, then firmly close the door. On the Main Menu, touch "Settings and Info."
Similar Questions

Dryer Will Not Turn On.
my dryer wil not turn on. I have checked a fuses and they are good. What's next?
my dryer wil not turn on. I have checked a fuses and they are good. What's next?
(Posted by Dtidavid54 7 years ago)

How Do I Remove The Drum From My Wed7300xw0 Dryer?
I already have the top off and the belt removed from the pulley. I'm trying to get the drum out so I...
I already have the top off and the belt removed from the pulley. I'm trying to get the drum out so I...
(Posted by Craighastings1978 8 years ago)

Power But No Tumbler?
The unit is only four years old, in a rental with one tenant, looks brand new! It powers on, switche...
The unit is only four years old, in a rental with one tenant, looks brand new! It powers on, switche...
(Posted by jwoloszyn14 8 years ago)


How Do I Remove The Front Panel?
I need to remove the front panel of our Whirlpool WGD4800XQ dryer.
I need to remove the front panel of our Whirlpool WGD4800XQ dryer.
(Posted by ljsbjs 12 years ago)