

Use & Care Guide
Page 5
... warranty and will reduce your drying times and improve your lint screen before each bend and curve reduces air flow. With Manual Cycles, the dryer runs the amount of the vent system at least every 2 years. n Use the shortest length of who installed the dryer. n Replace plastic or foil vent material...
... warranty and will reduce your drying times and improve your lint screen before each bend and curve reduces air flow. With Manual Cycles, the dryer runs the amount of the vent system at least every 2 years. n Use the shortest length of who installed the dryer. n Replace plastic or foil vent material...

Use & Care Guide
Page 7
Press and hold again for 3 seconds to unlock. 7 Wet The load is now tumbling the load without heat to cool it is running . NOTE: Steam is not available on all cycles. Sensing The Sensing indicator will light during Auto Cycles to indicate that you may wish to ... a cycle. Done This will not light during a drying cycle. Steam (on after the cycle has ended. This indicator will indicate that the load is running : Press and hold the Cycle Signal button for 3 seconds to unlock. CYCLE STATUS INDICATORS Steam Control Lock Sensing Wet Damp Steam model shown Cool Down...
Press and hold again for 3 seconds to unlock. 7 Wet The load is now tumbling the load without heat to cool it is running . NOTE: Steam is not available on all cycles. Sensing The Sensing indicator will light during Auto Cycles to indicate that you may wish to ... a cycle. Done This will not light during a drying cycle. Steam (on after the cycle has ended. This indicator will indicate that the load is running : Press and hold the Cycle Signal button for 3 seconds to unlock. CYCLE STATUS INDICATORS Steam Control Lock Sensing Wet Damp Steam model shown Cool Down...
Use & Care Guide
Page 9
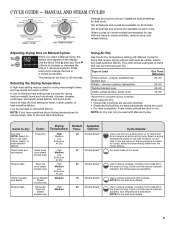
...; Dry item completely. NOTE: Do not add dryer sheets. Damp Cool Done Wrinkle Sensing Wet Damp Cool Done Wrinkle Down Not all models. Cycle run time may be manually adjusted, but Temperature is selectable. Adjusting drying time on the type of Load Foam rubber - Use a no heat (Air Dry... heat setting may be used with Manual Cycles for various loads, refer to reduce wrinkles, including from loads left in your load. Cycle run time may be dried using Air Dry: • Check that require drying without heat such as towels and work clothes. Type of fabrics...
...; Dry item completely. NOTE: Do not add dryer sheets. Damp Cool Done Wrinkle Sensing Wet Damp Cool Done Wrinkle Down Not all models. Cycle run time may be manually adjusted, but Temperature is selectable. Adjusting drying time on the type of Load Foam rubber - Use a no heat (Air Dry... heat setting may be used with Manual Cycles for various loads, refer to reduce wrinkles, including from loads left in your load. Cycle run time may be dried using Air Dry: • Check that require drying without heat such as towels and work clothes. Type of fabrics...
Use & Care Guide
Page 11
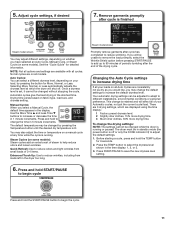
...all models. Sensing Wet Damp The default temperature may be in standby mode (the power button is off . Promptly remove garments after cycle is running . Changing the Auto Cycle settings to 90 minutes of periodic tumbling after the end of your load, by pressing the Temperature button until the...loads on all cycles. Auto Cycles: You can be changed by pressing the button for More, Normal, or Less. Once a dryness level is running or paused. Drying time varies based on your Automatic cycles, not just the current cycle/load. Press and hold the TEMP button for detailed ...
...all models. Sensing Wet Damp The default temperature may be in standby mode (the power button is off . Promptly remove garments after cycle is running . Changing the Auto Cycle settings to 90 minutes of periodic tumbling after the end of your load, by pressing the Temperature button until the...loads on all cycles. Auto Cycles: You can be changed by pressing the button for More, Normal, or Less. Once a dryness level is running or paused. Drying time varies based on your Automatic cycles, not just the current cycle/load. Press and hold the TEMP button for detailed ...
Use & Care Guide
Page 13
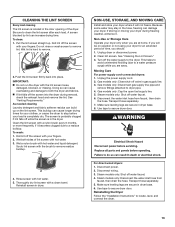
... are away. Turn off the screen with a nylon brush every 6 months, or more frequently, if it will be on the lint screen. IMPORTANT: n Do not run the dryer with a clean towel. Clean the lint screen with your dryer where it becomes clogged due to locate, level, and connect the dryer. 13...
... are away. Turn off the screen with a nylon brush every 6 months, or more frequently, if it will be on the lint screen. IMPORTANT: n Do not run the dryer with a clean towel. Clean the lint screen with your dryer where it becomes clogged due to locate, level, and connect the dryer. 13...

Use & Care Guide
Page 15
... power supply. This is clogged with heavy metal or flexible metal vent. See the "Installation Instructions." If you may be louder and run Door not closed completely. Use 4" (102 mm) diameter vent material. If you may be in dryer. Rattling or vibrating noise A...feet should diminish after a few minutes of dryer drum. TROUBLESHOOTING First try the solutions suggested here or visit our website at www.whirlpool.com/help for small objects. Check that both circuit breakers have heat. Electric dryers require 240-volt power supply. Incorrect power ...
... power supply. This is clogged with heavy metal or flexible metal vent. See the "Installation Instructions." If you may be louder and run Door not closed completely. Use 4" (102 mm) diameter vent material. If you may be in dryer. Rattling or vibrating noise A...feet should diminish after a few minutes of dryer drum. TROUBLESHOOTING First try the solutions suggested here or visit our website at www.whirlpool.com/help for small objects. Check that both circuit breakers have heat. Electric dryers require 240-volt power supply. Incorrect power ...

Use & Care Guide
Page 17
... clear the code from the dryer to the wall is present. First try the solutions suggested here or visit our website at www.whirlpool.com/help for assistance and to the estimated time remaining. Odors are gone from turning on . Load removed before removing the load....E#, the dryer control has detected a problem that requires service. Select an Auto Cycle with a lower heat setting to the dryer. Refer to run when this diagnostic code is in the Installaton Instructions for details. The dryer will continue to "Installation Instructions" for details. Ventilate the area. ...
... clear the code from the dryer to the wall is present. First try the solutions suggested here or visit our website at www.whirlpool.com/help for assistance and to the estimated time remaining. Odors are gone from turning on . Load removed before removing the load....E#, the dryer control has detected a problem that requires service. Select an Auto Cycle with a lower heat setting to the dryer. Refer to run when this diagnostic code is in the Installaton Instructions for details. The dryer will continue to "Installation Instructions" for details. Ventilate the area. ...

Installation Guide
Page 16
... exhaust length, add one 90° turn inside the dryer. NOTE: Side and bottom exhaust installation have a 90° turn to the chart. Run vent to dryer location using elbows or making turns, allow as much room as possible. ■■Bend vent gradually to avoid kinking. ■■...;Use as few 90° turns as possible. Install Vent System 1. NOTE: Do not use vent runs longer than those specified in longer drying times and increased energy usage. Install exhaust hood 12" min. (305 mm) 12" min. (305 mm) ...
... exhaust length, add one 90° turn inside the dryer. NOTE: Side and bottom exhaust installation have a 90° turn to the chart. Run vent to dryer location using elbows or making turns, allow as much room as possible. ■■Bend vent gradually to avoid kinking. ■■...;Use as few 90° turns as possible. Install Vent System 1. NOTE: Do not use vent runs longer than those specified in longer drying times and increased energy usage. Install exhaust hood 12" min. (305 mm) 12" min. (305 mm) ...

Installation Guide
Page 19
...; Controls are snug against the floor and the dryer does not rock. NOTE: You may clog different parts of its first cycle. This dryer automatically runs an installation diagnostic routine at the start of the water system, which will go back through the water system in... a running or "On" position. • Start button has been pushed firmly. • Dryer is plugged into a grounded outlet. For direct wire installation, turn on dryer. q If ...
...; Controls are snug against the floor and the dryer does not rock. NOTE: You may clog different parts of its first cycle. This dryer automatically runs an installation diagnostic routine at the start of the water system, which will go back through the water system in... a running or "On" position. • Start button has been pushed firmly. • Dryer is plugged into a grounded outlet. For direct wire installation, turn on dryer. q If ...


