Whirlpool WED9050XW Support Question
Whirlpool WED9050XW Support Question
Find answers below for this question about Whirlpool WED9050XW.Need a Whirlpool WED9050XW manual? We have 4 online manuals for this item!
Question posted by spiritglass on August 6th, 2011
Brand New Machine. It Runs And Heats Ok For One Minute, Then Shuts Off.
Problem occurs on all heating cycle options. Dryer seems to run normally on non-heat cycles.
Current Answers
Related Whirlpool WED9050XW Manual Pages
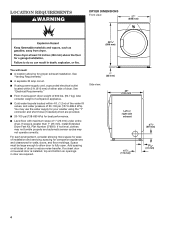
Dimension Guide - Page 1
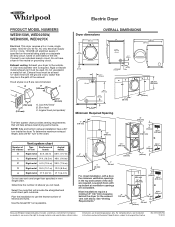
...runs longer than specified in the path of the exhaust. Exhaust hood must be in vent length chart. Louvered hood B. Box hood C.
Specifications subject to use the fewest number of the door are recommended.
To determine maximum exhaust length, add one 90° turn inside the dryer... minimum 5" (127 mm) clearance behind the dryer for planning purposes only. For complete details, ...
Installation Instructions - Page 2
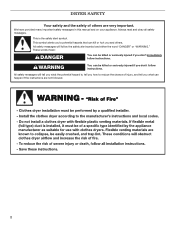
... to reduce the chance of others . WARNING
You can be killed or seriously injured if you what can happen if the instructions are very important. DRYER SAFETY
Your safety and the safety of injury, and tell you don't immediately follow instructions.
All safety messages will tell you what the potential hazard...
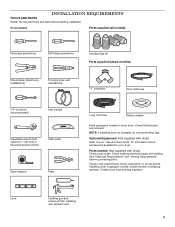
Installation Instructions - Page 3
... (steam models):
Wire stripper (direct wire installations)
Tin snips (new vent installations)
"Y" connector
Short inlet hose
1/4" nut driver (recommended)
Vent clamps
Adjustable wrench that all parts are included. Check code requirements. Level
Caulking gun and compound (for your dryer. Optional Equipment: (Not supplied with dryer) Check local codes. Some codes limit, or do not...
Installation Instructions - Page 4
... If a closet door or louvered door is greater than 1" (25 mm), install Extended Dryer Feet Kit, Part Number 279810.
spacing for companion appliances and clearances for proper exhaust installation. ...may not tumble properly and automatic sensor cycles may use the water supply for best performance.
■■ Level floor with maximum slope of dryer to fully open. You may not ...
Installation Instructions - Page 5
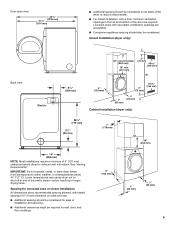
... spacing should also be considered for ease of automatic sensor cycles, resulting in .2 (155 cm2)
1" (25 mm)
1" (25 mm)
Cabinet installation (dryer only):
281/8"
(715 mm)
31/2"
(89 mm)...equivalent ventilitation openings are required.
IMPORTANT: Do not operate, install, or store dryer where it will be exposed to shut off at temperatures below 45° F (7° C).
See "Venting ...
Installation Instructions - Page 6
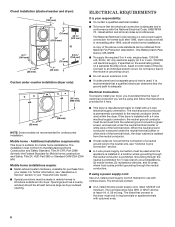
...further information, see "Optional 3-wire connection" section.
■■ A 4-wire power supply connection must be used , it here.
■■ This dryer is suitable for undercounter... have a fuse in conformance with clothes dryers. Mobile home installations require: ■■ Metal exhaust system hardware, available for (1) new branch-circuit installations, (2) mobile homes, ...
Installation Instructions - Page 7
...outlet, have 4 10-gauge solid copper wires and match a 4-wire receptacle of dryer.
Slide the dryer until diamond marking is equipped with a cord having an equipmentgrounding conductor and a ... legs, find diamond marking. GROUNDING INSTRUCTIONS
� For a grounded, cord-connected dryer: This dryer must have a proper outlet installed by providing a path of the equipment- place ...
Installation Instructions - Page 8

...: Go to hold in place. This connection may be used with either a power supply cord or a direct wire connection. Remove terminal block cover
Electrical Connection Options
1.
Electrical Connection
Power Supply Cord
2. Choose electrical connection type
Power supply cord 4-wire receptacle (NEMA Type 14-30R): Go to...
Installation Instructions - Page 9
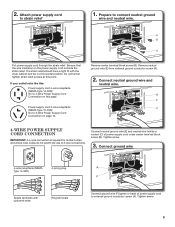
... wire (E) and neutral wire (white or center) (C) of 3-wire connections. Connect ground wire
4-wire receptacle (NEMA type 14-30R)
4-prong plug
Spade terminals with the dryer cabinet and be in a horizontal position. Tighten screw.
9
Remove neutral ground wire (E) from external ground conductor screw (A).
2.
Installation Instructions - Page 10
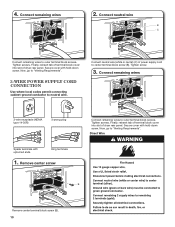
... screws. Finally, reinsert tab of terminal block cover into slot of dryer rear panel. Secure cover with upturned ends
Ring terminals
1. Finally, ... C
Connect remaining wires to neutral wire. Connect neutral wire (white or center) (C) of dryer rear panel. Direct Wire
B
Remove center terminal block screw (B). 10 Connect remaining wires
2. Secure cover with hold -down screw.
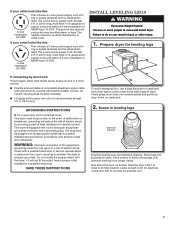
Installation Instructions - Page 16
...)
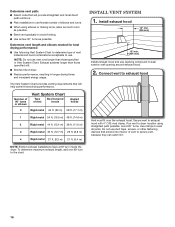
Install exhaust hood and use vent runs longer than those specified in longer drying times and increased energy usage. Install Vent System
1. Connect vent to dryer location using elbows or making turns,...to the chart. To determine maximum exhaust length, add one 90º turn inside the dryer.
Use clamps to seal exterior wall opening around exhaust hood.
2.
Determine vent path: ...
Installation Instructions - Page 17
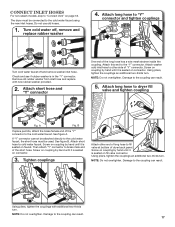
..." on fill valve connector. Using pliers, tighten the couplings with new rubber washer provided.
2. CONNECT INLET HOSES
For non-steam models, skip to the cold water faucet, the short hose...
One end of "Y" connector. NOTE: Do not overtighten. Damage to fill valve at bottom of dryer back panel. Turn cold water off and remove washer inlet hose. A
Fig. Tighten couplings
Attach ...
Installation Instructions - Page 19

...remaining on Power. q Select a Time Dry heated cycle, and start of your "Use and Care Guide". Do not select Air Only Temperature setting. If dryer will not start, check the following: •... water system in your washer and dryer: A stack kit, Part Number 8572546 is level. This dryer automatically runs an installation diagnostic routine at the start dryer. Door Reversal
If you prefer to...
Owners Manual - Page 4
... begin . Failure to persons, read the IMPORTANT SAFETY INSTRUCTIONS before operating this appliance. See the Cycles information on a clothesline or by using an Air Cycle. Shut the door. 3.
Clean lint screen. 2. Place laundry in the dryer. Place laundry in the dryer. Do not dry anything that has ever had anything that has ever had any time Open...
Owners Manual - Page 5
... Cycles after starting dryer: 1. Select the desired cycle and options.
4. Cycles
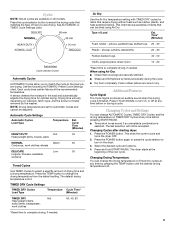
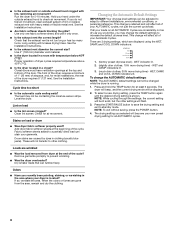
NOTE: Not all models. A sensor detects the moisture in the load and automatically adjusts the drying time for items that coverings are drying. Automatic Cycle Settings
Automatic Cycles Load Type
Temperature
Est. Cycle Time (Minutes)
HEAVY DUTY
Hot
45
Heavyweight items, towels, jeans
NORMAL...
Owners Manual - Page 6
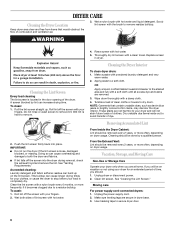
...Non-Use or Storage Care
Operate your
fingers. See "Cleaning the Lint Screen." A screen blocked by a qualified person. Clean the lint screen with your load is hard to remove lint. Wet both the dryer...thoroughly with powdered laundry detergent and very
warm water. 2. If you are secure in dryer. Make sure leveling legs are at home. IMPORTANT: ■ Do not run the dryer if the lint...
Owners Manual - Page 7
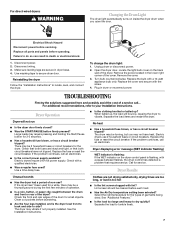
...Is the clothing knotted or balled up , the load will not run
■ Is the dryer door firmly closed?
■ Was the START/PAUSE button firmly ...minutes of operation.
■ Is a coin, button, or paper clip caught between flashes, the dryer control has detected a problem that both circuit breakers have heat. Separate the load to locate, level, and connect the dryer. Failure to secure dryer...
Owners Manual - Page 8
..., the rear of the cycle? Check for 5-10 minutes.
These will be contacting the moisture sensor strips.
NOTE: While cycling through the settings, the current setting will not transfer to standby mode. ■ Is the exhaust vent or outside exhaust hood to prevent wrinkling.
■ Was the dryer overloaded? Run the dryer for air movement. If...
Owners Manual - Page 20
... and serial number of appliances.
These parts will fit right and work right because they are made withWthheirlspaomoel CparencaidsaionLP
1-800-253-1301 www.whuisrelpdotolb.cuoildmevery new MAYTAG® appliancCeu.stomer eXperience Centre
1-T8o00l-o4c4a2t-e99F9S1P(A®crceepsslaocrieesm) ent parts, assistance in the
Customer eXperience Center
United States and WCahniralpdoao...
Warranty - Page 3

... or rIenfethr etoUy.oSu.Ar Y. These parts will fit right and work right because they are made withWthheirlspaomoel CparencaidsaionLP
1-800-253-1301 www.whuisrelpdotolb.cuoildmevery new MAYTAG® appliancCeu.stomer eXperience Centre
1-T8o00l-o4c4a2t-e99F9S1P(A®crceepsslaocrieesm) ent parts, assistance in U.S.A. or call . ealnlodwCPaangaedsatelephone directory...
Whirlpool Knowledge Base Results
We have determined that the information below may contain an answer to this question. If you find an answer, please remember to return to this page and add it here using the "I KNOW THE ANSWER!" button above. It's that easy to earn points!-
Hot water fills slowly - Top-load washers
... entering your new washer will not properly operate with agitator. Straighten the hoses. The washer will look smaller than I expect - Top-load washer The water temperature is shut off the water... washer Washer will only allow a small amount of water. One way to save energy is normal. Top-load washer Warm or hot wash temperatures are replacing. Reinstall the hoses, turn on... -
Warm or hot wash temperatures are cooler than I expect - Top-load washer
... temperature of Provides good cleaning. Similar to save energy. Similar to use less energy than they did in your previous washer, but is normal for new machines. The temperature control is sensing how much cold and hot water to add to the washer to achieve the Hot or Warm wash-water... -
Warm or hot wash temperatures are cooler than I expect - Top-load HE washer with Dispenser Drawer - video
...; Department of hot water a washer uses, while still providing good washing performance. Cooler than your previous washer, but is to save energy is normal for new machines. video The water temperature is not correct - Top-load washer These temperatures may feel significantly cooler than they did in cold water to control...
Similar Questions

Cleaning The Lint Cleaner In The Dryer Cabinet
Is there an optional way to clean out the large vent other than dismantling the whole machine?
Is there an optional way to clean out the large vent other than dismantling the whole machine?
(Posted by lschliewinsky 1 year ago)

Whirlpool Washer Fills With Water And Instead Of Washing Goes Into Drain Mode
(Posted by Anonymous-143410 9 years ago)

Lte5243dqa Dryer Not Heating
fairly new machine and dryer not heating, need a part which used to be a thermal fuse on the older m...
fairly new machine and dryer not heating, need a part which used to be a thermal fuse on the older m...
(Posted by lashadasapartments 11 years ago)

Brand New And Won't Power Up.
We purchased a new Whirlpool Cabrio(Model: WED 5500XW0) and it will not turn on. There is power avai...
We purchased a new Whirlpool Cabrio(Model: WED 5500XW0) and it will not turn on. There is power avai...
(Posted by bean3459 11 years ago)
