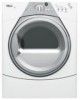
Use and Care Guide
Page 3
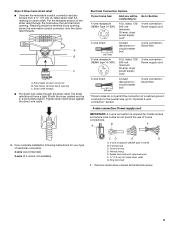
... exposed to cooking oils in your dryer. The kit should be type SRD or SRDT and be cleaned periodically by qualified service personnel. ■ See installation instructions for grounding requirements. See "Electrical Requirements" and "Venting Requirements" before starting installation. If using a power supply cord: Use a UL listed power supply cord kit marked for venting...
... exposed to cooking oils in your dryer. The kit should be type SRD or SRDT and be cleaned periodically by qualified service personnel. ■ See installation instructions for grounding requirements. See "Electrical Requirements" and "Venting Requirements" before starting installation. If using a power supply cord: Use a UL listed power supply cord kit marked for venting...

Use and Care Guide
Page 4
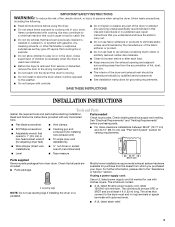
... you will need to place the dryer at least 18 inches (46 cm) above the floor. Place dryer at least 18" (46 cm) above the floor. See "Electrical Requirements." ■ A sturdy floor to the "Assistance or Service" section. If using a power cord, a grounded electrical outlet located within 2 ft (61...will need 18" (46 cm) to place the dryer at the end of the dryer in death, explosion, or fire. Optional Pedestal Are you are using a pedestal, you purchased your dryer or refer to stack your DUET SPORT™ washer and dryer? Stack Kit Are you will need to the bottom...
... you will need to place the dryer at least 18 inches (46 cm) above the floor. Place dryer at least 18" (46 cm) above the floor. See "Electrical Requirements." ■ A sturdy floor to the "Assistance or Service" section. If using a power cord, a grounded electrical outlet located within 2 ft (61...will need 18" (46 cm) to place the dryer at the end of the dryer in death, explosion, or fire. Optional Pedestal Are you are using a pedestal, you purchased your dryer or refer to stack your DUET SPORT™ washer and dryer? Stack Kit Are you will need to the bottom...
Use and Care Guide
Page 7
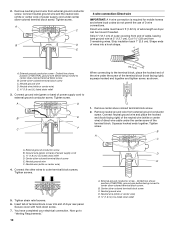
... will reduce the risk of electric shock by a qualified electrician. The kit should be type SRD or SRDT and be grounded. GROUNDING INSTRUCTIONS ■ For a grounded, cord-connected dryer: This dryer must be using a power supply cord: Use a UL listed power supply cord kit marked for use...(center or white wire) of the terminal block, the dryer cabinet is isolated from the neutral conductor. ■ A 4-wire power supply connection must be plugged into an appropriate outlet that connect to install with a 3-wire electrical supply connection. If your outlet looks like this : 4-...
... will reduce the risk of electric shock by a qualified electrician. The kit should be type SRD or SRDT and be grounded. GROUNDING INSTRUCTIONS ■ For a grounded, cord-connected dryer: This dryer must be using a power supply cord: Use a UL listed power supply cord kit marked for use...(center or white wire) of the terminal block, the dryer cabinet is isolated from the neutral conductor. ■ A 4-wire power supply connection must be plugged into an appropriate outlet that connect to install with a 3-wire electrical supply connection. If your outlet looks like this : 4-...
Use and Care Guide
Page 8
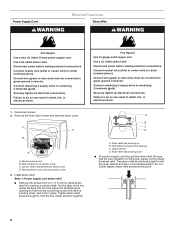
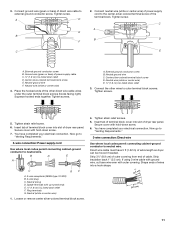
... to center terminal (silver). Do not further tighten strain relief screws at this point. 8 Power Supply Cord WARNING Electrical Connection Direct Wire WARNING Fire Hazard Use a new UL listed 30 amp power supply cord. Fire Hazard Use 10 gauge solid copper wire. Failure to do so can result...179;⁄₄" (1.9 cm) UL listed strain relief (UL marking on the power supply cord is pointing down ■ Put power supply cord through the strain relief. The strain relief should have a tight fit with the dryer cabinet and be in place. Ground wire (green or bare wire) must be...
... to center terminal (silver). Do not further tighten strain relief screws at this point. 8 Power Supply Cord WARNING Electrical Connection Direct Wire WARNING Fire Hazard Use a new UL listed 30 amp power supply cord. Fire Hazard Use 10 gauge solid copper wire. Failure to do so can result...179;⁄₄" (1.9 cm) UL listed strain relief (UL marking on the power supply cord is pointing down ■ Put power supply cord through the strain relief. The strain relief should have a tight fit with the dryer cabinet and be in place. Ground wire (green or bare wire) must be...
Use and Care Guide
Page 9
... If your type of electrical connection: 4-wire (recommended) 3-wire (if 4-wire is not available) CD E G A. 4-wire receptacle (NEMA type 14-30R) B. 4-prong plug C. The strain relief should have a tight fit ... disconnect or circuit breaker box* 4-wire connection: Direct Wire 3-wire receptacle (NEMA type 10-30R) A UL listed, 120/ 240-volt minimum, 30-amp, dryer power supply cord* 3-wire connection: Power supply cord 3-wire direct 3¹⁄₂" (8.9 cm) A fused disconnect or circuit breaker box* 3-wire connection: Direct Wire *If local codes do not...
... If your type of electrical connection: 4-wire (recommended) 3-wire (if 4-wire is not available) CD E G A. 4-wire receptacle (NEMA type 14-30R) B. 4-prong plug C. The strain relief should have a tight fit ... disconnect or circuit breaker box* 4-wire connection: Direct Wire 3-wire receptacle (NEMA type 10-30R) A UL listed, 120/ 240-volt minimum, 30-amp, dryer power supply cord* 3-wire connection: Power supply cord 3-wire direct 3¹⁄₂" (8.9 cm) A fused disconnect or circuit breaker box* 3-wire connection: Direct Wire *If local codes do not...
Use and Care Guide
Page 10
...required for mobile homes and where local codes do not permit the use of extra length so dryer can be moved if needed. Direct wire cable must have completed your electrical connection. Cut 1¹⁄₂" (3.8 cm) from external ground conductor screw. B. Neutral... ground wire D. Connect ground wire (green or bare) of power supply cord C 1.9 cm) UL listed strain relief D. Tighten screw. Remove neutral ground wire from end of dryer rear ...
...required for mobile homes and where local codes do not permit the use of extra length so dryer can be moved if needed. Direct wire cable must have completed your electrical connection. Cut 1¹⁄₂" (3.8 cm) from external ground conductor screw. B. Neutral... ground wire D. Connect ground wire (green or bare) of power supply cord C 1.9 cm) UL listed strain relief D. Tighten screw. Remove neutral ground wire from end of dryer rear ...
Use and Care Guide
Page 11
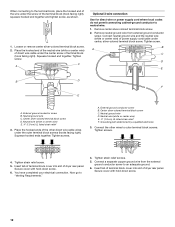
...A C GF A. 3-wire receptacle (NEMA type 10-30R) B. 3-wire plug C. Direct wire cable must have completed your electrical connection. Insert tab of terminal block cover into slot of dryer rear panel. Spade terminals with hold -down screw. 7. C A B D E A. External ground conductor screw B. Insert... (2.5 cm) 3¹⁄₂" (8.9 cm) 11 Tighten screw. Connect neutral wire (white or center wire) of power supply cord to the center, silver-colored terminal screw of the other wires to external ground conductor screw. Tighten screw. Center...
...A C GF A. 3-wire receptacle (NEMA type 10-30R) B. 3-wire plug C. Direct wire cable must have completed your electrical connection. Insert tab of terminal block cover into slot of dryer rear panel. Spade terminals with hold -down screw. 7. C A B D E A. External ground conductor screw B. Insert... (2.5 cm) 3¹⁄₂" (8.9 cm) 11 Tighten screw. Connect neutral wire (white or center wire) of power supply cord to the center, silver-colored terminal screw of the other wires to external ground conductor screw. Tighten screw. Center...
Use and Care Guide
Page 12
...copper ground wire from external ground conductor screw. Tighten screw. C A Optional 3-wire connection Use for direct wire or power supply cord where local codes do not permit connecting cabinet-ground conductor to "Venting Requirements." 4. B A C D...by a qualified electrician 3. Now go to neutral wire. 1. Tighten screws. You have completed your electrical connection. Secure cover with hold -down screw. 6. Remove center silver-colored terminal block screw. ...cover into slot of dryer rear panel. A. Tighten screws. 4. Insert tab of terminal block cover into slot of...
...copper ground wire from external ground conductor screw. Tighten screw. C A Optional 3-wire connection Use for direct wire or power supply cord where local codes do not permit connecting cabinet-ground conductor to "Venting Requirements." 4. B A C D...by a qualified electrician 3. Now go to neutral wire. 1. Tighten screws. You have completed your electrical connection. Secure cover with hold -down screw. 6. Remove center silver-colored terminal block screw. ...cover into slot of dryer rear panel. A. Tighten screws. 4. Insert tab of terminal block cover into slot of...
Use and Care Guide
Page 17
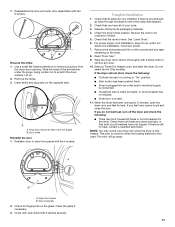
... close the door. If there is an extra part, go away. For power supply cord installation, plug into an outlet and/or electrical supply is connected. ■ Household fuse is intact and tight, or circuit breaker has not tripped. ■ Dryer door is still no heat, contact a qualified technician. A B A. Door strike Reinstall the...
... close the door. If there is an extra part, go away. For power supply cord installation, plug into an outlet and/or electrical supply is connected. ■ Household fuse is intact and tight, or circuit breaker has not tripped. ■ Dryer door is still no heat, contact a qualified technician. A B A. Door strike Reinstall the...
Use and Care Guide
Page 18
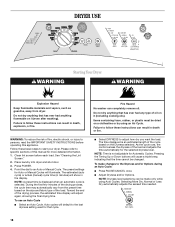
...display will cause a triple beep, indicating that cycle. Pressing the Timing Up or Down buttons will adjust again, showing the final drying time. Press POWER. 4. To use an Auto Cycle ■ Select an Auto Cycle. As the cycle runs, the control senses the dryness of oil on a ... lint screen before operating this manual for more detailed information. 1. During the first few minutes of fire, electric shock, or injury to start your dryer. Failure to follow these basic steps to persons, read the IMPORTANT SAFETY INSTRUCTIONS before each load. See "Cleaning the Lint Screen." 2. The...
...display will cause a triple beep, indicating that cycle. Pressing the Timing Up or Down buttons will adjust again, showing the final drying time. Press POWER. 4. To use an Auto Cycle ■ Select an Auto Cycle. As the cycle runs, the control senses the dryness of oil on a ... lint screen before operating this manual for more detailed information. 1. During the first few minutes of fire, electric shock, or injury to start your dryer. Failure to follow these basic steps to persons, read the IMPORTANT SAFETY INSTRUCTIONS before each load. See "Cleaning the Lint Screen." 2. The...
Use and Care Guide
Page 22
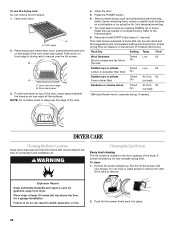
...A screen blocked by lint can reach all the surfaces. Push the lint screen firmly back into place. 22 Front edge 2. B A A. Press the POWER button. 6. Select a timed drying cycle and temperature (see following table. 8. You must be rack dried and the suggested cycle, temperature setting and drying... time. Time* Wool Sweaters Timed Low 60 Block to remove lint. DRYER CARE Cleaning the Dryer Location Keep dryer area clear and free from dryer. Do not rinse or wash screen to shape and lay flat on a clothesline or by pressing TIMING...
...A screen blocked by lint can reach all the surfaces. Push the lint screen firmly back into place. 22 Front edge 2. B A A. Press the POWER button. 6. Select a timed drying cycle and temperature (see following table. 8. You must be rack dried and the suggested cycle, temperature setting and drying... time. Time* Wool Sweaters Timed Low 60 Block to remove lint. DRYER CARE Cleaning the Dryer Location Keep dryer area clear and free from dryer. Do not rinse or wash screen to shape and lay flat on a clothesline or by pressing TIMING...
Use and Care Guide
Page 23
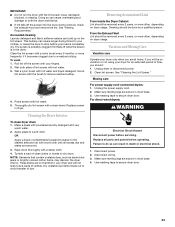
... sides of clothes. These stains are secure in dryer. If you are secure in dryer base. 4. Unplug the power supply cord. 2. Use masking tape to your load is completely dry. IMPORTANT: ■ Do not run the dryer with a clean towel. The screen is in death or electrical shock. 1. Roll lint off the screen with your...
... sides of clothes. These stains are secure in dryer. If you are secure in dryer base. 4. Unplug the power supply cord. 2. Use masking tape to your load is completely dry. IMPORTANT: ■ Do not run the dryer with a clean towel. The screen is in death or electrical shock. 1. Roll lint off the screen with your...

Use and Care Guide
Page 24
... to check air movement. In Canada www.whirlpool.ca Dryer Operation Dryer will bounce, causing the dryer to vibrate. The drum may be turning, but you do not feel air movement, clean exhaust system of the drum for the dryer. Do not use a metal foil vent. Electric dryers require 240-volt power supply. Replace the fuse or reset...
... to check air movement. In Canada www.whirlpool.ca Dryer Operation Dryer will bounce, causing the dryer to vibrate. The drum may be turning, but you do not feel air movement, clean exhaust system of the drum for the dryer. Do not use a metal foil vent. Electric dryers require 240-volt power supply. Replace the fuse or reset...

