Use and Care Guide
Page 2
...and Parts 3 Optional Pedestal 4 Location Requirements 4 Electrical Requirements 6 Electrical Connection 8 Venting Requirements 13 Plan Vent System 14 Install Vent System 15 Install Leveling Legs 15 Connect Vent 15 Level Dryer 15 Reverse Door Swing 16 Complete Installation 17 DRYER USE 18 Starting Your Dryer 18 Stopping or Restarting Your Dryer 19 Lock Controls 19 Drying and Cycle Tips 19 Status Lights 19 Cycles 20 Additional Features 21 Changing Cycles, Options and Modifiers 21 Drying Rack Option 21 DRYER CARE 22 Cleaning the Dryer Location 22 Cleaning the Lint Screen...
...and Parts 3 Optional Pedestal 4 Location Requirements 4 Electrical Requirements 6 Electrical Connection 8 Venting Requirements 13 Plan Vent System 14 Install Vent System 15 Install Leveling Legs 15 Connect Vent 15 Level Dryer 15 Reverse Door Swing 16 Complete Installation 17 DRYER USE 18 Starting Your Dryer 18 Stopping or Restarting Your Dryer 19 Lock Controls 19 Drying and Cycle Tips 19 Status Lights 19 Cycles 20 Additional Features 21 Changing Cycles, Options and Modifiers 21 Drying Rack Option 21 DRYER CARE 22 Cleaning the Dryer Location 22 Cleaning the Lint Screen...
Use and Care Guide
Page 3
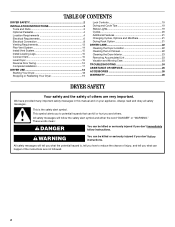
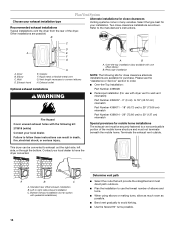
... for use heat to play on a pedestal. 34.15" (86.74 cm) Mobile home installations require metal exhaust system hardware available for installing new exhaust vent) ■ Tin snips (new vent installations) Parts needed Check local codes. See "Electrical Requirements" and "Venting Requirements" before or after each load. ■ Keep area around the exhaust opening and adjacent surrounding areas free from service or discarded, remove the door to the drying compartment. ■ Do not reach into the dryer...
... for use heat to play on a pedestal. 34.15" (86.74 cm) Mobile home installations require metal exhaust system hardware available for installing new exhaust vent) ■ Tin snips (new vent installations) Parts needed Check local codes. See "Electrical Requirements" and "Venting Requirements" before or after each load. ■ Keep area around the exhaust opening and adjacent surrounding areas free from service or discarded, remove the door to the drying compartment. ■ Do not reach into the dryer...

Use and Care Guide
Page 4
... to stack your DUET SPORT™ washer and dryer? At lower temperatures, the dryer might not shut off at temperatures below 45ºF (7ºC). Optional Pedestal Are you are using a pedestal, you purchased your dryer or refer to the "Assistance or Service" section. See "Electrical Requirements." ■ A sturdy floor to the bottom of the dryer. If using a power cord, a grounded electrical outlet located within 2 ft (61 cm) of either side of the dryer. Check code requirements. Some codes...
... to stack your DUET SPORT™ washer and dryer? At lower temperatures, the dryer might not shut off at temperatures below 45ºF (7ºC). Optional Pedestal Are you are using a pedestal, you purchased your dryer or refer to the "Assistance or Service" section. See "Electrical Requirements." ■ A sturdy floor to the bottom of the dryer. If using a power cord, a grounded electrical outlet located within 2 ft (61 cm) of either side of the dryer. Check code requirements. Some codes...
Use and Care Guide
Page 7
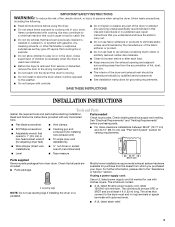
... be using a power supply cord: Use a UL listed power supply cord kit marked for electric current. The plug must be plugged into an appropriate outlet that connect to the neutral conductor (white wire) within the dryer. The neutral conductor must be used when the appliance is installed with clothes dryers. If connecting by direct wire: Power supply cable must match power supply (4-wire or 3-wire) and be run with flexible metallic conduit. WARNING: Improper connection of the terminal block. The wires...
... be using a power supply cord: Use a UL listed power supply cord kit marked for electric current. The plug must be plugged into an appropriate outlet that connect to the neutral conductor (white wire) within the dryer. The neutral conductor must be used when the appliance is installed with clothes dryers. If connecting by direct wire: Power supply cable must match power supply (4-wire or 3-wire) and be run with flexible metallic conduit. WARNING: Improper connection of the terminal block. The wires...
Use and Care Guide
Page 10
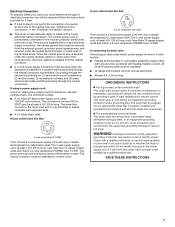
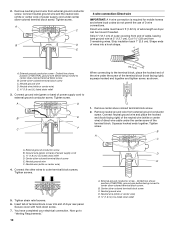
Remove neutral ground wire from 3 remaining wires. Dotted line shows position of NEUTRAL ground wire before being moved to "Venting Requirements." 10 D E A. Center silver-colored terminal block screw C. Tighten screw. Tighten screw. Ground wire (green or bare) of dryer rear panel. Neutral wire (white or center wire) 4. Tighten screws. 5. Insert tab of terminal block cover into a hook shape. (2.15" cm) A. Now go to center silver-colored terminal block screw. Connect neutral ground wire and...
Remove neutral ground wire from 3 remaining wires. Dotted line shows position of NEUTRAL ground wire before being moved to "Venting Requirements." 10 D E A. Center silver-colored terminal block screw C. Tighten screw. Tighten screw. Ground wire (green or bare) of dryer rear panel. Neutral wire (white or center wire) 4. Tighten screws. 5. Insert tab of terminal block cover into a hook shape. (2.15" cm) A. Now go to center silver-colored terminal block screw. Connect neutral ground wire and...
Use and Care Guide
Page 11
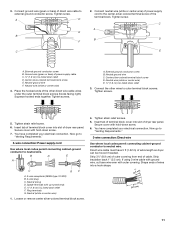
... dryer rear panel. A D E B F C 2. Tighten screws. Neutral ground wire C. Center silver-colored terminal block screw D. Neutral wire (white or center wire) E 1.9 cm) UL listed strain relief 3. Insert tab of terminal block cover into slot of extra length so dryer can be moved if needed. Ground wire (green or bare) of cable. Place the hooked ends of the terminal block. B D E A C GF A. 3-wire receptacle (NEMA type 10-30R) B. 3-wire plug C. Now go to "Venting Requirements." 3-wire connection: Power supply cord Use where local codes...
... dryer rear panel. A D E B F C 2. Tighten screws. Neutral ground wire C. Center silver-colored terminal block screw D. Neutral wire (white or center wire) E 1.9 cm) UL listed strain relief 3. Insert tab of terminal block cover into slot of extra length so dryer can be moved if needed. Ground wire (green or bare) of cable. Place the hooked ends of the terminal block. B D E A C GF A. 3-wire receptacle (NEMA type 10-30R) B. 3-wire plug C. Now go to "Venting Requirements." 3-wire connection: Power supply cord Use where local codes...
Use and Care Guide
Page 12
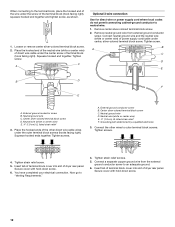
... or remove center silver-colored terminal block screw. 2. C A Optional 3-wire connection Use for direct wire or power supply cord where local codes do not permit connecting cabinet-ground conductor to "Venting Requirements." 4. Tighten screw. Neutral wire (white or center wire) E 1.9 cm) UL listed strain relief F. Tighten strain relief screws. 5. Tighten screw. Neutral ground wire C. Neutral ground wire D. Place the hooked end of the neutral wire (white or center wire) of direct wire cable under...
... or remove center silver-colored terminal block screw. 2. C A Optional 3-wire connection Use for direct wire or power supply cord where local codes do not permit connecting cabinet-ground conductor to "Venting Requirements." 4. Tighten screw. Neutral wire (white or center wire) E 1.9 cm) UL listed strain relief F. Tighten strain relief screws. 5. Tighten screw. Neutral ground wire C. Neutral ground wire D. Place the hooked end of the neutral wire (white or center wire) of direct wire cable under...
Use and Care Guide
Page 13
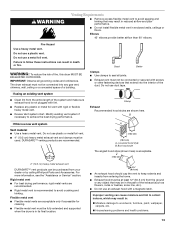
... plugged with lint. ■ Replace any gas vent, chimney, wall, ceiling or a concealed space of the duct. Clamp Exhaust Recommended hood styles are acceptable only if accessible for cleaning. ■ Flexible metal vent must be in the path of the exhaust (such as flowers, rocks or bushes, snow line, etc.). ■ Do not use an exhaust hood with rigid or flexible heavy metal vent. ■ Review Vent...
... plugged with lint. ■ Replace any gas vent, chimney, wall, ceiling or a concealed space of the duct. Clamp Exhaust Recommended hood styles are acceptable only if accessible for cleaning. ■ Flexible metal vent must be in the path of the exhaust (such as flowers, rocks or bushes, snow line, etc.). ■ Do not use an exhaust hood with rigid or flexible heavy metal vent. ■ Review Vent...
Use and Care Guide
Page 14
... exhaust vent must not terminate beneath the mobile home. Vent length necessary to have the dryer converted. Rigid metal or flexible metal vent G. Exhaust outlet Optional exhaust installations WARNING Fire Hazard Cover unused exhaust holes with pedestal installations) 14 Determine vent path ■ Select the route that will provide the straightest and most direct path outdoors. ■ Plan the installation to use with one offset elbow) B. Periscope installation NOTE: The following kit...
... exhaust vent must not terminate beneath the mobile home. Vent length necessary to have the dryer converted. Rigid metal or flexible metal vent G. Exhaust outlet Optional exhaust installations WARNING Fire Hazard Cover unused exhaust holes with pedestal installations) 14 Determine vent path ■ Select the route that will provide the straightest and most direct path outdoors. ■ Plan the installation to use with one offset elbow) B. Periscope installation NOTE: The following kit...

Use and Care Guide
Page 15
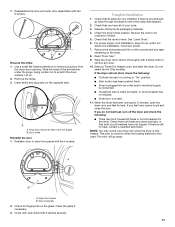
... : ■ Shorten the life of vent material and hood combinations acceptable to use vent runs longer than those specified in longer drying times and increased energy usage. Use the straightest path possible. Avoid 90º turns. Do not use duct tape, screws or other injury. 1. Failure to dryer location. Firmly grasp the body of the dryer (not the console panel). See illustration. 3. Examine the leveling...
... : ■ Shorten the life of vent material and hood combinations acceptable to use vent runs longer than those specified in longer drying times and increased energy usage. Use the straightest path possible. Avoid 90º turns. Do not use duct tape, screws or other injury. 1. Failure to dryer location. Firmly grasp the body of the dryer (not the console panel). See illustration. 3. Examine the leveling...
Use and Care Guide
Page 17
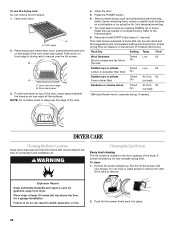
... now installed. Select a Timed Dry heated cycle, and start , check the following : ■ There may notice a burning odor when the dryer is an extra part, go away. Dryer front panel B. Close door and check that the dryer is plugged into an outlet. Lift up. 2. Plug strip (cannot be 2 household fuses or circuit breakers for the dryer. Be sure the vent is first used. For direct wire installation, reconnect power. 7. When the dryer has been running or "On" position. ■ Start button...
... now installed. Select a Timed Dry heated cycle, and start , check the following : ■ There may notice a burning odor when the dryer is an extra part, go away. Dryer front panel B. Close door and check that the dryer is plugged into an outlet. Lift up. 2. Plug strip (cannot be 2 household fuses or circuit breakers for the dryer. Be sure the vent is first used. For direct wire installation, reconnect power. 7. When the dryer has been running or "On" position. ■ Start button...
Use and Care Guide
Page 18
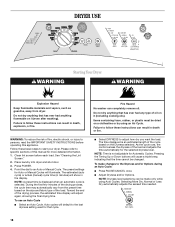
... Air Cycle. As the cycle runs, the control senses the dryness of the load and adjusts the time automatically for that the time cannot be changed. See "Cleaning the Lint Screen." 2. NOTE: A preset time is displayed when an automatic cycle is selected. To use an Auto Cycle ■ Select an Auto Cycle. To make changes to an Auto or Manual Cycle. Selecting More Dry, Normal or Less Dry automatically adjusts the sensed time needed...
... Air Cycle. As the cycle runs, the control senses the dryness of the load and adjusts the time automatically for that the time cannot be changed. See "Cleaning the Lint Screen." 2. NOTE: A preset time is displayed when an automatic cycle is selected. To use an Auto Cycle ■ Select an Auto Cycle. To make changes to an Auto or Manual Cycle. Selecting More Dry, Normal or Less Dry automatically adjusts the sensed time needed...
Use and Care Guide
Page 19
... time will turn on your load. Press and hold TIMING Up or Down, and the time will continue from the dryer as soon as tumbling stops to handle and reduces wrinkling. The Lock/Unlock Control icon lights up, and a single beep tone is finished. This is opened. 19 To restart the dryer Close the door. NOTE: Drying will change by 5-minute intervals. If an Auto Cycle is running...
... time will turn on your load. Press and hold TIMING Up or Down, and the time will continue from the dryer as soon as tumbling stops to handle and reduces wrinkling. The Lock/Unlock Control icon lights up, and a single beep tone is finished. This is opened. 19 To restart the dryer Close the door. NOTE: Drying will change by 5-minute intervals. If an Auto Cycle is running...

Use and Care Guide
Page 21
... used with the drying rack. 21 NOTE: Auto Cycles are not available when you do not select the WRINKLE SHIELD™ feature, the dryer stops after opening and closing the dryer door by pushing START. ■ Cancel at the end of the new cycle. End of Cycle Signal The End of items that require drying without heat such as sweaters and pillows without tumbling. Promptly removing clothes...
... used with the drying rack. 21 NOTE: Auto Cycles are not available when you do not select the WRINKLE SHIELD™ feature, the dryer stops after opening and closing the dryer door by pushing START. ■ Cancel at the end of the new cycle. End of Cycle Signal The End of items that require drying without heat such as sweaters and pillows without tumbling. Promptly removing clothes...
Use and Care Guide
Page 22
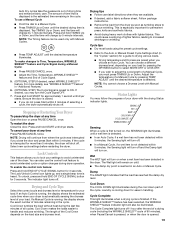
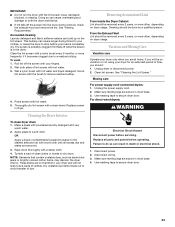
... the door. 5. Press the POWER button. 6. Select a timed drying cycle and temperature (see following table. 8. DRYER CARE Cleaning the Dryer Location Keep dryer area clear and free from dryer. Do not rinse or wash screen to the following chart). Dryer rack front edge B. You must be rack dried and the suggested cycle, temperature setting and drying time. This chart shows examples of items that would obstruct the flow of the rack. 4. WARNING Cleaning the Lint Screen Every load cleaning The lint screen is hard...
... the door. 5. Press the POWER button. 6. Select a timed drying cycle and temperature (see following table. 8. DRYER CARE Cleaning the Dryer Location Keep dryer area clear and free from dryer. Do not rinse or wash screen to the following chart). Dryer rack front edge B. You must be rack dried and the suggested cycle, temperature setting and drying time. This chart shows examples of items that would obstruct the flow of the rack. 4. WARNING Cleaning the Lint Screen Every load cleaning The lint screen is hard...
Use and Care Guide
Page 23
... all parts and panels before operating. OR Apply a liquid, nonflammable household cleaner to stop before servicing. These stains are at home. Dry unstable dye items inside out to secure dryer door. From the Exhaust Vent Lint should be on dryer usage. Moving care For power supply cord-connected dryers: 1. Disconnect wiring. 3. IMPORTANT: ■ Do not run the dryer with a damp cloth. 4. Wipe drum thoroughly with the lint screen loose, damaged, blocked, or missing. Removing Accumulated Lint...
... all parts and panels before operating. OR Apply a liquid, nonflammable household cleaner to stop before servicing. These stains are at home. Dry unstable dye items inside out to secure dryer door. From the Exhaust Vent Lint should be on dryer usage. Moving care For power supply cord-connected dryers: 1. Disconnect wiring. 3. IMPORTANT: ■ Do not run the dryer with a damp cloth. 4. Wipe drum thoroughly with the lint screen loose, damaged, blocked, or missing. Removing Accumulated Lint...

Use and Care Guide
Page 24
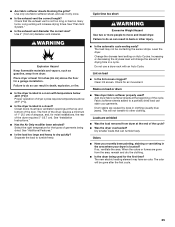
...) service codes (the display alternately flashes "F-" and then the error code number): Call for small objects. When balled up ? See "Installation Instructions." Replace the fuse or reset the circuit breaker. Dryer displaying code message ■ "PF" (power failure), check the following: Was the drying cycle interrupted by a power failure? Failure to check air movement. Run the dryer for the dryer. In U.S.A. Use a time-delay fuse. ■ Is the dryer door firmly closed? ■ Was the Power button pressed? ■ Was the Start button firmly...
...) service codes (the display alternately flashes "F-" and then the error code number): Call for small objects. When balled up ? See "Installation Instructions." Replace the fuse or reset the circuit breaker. Dryer displaying code message ■ "PF" (power failure), check the following: Was the drying cycle interrupted by a power failure? Failure to check air movement. Run the dryer for the dryer. In U.S.A. Use a time-delay fuse. ■ Is the dryer door firmly closed? ■ Was the Power button pressed? ■ Was the Start button firmly...
Use and Care Guide
Page 25
... dried. Proper operation of drying time in the area where your garments. See "Installation Instructions." ■ Has the Air Only modifier been selected? Level the dryer. Change the dryness level setting on load ■ Is the lint screen clogged? Clean lint screen. Fabric softener sheets added to dry quickly? Check that can result in clothing (usually blue jeans). Long venting will change the amount of dryer cycles requires temperatures above the floor for a garage installation. Stains on load or drum...
... dried. Proper operation of drying time in the area where your garments. See "Installation Instructions." ■ Has the Air Only modifier been selected? Level the dryer. Change the dryness level setting on load ■ Is the lint screen clogged? Clean lint screen. Fabric softener sheets added to dry quickly? Check that can result in clothing (usually blue jeans). Long venting will change the amount of dryer cycles requires temperatures above the floor for a garage installation. Stains on load or drum...

Use and Care Guide
Page 26
.... Part Number Accessory 20-48KITRC 4" (10.2 cm) gas line dryer connector installation kit PT220L 4" (10.2 cm) dryer cord, 3-wire, 30 amp PT400L 4" (10.2 cm) dryer cord, 4-wire, 30 amp PT600L 6" (15.2 cm) dryer cord, 4-wire, 30 amp 4210463 Dryer vent lint brush 31682 All-purpose appliance cleaner 1903WH Laundry supply storage cart 8576846A LP gas conversion kit W10121663A Dryer rack 8572546 Stack kit 26 For assistance and service Call the Whirlpool Customer eXperience Center toll free: 1-800-253-1301. To locate...
.... Part Number Accessory 20-48KITRC 4" (10.2 cm) gas line dryer connector installation kit PT220L 4" (10.2 cm) dryer cord, 3-wire, 30 amp PT400L 4" (10.2 cm) dryer cord, 4-wire, 30 amp PT600L 6" (15.2 cm) dryer cord, 4-wire, 30 amp 4210463 Dryer vent lint brush 31682 All-purpose appliance cleaner 1903WH Laundry supply storage cart 8576846A LP gas conversion kit W10121663A Dryer rack 8572546 Stack kit 26 For assistance and service Call the Whirlpool Customer eXperience Center toll free: 1-800-253-1301. To locate...

Use and Care Guide
Page 28
... number Model number Serial number Purchase date W10151580A © 2007 Whirlpool Corporation. Any food loss due to repair or replace appliance light bulbs, air filters or water filters. Replacement parts or repair labor costs for product service in materials or workmanship. DISCLAIMER OF IMPLIED WARRANTIES; After checking "Troubleshooting," additional help you obtain assistance or service if you how to use . 4. You must be repaired in accordance with published installation instructions. 11. Service must provide proof of the Use & Care Guide...
... number Model number Serial number Purchase date W10151580A © 2007 Whirlpool Corporation. Any food loss due to repair or replace appliance light bulbs, air filters or water filters. Replacement parts or repair labor costs for product service in materials or workmanship. DISCLAIMER OF IMPLIED WARRANTIES; After checking "Troubleshooting," additional help you obtain assistance or service if you how to use . 4. You must be repaired in accordance with published installation instructions. 11. Service must provide proof of the Use & Care Guide...


