Owners Manual
Page 2
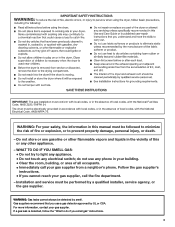
... or seriously injured if you and others are not followed. 2 All safety messages will follow instructions. We have provided many important safety messages in this manual and on your appliance. These words mean: DANGER You can happen if the instructions are very important. Always read and obey all safety messages. All...
... or seriously injured if you and others are not followed. 2 All safety messages will follow instructions. We have provided many important safety messages in this manual and on your appliance. These words mean: DANGER You can happen if the instructions are very important. Always read and obey all safety messages. All...
Owners Manual
Page 3
... in accordance with local codes, or in the absence of this or any other flammable vapors and liquids in your safety, the information in this manual must conform with local codes, or in the absence of local codes, with the National Electrical Code, ANSI/NFPA 70. do if you use a gas...
... in accordance with local codes, or in the absence of this or any other flammable vapors and liquids in your safety, the information in this manual must conform with local codes, or in the absence of local codes, with the National Electrical Code, ANSI/NFPA 70. do if you use a gas...
Owners Manual
Page 5
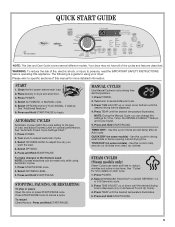
...Cycle. 3. Press POWER. 2. Press TIME ADJUST up or down arrow buttons until the desired drying time is displayed. 4. NOTE: During the Manual Cycle, you want the load. 4. TOUCH UP (on some models) - Press TEMP until the desired temperature illuminates. Press POWER. 2. Turn... time. Please refer to reduce wrinkles and odors in dryer and shut door. 3. START 1. See "Additional Features." 6. Select DRYNESS LEVEL to desired Manual Cycle. 3. Select OPTIONS. 5. Press and Hold START/PAUSE. TIMED DRY - Press POWER. 2. Select ENHANCED TOUCH UP or QUICK REFRESH 1-4 or ...
...Cycle. 3. Press POWER. 2. Press TIME ADJUST up or down arrow buttons until the desired drying time is displayed. 4. NOTE: During the Manual Cycle, you want the load. 4. TOUCH UP (on some models) - Press TEMP until the desired temperature illuminates. Press POWER. 2. Turn... time. Please refer to reduce wrinkles and odors in dryer and shut door. 3. START 1. See "Additional Features." 6. Select DRYNESS LEVEL to desired Manual Cycle. 3. Select OPTIONS. 5. Press and Hold START/PAUSE. TIMED DRY - Press POWER. 2. Select ENHANCED TOUCH UP or QUICK REFRESH 1-4 or ...
Owners Manual
Page 6
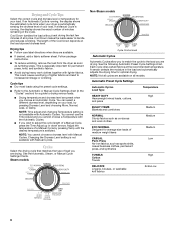
...Cycles allow you are drying. A sensor detects the moisture in the cycle. NOTE: Not all models. See the Automatic, Steam, or Manual Cycle Settings Charts. Drying and Cycle Tips Select the correct cycle and dryness level or temperature for your load, by pressing Temp until ...High DELICATE Lingerie, blouses, or washable knit fabrics Extra-Low 6 If an Automatic Cycle is running , the display shows the exact number of a Manual Cycle by pressing Dryness Level and choosing More, Normal, Less, or Damp. You can select a different dryness level, depending on all cycles are...
...Cycles allow you are drying. A sensor detects the moisture in the cycle. NOTE: Not all models. See the Automatic, Steam, or Manual Cycle Settings Charts. Drying and Cycle Tips Select the correct cycle and dryness level or temperature for your load, by pressing Temp until ...High DELICATE Lingerie, blouses, or washable knit fabrics Extra-Low 6 If an Automatic Cycle is running , the display shows the exact number of a Manual Cycle by pressing Dryness Level and choosing More, Normal, Less, or Damp. You can select a different dryness level, depending on all cycles are...
Owners Manual
Page 7
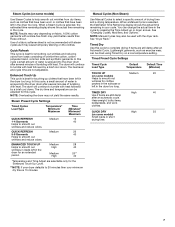
... 40 28 40 20** 40 *Temperature and Time Adjust are still damp after several minutes of tumbling with heat. When a Manual Cycle is 15 minutes. NOTE: Manual Cycles may yield better results than those without. In this cycle. You can be used with steam cycles as exercise wear,... models) Small loads or short drying time. 7 The dryer will continue to tumble with heat followed by a brief cool down . Manual Cycles (Non-Steam) Use Manual Cycles to smooth out wrinkles for an extended period. When a Steam Cycle is not recommended with the dryer rack. The dryer will ...
... 40 28 40 20** 40 *Temperature and Time Adjust are still damp after several minutes of tumbling with heat. When a Manual Cycle is 15 minutes. NOTE: Manual Cycles may yield better results than those without. In this cycle. You can be used with steam cycles as exercise wear,... models) Small loads or short drying time. 7 The dryer will continue to tumble with heat followed by a brief cool down . Manual Cycles (Non-Steam) Use Manual Cycles to smooth out wrinkles for an extended period. When a Steam Cycle is not recommended with the dryer rack. The dryer will ...
Owners Manual
Page 8
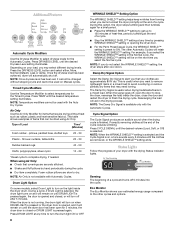
...: If you select the WRINKLE SHIELD™ setting in the Normal cycle, the WRINKLE SHIELD™ setting will aid in a mixed load to turn on Manual cycles. The Damp Dry Signal is available only with the drying Status indicator lights. Status Lights Follow the progress of a cycle. This is preset to...
...: If you select the WRINKLE SHIELD™ setting in the Normal cycle, the WRINKLE SHIELD™ setting will aid in a mixed load to turn on Manual cycles. The Damp Dry Signal is available only with the drying Status indicator lights. Status Lights Follow the progress of a cycle. This is preset to...
Owners Manual
Page 9
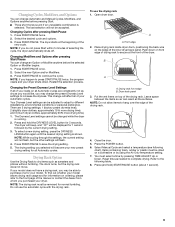
...of the new cycle. A A. Drying rack front edge B. Dryer back panel 3. NOTE: Do not allow items to complete drying. Select Manual Cycle and select a temperature (see following table. 8. The dryer starts at the front of the dryer. Changing the Preset Dryness Level Settings...LEVELbutton again until the desired drying setting is running. 2. Front edge 2. Changing Cycles, Modifiers, and Options You can change Automatic and Manual Cycles, Modifiers, and Options anytime before the selected Option or Modifier begins. 1. Changing Cycles after pressing Start/Pause You can change an...
...of the new cycle. A A. Drying rack front edge B. Dryer back panel 3. NOTE: Do not allow items to complete drying. Select Manual Cycle and select a temperature (see following table. 8. The dryer starts at the front of the dryer. Changing the Preset Dryness Level Settings...LEVELbutton again until the desired drying setting is running. 2. Front edge 2. Changing Cycles, Modifiers, and Options You can change Automatic and Manual Cycles, Modifiers, and Options anytime before the selected Option or Modifier begins. 1. Changing Cycles after pressing Start/Pause You can change an...


