Owners Manual
Page 4
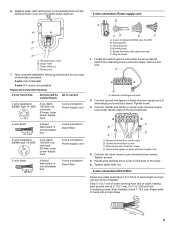
...with WFC. If you have a Whirlpool washer model starting with a maximum slope of an automatic cycle. For ordering information, please refer to the "Assistance or Service" section of this dryer. You will need A location that all parts listed are using a power supply cord, a grounded electrical ...parts package from dryer. Check that allows for Model Number LAB0050PQ. †®TORX is shipped with Stack Kit W10178021, which fits Whirlpool washer models starting with any other washer model, call the dealer from whom you planning to the "Assistance or Service" section of...
...with WFC. If you have a Whirlpool washer model starting with a maximum slope of an automatic cycle. For ordering information, please refer to the "Assistance or Service" section of this dryer. You will need A location that all parts listed are using a power supply cord, a grounded electrical ...parts package from dryer. Check that allows for Model Number LAB0050PQ. †®TORX is shipped with Stack Kit W10178021, which fits Whirlpool washer models starting with any other washer model, call the dealer from whom you planning to the "Assistance or Service" section of...
Owners Manual
Page 6
... within the dryer. s At least 5 ft (1.52 m) long. GROUNDING INSTRUCTIONS s For a grounded, cord-connected dryer: This dryer must match power supply (4-wire or 3-wire) and be: s Flexible armored cable or nonmetallic sheathed copper cable (with ground wire), protected with flexible metallic conduit. ... current. grounding conductor can be either green or bare. s To be sure that the ground path is properly grounded. s A 4-wire power supply connection must be used , it here. If connecting by a qualified electrician. This dryer uses a cord having an equipment-grounding conductor and...
... within the dryer. s At least 5 ft (1.52 m) long. GROUNDING INSTRUCTIONS s For a grounded, cord-connected dryer: This dryer must match power supply (4-wire or 3-wire) and be: s Flexible armored cable or nonmetallic sheathed copper cable (with ground wire), protected with flexible metallic conduit. ... current. grounding conductor can be either green or bare. s To be sure that the ground path is properly grounded. s A 4-wire power supply connection must be used , it here. If connecting by a qualified electrician. This dryer uses a cord having an equipment-grounding conductor and...
Owners Manual
Page 8
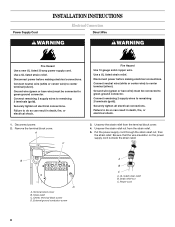
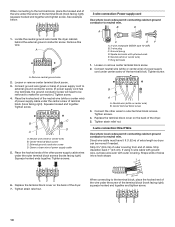
... (green or bare wire) must be connected to remaining 2 terminals (gold). Terminal block cover B. UL listed strain relief B. Disconnect power before making electrical connections. Disconnect power. 2. Securely tighten all electrical connections. A C 3. Unscrew the strain relief from the strain relief. 5. External ground conductor screw A...to green ground connector. Fire Hazard Use 10 gauge solid copper wire. Be sure that the wire insulation on the power supply cord is inside the strain relief. Use a UL listed strain relief. Remove the terminal block cover. Failure to...
... (green or bare wire) must be connected to remaining 2 terminals (gold). Terminal block cover B. UL listed strain relief B. Disconnect power before making electrical connections. Disconnect power. 2. Securely tighten all electrical connections. A C 3. Unscrew the strain relief from the strain relief. 5. External ground conductor screw A...to green ground connector. Fire Hazard Use 10 gauge solid copper wire. Be sure that the wire insulation on the power supply cord is inside the strain relief. Use a UL listed strain relief. Remove the terminal block cover. Failure to...
Owners Manual
Page 9
...wire connection: Direct Wire 3-wire receptacle (NEMA type 10-30R) A UL listed, 120/240-volt minimum, 30-amp, dryer power supply cord 3-wire connection: Power supply cord 3-wire direct 3¹⁄₂" (8.9 cm) A fused disconnect or circuit breaker box 3-wire connection: Direct Wire...ground conductor screw D. Remove this wire. Cut 1¹⁄₂" (3.8 cm) from end of outer covering from 3 remaining wires. Terminal block cover B. Power cord 7. Strip 5" (12.7 cm) of cable, leaving bare ground wire at 5" (12.7 cm). Replace strain relief (with upturned ends F. Strip ...
...wire connection: Direct Wire 3-wire receptacle (NEMA type 10-30R) A UL listed, 120/240-volt minimum, 30-amp, dryer power supply cord 3-wire connection: Power supply cord 3-wire direct 3¹⁄₂" (8.9 cm) A fused disconnect or circuit breaker box 3-wire connection: Direct Wire...ground conductor screw D. Remove this wire. Cut 1¹⁄₂" (3.8 cm) from end of outer covering from 3 remaining wires. Terminal block cover B. Power cord 7. Strip 5" (12.7 cm) of cable, leaving bare ground wire at 5" (12.7 cm). Replace strain relief (with upturned ends F. Strip ...
Owners Manual
Page 10
...cover on the back of the terminal block. Tighten screw. Center terminal block screw C. Ring terminals 1. B A A. Connect the other power supply cable wires under the outer terminal block screws (hooks facing right). Tighten strain relief nut. 3-wire connection: Direct Wire Use where local...the screw of the terminal block (hook facing right), squeeze hooked end together and tighten screw. 10 See example below. 3-wire connection: Power supply cord Use where local codes permit connecting cabinet-ground conductor to neutral wire. B D A 1. Remove this wire. A A. Loosen...
...cover on the back of the terminal block. Tighten screw. Center terminal block screw C. Ring terminals 1. B A A. Connect the other power supply cable wires under the outer terminal block screws (hooks facing right). Tighten strain relief nut. 3-wire connection: Direct Wire Use where local...the screw of the terminal block (hook facing right), squeeze hooked end together and tighten screw. 10 See example below. 3-wire connection: Power supply cord Use where local codes permit connecting cabinet-ground conductor to neutral wire. B D A 1. Remove this wire. A A. Loosen...
Owners Manual
Page 11
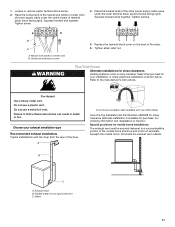
... Over-the-Top Installation Kit Part Number 4396028 for purchase. Place the hooked end of the neutral wire (white or center wire) of power supply cable under the outer terminal block screws (hooks facing right). Replace the terminal block cover on the back of terminal block (hook ... Elbow 11 Loosen or remove center terminal block screw. 2. Do not use a plastic vent. Exhaust hood B. Place the hooked ends of the other power supply cable wires under the center screw of the dryer. 5. Squeeze hooked ends together. Flexible metal vent or rigid metal vent C. Fire Hazard Use a...
... Over-the-Top Installation Kit Part Number 4396028 for purchase. Place the hooked end of the neutral wire (white or center wire) of power supply cable under the outer terminal block screws (hooks facing right). Replace the terminal block cover on the back of terminal block (hook ... Elbow 11 Loosen or remove center terminal block screw. 2. Do not use a plastic vent. Exhaust hood B. Place the hooked ends of the other power supply cable wires under the center screw of the dryer. 5. Squeeze hooked ends together. Flexible metal vent or rigid metal vent C. Fire Hazard Use a...
Owners Manual
Page 13
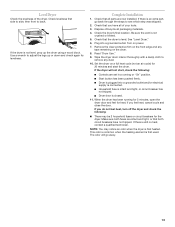
... that all packaging materials. 4. Be sure the vent is first heated. Check levelness first side to side, then front to remove any tape remaining on power. 7. Remove the clear protective film on the front edge and any dust. 10. Dispose of the dryer.
... that all packaging materials. 4. Be sure the vent is first heated. Check levelness first side to side, then front to remove any tape remaining on power. 7. Remove the clear protective film on the front edge and any dust. 10. Dispose of the dryer.
Owners Manual
Page 14
...from dryer. Doing so can result in the washer. Close the door. 2. After the beep sounds, press the START button. 2. Press the POWER button to change the cycle or temperature after washing). See "Drying, Cycle and Temperature Tips." Normal is the energy preferred dryness level and will... light will use fabric softener sheets in bold letters on it (even after pressing START 1. Turn the cycle knob to indicate that the power is shown in this dryer. the type of load being dried. Allow space for clothes to select the recommended temperature setting for 4. Press...
...from dryer. Doing so can result in the washer. Close the door. 2. After the beep sounds, press the START button. 2. Press the POWER button to change the cycle or temperature after washing). See "Drying, Cycle and Temperature Tips." Normal is the energy preferred dryness level and will... light will use fabric softener sheets in bold letters on it (even after pressing START 1. Turn the cycle knob to indicate that the power is shown in this dryer. the type of load being dried. Allow space for clothes to select the recommended temperature setting for 4. Press...
Owners Manual
Page 15
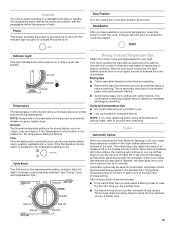
...of lighter fabrics, leading to dry, the amount of water left in the clothes as you are available. Indicator Light This light indicates when the power is on or that a cycle has started . Temperature The Temperature Control button lets you have selected a cycle and temperature, press this knob ... the clothes decreases, and the timer advances through the remainder of moisture left in the clothes, the machine will glow to indicate the power is simple to understand and easy to reduce wrinkling. Cycle Knob Turn this button to run. Drying tips Follow care label directions when ...
...of lighter fabrics, leading to dry, the amount of water left in the clothes as you are available. Indicator Light This light indicates when the power is on or that a cycle has started . Temperature The Temperature Control button lets you have selected a cycle and temperature, press this knob ... the clothes decreases, and the timer advances through the remainder of moisture left in the clothes, the machine will glow to indicate the power is simple to understand and easy to reduce wrinkling. Cycle Knob Turn this button to run. Drying tips Follow care label directions when ...
Owners Manual
Page 17
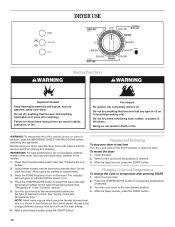
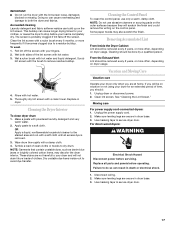
...brush to the stained area and rub with a nylon brush every 6 months, or more often, depending on dryer usage. Unplug dryer or disconnect power. 2. Cleaning the Dryer Interior To clean dryer drum 1. Some paper towels may discolor the dryer interior. Cleaning should be on vacation or not... Laundry detergent and fabric softener residue can build up on the control panel. This buildup can result in dryer base. 3. Moving care For power supply cord-connected dryers: 1. Dry unstable dye items inside-out to dry drum. Cleaning the Control Panel To clean the control panel, use...
...brush to the stained area and rub with a nylon brush every 6 months, or more often, depending on dryer usage. Unplug dryer or disconnect power. 2. Cleaning the Dryer Interior To clean dryer drum 1. Some paper towels may discolor the dryer interior. Cleaning should be on vacation or not... Laundry detergent and fabric softener residue can build up on the control panel. This buildup can result in dryer base. 3. Moving care For power supply cord-connected dryers: 1. Dry unstable dye items inside-out to dry drum. Cleaning the Control Panel To clean the control panel, use...
Owners Manual
Page 18
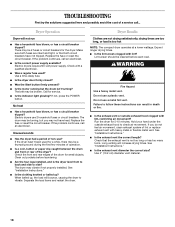
...or load is too hot NOTE: The compact dryer operates at a lower wattage. If the problem continues, call an electrician. s Is the correct power supply available? Use a time-delay fuse. Do not use ? Failure to check air movement. Hold your hand under the outside exhaust hood clogged ... or balled up , the load will bounce, causing the dryer to side? See "Installation Instructions." Electric dryers require 240-volt power supply. If not, press the POWER button. The dryer may be broken. Expect longer drying times. s Is the dryer door firmly closed? The drum may vibrate ...
...or load is too hot NOTE: The compact dryer operates at a lower wattage. If the problem continues, call an electrician. s Is the correct power supply available? Use a time-delay fuse. Do not use ? Failure to check air movement. Hold your hand under the outside exhaust hood clogged ... or balled up , the load will bounce, causing the dryer to side? See "Installation Instructions." Electric dryers require 240-volt power supply. If not, press the POWER button. The dryer may be broken. Expect longer drying times. s Is the dryer door firmly closed? The drum may vibrate ...


