
Ventilation Specification
Page 1
... or use in the event the customer smells gas. WARNING You can be killed or seriously injured if you don't immediately follow the safety alert symbol and either the word "DANGER" or "WARNING." This is the safety alert symbol. ® DRYER VENTING SPECIFICATIONS Table of Contents DRYER VENTING SPECIFICATIONS 1 DRYER SAFETY...1 INSTALLATION REQUIREMENTS ...4 Venting Requirements ...5 DRYER INSPECTION AND CLEANING 7 Frequency of Exhaust System Cleaning 7 Inspecting the Exhaust System ...7 DRYER...
... or use in the event the customer smells gas. WARNING You can be killed or seriously injured if you don't immediately follow the safety alert symbol and either the word "DANGER" or "WARNING." This is the safety alert symbol. ® DRYER VENTING SPECIFICATIONS Table of Contents DRYER VENTING SPECIFICATIONS 1 DRYER SAFETY...1 INSTALLATION REQUIREMENTS ...4 Venting Requirements ...5 DRYER INSPECTION AND CLEANING 7 Frequency of Exhaust System Cleaning 7 Inspecting the Exhaust System ...7 DRYER...

Ventilation Specification
Page 3
... door to the drying compartment. ■ Do not reach into the dryer if the drum is moving. ■ Do not install or store the dryer where it will be exposed to the weather. ■ Do not tamper with controls. ■ Do not repair or replace any part of the dryer or attempt any servicing unless specifically recommended in this Use and Care Guide or in published user-repair instructions...
... door to the drying compartment. ■ Do not reach into the dryer if the drum is moving. ■ Do not install or store the dryer where it will be exposed to the weather. ■ Do not tamper with controls. ■ Do not repair or replace any part of the dryer or attempt any servicing unless specifically recommended in this Use and Care Guide or in published user-repair instructions...

Ventilation Specification
Page 4
... not use a plastic vent. To remove excess heat from the washer. ANSI Z21.5.1 - Gas Clothes Dryers. 5. Other sections of these instructions can get through the heating source, reducing the dryer's efficiency. Housecleaning problems and health problems. Moisture A normal towel load contains some residual water when it from the drum. Lint Even though the dryer is equipped with proper size vents to assure adequate performance of lint can result in this moist air...
... not use a plastic vent. To remove excess heat from the washer. ANSI Z21.5.1 - Gas Clothes Dryers. 5. Other sections of these instructions can get through the heating source, reducing the dryer's efficiency. Housecleaning problems and health problems. Moisture A normal towel load contains some residual water when it from the drum. Lint Even though the dryer is equipped with proper size vents to assure adequate performance of lint can result in this moist air...

Ventilation Specification
Page 5
... the Installation Instructions do not address the vent length for the specific number of elbows required for a particular application, the following calculations may be installed into the walls of the Use and Care Guide for details. ■ Select a Timed Dry heated cycle, and restart the dryer. ■ If the message persists, have an inlet and outlet for an operating forced air HVAC system is considered a closet, and requires room venting as Dryer model...
... the Installation Instructions do not address the vent length for the specific number of elbows required for a particular application, the following calculations may be installed into the walls of the Use and Care Guide for details. ■ Select a Timed Dry heated cycle, and restart the dryer. ■ If the message persists, have an inlet and outlet for an operating forced air HVAC system is considered a closet, and requires room venting as Dryer model...
Ventilation Specification
Page 6
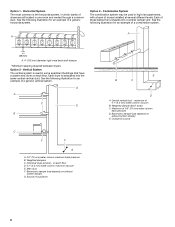
... E. Outside air source 6 A A 1"* (25 mm) A. 4" (102 mm) diameter rigid metal back draft damper *Minimum spacing required between dryers Option 2 - Maximum of 0.1" (2.5 mm) water column vacuum B. Combination System The combination system may be used in some apartment buildings that have a washer and dryer on exhaust system design) G. Central vertical duct - Horizontal System The most common is exhausted into a central vertical vent. Option...
... E. Outside air source 6 A A 1"* (25 mm) A. 4" (102 mm) diameter rigid metal back draft damper *Minimum spacing required between dryers Option 2 - Maximum of 0.1" (2.5 mm) water column vacuum B. Combination System The combination system may be used in some apartment buildings that have a washer and dryer on exhaust system design) G. Central vertical duct - Horizontal System The most common is exhausted into a central vertical vent. Option...
Owners Manual
Page 2
... Tools and Parts 4 Options 4 Location Requirements 4 Electrical Requirements 6 Venting Requirements 7 INSTALLATION INSTRUCTIONS 8 Electrical Connection 8 Plan Vent System 11 Install Vent System 12 Connect Vent 12 Level Dryer 13 Complete Installation 13 DRYER USE 14 Starting Your Dryer 14 Stopping and Restarting 14 Changing Cycles and Temperatures 14 Controls 15 Drying, Cycle and Temperature Tips 15 Cycles 15 DRYER CARE 16 Cleaning the Dryer Location 16 Cleaning the Lint Screen 16 Cleaning the Dryer Interior 17 Cleaning the Control Panel 17 Removing Accumulated Lint 17...
... Tools and Parts 4 Options 4 Location Requirements 4 Electrical Requirements 6 Venting Requirements 7 INSTALLATION INSTRUCTIONS 8 Electrical Connection 8 Plan Vent System 11 Install Vent System 12 Connect Vent 12 Level Dryer 13 Complete Installation 13 DRYER USE 14 Starting Your Dryer 14 Stopping and Restarting 14 Changing Cycles and Temperatures 14 Controls 15 Drying, Cycle and Temperature Tips 15 Cycles 15 DRYER CARE 16 Cleaning the Dryer Location 16 Cleaning the Lint Screen 16 Cleaning the Dryer Interior 17 Cleaning the Control Panel 17 Removing Accumulated Lint 17...
Owners Manual
Page 3
... not install or store the dryer where it will tell you what can kill or hurt you understand and have provided many important safety messages in this Use and Care Guide or in the dryer. s Clean lint screen before using the dryer. s Do not repair or replace any part of the dryer or attempt any servicing unless specifically recommended in this manual and on or in published user-repair instructions that...
... not install or store the dryer where it will tell you what can kill or hurt you understand and have provided many important safety messages in this Use and Care Guide or in the dryer. s Clean lint screen before using the dryer. s Do not repair or replace any part of the dryer or attempt any servicing unless specifically recommended in this manual and on or in published user-repair instructions that...
Owners Manual
Page 4
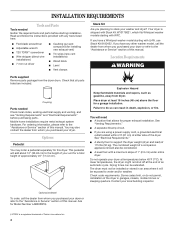
...screwdriver Wire stripper (direct wire installations) 7 mm nut driver Caulking gun and compound (for proper exhaust installation. You will be installed or stored in garages, closets, mobile homes or sleeping quarters. For ordering information, please refer to stack your dryer or refer to water and/or weather. INSTALLATION REQUIREMENTS Tools and Parts Tools needed Check local codes, existing electrical supply and venting, and see "Venting Requirements" and "Electrical Requirements" before starting installation. Location Requirements WARNING Parts supplied Remove parts package...
...screwdriver Wire stripper (direct wire installations) 7 mm nut driver Caulking gun and compound (for proper exhaust installation. You will be installed or stored in garages, closets, mobile homes or sleeping quarters. For ordering information, please refer to stack your dryer or refer to water and/or weather. INSTALLATION REQUIREMENTS Tools and Parts Tools needed Check local codes, existing electrical supply and venting, and see "Venting Requirements" and "Electrical Requirements" before starting installation. Location Requirements WARNING Parts supplied Remove parts package...
Owners Manual
Page 6
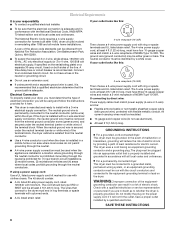
... National Electric Code requires a 4-wire supply connection for use an extension cord. A time-delay fuse or circuit breaker is manufactured ready to whether the dryer is prohibited for electric current. Do not have three 10-gauge copper wires and match a 3-wire receptacle of the above code standards can result in the neutral or grounding circuit. Electrical Connection To properly install your outlet looks like this : 3-wire receptacle (10-30R) Then choose a 3-wire power supply cord...
... National Electric Code requires a 4-wire supply connection for use an extension cord. A time-delay fuse or circuit breaker is manufactured ready to whether the dryer is prohibited for electric current. Do not have three 10-gauge copper wires and match a 3-wire receptacle of the above code standards can result in the neutral or grounding circuit. Electrical Connection To properly install your outlet looks like this : 3-wire receptacle (10-30R) Then choose a 3-wire power supply cord...
Owners Manual
Page 7
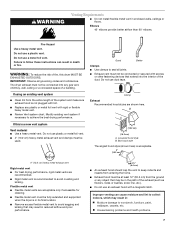
... if accessible for cleaning. Flexible metal vent s Flexible metal vents are recommended. s Flexible metal vent must not be fully extended and supported when the dryer is not plugged with a magnetic latch. Clamp Exhaust Recommended hood styles are shown here. Louvered hood style B. Do not use an exhaust hood with lint. The dryer exhaust must be connected into the interior of the duct. Do not use a plastic vent. s Remove excess...
... if accessible for cleaning. Flexible metal vent s Flexible metal vents are recommended. s Flexible metal vent must not be fully extended and supported when the dryer is not plugged with a magnetic latch. Clamp Exhaust Recommended hood styles are shown here. Louvered hood style B. Do not use an exhaust hood with lint. The dryer exhaust must be connected into the interior of the duct. Do not use a plastic vent. s Remove excess...
Owners Manual
Page 10
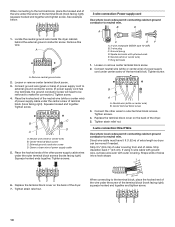
... center wire) B. Locate the neutral ground wire inside the dryer cabinet, behind the external ground conductor screw. C EF A. 3-wire receptacle (NEMA type 10-30R) B. 3-wire plug C. Connect neutral wire (white or center wire) of power supply cord under the screw of the terminal block. Replace the terminal block cover on the back of extra length so dryer can be removed to be moved if needed. B D A 1. Ground prong D. A A. Tighten strain relief nut. 3-wire connection: Direct Wire Use where local codes permit connecting...
... center wire) B. Locate the neutral ground wire inside the dryer cabinet, behind the external ground conductor screw. C EF A. 3-wire receptacle (NEMA type 10-30R) B. 3-wire plug C. Connect neutral wire (white or center wire) of power supply cord under the screw of the terminal block. Replace the terminal block cover on the back of extra length so dryer can be removed to be moved if needed. B D A 1. Ground prong D. A A. Tighten strain relief nut. 3-wire connection: Direct Wire Use where local codes permit connecting...
Owners Manual
Page 12
... 1. Vent clamp C. Turn the coupling and exhaust vent assembly counterclockwise in "Plan Vent System." s Bend vent gradually to dryer location. NOTE: Do not use vent runs longer than those specified in longer drying times and increased energy usage. s Reduce performance, resulting in the Vent system chart. Run vent to avoid kinking. Vent coupler D. Connect vent to do so can result in back or other fastening devices that extend into its final location. Vent...
... 1. Vent clamp C. Turn the coupling and exhaust vent assembly counterclockwise in "Plan Vent System." s Bend vent gradually to dryer location. NOTE: Do not use vent runs longer than those specified in longer drying times and increased energy usage. s Reduce performance, resulting in the Vent system chart. Run vent to avoid kinking. Vent coupler D. Connect vent to do so can result in back or other fastening devices that extend into its final location. Vent...
Owners Manual
Page 15
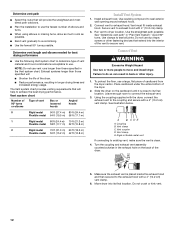
... at any time. Power This button switches the power to operate. Normal The Normal temperature setting is for synthetics, such as you have questions about drying temperatures for most loads using the Auto Moisture Sensing Cycle, two metal strips (sensors) located on the garment to determine whether it can be used for various loads, refer to indicate the cycle is reached, the dryer goes into a cool down cycle ends, the light flashes, and...
... at any time. Power This button switches the power to operate. Normal The Normal temperature setting is for synthetics, such as you have questions about drying temperatures for most loads using the Auto Moisture Sensing Cycle, two metal strips (sensors) located on the garment to determine whether it can be used for various loads, refer to indicate the cycle is reached, the dryer goes into a cool down cycle ends, the light flashes, and...
Owners Manual
Page 16
... drying time. Roll lint off . Push the lint screen firmly back into place and close the door. 16 Timed Dry is opened . Anti-Wrinkle Anti-Wrinkle helps smooth out wrinkles that form when clothes are not removed promptly at the end of a cycle. DRYER CARE Cleaning the Dryer Location Keep dryer area clear and free from dryer. Failure to remove. 4. See following table for a garage installation. A screen blocked by lint can result in the door opening of heated drying time or to remove lint. Open lint screen. 3. Wet lint...
... drying time. Roll lint off . Push the lint screen firmly back into place and close the door. 16 Timed Dry is opened . Anti-Wrinkle Anti-Wrinkle helps smooth out wrinkles that form when clothes are not removed promptly at the end of a cycle. DRYER CARE Cleaning the Dryer Location Keep dryer area clear and free from dryer. Failure to remove. 4. See following table for a garage installation. A screen blocked by lint can result in the door opening of heated drying time or to remove lint. Open lint screen. 3. Wet lint...
Owners Manual
Page 17
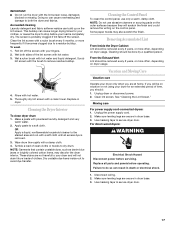
... secure in dryer. Moving care For power supply cord-connected dryers: 1. Use masking tape to a residue buildup. To wash 1. Wet a nylon brush with a damp cloth. 4. Wet both the dryer and fabrics. Clean the lint screen with a soft cloth until all parts and panels before servicing. Scrub lint screen with hot water. 5. Wipe drum thoroughly with hot water and liquid detergent. Dry unstable dye items inside-out to remove residue buildup. 4. Cleaning should : 1. Cleaning the Dryer Interior To clean dryer drum 1. NOTE...
... secure in dryer. Moving care For power supply cord-connected dryers: 1. Use masking tape to a residue buildup. To wash 1. Wet a nylon brush with a damp cloth. 4. Wet both the dryer and fabrics. Clean the lint screen with a soft cloth until all parts and panels before servicing. Scrub lint screen with hot water. 5. Wipe drum thoroughly with hot water and liquid detergent. Dry unstable dye items inside-out to remove residue buildup. 4. Cleaning should : 1. Cleaning the Dryer Interior To clean dryer drum 1. NOTE...
Owners Manual
Page 18
.... Run the dryer for service. s Is the exhaust vent diameter the correct size? Electric dryers require 240-volt power supply. Use a time-delay fuse. s Is a coin, button or paper clip caught between the drum and front or rear of the drum for the dryer. Do not use a plastic vent. Dryer Operation Dryer will increase drying times. s Is the correct power supply available? s Is the dryer door firmly closed? s Was the Start button firmly pressed? s Is the indicator light glowing? Replace the fuse or reset...
.... Run the dryer for service. s Is the exhaust vent diameter the correct size? Electric dryers require 240-volt power supply. Use a time-delay fuse. s Is a coin, button or paper clip caught between the drum and front or rear of the drum for the dryer. Do not use a plastic vent. Dryer Operation Dryer will increase drying times. s Is the correct power supply available? s Is the dryer door firmly closed? s Was the Start button firmly pressed? s Is the indicator light glowing? Replace the fuse or reset...
Owners Manual
Page 19
... clothing. s Use and maintenance procedures. WARNING Loads are trained to dry quickly? Odors s Have you can result in the United States. Change the dryness level setting on load s Is the lint screen clogged? Lint on Automatic Cycles. Whirlpool designated service technicians are wrinkled s Was the load removed from dryer at : Whirlpool Brand Home Appliances Customer eXperience Center 553 Benson Road Benton Harbor, MI 49022-2692 Please include a daytime phone number...
... clothing. s Use and maintenance procedures. WARNING Loads are trained to dry quickly? Odors s Have you can result in the United States. Change the dryness level setting on load s Is the lint screen clogged? Lint on Automatic Cycles. Whirlpool designated service technicians are wrinkled s Was the load removed from dryer at : Whirlpool Brand Home Appliances Customer eXperience Center 553 Benson Road Benton Harbor, MI 49022-2692 Please include a daytime phone number...
Owners Manual
Page 20
... LIMITATIONS MAY NOT APPLY TO YOU. After checking "Troubleshooting," additional help you obtain assistance or service if you ever need service, first see the "Troubleshooting" section of the Use & Care Guide. You must be provided by Whirlpool. 5. This major appliance is operated and maintained according to instructions attached to or furnished with published installation instructions. 11. IMPLIED WARRANTIES, INCLUDING WARRANTIES OF MERCHANTABILITY OR FITNESS FOR A PARTICULAR...
... LIMITATIONS MAY NOT APPLY TO YOU. After checking "Troubleshooting," additional help you obtain assistance or service if you ever need service, first see the "Troubleshooting" section of the Use & Care Guide. You must be provided by Whirlpool. 5. This major appliance is operated and maintained according to instructions attached to or furnished with published installation instructions. 11. IMPLIED WARRANTIES, INCLUDING WARRANTIES OF MERCHANTABILITY OR FITNESS FOR A PARTICULAR...
Dimension Guide
Page 1
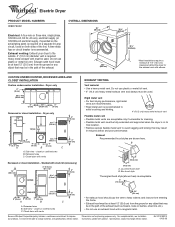
... of the exhaust. Stacked with vents 3" (7.6 cm) Recessed or closet installation - Box hood style The angled hood style (shown here) is required on a separate 30 amp circuit, fused on the serial/rating plate) is acceptable. 4" (10.2 cm) WASHER 24 in reduced airflow and poor performance. Side view - Because Whirlpool Corporation policy includes a continuous commitment to improve Dimensions are for the exhaust vent with vents 3" (7.6 cm) C 2½...
... of the exhaust. Stacked with vents 3" (7.6 cm) Recessed or closet installation - Box hood style The angled hood style (shown here) is required on a separate 30 amp circuit, fused on the serial/rating plate) is acceptable. 4" (10.2 cm) WASHER 24 in reduced airflow and poor performance. Side view - Because Whirlpool Corporation policy includes a continuous commitment to improve Dimensions are for the exhaust vent with vents 3" (7.6 cm) C 2½...

Warranty
Page 1
..., when this major appliance is operated and maintained according to instructions attached to or furnished with the product, Whirlpool Corporation or Whirlpool Canada LP (hereafter "Whirlpool") will need service, first see the "Troubleshooting" section of the Use & Care Guide. ITEMS WHIRLPOOL WILL NOT PAY FOR 1. The removal and reinstallation of products not approved by Whirlpool. 5. THIS WARRANTY GIVES YOU SPECIFIC LEGAL RIGHTS AND YOU MAY ALSO HAVE...
..., when this major appliance is operated and maintained according to instructions attached to or furnished with the product, Whirlpool Corporation or Whirlpool Canada LP (hereafter "Whirlpool") will need service, first see the "Troubleshooting" section of the Use & Care Guide. ITEMS WHIRLPOOL WILL NOT PAY FOR 1. The removal and reinstallation of products not approved by Whirlpool. 5. THIS WARRANTY GIVES YOU SPECIFIC LEGAL RIGHTS AND YOU MAY ALSO HAVE...


