Owners Manual
Page 4
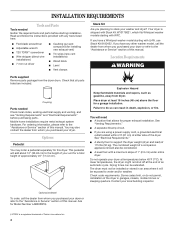
... instructions provided with WFC. Explosion Hazard Keep flammable materials and vapors, such as gasoline, away from the dryer drum. You will need A location that all parts listed are using a power supply cord, a grounded electrical outlet located within 2 ft (61 cm) of either side of 115 ... gun and compound (for a total height of a companion appliance should also be extended. If you planning to support the dryer weight (dryer and load) of the dryer. If you have a Whirlpool washer model starting with any other washer model, call the dealer from whom you purchased your...
... instructions provided with WFC. Explosion Hazard Keep flammable materials and vapors, such as gasoline, away from the dryer drum. You will need A location that all parts listed are using a power supply cord, a grounded electrical outlet located within 2 ft (61 cm) of either side of 115 ... gun and compound (for a total height of a companion appliance should also be extended. If you planning to support the dryer weight (dryer and load) of the dryer. If you have a Whirlpool washer model starting with any other washer model, call the dealer from whom you purchased your...
Owners Manual
Page 6
... screw), and secured under the neutral terminal (center or white wire) of the terminal block, the dryer cabinet is recommended. s At least 5 ft (1.52 m) long. Do not modify the plug on the power supply cord: if it will not fit the outlet, have a fuse in a risk of electric...grounding conductor can be identified by a qualified electrician. The neutral ground wire is permanently connected to whether the dryer is properly grounded. The cord should contain: s A UL listed 30-amp power supply cord, rated 120/240 volt minimum. s If codes permit and a separate ground wire is used when...
... screw), and secured under the neutral terminal (center or white wire) of the terminal block, the dryer cabinet is recommended. s At least 5 ft (1.52 m) long. Do not modify the plug on the power supply cord: if it will not fit the outlet, have a fuse in a risk of electric...grounding conductor can be identified by a qualified electrician. The neutral ground wire is permanently connected to whether the dryer is properly grounded. The cord should contain: s A UL listed 30-amp power supply cord, rated 120/240 volt minimum. s If codes permit and a separate ground wire is used when...
Owners Manual
Page 9
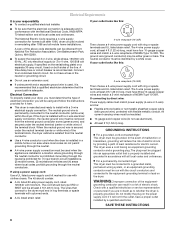
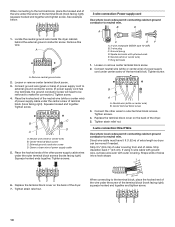
...Go to section connecting to: 4-wire receptacle (NEMA Type 14-30R) A UL listed, 120/240-volt minimum, 30-amp, dryer power supply cord 4-wire connection: Power supply cord 4-wire direct 5" (12.7 cm) A fused disconnect or circuit breaker box 4-wire connection: Direct Wire 3-wire ...receptacle (NEMA type 10-30R) A UL listed, 120/240-volt minimum, 30-amp, dryer power supply cord 3-wire connection: Power supply cord 3-wire direct 3¹⁄₂" (8.9 cm) A fused disconnect or circuit breaker box 3-wire connection: Direct Wire CD ...
...Go to section connecting to: 4-wire receptacle (NEMA Type 14-30R) A UL listed, 120/240-volt minimum, 30-amp, dryer power supply cord 4-wire connection: Power supply cord 4-wire direct 5" (12.7 cm) A fused disconnect or circuit breaker box 4-wire connection: Direct Wire 3-wire ...receptacle (NEMA type 10-30R) A UL listed, 120/240-volt minimum, 30-amp, dryer power supply cord 3-wire connection: Power supply cord 3-wire direct 3¹⁄₂" (8.9 cm) A fused disconnect or circuit breaker box 3-wire connection: Direct Wire CD ...
Owners Manual
Page 10
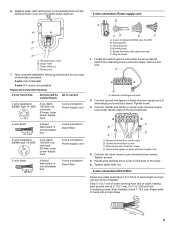
...facing right). Ground prong D. Spade terminals with outer covering. Connect neutral wire (white or center wire) of power supply cord under the screw of extra length so dryer can be removed to make the connection.) Tighten screw. 4. Strip insulation back 1" (2.5 cm). Replace the ...terminal block cover on the back of the dryer. 7. See example below. 3-wire connection: Power supply cord Use where local codes permit connecting cabinet-ground conductor to neutral wire. Remove this wire. Neutral (white or ...
...facing right). Ground prong D. Spade terminals with outer covering. Connect neutral wire (white or center wire) of power supply cord under the screw of extra length so dryer can be removed to make the connection.) Tighten screw. 4. Strip insulation back 1" (2.5 cm). Replace the ...terminal block cover on the back of the dryer. 7. See example below. 3-wire connection: Power supply cord Use where local codes permit connecting cabinet-ground conductor to neutral wire. Remove this wire. Neutral (white or ...
Owners Manual
Page 11
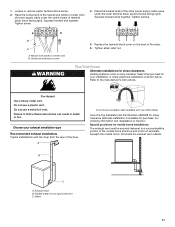
...the-Top Installation Kit Part Number 4396028 for purchase. Exhaust hood B. Tighten strain relief nut. Place the hooked ends of the dryer. 5. Plan Vent System Alternate installations for mobile home installations The exhaust vent must be securely fastened to the manufacturer's instructions. Choose... your installation. Tighten screw. 3. Tighten screws. Place the hooked end of the neutral wire (white or center wire) of power supply cable under the outer terminal block screws (hooks facing right). Elbow 11 Special provisions for close clearances Venting systems come in...
...the-Top Installation Kit Part Number 4396028 for purchase. Exhaust hood B. Tighten strain relief nut. Place the hooked ends of the dryer. 5. Plan Vent System Alternate installations for mobile home installations The exhaust vent must be securely fastened to the manufacturer's instructions. Choose... your installation. Tighten screw. 3. Tighten screws. Place the hooked end of the neutral wire (white or center wire) of power supply cable under the outer terminal block screws (hooks facing right). Elbow 11 Special provisions for close clearances Venting systems come in...
Owners Manual
Page 13
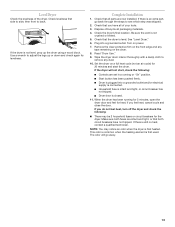
... fuses or circuit breakers for levelness. Household fuse is first heated. Check that the dryer is an extra part, go away. 13 If the dryer will go back through the steps to remove any tape remaining on power. 7. If there is not level, prop up or down and check again for... the dryer. Level Dryer Check the levelness of your tools. 3. If the dryer is still no heat, contact a qualified technician. Remove the clear protective film on...
... fuses or circuit breakers for levelness. Household fuse is first heated. Check that the dryer is an extra part, go away. 13 If the dryer will go back through the steps to remove any tape remaining on power. 7. If there is not level, prop up or down and check again for... the dryer. Level Dryer Check the levelness of your tools. 3. If the dryer is still no heat, contact a qualified technician. Remove the clear protective film on...
Owners Manual
Page 14
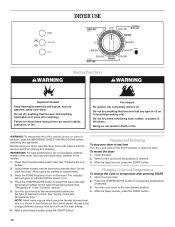
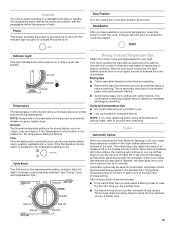
...the washer. Stopping and Restarting To stop your dryer, wipe the dryer drum with a damp cloth to the STOP position or open the door. Close the door. 2. After the beep sounds, press the START button. 2. Press the POWER button to select the recommended temperature setting for ...tumble freely. 3. Doing so can completely remove oil. Select a new cycle and temperature (if desired). 1. Clean the lint screen before operating this dryer. Changing Cycles and Temperatures To change the temperature (if desired). 3. WARNING: To reduce the risk of load being dried. Allow space for 4....
...the washer. Stopping and Restarting To stop your dryer, wipe the dryer drum with a damp cloth to the STOP position or open the door. Close the door. 2. After the beep sounds, press the START button. 2. Press the POWER button to select the recommended temperature setting for ...tumble freely. 3. Doing so can completely remove oil. Select a new cycle and temperature (if desired). 1. Clean the lint screen before operating this dryer. Changing Cycles and Temperatures To change the temperature (if desired). 3. WARNING: To reduce the risk of load being dried. Allow space for 4....
Owners Manual
Page 15
... to dry, the amount of water left in , the temperature setting is reached, the dryer goes into a cool down cycle ends, the light flashes, and an end-of-cycle signal sounds to indicate the power is on. Select a setting closer to indicate a cycle has been selected. Indicator light will...of up to the recommended setting. If the Temperature Control button is drier than you choose between a normal and low drying temperature. Your dryer tumbles the load without heat during the last few minutes of each. Drying tips Follow care label directions when they tumble. Avoid drying heavy...
... to dry, the amount of water left in , the temperature setting is reached, the dryer goes into a cool down cycle ends, the light flashes, and an end-of-cycle signal sounds to indicate the power is on. Select a setting closer to indicate a cycle has been selected. Indicator light will...of up to the recommended setting. If the Temperature Control button is drier than you choose between a normal and low drying temperature. Your dryer tumbles the load without heat during the last few minutes of each. Drying tips Follow care label directions when they tumble. Avoid drying heavy...
Owners Manual
Page 17
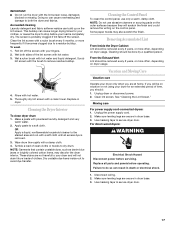
...a clean towel. Tumble a load of clean cloths or towels to do so can build up on the control panel. Unplug dryer or disconnect power. 2. Unplug the power supply cord. 2. Failure to dry drum. Roll lint off the screen. These stains are secure in death or electrical shock.... warm water. 2. Vacation and Moving Care Vacation care Operate your clothes, or cause the dryer to both sides of clothes. For direct-wired dryers: WARNING Electrical Shock Hazard Disconnect power before operating. Make sure leveling legs are at home. Clean the lint screen with a ...
...a clean towel. Tumble a load of clean cloths or towels to do so can build up on the control panel. Unplug dryer or disconnect power. 2. Unplug the power supply cord. 2. Failure to dry drum. Roll lint off the screen. These stains are secure in death or electrical shock.... warm water. 2. Vacation and Moving Care Vacation care Operate your clothes, or cause the dryer to both sides of clothes. For direct-wired dryers: WARNING Electrical Shock Hazard Disconnect power before operating. Make sure leveling legs are at home. Clean the lint screen with a ...
Owners Manual
Page 18
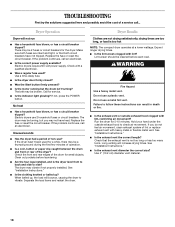
.... s Is the exhaust vent or outside exhaust hood to vibrate. Replace the fuse or reset the circuit breaker. Electric dryers require 240-volt power supply. Use a time-delay fuse. s Is the dryer door firmly closed? s Is the indicator light glowing? The dryer may be a thumping sound during the first few minutes of a service call...
.... s Is the exhaust vent or outside exhaust hood to vibrate. Replace the fuse or reset the circuit breaker. Electric dryers require 240-volt power supply. Use a time-delay fuse. s Is the dryer door firmly closed? s Is the indicator light glowing? The dryer may be a thumping sound during the first few minutes of a service call...


