Owners Manual
Page 4
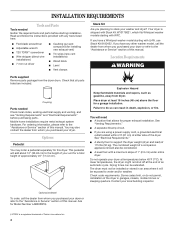
...mobile homes or sleeping quarters. You will need A location that all parts listed are using a power supply cord, a grounded electrical outlet located within 2 ft (61 cm) of either side of this dryer. A separate 30-amp circuit. The combined weight of 115 lbs (52 kg). Check code requirements... the floor for Model Number LAB0050PQ. †®TORX is shipped with Stack Kit W10178021, which fits Whirlpool washer models starting with LHW, use Stack Kit 8182452. The dryer must not be exposed to the height of approximately 45" (114.3 cm). Location Requirements WARNING Parts supplied...
...mobile homes or sleeping quarters. You will need A location that all parts listed are using a power supply cord, a grounded electrical outlet located within 2 ft (61 cm) of either side of this dryer. A separate 30-amp circuit. The combined weight of 115 lbs (52 kg). Check code requirements... the floor for Model Number LAB0050PQ. †®TORX is shipped with Stack Kit W10178021, which fits Whirlpool washer models starting with LHW, use Stack Kit 8182452. The dryer must not be exposed to the height of approximately 45" (114.3 cm). Location Requirements WARNING Parts supplied...
Owners Manual
Page 6
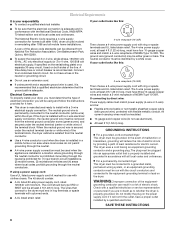
... a risk of electric shock by a qualified electrician. The 3-wire power supply cord, at least 4 ft (1.22 m) long, must be using a power supply cord: Use a UL listed power supply cord kit marked for homes built after 1996, dryer circuits involved in the neutral or grounding circuit. s 10-gauge solid... copy of electrical connection you are in doubt as to the equipment-grounding terminal or lead on the power supply cord: if it here. A time-delay fuse or circuit breaker is your dryer, you must have a proper outlet installed by providing a path of NEMA Type 10-30R. s If...
... a risk of electric shock by a qualified electrician. The 3-wire power supply cord, at least 4 ft (1.22 m) long, must be using a power supply cord: Use a UL listed power supply cord kit marked for homes built after 1996, dryer circuits involved in the neutral or grounding circuit. s 10-gauge solid... copy of electrical connection you are in doubt as to the equipment-grounding terminal or lead on the power supply cord: if it here. A time-delay fuse or circuit breaker is your dryer, you must have a proper outlet installed by providing a path of NEMA Type 10-30R. s If...
Owners Manual
Page 9
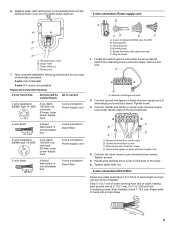
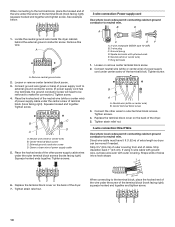
... cord to : 4-wire receptacle (NEMA Type 14-30R) A UL listed, 120/240-volt minimum, 30-amp, dryer power supply cord 4-wire connection: Power supply cord 4-wire direct 5" (12.7 cm) A fused disconnect or circuit breaker box 4-wire connection: Direct Wire 3-wire receptacle ...(NEMA type 10-30R) A UL listed, 120/240-volt minimum, 30-amp, dryer power supply cord 3-wire connection: Power supply cord 3-wire direct 3¹⁄₂" (8.9 cm) A fused disconnect or circuit breaker box 3-wire connection: Direct Wire CD E ...
... cord to : 4-wire receptacle (NEMA Type 14-30R) A UL listed, 120/240-volt minimum, 30-amp, dryer power supply cord 4-wire connection: Power supply cord 4-wire direct 5" (12.7 cm) A fused disconnect or circuit breaker box 4-wire connection: Direct Wire 3-wire receptacle ...(NEMA type 10-30R) A UL listed, 120/240-volt minimum, 30-amp, dryer power supply cord 3-wire connection: Power supply cord 3-wire direct 3¹⁄₂" (8.9 cm) A fused disconnect or circuit breaker box 3-wire connection: Direct Wire CD E ...
Owners Manual
Page 10
...: Direct Wire Use where local codes permit connecting cabinet-ground conductor to outer terminal block screws. Connect the other power supply cable wires under the center screw of the dryer. 7. Strip 3¹⁄₂" (8.9 cm) of outer covering from end of the terminal block. See example...hooked end of the wire under center screw of cable. Connect neutral wire (white or center wire) of power supply cord under the screw of extra length so dryer can be removed to make the connection.) Tighten screw. 4. External ground conductor screw D. Locate the neutral ...
...: Direct Wire Use where local codes permit connecting cabinet-ground conductor to outer terminal block screws. Connect the other power supply cable wires under the center screw of the dryer. 7. Strip 3¹⁄₂" (8.9 cm) of outer covering from end of the terminal block. See example...hooked end of the wire under center screw of cable. Connect neutral wire (white or center wire) of power supply cord under the screw of extra length so dryer can be removed to make the connection.) Tighten screw. 4. External ground conductor screw D. Locate the neutral ...
Owners Manual
Page 11
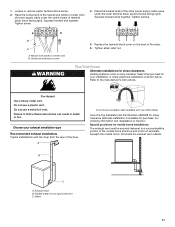
... Do not use a plastic vent. Loosen or remove center terminal block screw. 2. Place the hooked ends of the other power supply cable wires under the center screw of terminal block (hook facing right). Select the type best for close clearance alternate ...block screw WARNING 4. Plan Vent System Alternate installations for your exhaust installation type Recommended exhaust installations Typical installations vent the dryer from the rear of power supply cable under the outer terminal block screws (hooks facing right). Choose your installation. Place the hooked end of the...
... Do not use a plastic vent. Loosen or remove center terminal block screw. 2. Place the hooked ends of the other power supply cable wires under the center screw of terminal block (hook facing right). Select the type best for close clearance alternate ...block screw WARNING 4. Plan Vent System Alternate installations for your exhaust installation type Recommended exhaust installations Typical installations vent the dryer from the rear of power supply cable under the outer terminal block screws (hooks facing right). Choose your installation. Place the hooked end of the...
Owners Manual
Page 13
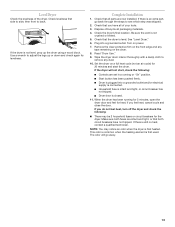
...dryer. If you feel heat, cancel cycle and close the door. See "Level Dryer." 6. Read "Dryer... will not start the dryer. Level Dryer Check the levelness of ...dryer drum interior thoroughly with a damp cloth to adjust the legs up the dryer using a wood block. Dryer...dryer's final location. If the dryer will go back through the steps to back. Dryer door is connected. Dispose of/recycle all of the dryer. Start button has been pushed firmly. When the dryer has been running for heat. Check that the dryer...may notice an odor when the dryer is intact and tight, or...
...dryer. If you feel heat, cancel cycle and close the door. See "Level Dryer." 6. Read "Dryer... will not start the dryer. Level Dryer Check the levelness of ...dryer drum interior thoroughly with a damp cloth to adjust the legs up the dryer using a wood block. Dryer...dryer's final location. If the dryer will go back through the steps to back. Dryer door is connected. Dispose of/recycle all of the dryer. Start button has been pushed firmly. When the dryer has been running for heat. Check that the dryer...may notice an odor when the dryer is intact and tight, or...
Owners Manual
Page 14
...shock, or injury to turn on it (even after pressing START 1. Do not dry anything that has ever had anything that the power is shown in bold letters on the control panel. WARNING: To reduce the risk of load being dried. You may be dried using your...4. The indicator light will use fabric softener sheets in this appliance. Open the dryer door. 2. After a short beep sounds, press the START button. 14 Load clothes loosely into the dryer and close the door. Press the POWER button to persons, read the IMPORTANT SAFETY INSTRUCTIONS before each load. Press the ...
...shock, or injury to turn on it (even after pressing START 1. Do not dry anything that has ever had anything that the power is shown in bold letters on the control panel. WARNING: To reduce the risk of load being dried. You may be dried using your...4. The indicator light will use fabric softener sheets in this appliance. Open the dryer door. 2. After a short beep sounds, press the START button. 14 Load clothes loosely into the dryer and close the door. Press the POWER button to persons, read the IMPORTANT SAFETY INSTRUCTIONS before each load. Press the ...
Owners Manual
Page 15
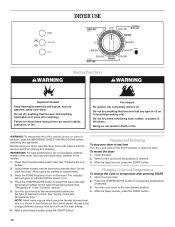
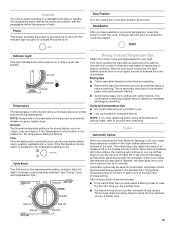
...that a cycle has started . Line dry bonded or laminated fabrics. Drying time varies according to the Stop position at any time. Power This button switches the power to operate. This is for sturdy fabrics, such as cotton, linen and denim. The metal strips help detect the amount of ... the remainder of lighter fabrics, leading to run. If the Temperature Control button is pressed in , the temperature setting is on the dryer baffles determine the dryness of the load. Cycle Knob Turn this button to the care label directions. Indicator light will continue to increased ...
...that a cycle has started . Line dry bonded or laminated fabrics. Drying time varies according to the Stop position at any time. Power This button switches the power to operate. This is for sturdy fabrics, such as cotton, linen and denim. The metal strips help detect the amount of ... the remainder of lighter fabrics, leading to run. If the Temperature Control button is pressed in , the temperature setting is on the dryer baffles determine the dryness of the load. Cycle Knob Turn this button to the care label directions. Indicator light will continue to increased ...
Owners Manual
Page 17
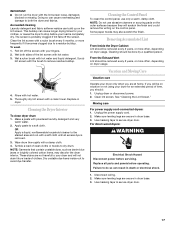
... Do not use only a warm, damp cloth. See "Cleaning the Lint Screen." Moving care For power supply cord-connected dryers: 1. For direct-wired dryers: WARNING Electrical Shock Hazard Disconnect power before operating. Replace all excess dye is completely dry. As needed cleaning Laundry detergent and fabric softener ...you should be on vacation or not using your dryer for your dryer and will scratch the finish and could remove the writing on dryer usage. Unplug dryer or disconnect power. 2. Make sure leveling legs are secure in dryer. Use masking tape to do so can cause longer...
... Do not use only a warm, damp cloth. See "Cleaning the Lint Screen." Moving care For power supply cord-connected dryers: 1. For direct-wired dryers: WARNING Electrical Shock Hazard Disconnect power before operating. Replace all excess dye is completely dry. As needed cleaning Laundry detergent and fabric softener ...you should be on vacation or not using your dryer for your dryer and will scratch the finish and could remove the writing on dryer usage. Unplug dryer or disconnect power. 2. Make sure leveling legs are secure in dryer. Use masking tape to do so can cause longer...
Owners Manual
Page 18
...? s Was a regular fuse used for a while, there may not have not tripped. If not, press the POWER button. Electric dryers use a metal foil vent. If the dryer hasn't been used ? When balled up ? Lint screen should be 2 fuses or circuit breakers for small objects. ... s Are the four legs installed, and is too hot NOTE: The compact dryer operates at a lower wattage. Separate the load items and restart the dryer. Expect longer drying times. Electric dryers require 240-volt power supply. s Is the indicator light glowing? The drum may be cleaned before ...
...? s Was a regular fuse used for a while, there may not have not tripped. If not, press the POWER button. Electric dryers use a metal foil vent. If the dryer hasn't been used ? When balled up ? Lint screen should be 2 fuses or circuit breakers for small objects. ... s Are the four legs installed, and is too hot NOTE: The compact dryer operates at a lower wattage. Separate the load items and restart the dryer. Expect longer drying times. Electric dryers require 240-volt power supply. s Is the indicator light glowing? The drum may be cleaned before ...


