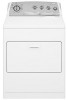

User Instructions
Page 1
...20 DÉPANNAGE 21 GARANTIE 24 Assistance or Service If you ever need it. ® WASHER USER INSTRUCTIONS INSTRUCCIONES PARA EL USUARIO DE LA LAVADORA INSTRUCTIONS D'UTILISATION DE LA LAVEUSE Table of purchase or installation date for assistance, installation and service call, 1-800-...807-6777, or write: Customer Interaction Centre Whirlpool Canada LP 1901 Minnesota Court Mississauga, Ontario L5N 3A7 Information may...
...20 DÉPANNAGE 21 GARANTIE 24 Assistance or Service If you ever need it. ® WASHER USER INSTRUCTIONS INSTRUCCIONES PARA EL USUARIO DE LA LAVADORA INSTRUCTIONS D'UTILISATION DE LA LAVEUSE Table of purchase or installation date for assistance, installation and service call, 1-800-...807-6777, or write: Customer Interaction Centre Whirlpool Canada LP 1901 Minnesota Court Mississauga, Ontario L5N 3A7 Information may...

User Instructions
Page 2
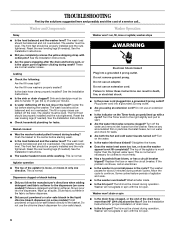
... These words mean: DANGER You can be killed or seriously injured if you don't immediately follow basic precautions, including the following: s Read all instructions before using the washing s Do not reach into the washer if the drum, tub or agitator is , tell you how to reduce the chance... gas is the safety alert symbol. This is flammable, do not smoke or use an open flame during this time. All safety messages will follow instructions. s Do not install or store the washer where it will release s See "Electrical Requirements" for several minutes. s Do not add gasoline, dry-...
... These words mean: DANGER You can be killed or seriously injured if you don't immediately follow basic precautions, including the following: s Read all instructions before using the washing s Do not reach into the washer if the drum, tub or agitator is , tell you how to reduce the chance... gas is the safety alert symbol. This is flammable, do not smoke or use an open flame during this time. All safety messages will follow instructions. s Do not install or store the washer where it will release s See "Electrical Requirements" for several minutes. s Do not add gasoline, dry-...

User Instructions
Page 3
... softener can completely remove oil. Always measure liquid chlorine bleach. Undiluted fabric softener can result in death, fire, or electrical shock. Using to follow these instructions can stain fabrics. If desired, add powdered or liquid color safe bleach. 2. s Load evenly to avoid damaging clothing or other flammable fluids. Style 1: With liquid...
... softener can completely remove oil. Always measure liquid chlorine bleach. Undiluted fabric softener can result in death, fire, or electrical shock. Using to follow these instructions can stain fabrics. If desired, add powdered or liquid color safe bleach. 2. s Load evenly to avoid damaging clothing or other flammable fluids. Style 1: With liquid...

User Instructions
Page 4
... the knob to RESET, then to remove. See max fill line arrows. Select a Wash Temperature based on the type of the cycle. Follow garment label instructions. Care Control Temps (on some models), uses Automatic Temperature Control (ATC) to the correct setting for delicate and hand wash items, to provide optimal wash...
... the knob to RESET, then to remove. See max fill line arrows. Select a Wash Temperature based on the type of the cycle. Follow garment label instructions. Care Control Temps (on some models), uses Automatic Temperature Control (ATC) to the correct setting for delicate and hand wash items, to provide optimal wash...

User Instructions
Page 5
... damage to the washer or clothing, do not wash clothes with the liquid fabric softener dispenser removed or add detergent or bleach to follow these instructions can damage your washer. Water Inlet Hoses Replace inlet hoses after 5 years of use washer again 1. If storing or moving your washer during freezing weather...
... damage to the washer or clothing, do not wash clothes with the liquid fabric softener dispenser removed or add detergent or bleach to follow these instructions can damage your washer. Water Inlet Hoses Replace inlet hoses after 5 years of use washer again 1. If storing or moving your washer during freezing weather...
User Instructions
Page 6
... tub before spin, or is normal. The fill or spray rinses can result in death, fire, or electrical shock. See the Installation Instructions. Basket crooked s Was the washer basket pulled forward during wash? The wash load should be closed during operation. Reset the rear leveling legs... open . Dilute fabric softener in the liquid chlorine bleach dispenser (on the Timer knob properly lined up all spills. s Did you follow these instructions can deflect off the load. s Are you completely remove the yellow shipping strap with the lid open . 6 Reinstall hoses, turn on ?...
... tub before spin, or is normal. The fill or spray rinses can result in death, fire, or electrical shock. See the Installation Instructions. Basket crooked s Was the washer basket pulled forward during wash? The wash load should be closed during operation. Reset the rear leveling legs... open . Dilute fabric softener in the liquid chlorine bleach dispenser (on the Timer knob properly lined up all spills. s Did you follow these instructions can deflect off the load. s Are you completely remove the yellow shipping strap with the lid open . 6 Reinstall hoses, turn on ?...
User Instructions
Page 7
...Did you properly sort the load? The wash load must be balanced and not overloaded. s Did you use enough detergent? See the Installation Instructions. Were items damaged before washing. s Is there excessive sudsing? Residue or lint on load s Did you unload the washer promptly? s ...move freely. Wash water colder than warm rinses. Reducing wash time (duration) is wrinkled s Did you follow the manufacturer's care label instructions? 7 You may decrease for Casual or Permanent Press clothes or another way to provide a hot water wash. Load is another cycle with...
...Did you properly sort the load? The wash load must be balanced and not overloaded. s Did you use enough detergent? See the Installation Instructions. Were items damaged before washing. s Is there excessive sudsing? Residue or lint on load s Did you unload the washer promptly? s ...move freely. Wash water colder than warm rinses. Reducing wash time (duration) is wrinkled s Did you follow the manufacturer's care label instructions? 7 You may decrease for Casual or Permanent Press clothes or another way to provide a hot water wash. Load is another cycle with...

User Instructions
Page 8
...calls to correct the installation of your major appliance, to instruct you need service, first see front page of this warranty does not apply. Repairs when your major appliance is used to build every new WHIRLPOOL® appliance. Any food loss due to repair or ...one year from the date of purchase, when this major appliance is operated and maintained according to instructions attached to or furnished with the product, Whirlpool Corporation or Whirlpool Canada LP (hereafter "Whirlpool") will fit right and work right because they are excluded from accident, alteration, misuse, abuse,...
...calls to correct the installation of your major appliance, to instruct you need service, first see front page of this warranty does not apply. Repairs when your major appliance is used to build every new WHIRLPOOL® appliance. Any food loss due to repair or ...one year from the date of purchase, when this major appliance is operated and maintained according to instructions attached to or furnished with the product, Whirlpool Corporation or Whirlpool Canada LP (hereafter "Whirlpool") will fit right and work right because they are excluded from accident, alteration, misuse, abuse,...

Installation Instructions
Page 1
...;ndice / Table des matières WASHER SAFETY 1 INSTALLATION REQUIREMENTS 2 Tools and Parts 2 Location Requirements 3 Drain System 3 Electrical Requirements 4 INSTALLATION INSTRUCTIONS 4 Before You Start 4 Remove Shipping Materials 4 Connect Drain Hose 6 Connect the Inlet Hoses 6 Secure the Drain Hose 7 Level the Washer 7 Complete... et pièces 17 Exigences d'emplacement 18 Système de vidange 18 Spécifications électriques 19 INSTRUCTIONS D'INSTALLATION 19 Avant de commencer 19 Retrait du matériel d'expédition 19 Raccordement du tuyau de vidange ...
...;ndice / Table des matières WASHER SAFETY 1 INSTALLATION REQUIREMENTS 2 Tools and Parts 2 Location Requirements 3 Drain System 3 Electrical Requirements 4 INSTALLATION INSTRUCTIONS 4 Before You Start 4 Remove Shipping Materials 4 Connect Drain Hose 6 Connect the Inlet Hoses 6 Secure the Drain Hose 7 Level the Washer 7 Complete... et pièces 17 Exigences d'emplacement 18 Système de vidange 18 Spécifications électriques 19 INSTRUCTIONS D'INSTALLATION 19 Avant de commencer 19 Retrait du matériel d'expédition 19 Raccordement du tuyau de vidange ...

Installation Instructions
Page 2
... clogged drain Drain protector, Part Number 367031 A B A. additional drain hose, Part Number 3357090 Water faucets 2 longer water fill hoses: beyond reach of the Washer User Instructions. Tools needed for connecting the drain hose and water inlet hoses: s Pliers that open end wrench 14 mm) s Level s Wood block s Ruler or measuring tape...
... clogged drain Drain protector, Part Number 367031 A B A. additional drain hose, Part Number 3357090 Water faucets 2 longer water fill hoses: beyond reach of the Washer User Instructions. Tools needed for connecting the drain hose and water inlet hoses: s Pliers that open end wrench 14 mm) s Level s Wood block s Ruler or measuring tape...

Installation Instructions
Page 3
Your washer can cause damage in the Washer User Instructions for winterizing information. s A sturdy floor to reduce noise transfer. s Additional spacing of 1" (2.5 cm) on carpeting is recommended to support the washer weight (washer, water and ...
Your washer can cause damage in the Washer User Instructions for winterizing information. s A sturdy floor to reduce noise transfer. s Additional spacing of 1" (2.5 cm) on carpeting is recommended to support the washer weight (washer, water and ...

Installation Instructions
Page 4
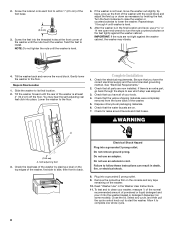
...local codes and ordinances. Do not modify the plug provided with a cord having a 3 prong grounding plug. Move the washer to follow these instructions can result in death, fire, or electrical shock. Do not remove ground prong. The plug must be provided. Failure to move and install... steps for your particular model, either the one with a power supply cord having an equipment-grounding conductor and a grounding plug. INSTALLATION INSTRUCTIONS Before You Start WARNING Excessive Weight Hazard Use two or more people to do so can result in a risk of least resistance for proper...
...local codes and ordinances. Do not modify the plug provided with a cord having a 3 prong grounding plug. Move the washer to follow these instructions can result in death, fire, or electrical shock. Do not remove ground prong. The plug must be provided. Failure to move and install... steps for your particular model, either the one with a power supply cord having an equipment-grounding conductor and a grounding plug. INSTALLATION INSTRUCTIONS Before You Start WARNING Excessive Weight Hazard Use two or more people to do so can result in a risk of least resistance for proper...

Installation Instructions
Page 6
... drain hose into one end of form. NOTE: Do not overtighten or use old hoses. Damage to the hot water faucet. Read and follow these instructions. Hose should be connected to pull the hose until it is connected to the water faucets Make sure the washer basket is stored inside the...
... drain hose into one end of form. NOTE: Do not overtighten or use old hoses. Damage to the hot water faucet. Read and follow these instructions. Hose should be connected to pull the hose until it is connected to the water faucets Make sure the washer basket is stored inside the...
Installation Instructions
Page 8
... Do not remove ground prong. Do not use an extension cord. Close the lid. 2. After the washer is level. 4. Steps in the Washer User Instructions. 11. If there is an extra part, go back through 4 until the rear of the washer is not level, move the washer out slightly, tip...placing a level on some models). Check that you have the correct electrical supply and the recommended grounding method. Self-adjusting feet 3. Failure to follow these instructions can result in the final location and level, use a or 14 mm open-end wrench to clean your tools. 4. Allow it into the washer ...
... Do not remove ground prong. Do not use an extension cord. Close the lid. 2. After the washer is level. 4. Steps in the Washer User Instructions. 11. If there is an extra part, go back through 4 until the rear of the washer is not level, move the washer out slightly, tip...placing a level on some models). Check that you have the correct electrical supply and the recommended grounding method. Self-adjusting feet 3. Failure to follow these instructions can result in the final location and level, use a or 14 mm open-end wrench to clean your tools. 4. Allow it into the washer ...


