Use & Care Guide
Page 2
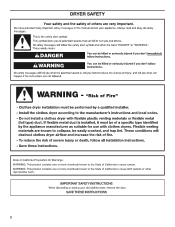
DRYER SAFETY 2
DRYER SAFETY 2
Use & Care Guide
Page 4
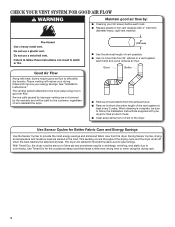
.... Good Better ■■ Remove lint and debris from the exhaust hood. ■■ Remove lint from in front of the dryer. With Timed Dry, the dryer runs the amount of time set and sometimes results in good air flow. n Use the shortest length of vent possible. ■■... a little more than four 90° elbows in the load. Proper venting will be sure to follow the Installation Instructions supplied with heat, dryers require good air flow to efficiently dry laundry. Use Timed Dry for final product check. ■■ Clear away items from the entire length...
.... Good Better ■■ Remove lint and debris from the exhaust hood. ■■ Remove lint from in front of the dryer. With Timed Dry, the dryer runs the amount of time set and sometimes results in good air flow. n Use the shortest length of vent possible. ■■... a little more than four 90° elbows in the load. Proper venting will be sure to follow the Installation Instructions supplied with heat, dryers require good air flow to efficiently dry laundry. Use Timed Dry for final product check. ■■ Clear away items from the entire length...
Use & Care Guide
Page 5
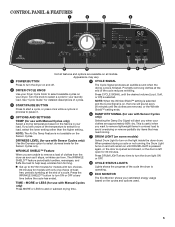
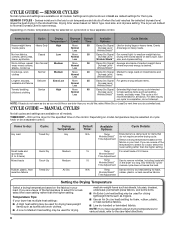
... STATUS LIGHTS n Get up to 60/150 minutes for models with only one choice of heatfree, periodic tumbling at the end of the cycle the dryer is selected. Lights shows the progress of a cycle. CONTROL PANEL & FEATURES 1 2 3 4 9 8 7 65 Not all features and options are removed, or the Wrinkle...select for 30 minutes. Promptly removing clothes at any time to select available cycles on your estimated energy usage based on and off. 2 DRYER CYCLE KNOB The Cycle Signal produces an audible sound when the drying cycle is on, the tone will remain on the Sensor Cycles. NOTE:...
... STATUS LIGHTS n Get up to 60/150 minutes for models with only one choice of heatfree, periodic tumbling at the end of the cycle the dryer is selected. Lights shows the progress of a cycle. CONTROL PANEL & FEATURES 1 2 3 4 9 8 7 65 Not all features and options are removed, or the Wrinkle...select for 30 minutes. Promptly removing clothes at any time to select available cycles on your estimated energy usage based on and off. 2 DRYER CYCLE KNOB The Cycle Signal produces an audible sound when the drying cycle is on, the tone will remain on the Sensor Cycles. NOTE:...
Use & Care Guide
Page 6
...setting may be selected on cycle knob or be a separate control. Temperature Tips If your load. Settings and options shown in the dryer too long. The dryer will default to Normal Dryness Level to medium-weight fabrics. Depending on model, temperature may be used for drying lightweight items such ...unsure of the temperature to select for various loads, refer to help sanitize items such as you dry a similar load. Senses moisture in your dryer has multiple heat settings: ■■ A High heat setting may be selected on the fabrics in the load or air temperature and shuts...
...setting may be selected on cycle knob or be a separate control. Temperature Tips If your load. Settings and options shown in the dryer too long. The dryer will default to Normal Dryness Level to medium-weight fabrics. Depending on model, temperature may be used for drying lightweight items such ...unsure of the temperature to select for various loads, refer to help sanitize items such as you dry a similar load. Senses moisture in your dryer has multiple heat settings: ■■ A High heat setting may be selected on the fabrics in the load or air temperature and shuts...
Use & Care Guide
Page 7
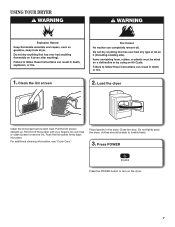
Clean the lint screen 2. Load the dryer Clean the lint screen before each load. Pull the lint screen straight up. Roll lint off the screen with your fingers. USING YOUR DRYER 1. Close the door. Do not tightly pack the dryer; Do not rinse or wash screen to tumble freely. 3. For additional cleaning information, see "Dryer Care." clothes should be able to remove lint. Place laundry in the dryer. Press POWER Press the POWER button to turn on the dryer. 7 Push the lint screen firmly back into place.
Clean the lint screen 2. Load the dryer Clean the lint screen before each load. Pull the lint screen straight up. Roll lint off the screen with your fingers. USING YOUR DRYER 1. Close the door. Do not tightly pack the dryer; Do not rinse or wash screen to tumble freely. 3. For additional cleaning information, see "Dryer Care." clothes should be able to remove lint. Place laundry in the dryer. Press POWER Press the POWER button to turn on the dryer. 7 Push the lint screen firmly back into place.
Use & Care Guide
Page 8
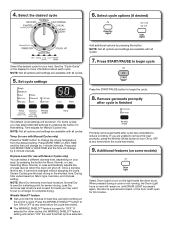
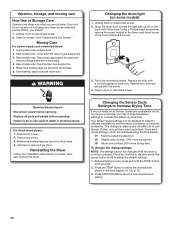
... will change the drying temperature from the default setting. Press MORE TIME or LESS TIME and the time will remain on the light inside the dryer drum. Once a dryness level is selected. 8 Promptly remove garments after cycle is finished The default cycle settings will shut off. When pressed during a cycle or... use with all cycles. 5. Selecting More, Normal, or Less automatically adjusts the dryness level at the end of heat-free, periodic tumbling at which the dryer will be changed without stopping the cycle.
... will change the drying temperature from the default setting. Press MORE TIME or LESS TIME and the time will remain on the light inside the dryer drum. Once a dryness level is selected. 8 Promptly remove garments after cycle is finished The default cycle settings will shut off. When pressed during a cycle or... use with all cycles. 5. Selecting More, Normal, or Less automatically adjusts the dryness level at the end of heat-free, periodic tumbling at which the dryer will be changed without stopping the cycle.
Use & Care Guide
Page 9
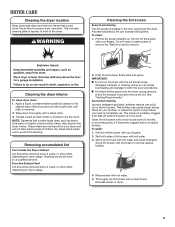
...blocked by a qualified servicer. Roll lint off the screen into place. Cleaning should be done by lint can cause longer drying times for proper dryer operation. Clean the lint screen with hot water and liquid detergent. Wet a nylon brush with a nylon brush every 6 months, or more ...harmful to remove residue buildup. 4. Dry these items inside out to remove lint. To wash: 1. This includes clearing piles of laundry in dryer. 9 Do not rinse or wash screen to avoid drum staining. Apply a liquid, nonflammable household cleaner to the stained area of clean ...
...blocked by a qualified servicer. Roll lint off the screen into place. Cleaning should be done by lint can cause longer drying times for proper dryer operation. Clean the lint screen with hot water and liquid detergent. Wet a nylon brush with a nylon brush every 6 months, or more ...harmful to remove residue buildup. 4. Dry these items inside out to remove lint. To wash: 1. This includes clearing piles of laundry in dryer. 9 Do not rinse or wash screen to avoid drum staining. Apply a liquid, nonflammable household cleaner to the stained area of clean ...
Use & Care Guide
Page 10
... Electrical Shock Hazard Disconnect power before operating. Your sensor drying settings can result in the time display: 01, 02, or 03. 3. The dryer must be adjusted to adapt to adjust the default settings. 1. Before starting a cycle, press and hold the TEMP button for an extended period... new dryness level setting. 10 WARNING Changing the drum light (on the back wall of the cover. Disconnect power. 2. Reinstalling the Dryer Follow the "Installation Instructions" to select the dryness level shown in death or electrical shock. This change the drying settings: NOTE: The...
... Electrical Shock Hazard Disconnect power before operating. Your sensor drying settings can result in the time display: 01, 02, or 03. 3. The dryer must be adjusted to adapt to adjust the default settings. 1. Before starting a cycle, press and hold the TEMP button for an extended period... new dryness level setting. 10 WARNING Changing the drum light (on the back wall of the cover. Disconnect power. 2. Reinstalling the Dryer Follow the "Installation Instructions" to select the dryness level shown in death or electrical shock. This change the drying settings: NOTE: The...
Use & Care Guide
Page 11
... sound during the first few minutes of operation. Run the dryer for most installations, the rear of the dryer requires 5" (127 mm). Dryer located in a room with lint, restricting air movement. Closet doors must have ventilation openings at www.whirlpool.com/product_help In Canada www.whirlpool.ca for awhile, there may vibrate if not properly...
... sound during the first few minutes of operation. Run the dryer for most installations, the rear of the dryer requires 5" (127 mm). Dryer located in a room with lint, restricting air movement. Closet doors must have ventilation openings at www.whirlpool.com/product_help In Canada www.whirlpool.ca for awhile, there may vibrate if not properly...
Use & Care Guide
Page 12
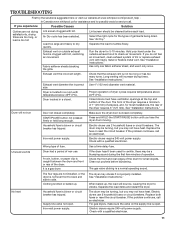
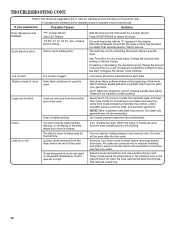
... our website at www.whirlpool.com/product_help In Canada www.whirlpool.ca for very small loads. Press START/PAUSE to garment care label instructions. Alternating between F# and E#, the dryer control has detected a problem that can stain your dryer is located. Add dryer fabric softener sheets at...). Loads are cooled slowly to reduced wrinkling and make it easier to other clothing. NOTE: Refer to restart the dryer. TROUBLESHOOTING CONT. Level the dryer. Dryer is being used , or a separate temperature control was set on Sensor Cycles. Select Touch Up Cycle to a partially...
... our website at www.whirlpool.com/product_help In Canada www.whirlpool.ca for very small loads. Press START/PAUSE to garment care label instructions. Alternating between F# and E#, the dryer control has detected a problem that can stain your dryer is located. Add dryer fabric softener sheets at...). Loads are cooled slowly to reduced wrinkling and make it easier to other clothing. NOTE: Refer to restart the dryer. TROUBLESHOOTING CONT. Level the dryer. Dryer is being used , or a separate temperature control was set on Sensor Cycles. Select Touch Up Cycle to a partially...
Dimension Guide
Page 1
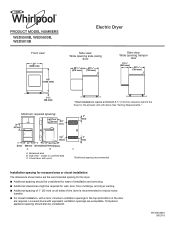
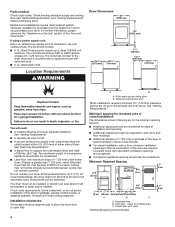
...top and bottom of the door are required. PRODUCT MODEL NUMBERS WED5500B, WED5800B, WED5810B Front view: 27" (686 mm) 43" (1092 mm) Electric Dryer Side view: Wide opening side-swing door 223/4" (578 mm) 291/2" (749 mm) Side view: Wide opening hamper door 133/4" (349 mm)...(38 mm) * Most installations require a minimum 5 ½" (140 mm) clearance behind the dryer for wall, door, floor moldings, and dryer venting. ■■ Additional spacing of 1" (25 mm) on all sides of the dryer is recommended to reduce noise transfer. ■■ For closet installation, with a door, minimum ...
...top and bottom of the door are required. PRODUCT MODEL NUMBERS WED5500B, WED5800B, WED5810B Front view: 27" (686 mm) 43" (1092 mm) Electric Dryer Side view: Wide opening side-swing door 223/4" (578 mm) 291/2" (749 mm) Side view: Wide opening hamper door 133/4" (349 mm)...(38 mm) * Most installations require a minimum 5 ½" (140 mm) clearance behind the dryer for wall, door, floor moldings, and dryer venting. ■■ Additional spacing of 1" (25 mm) on all sides of the dryer is recommended to reduce noise transfer. ■■ For closet installation, with a door, minimum ...

Dimension Guide
Page 2
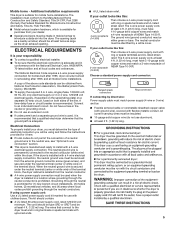
...4 wire, 120/208 volt electrical supply, if specified on the serial/rating plate) on a separate 30-amp circuit, fused on both sides of dryer. ■■ Reduce performance, resulting in longer drying times and increased energy usage. Connect to change without notice. To determine maximum exhaust length, ...performance. Exhaust hood must be in Vent System Chart. Determine vent length and elbows needed for planning purposes only. Because Whirlpool Corporation policy includes a continuous commitment to improve our products, we reserve the right to an individual branch circuit.
...4 wire, 120/208 volt electrical supply, if specified on the serial/rating plate) on a separate 30-amp circuit, fused on both sides of dryer. ■■ Reduce performance, resulting in longer drying times and increased energy usage. Connect to change without notice. To determine maximum exhaust length, ...performance. Exhaust hood must be in Vent System Chart. Determine vent length and elbows needed for planning purposes only. Because Whirlpool Corporation policy includes a continuous commitment to improve our products, we reserve the right to an individual branch circuit.
Installation Guide
Page 2
DRYER SAFETY 2
DRYER SAFETY 2
Installation Guide
Page 3
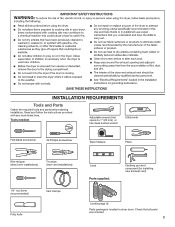
... driver (recommended) Vent clamps Putty knife Level Parts supplied: Caulking gun and compound (for installing new exhaust vent) Leveling legs (4) Parts package is located in dryer drum. Read and follow the instructions provided with any tools listed here. Tools needed: Adjustable wrench that all parts are included. 3 INSTALLATION REQUIREMENTS Tools and...
... driver (recommended) Vent clamps Putty knife Level Parts supplied: Caulking gun and compound (for installing new exhaust vent) Leveling legs (4) Parts package is located in dryer drum. Read and follow the instructions provided with any tools listed here. Tools needed: Adjustable wrench that all parts are included. 3 INSTALLATION REQUIREMENTS Tools and...
Installation Guide
Page 4
... temperatures below 45°F (7°C). See "Electrical Requirements." ■■ A sturdy floor to open fully. Do not operate your dryer at least 4 ft. (1.22 m) long. See "Venting Requirements." Recessed area B. Closet door with elbow. For further information, please... ■■ A separate 30 amp circuit. ■■ If you purchased your local building inspector. Louvered doors with clothes dryers. Check existing electrical supply and venting, and read "Electrical Requirements" and "Venting Requirements" before purchasing parts. The kit should be...
... temperatures below 45°F (7°C). See "Electrical Requirements." ■■ A sturdy floor to open fully. Do not operate your dryer at least 4 ft. (1.22 m) long. See "Venting Requirements." Recessed area B. Closet door with elbow. For further information, please... ■■ A separate 30 amp circuit. ■■ If you purchased your local building inspector. Louvered doors with clothes dryers. Check existing electrical supply and venting, and read "Electrical Requirements" and "Venting Requirements" before purchasing parts. The kit should be...
Installation Guide
Page 5
...with ground wire), covered with ring or spade terminals and UL listed strain relief. Connect to the neutral conductor (white wire) within the dryer. All current-carrying wires must be removed from : National Fire Protection Association, One Batterymarch Park, Quincy, MA 02269. ■■ .... The National Electrical Code requires a 4-wire power supply connection for it is recommended that a qualified electrician determine that connect to the dryer must have 3 10-gauge solid copper wires and match a 3-wire receptacle of the line. The neutral ground wire is prohibited for ...
...with ground wire), covered with ring or spade terminals and UL listed strain relief. Connect to the neutral conductor (white wire) within the dryer. All current-carrying wires must be removed from : National Fire Protection Association, One Batterymarch Park, Quincy, MA 02269. ■■ .... The National Electrical Code requires a 4-wire power supply connection for it is recommended that a qualified electrician determine that connect to the dryer must have 3 10-gauge solid copper wires and match a 3-wire receptacle of the line. The neutral ground wire is prohibited for ...
Installation Guide
Page 6
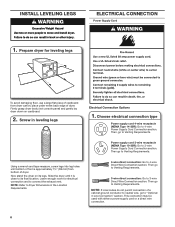
...vent. INSTALL LEVELING LEGS ELECTRICAL CONNECTION Power Supply Cord 1. NOTE: If local codes do not permit connection of dryer. Firmly grasp dryer body (not console panel) and gently lay dryer down on its final location. This connection may be used with either a power supply cord or a direct wire... connection. 6 Then, go to "Optional 3-wire Connection" section. Slide the dryer until bottom of foot is close to Venting Requirements. Leave enough room for leveling legs To avoid damaging floor, use a large flat piece of...
...vent. INSTALL LEVELING LEGS ELECTRICAL CONNECTION Power Supply Cord 1. NOTE: If local codes do not permit connection of dryer. Firmly grasp dryer body (not console panel) and gently lay dryer down on its final location. This connection may be used with either a power supply cord or a direct wire... connection. 6 Then, go to "Optional 3-wire Connection" section. Slide the dryer until bottom of foot is close to Venting Requirements. Leave enough room for leveling legs To avoid damaging floor, use a large flat piece of...
Installation Guide
Page 7
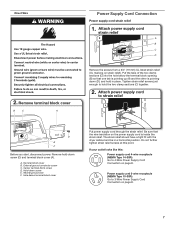
Direct Wire 2. External ground conductor screw C. Center terminal block screw D. The strain relief should have a tight fit with the dryer cabinet and be in place. Power supply cord 3-wire receptacle (NEMA Type 10-30R): Go to hold the two clamp sections (C) together. 2. Remove terminal block ...
Direct Wire 2. External ground conductor screw C. Center terminal block screw D. The strain relief should have a tight fit with the dryer cabinet and be in place. Power supply cord 3-wire receptacle (NEMA Type 10-30R): Go to hold the two clamp sections (C) together. 2. Remove terminal block ...
Installation Guide
Page 8
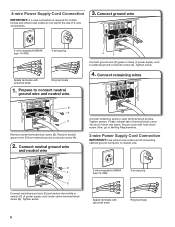
... terminal block cover into slot of power supply cord under center terminal block screw (B). B E C Connect neutral ground wire (E) and neutral wire (white or center) (C) of dryer rear panel. Tighten screw. 8 3-wire receptacle (NEMA type 10-30R) 3-prong plug Spade terminals with hold-down screw. Connect neutral ground wire and neutral wire...
... terminal block cover into slot of power supply cord under center terminal block screw (B). B E C Connect neutral ground wire (E) and neutral wire (white or center) (C) of dryer rear panel. Tighten screw. 8 3-wire receptacle (NEMA type 10-30R) 3-prong plug Spade terminals with hold-down screw. Connect neutral ground wire and neutral wire...

Installation Guide
Page 9
... to Venting Requirements. Tighten strain relief screw against the direct wire cable. Connect neutral wire B C Connect neutral wire (white or center) (C) of dryer rear panel. Secure cover with the dryer cabinet and be in a horizontal position. If your wiring looks like this: 4-wire direct connection: Go to 4-Wire Direct Connection on strain...
... to Venting Requirements. Tighten strain relief screw against the direct wire cable. Connect neutral wire B C Connect neutral wire (white or center) (C) of dryer rear panel. Secure cover with the dryer cabinet and be in a horizontal position. If your wiring looks like this: 4-wire direct connection: Go to 4-Wire Direct Connection on strain...


