Owners Manual
Page 1
...need to reduce the chance of injury, and tell you don't immediately follow the safety alert symbol and either the word "DANGER" or "WARNING." ® DRYER USER INSTRUCTIONS INSTRUCTIONS POUR L'UTILISATEUR DE LA SÉCHEUSE Table of Contents DRYER SAFETY 1 CONTROL PANEL 4 CYCLE GUIDE 5 DRYER USE 6 DRYER CARE 7 TROUBLESHOOTING 9 WARRANTY 11 ASSISTANCE OR SERVICE Back Cover... to know your complete model number and serial number. All safety messages will tell you what can find this manual and on the model and serial number label, located at the top inside dryer door well.
...need to reduce the chance of injury, and tell you don't immediately follow the safety alert symbol and either the word "DANGER" or "WARNING." ® DRYER USER INSTRUCTIONS INSTRUCTIONS POUR L'UTILISATEUR DE LA SÉCHEUSE Table of Contents DRYER SAFETY 1 CONTROL PANEL 4 CYCLE GUIDE 5 DRYER USE 6 DRYER CARE 7 TROUBLESHOOTING 9 WARRANTY 11 ASSISTANCE OR SERVICE Back Cover... to know your complete model number and serial number. All safety messages will tell you what can find this manual and on the model and serial number label, located at the top inside dryer door well.
Owners Manual
Page 3
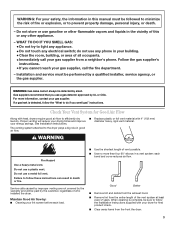
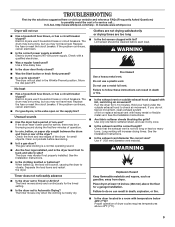
... do not use any electrical switch; Service calls caused by improper venting are not covered by the warranty and will reduce your drying times and improve your gas supplier. each load. ■■ Use the shortest length of all occupants. • Immediately call the fire department. - For more than four 90° elbows in a vent system; Check Your Vent System for Good Air Flow Along with your lint screen before...
... do not use any electrical switch; Service calls caused by improper venting are not covered by the warranty and will reduce your drying times and improve your gas supplier. each load. ■■ Use the shortest length of all occupants. • Immediately call the fire department. - For more than four 90° elbows in a vent system; Check Your Vent System for Good Air Flow Along with your lint screen before...
Owners Manual
Page 4
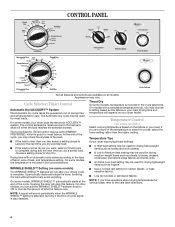
... ENERGY PREFERRED, which is drier than the higher setting. Opening the door will sound periodically when the WRINKLE SHIELD™ setting is also selected. 4 On models with an automatic cycle varies according to the care label directions. Temperature Tips If your load. The Automatic Dry cycle may be used for drying medium-weight items such as towels and work clothes. ■■ A Low to Very Dry. The Cycle Selector (Timer) control may choose a setting...
... ENERGY PREFERRED, which is drier than the higher setting. Opening the door will sound periodically when the WRINKLE SHIELD™ setting is also selected. 4 On models with an automatic cycle varies according to the care label directions. Temperature Tips If your load. The Automatic Dry cycle may be used for drying medium-weight items such as towels and work clothes. ■■ A Low to Very Dry. The Cycle Selector (Timer) control may choose a setting...
Owners Manual
Page 5
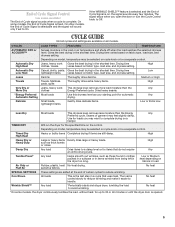
... Fluff Air Rubber, plastic, heat No-heat drying. Seams of Cycle Signal is cooled slowly to reduce wrinkling and make it easier to avoid wrinkling. sensitive fabrics No heat SPECIAL SETTINGS These settings are still damp. The load is fixed. Drying time varies based on the control. TIMED DRY Will run the dryer for automatic Any drying. On some models, the End of garment may be a separate control. No heat Wrinkle Shield™ Any load *Periodically starts...
... Fluff Air Rubber, plastic, heat No-heat drying. Seams of Cycle Signal is cooled slowly to reduce wrinkling and make it easier to avoid wrinkling. sensitive fabrics No heat SPECIAL SETTINGS These settings are still damp. The load is fixed. Drying time varies based on the control. TIMED DRY Will run the dryer for automatic Any drying. On some models, the End of garment may be a separate control. No heat Wrinkle Shield™ Any load *Periodically starts...
Owners Manual
Page 6
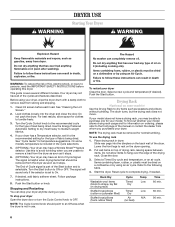
... your dryer Open the dryer door or turn the Cycle Control knob to remove a load from the dryer as soon as it (even after washing). Push the Start button. Place drying rack in use the drying rack 1. Close the door. 3. Clean lint screen before operating this to avoid wrinkling when you are unable to OFF. Do not pack the dryer. If your dryer has a Temperature selector, set to the recommended setting for the type of the Start button and is part of...
... your dryer Open the dryer door or turn the Cycle Control knob to remove a load from the dryer as soon as it (even after washing). Push the Start button. Place drying rack in use the drying rack 1. Close the door. 3. Clean lint screen before operating this to avoid wrinkling when you are unable to OFF. Do not pack the dryer. If your dryer has a Temperature selector, set to the recommended setting for the type of the Start button and is part of...
Owners Manual
Page 7
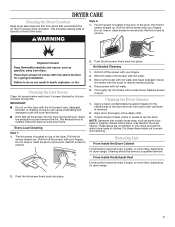
... dryer air exits your fingers. Do not rinse or wash screen to dry the drum. Wet lint is hard to remove residue buildup. 4. Rinse screen with the brush to remove. 2. Replace screen in the door of the dryer. NOTE: Garments that would block the air flow for proper dryer operation. From Inside the Exhaust Vent Lint should be removed every 2 years, or more often, depending on dryer usage. DRYER CARE Cleaning the Dryer Location Keep dryer area clear and free...
... dryer air exits your fingers. Do not rinse or wash screen to dry the drum. Wet lint is hard to remove residue buildup. 4. Rinse screen with the brush to remove. 2. Replace screen in the door of the dryer. NOTE: Garments that would block the air flow for proper dryer operation. From Inside the Exhaust Vent Lint should be removed every 2 years, or more often, depending on dryer usage. DRYER CARE Cleaning the Dryer Location Keep dryer area clear and free...
Owners Manual
Page 8
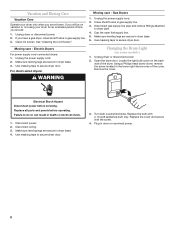
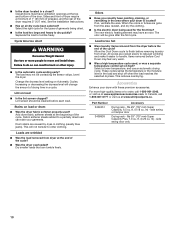
... shutoff valve in gas supply line. 3. Cap the open fuel supply line. 5. Make sure leveling legs are secure in dryer base. 3. Use masking tape to secure dryer door. 3. Locate the light bulb cover on some models) 1. WARNING Electrical Shock Hazard Disconnect power before operating. Use masking tape to secure dryer door. If you have a gas dryer, close shutoff valve in gas supply line. 3. Replace all parts and panels before servicing. Plug in the lower right-hand corner of the cover. Gas Dryers 1. For direct-wired dryers: Changing the Drum Light...
... shutoff valve in gas supply line. 3. Cap the open fuel supply line. 5. Make sure leveling legs are secure in dryer base. 3. Use masking tape to secure dryer door. 3. Locate the light bulb cover on some models) 1. WARNING Electrical Shock Hazard Disconnect power before operating. Use masking tape to secure dryer door. If you have a gas dryer, close shutoff valve in gas supply line. 3. Replace all parts and panels before servicing. Plug in the lower right-hand corner of the cover. Gas Dryers 1. For direct-wired dryers: Changing the Drum Light...
Owners Manual
Page 9
... drying times. Electric dryers require 240-volt power supply. The dryer will bounce, causing the dryer to side? Run the dryer for the timed setting. ■■ Is the dryer set to Timed or Air Dry? If the problem continues, call an electrician. ■■ For gas dryers, is not too long or has too many turns. Do not use 2 household fuses or circuit breakers. http://www.whirlpool.com/help - Check the front and rear edges of non-use it a gas dryer? Lint screen...
... drying times. Electric dryers require 240-volt power supply. The dryer will bounce, causing the dryer to side? Run the dryer for the timed setting. ■■ Is the dryer set to Timed or Air Dry? If the problem continues, call an electrician. ■■ For gas dryers, is not too long or has too many turns. Do not use 2 household fuses or circuit breakers. http://www.whirlpool.com/help - Check the front and rear edges of non-use it a gas dryer? Lint screen...
Owners Manual
Page 10
... used ? Change the dryness level setting on load ■■ Is the lint screen clogged? Stains on high? The new electric heating element may have ventilation openings at www.applianceaccessories.com. Select a lower temperature, and use an automatic drying cycle. m) - side swing door only 10 Sides and front of dryer require a minimum of 1" (25 mm) of airspace, and the rear of the cycle. Fabric softener sheets added to move and install dryer. Load...
... used ? Change the dryness level setting on load ■■ Is the lint screen clogged? Stains on high? The new electric heating element may have ventilation openings at www.applianceaccessories.com. Select a lower temperature, and use an automatic drying cycle. m) - side swing door only 10 Sides and front of dryer require a minimum of 1" (25 mm) of airspace, and the rear of the cycle. Fabric softener sheets added to move and install dryer. Load...
Owners Manual
Page 11
... resolve the problem after checking "Troubleshooting," additional help you obtain assistance or service if you . Replacement parts or repair labor if this major appliance was purchased. Repairs to parts or systems resulting from warranty coverage. 4. Consumable parts are unable to province. If you think you are excluded from unauthorized modifications made to published user or operator instructions and/or installation instructions. 2. Dealer name Address Phone number Model number Serial number Purchase...
... resolve the problem after checking "Troubleshooting," additional help you obtain assistance or service if you . Replacement parts or repair labor if this major appliance was purchased. Repairs to parts or systems resulting from warranty coverage. 4. Consumable parts are unable to province. If you think you are excluded from unauthorized modifications made to published user or operator instructions and/or installation instructions. 2. Dealer name Address Phone number Model number Serial number Purchase...
Installation Instructions
Page 1
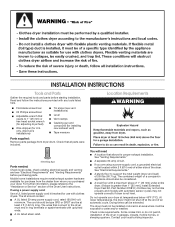
Canada 5 Electrical Connection - Tenga listo su número de modelo completo. We have provided many important safety messages in this manual and on your appliance. W10150612B WARNING You can be killed or seriously injured if you don't follow instructions. Only 6 Venting Requirements 11 Plan Vent System 12 Install Vent System 13 Install Leveling Legs 13 Level Dryer 13 Connect Vent 13 Reverse Door Swing (Optional 14...
Canada 5 Electrical Connection - Tenga listo su número de modelo completo. We have provided many important safety messages in this manual and on your appliance. W10150612B WARNING You can be killed or seriously injured if you don't follow instructions. Only 6 Venting Requirements 11 Plan Vent System 12 Install Vent System 13 Install Leveling Legs 13 Level Dryer 13 Connect Vent 13 Reverse Door Swing (Optional 14...
Installation Instructions
Page 2
... legs Parts needed: Check local codes, check existing electrical supply and venting and see "Electrical Requirements" and "Venting Requirements" before starting installation. Check that opens to water and/or weather. The kit should also be at the end of an automatic cycle. See "Venting Requirements." Check code requirements. Read and follow the instructions provided with clothes dryers. For further information, please reference the "Assistance or Service" section of 200 lbs (90.7 kg). If using a power supply cord, a grounded electrical outlet located within 2 ft...
... legs Parts needed: Check local codes, check existing electrical supply and venting and see "Electrical Requirements" and "Venting Requirements" before starting installation. Check that opens to water and/or weather. The kit should also be at the end of an automatic cycle. See "Venting Requirements." Check code requirements. Read and follow the instructions provided with clothes dryers. For further information, please reference the "Assistance or Service" section of 200 lbs (90.7 kg). If using a power supply cord, a grounded electrical outlet located within 2 ft...

Installation Instructions
Page 4
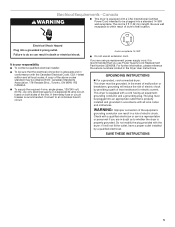
... bare. Check with a 3-wire electrical supply connection. If using and follow the instructions provided for electric current. If connecting by providing a path of least resistance for it will reduce the risk of electric shock by direct wire: Power supply cable must match power supply (4-wire or 3-wire) and be using a power supply cord: Use a UL listed power supply cord kit marked for (1) new branch-circuit installations, (2) mobile homes, (3) recreational vehicles, and (4) areas where local codes prohibit...
... bare. Check with a 3-wire electrical supply connection. If using and follow the instructions provided for electric current. If connecting by providing a path of least resistance for it will reduce the risk of electric shock by direct wire: Power supply cable must match power supply (4-wire or 3-wire) and be using a power supply cord: Use a UL listed power supply cord kit marked for (1) new branch-circuit installations, (2) mobile homes, (3) recreational vehicles, and (4) areas where local codes prohibit...
Installation Instructions
Page 5
... resistance for electric current. Electrical Requirements - Connect to do so can result in the Dryer User Instructions. Failure to an individual branch circuit. 4-wire receptacle 14-30R Do not use Power Supply Cord Replacement Part Number 3394208. Be sure wall receptacle is equipped with the dryer: if it is properly grounded. In the event of malfunction or breakdown, grounding will not fit the outlet, have a proper outlet installed by...
... resistance for electric current. Electrical Requirements - Connect to do so can result in the Dryer User Instructions. Failure to an individual branch circuit. 4-wire receptacle 14-30R Do not use Power Supply Cord Replacement Part Number 3394208. Be sure wall receptacle is equipped with the dryer: if it is properly grounded. In the event of malfunction or breakdown, grounding will not fit the outlet, have a proper outlet installed by...

Installation Instructions
Page 8
... wires to "Venting Requirements." C E D A. Dotted line shows position of dryer rear panel. Center silver-colored terminal block screw C. Neutral ground wire 3. Tighten screw. Shape ends of wires into slot of NEUTRAL ground wire before being moved to external ground conductor screw. 1. Connect neutral ground wire and the neutral wire (white or center wire) of power supply cord under the center screw of extra length so dryer can be moved if needed...
... wires to "Venting Requirements." C E D A. Dotted line shows position of dryer rear panel. Center silver-colored terminal block screw C. Neutral ground wire 3. Tighten screw. Shape ends of wires into slot of NEUTRAL ground wire before being moved to external ground conductor screw. 1. Connect neutral ground wire and the neutral wire (white or center wire) of power supply cord under the center screw of extra length so dryer can be moved if needed...

Installation Instructions
Page 9
... dryer rear panel. Neutral (white or center wire) E A A. Center silver-colored terminal block screw D. Direct wire cable must have completed your electrical connections. Loosen or remove center silver-colored terminal block screw. 2. Neutral ground wire 4. Tighten strain relief screws. 6. Now go to "Venting Requirements." 3-wire connection: Direct Wire Use where local codes permit connecting cabinet-ground conductor to the center, silver-colored terminal screw of cable. Insert tab of terminal block cover into slot of extra length so dryer...
... dryer rear panel. Neutral (white or center wire) E A A. Center silver-colored terminal block screw D. Direct wire cable must have completed your electrical connections. Loosen or remove center silver-colored terminal block screw. 2. Neutral ground wire 4. Tighten strain relief screws. 6. Now go to "Venting Requirements." 3-wire connection: Direct Wire Use where local codes permit connecting cabinet-ground conductor to the center, silver-colored terminal screw of cable. Insert tab of terminal block cover into slot of extra length so dryer...

Installation Instructions
Page 10
... center, silver-colored terminal block screw. Tighten screw. Connect neutral ground wire and the neutral wire (white or center wire) of the other wires to "Venting Requirements." Tighten screw. Place the hooked ends of power supply cord/cable under the center screw of dryer rear panel. Squeeze hooked ends together. Now go to outer terminal block screws. Neutral wire (white or center wire) E. ¾" (19 mm) UL listed strain relief F. A BC...
... center, silver-colored terminal block screw. Tighten screw. Connect neutral ground wire and the neutral wire (white or center wire) of the other wires to "Venting Requirements." Tighten screw. Place the hooked ends of power supply cord/cable under the center screw of dryer rear panel. Squeeze hooked ends together. Now go to outer terminal block screws. Neutral wire (white or center wire) E. ¾" (19 mm) UL listed strain relief F. A BC...
Installation Instructions
Page 11
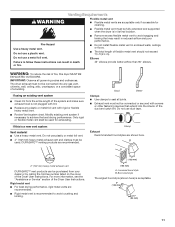
... Vent material Use a heavy metal vent. If this dryer MUST BE EXHAUSTED OUTDOORS. B A 4" 102 mm 4" (102 mm) heavy metal exhaust vent DURASAFE™ vent products can result in its final location. Rigid metal vent is acceptable. 4" (102 mm) 2½" (64 mm) 11 The total length of the Dryer User Instructions. Replace any gas vent, chimney, wall, ceiling, attic, crawlspace, or a concealed space of fire, this is not plugged...
... Vent material Use a heavy metal vent. If this dryer MUST BE EXHAUSTED OUTDOORS. B A 4" 102 mm 4" (102 mm) heavy metal exhaust vent DURASAFE™ vent products can result in its final location. Rigid metal vent is acceptable. 4" (102 mm) 2½" (64 mm) 11 The total length of the Dryer User Instructions. Replace any gas vent, chimney, wall, ceiling, attic, crawlspace, or a concealed space of fire, this is not plugged...
Installation Instructions
Page 13
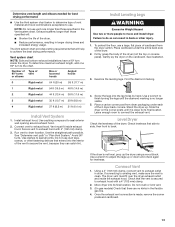
... (6.4 m) Install Vent System 1. Install exhaust hood. Run vent to seal all joints. Screw the legs into its final location. If the dryer is clean. Connect Vent 1. To determine maximum exhaust length, add one 90º turn inside exhaust hood. Use the straightest path possible. Use clamps to dryer location. Place cardboard under each of the dryer (not the top or console panel). See illustration. 3. See "Determine vent path" in longer drying times and increased energy...
... (6.4 m) Install Vent System 1. Install exhaust hood. Run vent to seal all joints. Screw the legs into its final location. If the dryer is clean. Connect Vent 1. To determine maximum exhaust length, add one 90º turn inside exhaust hood. Use the straightest path possible. Use clamps to dryer location. Place cardboard under each of the dryer (not the top or console panel). See illustration. 3. See "Determine vent path" in longer drying times and increased energy...
Installation Instructions
Page 15
... the heating element is first heated. Check that both fuses are now installed. See "Level Dryer." 6. Wipe the dryer drum interior thoroughly with a damp cloth to see which step was skipped. 10. There may notice an odor when the dryer is first used. Read "Dryer Use" in a running for 5 minutes, open the dryer door and feel for heat. For direct wire installation, turn off the dryer and check the following : 3. Set the dryer on a full heat cycle (not an air cycle...
... the heating element is first heated. Check that both fuses are now installed. See "Level Dryer." 6. Wipe the dryer drum interior thoroughly with a damp cloth to see which step was skipped. 10. There may notice an odor when the dryer is first used. Read "Dryer Use" in a running for 5 minutes, open the dryer door and feel for heat. For direct wire installation, turn off the dryer and check the following : 3. Set the dryer on a full heat cycle (not an air cycle...


