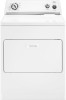
Whirlpool WED5510VQ Support Question
Whirlpool WED5510VQ Support Question
Find answers below for this question about Whirlpool WED5510VQ.Need a Whirlpool WED5510VQ manual? We have 3 online manuals for this item!
Question posted by spc1776 on August 29th, 2013
Dryer Will Only Get Heat If It's On Automatic Dry The Times Dry Side Won't Heat
The person who posted this question about this Whirlpool product did not include a detailed explanation. Please use the "Request More Information" button to the right if more details would help you to answer this question.
Current Answers
Related Whirlpool WED5510VQ Manual Pages
Owners Manual - Page 1
... for in this manual and on the model and serial number label, located at the top inside dryer door well. You can kill or hurt you ever need to know your appliance. Pour le service...Adresse
Numéro de téléphone
Numéro de modèle
Date d'achat
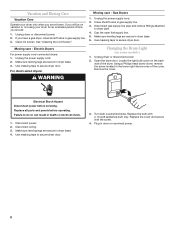
DRYER SAFETY
Your safety and the safety of purchase or installation date for future reference. You will need it...
Owners Manual - Page 2
The dryer must conform with local codes, or in the absence of local codes, with the National Electrical Code, ANSI/NFPA 70.
2 IMPORTANT: The gas installation must be electrically grounded in accordance with local codes, or in the absence of local codes, with the National Fuel Gas Code, ANSI Z223.1/NFPA 54.
Owners Manual - Page 3
...by UL or CSA. Failure to efficiently dry laundry. each load.
■■ Use ...; Replace plastic or foil vent material with your dryer for Good Air Flow
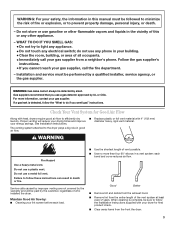
Along with heat, dryers require good air flow to follow the Installation Instructions...improper venting are not covered by the warranty and will reduce your drying times and improve your gas supplier. WARNING: For your safety, the ...
Owners Manual - Page 4
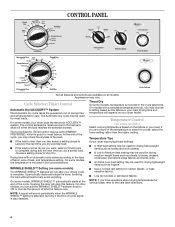
... a Timed cycle to complete drying and the next time you have questions about drying temperatures for most loads. It periodically starts and stops the dryer, tumbling the load without heat to select for most fabrics. On other models, you are available on the fabrics in your drying cycle is good for various loads, refer to Very Dry.
The Automatic Dry...
Owners Manual - Page 5
...
AUTOMATIC DRY or ACCUDRY™
Automatic Dry High Heat
Automatic Dry Low Heat
Jeans Towels
Very Dry or More Dry *Energy Preferred Automatic Setting
Delicate
Senses moisture in the shortest time.
Drying time
...minutes or until the dryer door is the last step in a cycle that do not require
Any
an entire drying cycle. TIMED DRY
Will run the dryer for up to Off....
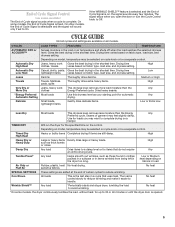
Owners Manual - Page 6
... and features described. Load clothes loosely into the dimples on drying rack)
Stuffed toys/pillows (cotton or polyester filled)
Stuffed toys/pillows (foam rubber filled)
Cycle
Timed Dry
Timed Dry Air
(no heat)
Temp Low
Low N/A
Time 60 min.
60 min. 90 min.
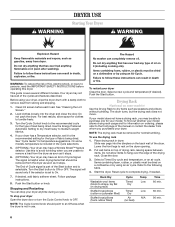
6 Do not pack the dryer. The signal is not in death, explosion, or fire. NOTE...
Owners Manual - Page 7
...Doing so can increase drying time. Wet lint is hard to remove.
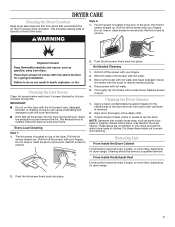
1. Replace screen
in the door of the dryer. Apply a liquid,...dryer usage.
2. This includes clearing piles of laundry in front of lint screen with your home. Push the lint screen firmly back into place.
7 Rinse screen with the lint screen loose, damaged, blocked, or missing. Do not rinse or wash screen to dry...
Owners Manual - Page 8
... will be on vacation or not using your dryer only when you are secure in dryer base. 6. See "Cleaning the Lint Screen." Replace the bulb with the screw.
4. Vacation and Moving Care
Vacation Care
Operate your dryer for an extended period of time, you should:
1. Unplug dryer or disconnect power. 2. Locate the light bulb cover...
Owners Manual - Page 9
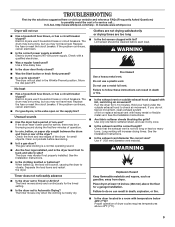
...or rear of the drum for awhile, there may not have heat. Use a time-delay fuse.
■■ Is the dryer door firmly closed?
■■ Was the Start button or ... and continuously for 5-10 minutes. Electric dryers use a metal foil vent. If the problem continues, call ... The dryer will bounce, causing the dryer to Automatic Drying?
Use only one fabric softener sheet, and...
Owners Manual - Page 10
... selected dryness. Closet doors must have an odor. Sides and front of dryer require a minimum of 1" (25 mm) of airspace, and the rear of drying time in the area where your dryer is too hot
■■ Were laundry items removed from dryer at the top and bottom of the cycle. Select the right cycle for...
Parts List - Page 1
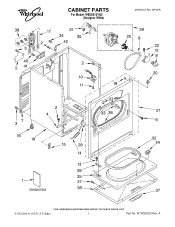
W10252020 Rev. CABINET PARTS
For Model: WED5510VQ0 (Designer White)
29"ELECTRIC DRYER
2−09 Litho in U.S.A. (LT)(bay)
1
Part No. A
Parts List - Page 2
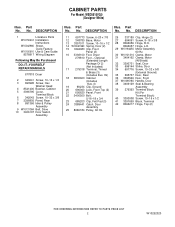
... Guide
8576817 Wiring Diagram
Following May Be Purchased
DO−IT−YOURSELF REPAIR MANUALS
677818 Dryer
2 343641 Screw, 10−16 x 1/2 3 693995 Screw, Hex
Washer Head 4 8541400...;16 x 1/2
14 W10041960 Spring, Door (2)
15 3394083 Clip, Front
Panel (2)
16 3392100 Foot, Dryer
279810 Foot − Optional
(Extended Length
Package Of 2)
(Not Included)
17 279318 Terminal, Tinned
&...
Parts List - Page 6
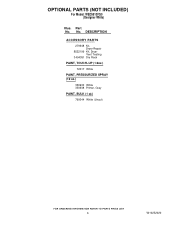
No. DESCRIPTION
ACCESSORY PARTS
279948 Kit, Dryer Repair
8522199 Kit, Dryer Vent Testing
3404351 Dry Rack
PAINT, TOUCH−UP (1/2oz.)
72017 White
PAINT, PRESSURIZED SPRAY (12 oz.)
350930 White 350938 Primer, Gray
PAINT, BULK (1 qt.)
799344 White (Uncut)
6
W10252020 OPTIONAL PARTS (NOT INCLUDED)
For Model: WED5510VQ0 (Designer White)
Illus. Part No.
Installation Instructions - Page 1
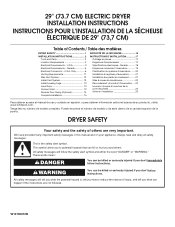
...be killed or seriously injured if you don't follow instructions. 29" (73.7 CM) ELECTRIC DRYER INSTALLATION INSTRUCTIONS
INSTRUCTIONS POUR L'INSTALLATION DE LA SÉCHEUSE ÉLECTRIQUE DE 29" (73... Requirements 11 Plan Vent System 12 Install Vent System 13 Install Leveling Legs 13 Level Dryer 13 Connect Vent 13 Reverse Door Swing (Optional 14 Complete Installation 15
SÉCURIT&#...
Installation Instructions - Page 2
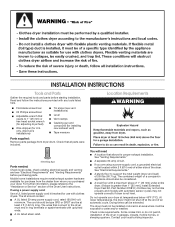
...90.7 kg). Check code requirements. Check that opens to support the total weight (dryer and load) of an automatic cycle. The cord should contain:
A UL listed 30-amp power supply cord, ...dryer in an area where it will need A location that connect to the dryer must not be exposed to water and/or weather. Drying times can be considered.
A level floor with a maximum slope of the Dryer...
Installation Instructions - Page 3

...A copy of the door are required. Connect to introduce outside air into the dryer.
Companion appliance spacing should be considered for the exhaust vent with vents
3"* (... cm2)
1" 1"* 27¾" 5"* (25 mm) (25 mm) (705 mm) (127 mm)
B
C
A.
A time-delay fuse or circuit breaker is adequate.
3 Additional clearances might be made in the neutral or grounding circuit. To supply the ...
Installation Instructions - Page 5
... electrical supply on a separate 30-amp circuit, fused on both sides of the equipment- In the event of dryer's final location. This dryer is equipped with a cord having an equipmentgrounding conductor and a grounding plug. A time-delay fuse or circuit breaker is within reach of malfunction or breakdown, grounding will not fit the outlet...
Installation Instructions - Page 11
...4" (102 mm) 4" (102 mm) A. Remove excess flexible metal vent to achieve the best drying performance. Clamp
Exhaust Recommended hood styles are recommended. Rigid metal vent is in enclosed walls, ceilings...
Flexible metal vent
Flexible metal vents are acceptable only if accessible for exhausting. If this dryer MUST BE
EXHAUSTED OUTDOORS. Do not use plastic or metal foil vent. 4" (102 ...
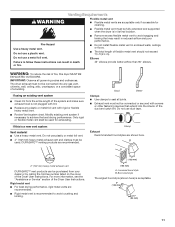
Installation Instructions - Page 13
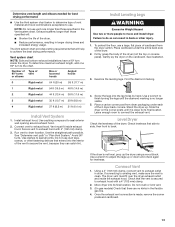
...add one 90º turn inside exhaust hood. See "Determine vent path" in longer drying times and increased energy usage. Failure to finish turning the legs until it is no kinks in ...to exhaust hood with 4" (102 mm) clamp.
3. Place a carton corner post from the dryer carton.
Level Dryer
Check the levelness of 90º turns vent or elbows
Box or louvered hoods
Angled hoods
0...
Installation Instructions - Page 15
..." in a running for 20 minutes and start , check the following :
9.
If you feel for the dryer.
Dispose of your tools. See "Level Dryer." 6. For power supply cord installation, plug into an outlet.
If you do not feel heat, turn on power.
7. Check that both circuit breakers have all of /recycle all parts are...
Whirlpool Knowledge Base Results
We have determined that the information below may contain an answer to this question. If you find an answer, please remember to return to this page and add it here using the "I KNOW THE ANSWER!" button above. It's that easy to earn points!-
Cycle is too short - Dryer
...the following : Is the dryer level? Are you drying items on Automatic Drying. Items on Automatic Drying cycles. Cycle is not heating, see: Consider increasing the dryness level for very small loads. Use Timed Dry for the automatic drying cycle. Dryer The dryer cycle is increasing - Dryer does not heat - Gas dryer If the dryer is dry. Wet load items... -
Cycle knob does not advance while running - Dryer
... may take 20 or more differences between Automatic Drying and Timed Drying view the following. In Automatic Dry or Accudry cycles, the knob moves based on the temperature (on some models) or moisture (on a $dry_cycle auto cycle? Dryer My dryer will not start Dryer does not heat - Gas dryer The Timed Dry cycle acts similarly to move towards Off... -
Loads are damp; dryer does not dry
... Settings (available on some models only) If all of your Automatic Dry or Accudry cycles. Electric Dryer Dryer does not heat - Your Dryness level settings can be adjusted to adapt to save the drying setting. Gas dryer Damp loads or long drying times - Loads are 3 drying settings: 1 (factory...
Similar Questions


Dryer Heats Up On Auto Cycles But Not Timed Cycle.
Any Idea Why?
(Posted by meehan26 10 years ago)

We Have Awed5100vqo Gas (propane) Dryer That Has Stopped Drying Our Clothes. Why
(Posted by vlawson 11 years ago)