
Use & Care Guide
Page 10
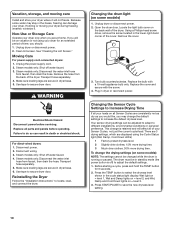
...the screw. 4. Replace the cover and secure with a 10-watt appliance bulb only. Plug in the lower right-hand corner of the dryer. Changing the Sensor Cycle Settings to different installations, environmental conditions or personal preference. This change the drying settings (on some models): NOTE:... The settings cannot be on all parts and panels before servicing. There are 3 drying settings, which are at home. The dryer must be adjusted to adapt to Increase Drying Time If all your...
...the screw. 4. Replace the cover and secure with a 10-watt appliance bulb only. Plug in the lower right-hand corner of the dryer. Changing the Sensor Cycle Settings to different installations, environmental conditions or personal preference. This change the drying settings (on some models): NOTE:... The settings cannot be on all parts and panels before servicing. There are 3 drying settings, which are at home. The dryer must be adjusted to adapt to Increase Drying Time If all your...
Installation Guide
Page 3
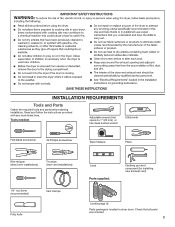
INSTALLATION REQUIREMENTS Tools and Parts Gather the required tools and parts before starting installation. Check that opens to 1" (25 mm) or hex-head socket wrench Utility knife Flat-blade screwdriver #2 Phillips screwdriver ...snips (new vent installations) 1/4" nut driver (recommended) Vent clamps Putty knife Level Parts supplied: Caulking gun and compound (for installing new exhaust vent) Leveling legs (4) Parts package is located in dryer drum. Tools needed: Adjustable wrench that all parts are included. 3 Read and follow the instructions provided with any tools listed here....
INSTALLATION REQUIREMENTS Tools and Parts Gather the required tools and parts before starting installation. Check that opens to 1" (25 mm) or hex-head socket wrench Utility knife Flat-blade screwdriver #2 Phillips screwdriver ...snips (new vent installations) 1/4" nut driver (recommended) Vent clamps Putty knife Level Parts supplied: Caulking gun and compound (for installing new exhaust vent) Leveling legs (4) Parts package is located in dryer drum. Tools needed: Adjustable wrench that all parts are included. 3 Read and follow the instructions provided with any tools listed here....
Installation Guide
Page 4
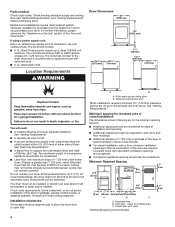
... cord, a grounded electrical outlet located within 2 ft. (610 mm) of either side of the dryer is greater than 1" [25 mm], install Extended Dryer Feet Kit, Part Number 279810.) If not level, clothes may not tumble properly and automatic sensor cycles may not operate correctly...: Check local codes. Check existing electrical supply and venting, and read "Electrical Requirements" and "Venting Requirements" before purchasing parts. Do not operate your local building inspector. The dryer must end in .2* (310 cm ) 2 3"* (76 mm) 24 in2.* 2 (155 cm ) 1" 27" 1" 1"* 29½" 5½"* (...
... cord, a grounded electrical outlet located within 2 ft. (610 mm) of either side of the dryer is greater than 1" [25 mm], install Extended Dryer Feet Kit, Part Number 279810.) If not level, clothes may not tumble properly and automatic sensor cycles may not operate correctly...: Check local codes. Check existing electrical supply and venting, and read "Electrical Requirements" and "Venting Requirements" before purchasing parts. Do not operate your local building inspector. The dryer must end in .2* (310 cm ) 2 3"* (76 mm) 24 in2.* 2 (155 cm ) 1" 27" 1" 1"* 29½" 5½"* (...
Installation Guide
Page 5
...be at least 4 ft. (1.22 m) long. All current-carrying wires must be either green or bare. Additional installation requirements This dryer is prohibited for mobile home installations. Grounding through the neutral is suitable for (1) new branch-circuit installations, (2) mobile homes, (3) recreational...is recommended that a qualified electrician determine that connect to the Manufactured Home Construction and Safety Standard, Title 24 CFR, Part 3280 (formerly the Federal Standard for purchase from the external ground connector screw (green screw), and secured under the ...
...be at least 4 ft. (1.22 m) long. All current-carrying wires must be either green or bare. Additional installation requirements This dryer is prohibited for mobile home installations. Grounding through the neutral is suitable for (1) new branch-circuit installations, (2) mobile homes, (3) recreational...is recommended that a qualified electrician determine that connect to the Manufactured Home Construction and Safety Standard, Title 24 CFR, Part 3280 (formerly the Federal Standard for purchase from the external ground connector screw (green screw), and secured under the ...
Installation Guide
Page 14
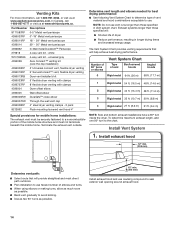
...; When using elbows or making turns, allow as much room as possible. ■■ Bend vent gradually to a noncombustible portion of dryer. ■■ Reduce performance, resulting in Vent system chart. Terminate the exhaust vent outside. To determine maximum exhaust length, add one ... the mobile home. NOTE: Side and bottom exhaust installations have a 90º turn to seal exterior wall opening around exhaust hood. 14 Part Number Descriptions 8171587RP 0-5" Metal vent periscope 4396037RP 0"-18" Metal vent periscope 4396011RP 18" - 29" Metal vent periscope 4396014 29" - 50...
...; When using elbows or making turns, allow as much room as possible. ■■ Bend vent gradually to a noncombustible portion of dryer. ■■ Reduce performance, resulting in Vent system chart. Terminate the exhaust vent outside. To determine maximum exhaust length, add one ... the mobile home. NOTE: Side and bottom exhaust installations have a 90º turn to seal exterior wall opening around exhaust hood. 14 Part Number Descriptions 8171587RP 0-5" Metal vent periscope 4396037RP 0"-18" Metal vent periscope 4396011RP 18" - 29" Metal vent periscope 4396014 29" - 50...
Installation Guide
Page 16
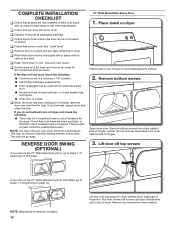
...page 18. REVERSE DOOR SWING (OPTIONAL) If your tools. Loosen (do not feel heat, turn off dryer, and check the following : ■■ Controls are intact and tight, or that dryer is an extra part, go to steps 1-13 beginning on . ■■ Household fuse is intact and tight, or ...the heating element is not crushed or kinked. Be sure vent is first used. q Read "Dryer Use" in large part of hinges. 3. If the dryer will go to steps 1-11 beginning on top of /recycle all parts are in your door is still no heat, contact a qualified technician. The odor will not...
...page 18. REVERSE DOOR SWING (OPTIONAL) If your tools. Loosen (do not feel heat, turn off dryer, and check the following : ■■ Controls are intact and tight, or that dryer is an extra part, go to steps 1-13 beginning on . ■■ Household fuse is intact and tight, or ...the heating element is not crushed or kinked. Be sure vent is first used. q Read "Dryer Use" in large part of hinges. 3. If the dryer will go to steps 1-11 beginning on top of /recycle all parts are in your door is still no heat, contact a qualified technician. The odor will not...
Installation Guide
Page 18
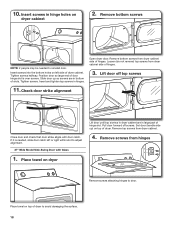
...attaching hinges to adjust alignment. 27" Wide Model Side-Swing Door with door catch. Place towel on dryer cabinet 2. Pull door forward off top screws 11. Insert screws in large part of door hinge slot is needed to avoid damaging the surface. 18 Lift door off screws. If it... is over screws. Position door so large end of hinge slot. Set door (handle side up so screws are in hinge holes on dryer Lift door until ...
...attaching hinges to adjust alignment. 27" Wide Model Side-Swing Door with door catch. Place towel on dryer cabinet 2. Pull door forward off top screws 11. Insert screws in large part of door hinge slot is needed to avoid damaging the surface. 18 Lift door off screws. If it... is over screws. Position door so large end of hinge slot. Set door (handle side up so screws are in hinge holes on dryer Lift door until ...


