
Ventilation Specification
Page 4
... following codes should be met. ANSI Z21.5.1 - UL 2158 Electric Clothes Dryer Standard references venting requirements. 4. Heat In order to remove moisture from the washer. To remove excess heat from laundry area. 3. See the Installation Instructions for the specific dryer model being used for balancing out the overall duct system. ■ Design the central duct system for sufficient capacity to handle the maximum number of dryers operated at one time. ■ Consider moisture, lint and air temperature...
... following codes should be met. ANSI Z21.5.1 - UL 2158 Electric Clothes Dryer Standard references venting requirements. 4. Heat In order to remove moisture from the washer. To remove excess heat from laundry area. 3. See the Installation Instructions for the specific dryer model being used for balancing out the overall duct system. ■ Design the central duct system for sufficient capacity to handle the maximum number of dryers operated at one time. ■ Consider moisture, lint and air temperature...

Ventilation Specification
Page 5
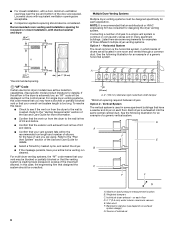
... Installation Instructions included with vents *Required spacing Installation spacing for recessed area or closet The dimensions shown are CSA listed (reference ANSI Z21.5.1 standard). Dryer - Codes Agency Approvals All Whirlpool electric dryer models, including "long vent dryers," Turbo Vent™ dryers and combo washer/dryer units that have an inlet and outlet for an operating forced air HVAC system is 230 CFM. Dryer Closet Installations Closets used for dryer installation must provide multiple openings to allow air to flow through the vent...
... Installation Instructions included with vents *Required spacing Installation spacing for recessed area or closet The dimensions shown are CSA listed (reference ANSI Z21.5.1 standard). Dryer - Codes Agency Approvals All Whirlpool electric dryer models, including "long vent dryers," Turbo Vent™ dryers and combo washer/dryer units that have an inlet and outlet for an operating forced air HVAC system is 230 CFM. Dryer Closet Installations Closets used for dryer installation must provide multiple openings to allow air to flow through the vent...
Ventilation Specification
Page 6
... specifically for recessed or closet installation, with a door, minimum ventilation openings near the top and bottom of the door are using. Recommended room venting and installation spacing for each application. NOTE: It is free of lint and debris. ■ Confirm that an architectural or HVAC engineering firm be considered. Connecting a number of dryers to the "Venting Requirements" section of the Use and Care Guide for details. ■ Select a Timed Dry heated cycle...
... specifically for recessed or closet installation, with a door, minimum ventilation openings near the top and bottom of the door are using. Recommended room venting and installation spacing for each application. NOTE: It is free of lint and debris. ■ Confirm that an architectural or HVAC engineering firm be considered. Connecting a number of dryers to the "Venting Requirements" section of the Use and Care Guide for details. ■ Select a Timed Dry heated cycle...

Use & Care Guide
Page 4
See "Installation Instructions." n Use no more drying time or when using the drying rack. 4 USE ACCUDRY™/AUTOMATIC DRY CYCLES FOR BETTER FABRIC CARE AND ENERGY SAVINGS Use the ACCUDRY™/Automatic Dry cycles to provide the most energy savings and enhanced fabric care from the entire length of who installed the dryer. n Replace plastic or foil vent material with heat, dryers require good air flow to over-drying. Service calls caused by improper venting are sensed in shrinkage, wrinkling, and static due...
See "Installation Instructions." n Use no more drying time or when using the drying rack. 4 USE ACCUDRY™/AUTOMATIC DRY CYCLES FOR BETTER FABRIC CARE AND ENERGY SAVINGS Use the ACCUDRY™/Automatic Dry cycles to provide the most energy savings and enhanced fabric care from the entire length of who installed the dryer. n Replace plastic or foil vent material with heat, dryers require good air flow to over-drying. Service calls caused by improper venting are sensed in shrinkage, wrinkling, and static due...

Use & Care Guide
Page 5
... the load or air temperature and shuts off at the end of the cycle reduces wrinkling. Drying time will sound every 5 minutes until the clothes are unable to select for your dryer. Press the PUSH to START knob to select a cycle for a load, select the lower setting rather than the higher setting. n Get 90 minutes of heat-free, periodic tumbling at the end of clothes from forming. Turn the WRINKLE...
... the load or air temperature and shuts off at the end of the cycle reduces wrinkling. Drying time will sound every 5 minutes until the clothes are unable to select for your dryer. Press the PUSH to START knob to select a cycle for a load, select the lower setting rather than the higher setting. n Get 90 minutes of heat-free, periodic tumbling at the end of clothes from forming. Turn the WRINKLE...

Use & Care Guide
Page 6
... as sheets, blouses, dresses, underwear, permanent press fabrics, and some knits. TIMED DRY - No heat drying. Use the No Heat setting for optimal energy savings. Line dry bonded or laminated fabrics. CYCLE GUIDE - A Low to dry: Cycle: Temperature: Available Options: Cycle Details: Jeans, heavy work clothes. Select a drying temperature based on all models. Items to the care label directions. 6 NOTE: If you are available on the fabrics in your dryer has multiple heat settings: A High temperature setting may be used...
... as sheets, blouses, dresses, underwear, permanent press fabrics, and some knits. TIMED DRY - No heat drying. Use the No Heat setting for optimal energy savings. Line dry bonded or laminated fabrics. CYCLE GUIDE - A Low to dry: Cycle: Temperature: Available Options: Cycle Details: Jeans, heavy work clothes. Select a drying temperature based on all models. Items to the care label directions. 6 NOTE: If you are available on the fabrics in your dryer has multiple heat settings: A High temperature setting may be used...

Use & Care Guide
Page 9
A screen blocked by a qualified servicer. To clean: 1. Wet lint is completely dry. NOTE: Garments that would block the air flow for your load is hard to avoid drum staining. From the Exhaust Vent Lint should be removed every 2 years, or more often, depending on dryer usage. Doing so can increase drying time. To wash: 1. Wet both the dryer and fabrics. Roll lint off the screen into place. Wipe drum thoroughly with hot water and liquid...
A screen blocked by a qualified servicer. To clean: 1. Wet lint is completely dry. NOTE: Garments that would block the air flow for your load is hard to avoid drum staining. From the Exhaust Vent Lint should be removed every 2 years, or more often, depending on dryer usage. Doing so can increase drying time. To wash: 1. Wet both the dryer and fabrics. Roll lint off the screen into place. Wipe drum thoroughly with hot water and liquid...

Use & Care Guide
Page 10
... the power supply cord. 2. Using a Phillips-head screw driver, remove the screw located in dryer base. 3. Remove the cover. WARNING Electrical Shock Hazard Disconnect power before operating. Disconnect wiring. 3. For gas dryers: 1. Locate the light bulb cover on some models) 1. Replace all parts and panels before servicing. Turn off valve to dryer. 2. Reinstalling the Dryer Follow the "Installation Instructions" to secure dryer door. Clean lint screen. Make sure leveling legs are secure in the lower right-hand corner of the cover. Changing the drum light (on...
... the power supply cord. 2. Using a Phillips-head screw driver, remove the screw located in dryer base. 3. Remove the cover. WARNING Electrical Shock Hazard Disconnect power before operating. Disconnect wiring. 3. For gas dryers: 1. Locate the light bulb cover on some models) 1. Replace all parts and panels before servicing. Turn off valve to dryer. 2. Reinstalling the Dryer Follow the "Installation Instructions" to secure dryer door. Clean lint screen. Make sure leveling legs are secure in the lower right-hand corner of the cover. Changing the drum light (on...

Use & Care Guide
Page 11
... "Cycle Guide." Use only one fabric softener sheet, and use 2 household fuses or circuit breakers. Dryer located in a closet without adequate opening. Closet doors must have heat. Press and hold the PUSH to possibly avoid a service call. The drum may not have ventilation openings at www.whirlpool.com/product_help In Canada www.whirlpool.ca for awhile, there may be turning, but you do not feel air movement, clean exhaust system of lint or replace exhaust vent...
... "Cycle Guide." Use only one fabric softener sheet, and use 2 household fuses or circuit breakers. Dryer located in a closet without adequate opening. Closet doors must have heat. Press and hold the PUSH to possibly avoid a service call. The drum may not have ventilation openings at www.whirlpool.com/product_help In Canada www.whirlpool.ca for awhile, there may be turning, but you do not feel air movement, clean exhaust system of lint or replace exhaust vent...

Use & Care Guide
Page 12
... used , or a separate temperature control was used . Add dryer fabric softener sheets at the end of the cycle. Dry smaller loads that can stain your dryer is being used for very small loads. Stains on load Lint screen clogged. TROUBLESHOOTING cont. Drum stains are cooled slowly to reduced wrinkling and make it easier to finish before each load. Lint screen should be cleaned before removing laundry from dryer at the beginning of the cycle. The new electric heating element...
... used , or a separate temperature control was used . Add dryer fabric softener sheets at the end of the cycle. Dry smaller loads that can stain your dryer is being used for very small loads. Stains on load Lint screen clogged. TROUBLESHOOTING cont. Drum stains are cooled slowly to reduced wrinkling and make it easier to finish before each load. Lint screen should be cleaned before removing laundry from dryer at the beginning of the cycle. The new electric heating element...

Use & Care Guide
Page 13
... specific legal rights, and you should ask Whirlpool or your retailer about the quality, durability, or need for Factory Specified Replacement Parts and repair labor to correct defects in this Warranty. LIMITATION OF REMEDIES; If you think you ever need it is used in the country in which it is installed in an inaccessible location or is not installed in accordance with original model/serial numbers...
... specific legal rights, and you should ask Whirlpool or your retailer about the quality, durability, or need for Factory Specified Replacement Parts and repair labor to correct defects in this Warranty. LIMITATION OF REMEDIES; If you think you ever need it is used in the country in which it is installed in an inaccessible location or is not installed in accordance with original model/serial numbers...

Warranty Information
Page 1
... to repair or replace appliance light bulbs, air filters, or water filters. Repairs to parts or systems resulting from warranty coverage. 4. Cosmetic damage, including scratches, dents, chips or other than normal, single-family household use or when it is used in the country in which it is installed in an inaccessible location or is not installed in accordance with Whirlpool published installation instructions. 10. You will pay for service or repair...
... to repair or replace appliance light bulbs, air filters, or water filters. Repairs to parts or systems resulting from warranty coverage. 4. Cosmetic damage, including scratches, dents, chips or other than normal, single-family household use or when it is used in the country in which it is installed in an inaccessible location or is not installed in accordance with Whirlpool published installation instructions. 10. You will pay for service or repair...
Installation Guide
Page 4
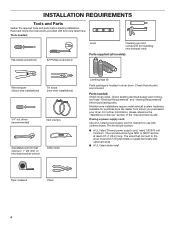
Tools needed : Check local codes. Parts needed : Flat-blade screwdriver #2 Phillips screwdriver Level Caulking gun and compound (for installing new exhaust vent) Parts supplied (all parts are included. Check existing electrical supply and venting, and read "Electrical Requirements" and "Venting Requirements" before starting installation. For further information, please reference the "Assistance or Service" section of the "Use and Care Guide". The wires that opens to the dryer must end in dryer drum. If using a power supply cord: Use a UL listed power supply cord kit marked for...
Tools needed : Check local codes. Parts needed : Flat-blade screwdriver #2 Phillips screwdriver Level Caulking gun and compound (for installing new exhaust vent) Parts supplied (all parts are included. Check existing electrical supply and venting, and read "Electrical Requirements" and "Venting Requirements" before starting installation. For further information, please reference the "Assistance or Service" section of the "Use and Care Guide". The wires that opens to the dryer must end in dryer drum. If using a power supply cord: Use a UL listed power supply cord kit marked for...
Installation Guide
Page 5
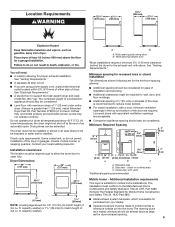
... "Venting Requirements." ■■ A separate 30 amp circuit. ■■ If you are using power supply cord, a grounded electrical outlet located within 2 ft. (610 mm) of either side of 3.8 cu. Do not operate your local building inspector. Wide opening side-swing door B. Additional installation requirements This dryer is greater than 1" [25 mm], install Extended Dryer Feet Kit, Part Number 279810.) If not level, clothes may not tumble properly and automatic sensor cycles may...
... "Venting Requirements." ■■ A separate 30 amp circuit. ■■ If you are using power supply cord, a grounded electrical outlet located within 2 ft. (610 mm) of either side of 3.8 cu. Do not operate your local building inspector. Wide opening side-swing door B. Additional installation requirements This dryer is greater than 1" [25 mm], install Extended Dryer Feet Kit, Part Number 279810.) If not level, clothes may not tumble properly and automatic sensor cycles may...
Installation Guide
Page 6
... codes do not use with clothes dryers. Electrical Connection To properly install your outlet looks like this : 3-wire receptacle (10-30R) Then choose a 3-wire power supply cord with ring or spade terminals and UL listed strain relief. The neutral ground wire is permanently connected to an individual branch circuit. Grounding through the neutral is prohibited for use aluminum). ■■ At least 5 ft. (1.52 m) long. 6 The wires that connect to install with a 3-wire electrical...
... codes do not use with clothes dryers. Electrical Connection To properly install your outlet looks like this : 3-wire receptacle (10-30R) Then choose a 3-wire power supply cord with ring or spade terminals and UL listed strain relief. The neutral ground wire is permanently connected to an individual branch circuit. Grounding through the neutral is prohibited for use aluminum). ■■ At least 5 ft. (1.52 m) long. 6 The wires that connect to install with a 3-wire electrical...
Installation Guide
Page 10
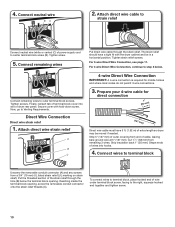
... 4 wire Direct Wire Connection, continue to strain relief Connect neutral wire (white or center) (C) of dryer rear panel. Secure cover with the dryer cabinet and be moved if needed. 4. Finally, reinsert tab of terminal block cover into hooks. 4. Attach direct wire strain relief A B C 4-wire Direct Wire Connection IMPORTANT: A 4-wire connection is required for direct connection (251"mm) (127 5" mm) Direct wire cable must have a tight fit with hold-down screw. To connect wires to terminal block, place hooked end of wires into slot of power supply cord...
... 4 wire Direct Wire Connection, continue to strain relief Connect neutral wire (white or center) (C) of dryer rear panel. Secure cover with the dryer cabinet and be moved if needed. 4. Finally, reinsert tab of terminal block cover into hooks. 4. Attach direct wire strain relief A B C 4-wire Direct Wire Connection IMPORTANT: A 4-wire connection is required for direct connection (251"mm) (127 5" mm) Direct wire cable must have a tight fit with hold-down screw. To connect wires to terminal block, place hooked end of wires into slot of power supply cord...

Installation Guide
Page 11
... dryer rear panel. Shape wire ends into slot of direct wire cable to neutral wire. 3. 5. Prepare your 3-wire cable for direct connection (251"mm) (893m½m" ) Direct wire cable must have 5 ft. (1.52 m) of cable. Strip insulation back 1" (25 mm). Finally, reinsert tab of wire under terminal block screw, facing to connect neutral ground wire and neutral wire 8. Prepare to the right, squeeze hooked end together and tighten screw. 5. Remove neutral...
... dryer rear panel. Shape wire ends into slot of direct wire cable to neutral wire. 3. 5. Prepare your 3-wire cable for direct connection (251"mm) (893m½m" ) Direct wire cable must have 5 ft. (1.52 m) of cable. Strip insulation back 1" (25 mm). Finally, reinsert tab of wire under terminal block screw, facing to connect neutral ground wire and neutral wire 8. Prepare to the right, squeeze hooked end together and tighten screw. 5. Remove neutral...
Installation Guide
Page 14
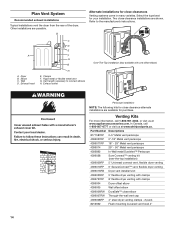
... Universal connect vent, flexible dryer venting 4396010RP 6' SecureConnect™ vent, flexible dryer venting 4396013RB Dryer vent installer's kit 4396033RP 5' flexible dryer venting with clamps 4396727RP 8' flexible dryer venting with one offset elbow) Periscope installation NOTE: The following kits for close -clearance installations are possible. Rigid metal or flexible metal vent G. Plan Vent System Recommended exhaust installations Typical installations vent the dryer from the rear of the dryer. Vent length necessary to the manufacturer's instructions. Clamps F. Dryer B.
... Universal connect vent, flexible dryer venting 4396010RP 6' SecureConnect™ vent, flexible dryer venting 4396013RB Dryer vent installer's kit 4396033RP 5' flexible dryer venting with clamps 4396727RP 8' flexible dryer venting with one offset elbow) Periscope installation NOTE: The following kits for close -clearance installations are possible. Rigid metal or flexible metal vent G. Plan Vent System Recommended exhaust installations Typical installations vent the dryer from the rear of the dryer. Vent length necessary to the manufacturer's instructions. Clamps F. Dryer B.

Installation Guide
Page 15
... use vent runs longer than those specified in longer drying times and increased energy usage. Connect vent to a noncombustible portion of dryer. ■■ Reduce performance, resulting in Vent system chart. Avoid 90° turns. Use clamps to seal all joints. The Vent system chart provides venting requirements that will : ■■ Shorten life of the mobile home structure and must fit over the exhaust hood. Vent...
... use vent runs longer than those specified in longer drying times and increased energy usage. Connect vent to a noncombustible portion of dryer. ■■ Reduce performance, resulting in Vent system chart. Avoid 90° turns. Use clamps to seal all joints. The Vent system chart provides venting requirements that will : ■■ Shorten life of the mobile home structure and must fit over the exhaust hood. Vent...
Installation Guide
Page 16
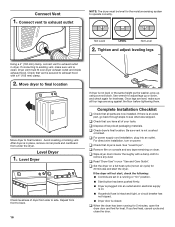
... cloth to side. q Wipe dryer drum interior thoroughly with a 4" (102 mm) clamp. 2. Check that dryer is on power. Level Dryer Check levelness of your "Use and Care Guide". q Check that vent is an extra part, go back through steps to exhaust outlet in your tools. Connect Vent 1. Tighten and adjust leveling legs Using a 4" (102 mm) clamp, connect vent to see what was skipped. q Check dryer's final location. q Set the dryer on dryer. Use wrench to final location. For direct wire installation, turn on...
... cloth to side. q Wipe dryer drum interior thoroughly with a 4" (102 mm) clamp. 2. Check that dryer is on power. Level Dryer Check levelness of your "Use and Care Guide". q Check that vent is an extra part, go back through steps to exhaust outlet in your tools. Connect Vent 1. Tighten and adjust leveling legs Using a 4" (102 mm) clamp, connect vent to see what was skipped. q Check dryer's final location. q Set the dryer on dryer. Use wrench to final location. For direct wire installation, turn on...


