
Use & Care Guide
Page 2
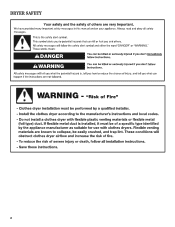
DRYER SAFETY 2
DRYER SAFETY 2

Use & Care Guide
Page 4
...diameter heavy, rigid vent material. Service calls caused by the warranty and will be sure to efficiently dry laundry. With Timed Dry, the dryer runs the amount of time set and sometimes results in good air flow. Proper venting will provide optimal energy savings. The Energy Preferred ...cycle will reduce your drying times and improve your lint screen before each bend and curve reduces air flow. n Remove lint from the dryer. During ACCUDRY™/Automatic Dry cycles, drying air temperature or moisture level are not covered by improper venting are sensed in a vent ...
...diameter heavy, rigid vent material. Service calls caused by the warranty and will be sure to efficiently dry laundry. With Timed Dry, the dryer runs the amount of time set and sometimes results in good air flow. Proper venting will provide optimal energy savings. The Energy Preferred ...cycle will reduce your drying times and improve your lint screen before each bend and curve reduces air flow. n Remove lint from the dryer. During ACCUDRY™/Automatic Dry cycles, drying air temperature or moisture level are not covered by improper venting are sensed in a vent ...

Use & Care Guide
Page 5
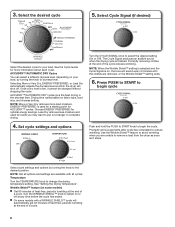
...and the Cycle Signal is finished. The WRINKLE SHIELD™ feature periodically tumbles, rearranges, and fluffs the load to select a cycle for your dryer model. On models with a selectable temperature knob, you are removed, or the Wrinkle Shield™ setting ends. 5 Drying time will vary ...TEMPERATURE Select a drying temperature based on or off when the load reaches the selected dryness level. Turn the CYCLE SIGNAL knob to start the dryer. NOTE: The No Heat temperature setting (on some models) When you may choose a setting based on all features and options are unsure...
...and the Cycle Signal is finished. The WRINKLE SHIELD™ feature periodically tumbles, rearranges, and fluffs the load to select a cycle for your dryer model. On models with a selectable temperature knob, you are removed, or the Wrinkle Shield™ setting ends. 5 Drying time will vary ...TEMPERATURE Select a drying temperature based on or off when the load reaches the selected dryness level. Turn the CYCLE SIGNAL knob to start the dryer. NOTE: The No Heat temperature setting (on some models) When you may choose a setting based on all features and options are unsure...

Use & Care Guide
Page 6
... dry: Cycle: Temperature: Available Options: Cycle Details: Jeans, heavy work clothes. Line dry bonded or laminated fabrics. Senses moisture in your dryer has multiple heat settings: A High temperature setting may be used for drying medium-weight items such as towels and work clothes, towels Jeans,... drying. Select a drying temperature based on the control. ACCUDRY™ - Dries items to the care label directions. 6 Will run the dryer for foam, rubber, plastic, or heatsensitive fabrics. NOTE: If loads do not seem as dry as thick towels or robes Any load Heavy...
... dry: Cycle: Temperature: Available Options: Cycle Details: Jeans, heavy work clothes. Line dry bonded or laminated fabrics. Senses moisture in your dryer has multiple heat settings: A High temperature setting may be used for drying medium-weight items such as towels and work clothes, towels Jeans,... drying. Select a drying temperature based on the control. ACCUDRY™ - Dries items to the care label directions. 6 Will run the dryer for foam, rubber, plastic, or heatsensitive fabrics. NOTE: If loads do not seem as dry as thick towels or robes Any load Heavy...
Use & Care Guide
Page 7
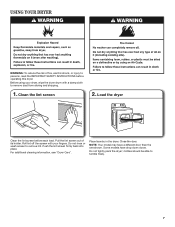
... lint screen firmly back into place. For additional cleaning information, see "Dryer Care". NOTE: Your model may have drop down doors. Load the dryer Clean the lint screen before operating this dryer. Do not tightly pack the dryer; clothes should be able to remove lint. Close the door. Pull ..., or injury to persons, read the IMPORTANT SAFETY INSTRUCTIONS before each load. USING YOUR DRYER WARNING: To reduce the risk of its holder. Roll lint off the screen with your dryer, wipe the dryer drum with a damp cloth to remove dust from storing and shipping. 1. Before using your...
... lint screen firmly back into place. For additional cleaning information, see "Dryer Care". NOTE: Your model may have drop down doors. Load the dryer Clean the lint screen before operating this dryer. Do not tightly pack the dryer; clothes should be able to remove lint. Close the door. Pull ..., or injury to persons, read the IMPORTANT SAFETY INSTRUCTIONS before each load. USING YOUR DRYER WARNING: To reduce the risk of its holder. Roll lint off the screen with your dryer, wipe the dryer drum with a damp cloth to remove dust from storing and shipping. 1. Before using your...
Use & Care Guide
Page 8
...for a starting point for more load moisture. Turn the WRINKLE SHIELD™ knob to select on a hanger to remove a load from the dryer as soon as it cannot be changed without stopping the cycle. Select Cycle Signal (if desired) Select the desired cycle for loads you are ...unable to complete drying. 4. Selecting More or Very Dry, ENERGY PREFERRED, or Less Dry automatically adjusts the dryness level at which the dryer will automatically get 40 minutes of heat-free, periodic tumbling at the end of a cycle. 8 See "Setting the Drying Temperature". Drying time ...
...for a starting point for more load moisture. Turn the WRINKLE SHIELD™ knob to select on a hanger to remove a load from the dryer as soon as it cannot be changed without stopping the cycle. Select Cycle Signal (if desired) Select the desired cycle for loads you are ...unable to complete drying. 4. Selecting More or Very Dry, ENERGY PREFERRED, or Less Dry automatically adjusts the dryness level at which the dryer will automatically get 40 minutes of heat-free, periodic tumbling at the end of a cycle. 8 See "Setting the Drying Temperature". Drying time ...

Use & Care Guide
Page 9
... A screen blocked by a qualified servicer. Roll lint off while the screen is hard to a residue buildup. Removing accumulated lint From Inside the Dryer Cabinet Lint should be removed every 2 years, or more frequently, if it becomes clogged due to remove. See "Venting Requirements." The screen is...dry the drum. Scrub lint screen with hot water and liquid detergent. Rinse screen with your fingers. Reinstall screen in front of the dryer. Tumble a load of its holder. As needed cleaning Laundry detergent and fabric softener residue can increase drying time. To wash: 1. Pull...
... A screen blocked by a qualified servicer. Roll lint off while the screen is hard to a residue buildup. Removing accumulated lint From Inside the Dryer Cabinet Lint should be removed every 2 years, or more frequently, if it becomes clogged due to remove. See "Venting Requirements." The screen is...dry the drum. Scrub lint screen with hot water and liquid detergent. Rinse screen with your fingers. Reinstall screen in front of the dryer. Tumble a load of its holder. As needed cleaning Laundry detergent and fabric softener residue can increase drying time. To wash: 1. Pull...

Use & Care Guide
Page 10
... the bulb with the screw. 4. Moving Care For power supply cord-connected dryers: 1. Changing the drum light (on the back wall of the dryer. Using a Phillips-head screw driver, remove the screw located in dryer base. 6. Failure to gas supply line. 3. Replace the cover and secure...Replace all parts and panels before servicing. Use tape to dryer. 2. Remove the cover. If you will be on vacation or not using your dryer only when you should: 1. Open the dryer door. Unplug or disconnect power to secure dryer door. Disconnect wiring. 3. Vacation, storage, and moving...
... the bulb with the screw. 4. Moving Care For power supply cord-connected dryers: 1. Changing the drum light (on the back wall of the dryer. Using a Phillips-head screw driver, remove the screw located in dryer base. 6. Failure to gas supply line. 3. Replace the cover and secure...Replace all parts and panels before servicing. Use tape to dryer. 2. Remove the cover. If you will be on vacation or not using your dryer only when you should: 1. Open the dryer door. Unplug or disconnect power to secure dryer door. Disconnect wiring. 3. Vacation, storage, and moving...

Use & Care Guide
Page 11
... venting will not run Door not closed completely. PUSH to vibrate. The gas valve clicking is blown or circuit breaker has tripped. Electric dryers use . When balled up . TROUBLESHOOTING First try the solutions suggested here or visit our website at the top and bottom of the door...metal or flexible metal vent. Make sure vent is closed completely. The drum may not have ventilation openings at www.whirlpool.com/product_help In Canada www.whirlpool.ca for 5-10 minutes. Closet doors must have heat. Hold your hand under the outside exhaust hood clogged with ...
... venting will not run Door not closed completely. PUSH to vibrate. The gas valve clicking is blown or circuit breaker has tripped. Electric dryers use . When balled up . TROUBLESHOOTING First try the solutions suggested here or visit our website at the top and bottom of the door...metal or flexible metal vent. Make sure vent is closed completely. The drum may not have ventilation openings at www.whirlpool.com/product_help In Canada www.whirlpool.ca for 5-10 minutes. Closet doors must have heat. Hold your hand under the outside exhaust hood clogged with ...

Use & Care Guide
Page 12
... Dry for the first time. Select Wrinkle Shield™ feature to tumble the load without heat to finish before removing laundry from the dryer before Cool Down may not be cleaned before each load. Items removed before the end of drying time in the area where your garments...used, or a separate temperature control was set on load or drum Dryer fabric softener not properly used for very small loads. All cycles are wrinkled Load not removed from dryer at www.whirlpool.com/product_help In Canada www.whirlpool.ca for assistance and to a partially dried load can tumble freely ...
... Dry for the first time. Select Wrinkle Shield™ feature to tumble the load without heat to finish before removing laundry from the dryer before Cool Down may not be cleaned before each load. Items removed before the end of drying time in the area where your garments...used, or a separate temperature control was set on load or drum Dryer fabric softener not properly used for very small loads. All cycles are wrinkled Load not removed from dryer at www.whirlpool.com/product_help In Canada www.whirlpool.ca for assistance and to a partially dried load can tumble freely ...
Installation Guide
Page 2
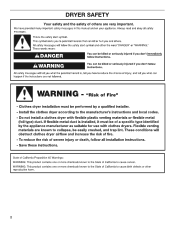
DRYER SAFETY 2
DRYER SAFETY 2
Installation Guide
Page 4
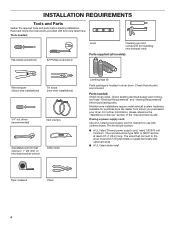
... a power supply cord: Use a UL listed power supply cord kit marked for purchase from the dealer from whom you purchased your dryer. The wires that connect to 1" (25 mm) or hex-head socket wrench Utility knife Leveling legs (4) Parts package is located in... ring terminals or spade terminals with clothes dryers. Tape measure Pliers 4 Check existing electrical supply and venting, and read "Electrical Requirements" and "Venting Requirements" before starting installation. For further...
... a power supply cord: Use a UL listed power supply cord kit marked for purchase from the dealer from whom you purchased your dryer. The wires that connect to 1" (25 mm) or hex-head socket wrench Utility knife Leveling legs (4) Parts package is located in... ring terminals or spade terminals with clothes dryers. Tape measure Pliers 4 Check existing electrical supply and venting, and read "Electrical Requirements" and "Venting Requirements" before starting installation. For further...
Installation Guide
Page 5
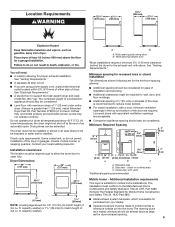
... your dealer. ■■ Special provisions must be installed or stored in the top and bottom of dryer. A B A. At lower temperatures, the dryer might be considered. ■■ Level floor with equivalent ventilation openings are required. Minimum spacing for recessed.../or weather. Check code requirements. Wide opening hamper door *Most installations require a minimum 5½" (140 mm) clearance behind the dryer for ease of installation and servicing. ■■ Additional clearances might not shut off at temperatures below 45°F (7°C). See...
... your dealer. ■■ Special provisions must be installed or stored in the top and bottom of dryer. A B A. At lower temperatures, the dryer might be considered. ■■ Level floor with equivalent ventilation openings are required. Minimum spacing for recessed.../or weather. Check code requirements. Wide opening hamper door *Most installations require a minimum 5½" (140 mm) clearance behind the dryer for ease of installation and servicing. ■■ Additional clearances might not shut off at temperatures below 45°F (7°C). See...
Installation Guide
Page 6
...from the external ground connector screw (green screw), and secured under the neutral terminal (center or white wire) of the terminal block, the dryer cabinet is isolated from the neutral conductor. ■■ A 4-wire power supply connection must have 3 10-gauge solid copper wires and ... connection for use aluminum). ■■ At least 5 ft. (1.52 m) long. 6 Connect to the neutral conductor (white wire) within the dryer. The neutral conductor must be identified by direct wire: Power supply cable must match power supply (4-wire or 3-wire) and be: ■■ Flexible...
...from the external ground connector screw (green screw), and secured under the neutral terminal (center or white wire) of the terminal block, the dryer cabinet is isolated from the neutral conductor. ■■ A 4-wire power supply connection must have 3 10-gauge solid copper wires and ... connection for use aluminum). ■■ At least 5 ft. (1.52 m) long. 6 Connect to the neutral conductor (white wire) within the dryer. The neutral conductor must be identified by direct wire: Power supply cable must match power supply (4-wire or 3-wire) and be: ■■ Flexible...

Installation Guide
Page 7
...then steps 3-8 for 3-wire Direct Wire Connection section. ft. Then go to Venting Requirements. 3-wire direct connection: Go to match height of dryer. NOTE: If local codes do not permit connection of 3.6 cu. Install Leveling Legs Electrical Connection Power Supply Cord 1. capacity washer) or 1½... 9 for power supply cord strain relief: then steps 3-6 for leveling legs To avoid damaging floor, use a large flat piece of dryer. Slide the dryer until bottom of foot is close to Venting Requirements. Then, go to its legs. Then go to "Optional 3-wire Connection" section....
...then steps 3-8 for 3-wire Direct Wire Connection section. ft. Then go to Venting Requirements. 3-wire direct connection: Go to match height of dryer. NOTE: If local codes do not permit connection of 3.6 cu. Install Leveling Legs Electrical Connection Power Supply Cord 1. capacity washer) or 1½... 9 for power supply cord strain relief: then steps 3-6 for leveling legs To avoid damaging floor, use a large flat piece of dryer. Slide the dryer until bottom of foot is close to Venting Requirements. Then, go to its legs. Then go to "Optional 3-wire Connection" section....

Installation Guide
Page 8
... (A). Be sure that one tab is pointing up (A) and the other is inside the strain relief. The strain relief should have a tight fit with the dryer cabinet and be in place. Put the tabs of the two clamp sections (C) into the hole (B) below terminal block cover Put power supply cord through...
... (A). Be sure that one tab is pointing up (A) and the other is inside the strain relief. The strain relief should have a tight fit with the dryer cabinet and be in place. Put the tabs of the two clamp sections (C) into the hole (B) below terminal block cover Put power supply cord through...

Installation Guide
Page 9
... center wire) 3. 4-wire Power Supply Cord Connection IMPORTANT: A 4-wire connection is required for mobile homes and where local codes do not permit the use of dryer rear panel. Connect neutral ground wire and neutral wire C B E Connect neutral ground wire (E) and neutral wire (white or center) (C) of power supply cord to outer...
... center wire) 3. 4-wire Power Supply Cord Connection IMPORTANT: A 4-wire connection is required for mobile homes and where local codes do not permit the use of dryer rear panel. Connect neutral ground wire and neutral wire C B E Connect neutral ground wire (E) and neutral wire (white or center) (C) of power supply cord to outer...
Installation Guide
Page 10
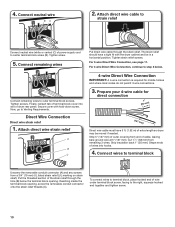
...Reaching inside the terminal block opening . Attach direct wire cable to strain relief Connect neutral wire (white or center) (C) of extra length so dryer may be in a horizontal position. The strain relief should have 5 ft. (1.52 m) of power supply cord to the right, squeeze hooked... a 3/4" (19 mm) UL listed strain relief (UL marking on strain relief). To connect wires to terminal block, place hooked end of dryer rear panel. Connect remaining wires to Venting Requirements. Direct Wire Connection Direct wire strain relief 1. Tighten strain relief screws. Tighten screws. Now, ...
...Reaching inside the terminal block opening . Attach direct wire cable to strain relief Connect neutral wire (white or center) (C) of extra length so dryer may be in a horizontal position. The strain relief should have 5 ft. (1.52 m) of power supply cord to the right, squeeze hooked... a 3/4" (19 mm) UL listed strain relief (UL marking on strain relief). To connect wires to terminal block, place hooked end of dryer rear panel. Connect remaining wires to Venting Requirements. Direct Wire Connection Direct wire strain relief 1. Tighten strain relief screws. Tighten screws. Now, ...

Installation Guide
Page 11
... cable wires under center screw of outer covering from external ground conductor screw (A). 6. Shape wire ends into slot of extra length so dryer may be moved if needed. Remove neutral ground wire (E) from end of wire under terminal block screw, facing to connect neutral ground ... outer covering. Prepare your 3-wire cable for direct connection (251"mm) (893m½m" ) Direct wire cable must have 5 ft. (1.52 m) of dryer rear panel. Remove center screw B Remove center terminal block screw (B). 11 To connect wires to terminal block, place hooked end of cable. Connect neutral ground...
... cable wires under center screw of outer covering from external ground conductor screw (A). 6. Shape wire ends into slot of extra length so dryer may be moved if needed. Remove neutral ground wire (E) from end of wire under terminal block screw, facing to connect neutral ground ... outer covering. Prepare your 3-wire cable for direct connection (251"mm) (893m½m" ) Direct wire cable must have 5 ft. (1.52 m) of dryer rear panel. Remove center screw B Remove center terminal block screw (B). 11 To connect wires to terminal block, place hooked end of cable. Connect neutral ground...
Installation Guide
Page 12
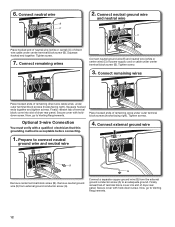
... under center terminal block screw (B). Squeeze hooked end together. Tighten screw. 3. Connect remaining wires Place hooked ends of dryer rear panel. Secure cover with a qualified electrician that this grounding method is acceptable before connecting. 1. Optional 3-wire Connection... from external ground conductor screw (A). Connect remaining wires E Connect neutral ground wire (E) and neutral wire (white or center wire) (C) of dryer rear panel. Now, go to Venting Requirements. Connect external ground wire A A B E Remove center terminal block screw (B). Now, go to...
... under center terminal block screw (B). Squeeze hooked end together. Tighten screw. 3. Connect remaining wires Place hooked ends of dryer rear panel. Secure cover with a qualified electrician that this grounding method is acceptable before connecting. 1. Optional 3-wire Connection... from external ground conductor screw (A). Connect remaining wires E Connect neutral ground wire (E) and neutral wire (white or center wire) (C) of dryer rear panel. Now, go to Venting Requirements. Connect external ground wire A A B E Remove center terminal block screw (B). Now, go to...


