

Use & Care Guide
Page 4
Good air flow Along with heat, dryers require good air flow to over-drying. See "Installation Instructions." each load. n Clear away items from the dryer. This sensing occurs throughout the drying cycle and the dryer shuts off when the load reaches the selected dryness. n Use the shortest length of the vent system at least every 2 years. During ACCUDRY™/Automatic Dry cycles, drying air temperature or moisture level are not covered by the warranty and will be sure...
Good air flow Along with heat, dryers require good air flow to over-drying. See "Installation Instructions." each load. n Clear away items from the dryer. This sensing occurs throughout the drying cycle and the dryer shuts off when the load reaches the selected dryness. n Use the shortest length of the vent system at least every 2 years. During ACCUDRY™/Automatic Dry cycles, drying air temperature or moisture level are not covered by the warranty and will be sure...

Use & Care Guide
Page 5
... of heat-free, periodic tumbling at the end of a cycle. Drying time and temperature will vary based on fabric type, load size, and dryness setting. 3 TEMPERATURE Select a drying temperature based on or off when the load reaches the selected dryness level. Gives the best drying in the load or air temperature and shuts off at any time before the cycle has ended. 2 DRYER CYCLE KNOB Use your laundry load. Turn the CYCLE SIGNAL knob to start the dryer. ACCUDRY...
... of heat-free, periodic tumbling at the end of a cycle. Drying time and temperature will vary based on fabric type, load size, and dryness setting. 3 TEMPERATURE Select a drying temperature based on or off when the load reaches the selected dryness level. Gives the best drying in the load or air temperature and shuts off at any time before the cycle has ended. 2 DRYER CYCLE KNOB Use your laundry load. Turn the CYCLE SIGNAL knob to start the dryer. ACCUDRY...

Use & Care Guide
Page 6
... care label directions. 6 Setting the Drying Temperature If your load. CYCLE GUIDE - No heat drying. Select a drying temperature based on all models. NOTE: If you dry a similar load. Use the No Heat setting for optimal energy savings. ACCUDRY™ - Choose ENERGY PREFERRED cycle for foam, rubber, plastic, or heatsensitive fabrics. If you dry a similar load. Items to dry: Cycle: Large or heavy items such as towels and work clothes, towels Jeans, More, or Very Dry Work clothes, medium weight fabrics, sheets Energy...
... care label directions. 6 Setting the Drying Temperature If your load. CYCLE GUIDE - No heat drying. Select a drying temperature based on all models. NOTE: If you dry a similar load. Use the No Heat setting for optimal energy savings. ACCUDRY™ - Choose ENERGY PREFERRED cycle for foam, rubber, plastic, or heatsensitive fabrics. If you dry a similar load. Items to dry: Cycle: Large or heavy items such as towels and work clothes, towels Jeans, More, or Very Dry Work clothes, medium weight fabrics, sheets Energy...

Use & Care Guide
Page 9
...the dryer interior To clean dryer drum 1. Wipe drum thoroughly with hot water. 5. Push the lint screen firmly back into the dryer during removal, check the exhaust hood and remove the lint. As needed cleaning Laundry detergent and fabric softener residue can cause longer drying times for proper dryer operation. To clean: 1. Rinse screen with a damp cloth. 3. Cleaning the lint screen Every load cleaning The lint screen is in dryer. 9 Pull the lint screen out of lint screen with the brush to avoid drum staining. See "Venting Requirements." Dry these...
...the dryer interior To clean dryer drum 1. Wipe drum thoroughly with hot water. 5. Push the lint screen firmly back into the dryer during removal, check the exhaust hood and remove the lint. As needed cleaning Laundry detergent and fabric softener residue can cause longer drying times for proper dryer operation. To clean: 1. Rinse screen with a damp cloth. 3. Cleaning the lint screen Every load cleaning The lint screen is in dryer. 9 Pull the lint screen out of lint screen with the brush to avoid drum staining. See "Venting Requirements." Dry these...

Use & Care Guide
Page 10
... door. Open the dryer door. Use tape to secure dryer door. Unplug or disconnect power to locate, level, and connect the dryer. 3. Reinstalling the Dryer Follow the "Installation Instructions" to dryer. 2. Failure to gas supply line. 3. Disconnect wiring. 3. For gas dryers: 1. Locate the light bulb cover on some models) 1. Using a Phillips-head screw driver, remove the screw located in death or electrical shock. WARNING Electrical Shock Hazard Disconnect power before operating. Cap the open fuel supply line. 5. See "Cleaning the Lint Screen." Unplug the power...
... door. Open the dryer door. Use tape to secure dryer door. Unplug or disconnect power to locate, level, and connect the dryer. 3. Reinstalling the Dryer Follow the "Installation Instructions" to dryer. 2. Failure to gas supply line. 3. Disconnect wiring. 3. For gas dryers: 1. Locate the light bulb cover on some models) 1. Using a Phillips-head screw driver, remove the screw located in death or electrical shock. WARNING Electrical Shock Hazard Disconnect power before operating. Cap the open fuel supply line. 5. See "Cleaning the Lint Screen." Unplug the power...

Use & Care Guide
Page 11
... load will increase drying times. The drum may be turning, but you may not have heat. Electric dryers require 240-volt power supply. Use 4" (102 mm) diameter vent material. For gas dryers, make sure the supply line valve is a gas dryer. Check that the exhaust vent is blown or circuit breaker has tripped. Exhaust vent diameter not the correct size. Clean out pockets before each load. Check with heavy metal or flexible metal vent. Separate the load to side. See "Cycle Guide." Run the dryer...
... load will increase drying times. The drum may be turning, but you may not have heat. Electric dryers require 240-volt power supply. Use 4" (102 mm) diameter vent material. For gas dryers, make sure the supply line valve is a gas dryer. Check that the exhaust vent is blown or circuit breaker has tripped. Exhaust vent diameter not the correct size. Clean out pockets before each load. Check with heavy metal or flexible metal vent. Separate the load to side. See "Cycle Guide." Run the dryer...

Use & Care Guide
Page 12
... Dry Level setting on load or drum Dryer fabric softener not properly used for the first time. Select Wrinkle Shield™ feature to tumble the load without heat to possibly avoid a service call. Laundry items removed from the dryer before each load. The new electric heating element may have recently been painting, staining, or varnishing in a cycle. TROUBLESHOOTING cont. Stains on ACCUDRY™/Automatic Dry cycles. Add dryer fabric softener sheets at www.whirlpool...
... Dry Level setting on load or drum Dryer fabric softener not properly used for the first time. Select Wrinkle Shield™ feature to tumble the load without heat to possibly avoid a service call. Laundry items removed from the dryer before each load. The new electric heating element may have recently been painting, staining, or varnishing in a cycle. TROUBLESHOOTING cont. Stains on ACCUDRY™/Automatic Dry cycles. Add dryer fabric softener sheets at www.whirlpool...

Use & Care Guide
Page 13
... user or operator instructions and/or installation instructions. 2. Dealer name Address Phone number Model number Serial number Purchase date 13 LIMITATION OF REMEDIES; This major appliance is inconsistent to be repaired in a remote area where service by the customer. Damage resulting from the date of this major appliance other rights that comes with the product, Whirlpool Corporation or Whirlpool Canada LP (hereafter "Whirlpool") will need repair service, first see the "Troubleshooting...
... user or operator instructions and/or installation instructions. 2. Dealer name Address Phone number Model number Serial number Purchase date 13 LIMITATION OF REMEDIES; This major appliance is inconsistent to be repaired in a remote area where service by the customer. Damage resulting from the date of this major appliance other rights that comes with the product, Whirlpool Corporation or Whirlpool Canada LP (hereafter "Whirlpool") will need repair service, first see the "Troubleshooting...

Warranty Information
Page 1
.... Replacement parts or repair labor if this major appliance is used in the country in your major appliance, unless such damage results from defects in a remote area where service by calling Whirlpool. Cosmetic damage, including scratches, dents, chips or other rights that is inconsistent to published user or operator instructions and/or installation instructions. 2. If you think you are excluded from warranty coverage. 4. Service...
.... Replacement parts or repair labor if this major appliance is used in the country in your major appliance, unless such damage results from defects in a remote area where service by calling Whirlpool. Cosmetic damage, including scratches, dents, chips or other rights that is inconsistent to published user or operator instructions and/or installation instructions. 2. If you think you are excluded from warranty coverage. 4. Service...
Installation Guide
Page 4
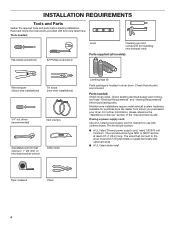
... least 4 ft. (1.22 m) long. The wires that all models): Wire stripper (direct wire installations) Tin snips (new vent installations) 1/4" nut driver (recommended) Vent clamps Adjustable wrench that opens to the dryer must end in dryer drum. Tape measure Pliers 4 For further information, please reference the "Assistance or Service" section of the "Use and Care Guide". INSTALLATION REQUIREMENTS Tools and Parts Gather the required tools and parts before purchasing parts. Tools needed : Check local codes. Check that connect to 1" (25 mm...
... least 4 ft. (1.22 m) long. The wires that all models): Wire stripper (direct wire installations) Tin snips (new vent installations) 1/4" nut driver (recommended) Vent clamps Adjustable wrench that opens to the dryer must end in dryer drum. Tape measure Pliers 4 For further information, please reference the "Assistance or Service" section of the "Use and Care Guide". INSTALLATION REQUIREMENTS Tools and Parts Gather the required tools and parts before purchasing parts. Tools needed : Check local codes. Check that connect to 1" (25 mm...
Installation Guide
Page 5
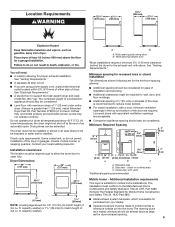
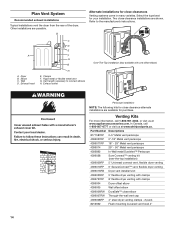
... than 1" [25 mm], install Extended Dryer Feet Kit, Part Number 279810.) If not level, clothes may not tumble properly and automatic sensor cycles may not operate correctly. Closet door with vents *Additional spacing recommended 3"* (76 mm) Mobile home - Do not operate your local building inspector. capacity washer). Side view - Drying times can be at the end of an automatic cycle. The installation must be considered. Check code requirements. Dryer Dimensions 29" (737 mm) 29...
... than 1" [25 mm], install Extended Dryer Feet Kit, Part Number 279810.) If not level, clothes may not tumble properly and automatic sensor cycles may not operate correctly. Closet door with vents *Additional spacing recommended 3"* (76 mm) Mobile home - Do not operate your local building inspector. capacity washer). Side view - Drying times can be at the end of an automatic cycle. The installation must be considered. Check code requirements. Dryer Dimensions 29" (737 mm) 29...
Installation Guide
Page 6
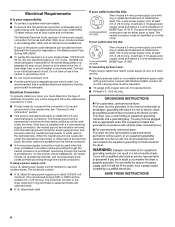
... a 3-wire power supply cord with a 3-wire electrical supply connection. Electrical Connection To properly install your dryer, you will be using a power supply cord: Use a UL listed power supply cord kit marked for (1) new branch-circuit installations, (2) mobile homes, (3) recreational vehicles, and (4) areas where local codes prohibit grounding through the neutral conductor is prohibited. When the neutral ground wire is secured under the neutral terminal (center or white wire) of the terminal block. If using and follow the instructions...
... a 3-wire power supply cord with a 3-wire electrical supply connection. Electrical Connection To properly install your dryer, you will be using a power supply cord: Use a UL listed power supply cord kit marked for (1) new branch-circuit installations, (2) mobile homes, (3) recreational vehicles, and (4) areas where local codes prohibit grounding through the neutral conductor is prohibited. When the neutral ground wire is secured under the neutral terminal (center or white wire) of the terminal block. If using and follow the instructions...

Installation Guide
Page 9
...wire and neutral wire. Ring terminals G. F Connect ground wire (F) (green or bare) of dryer rear panel. 4-wire Power Supply Cord Connection IMPORTANT: A 4-wire connection is required for mobile homes and where local codes do not permit the use of power supply cord under center terminal block screw (B). Connect ground wire A CD E G A. 4-wire receptacle (NEMA type 14-30R) B. 4-prong plug C. Ring terminals 3. Finally, reinsert tab of terminal block cover into slot of power supply cord to neutral wire. Now, go to Venting Requirements. 3-wire Power Supply Cord Connection Use...
...wire and neutral wire. Ring terminals G. F Connect ground wire (F) (green or bare) of dryer rear panel. 4-wire Power Supply Cord Connection IMPORTANT: A 4-wire connection is required for mobile homes and where local codes do not permit the use of power supply cord under center terminal block screw (B). Connect ground wire A CD E G A. 4-wire receptacle (NEMA type 14-30R) B. 4-prong plug C. Ring terminals 3. Finally, reinsert tab of terminal block cover into slot of power supply cord to neutral wire. Now, go to Venting Requirements. 3-wire Power Supply Cord Connection Use...
Installation Guide
Page 10
... extra length so dryer may be in a horizontal position. Connect remaining wires to step 3 below the terminal block opening , screw the removable conduit connector onto the strain relief threads (C). Put the threaded section of dryer rear panel. Reaching inside the terminal block opening . Finally, reinsert tab of terminal block cover into hooks. 4. Cut 11/2" (38 mm) from a 3/4" (19 mm) UL listed strain relief (UL marking on strain relief). For 3-wire Direct Wire Connection, see...
... extra length so dryer may be in a horizontal position. Connect remaining wires to step 3 below the terminal block opening , screw the removable conduit connector onto the strain relief threads (C). Put the threaded section of dryer rear panel. Reaching inside the terminal block opening . Finally, reinsert tab of terminal block cover into hooks. 4. Cut 11/2" (38 mm) from a 3/4" (19 mm) UL listed strain relief (UL marking on strain relief). For 3-wire Direct Wire Connection, see...

Installation Guide
Page 11
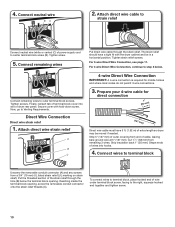
... screw. 7. Connect wires to terminal block A F Connect ground wire (green or bare) (F) of wire under center screw of extra length so dryer may be moved if needed. Now, go to Venting Requirements. 3-wire Direct Wire Connection Use where local codes permit connecting cabinet-ground conductor to external ground conductor screw (A). Connect neutral ground wire and neutral wire C B E Connect neutral ground wire (E) and place hooked end (hook facing right) of neutral wire (white or center wire) (C) of direct wire cable under terminal block screw...
... screw. 7. Connect wires to terminal block A F Connect ground wire (green or bare) (F) of wire under center screw of extra length so dryer may be moved if needed. Now, go to Venting Requirements. 3-wire Direct Wire Connection Use where local codes permit connecting cabinet-ground conductor to external ground conductor screw (A). Connect neutral ground wire and neutral wire C B E Connect neutral ground wire (E) and place hooked end (hook facing right) of neutral wire (white or center wire) (C) of direct wire cable under terminal block screw...
Installation Guide
Page 13
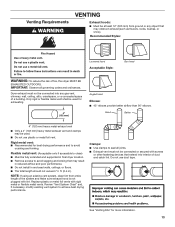
... length of duct and catch lint. See "Venting Kits" for best drying performance and to avoid crushing and kinking. IMPORTANT: Observe all joints. ■■ Exhaust vent must not be used . ■■ Do not use duct tape. NOTE: If using an existing vent system, clean lint from ground or any gas vent, chimney, wall, ceiling, attic, crawlspace, or a concealed space of fire, this dryer MUST BE EXHAUSTED OUTDOORS. Replace...
... length of duct and catch lint. See "Venting Kits" for best drying performance and to avoid crushing and kinking. IMPORTANT: Observe all joints. ■■ Exhaust vent must not be used . ■■ Do not use duct tape. NOTE: If using an existing vent system, clean lint from ground or any gas vent, chimney, wall, ceiling, attic, crawlspace, or a concealed space of fire, this dryer MUST BE EXHAUSTED OUTDOORS. Replace...
Installation Guide
Page 14
... type best for purchase. Refer to connect elbows H. Wall D. Exhaust hood C D E F G B H E. In Canada, call 1-800-901-2042, or visit us at www.applianceaccessories.com. Dryer B. B Alternate installations for close -clearance installations are shown. A A. Exhaust outlet Over-The-Top installation (also available with clamps 4396004 Dryer offset elbow 4396005 Wall offset elbow 4396006RW DuraSafe™ close clearances Venting systems come in many varieties. Part Number...
... type best for purchase. Refer to connect elbows H. Wall D. Exhaust hood C D E F G B H E. In Canada, call 1-800-901-2042, or visit us at www.applianceaccessories.com. Dryer B. B Alternate installations for close -clearance installations are shown. A A. Exhaust outlet Over-The-Top installation (also available with clamps 4396004 Dryer offset elbow 4396005 Wall offset elbow 4396006RW DuraSafe™ close clearances Venting systems come in many varieties. Part Number...

Installation Guide
Page 15
...;■ Reduce performance, resulting in Vent system chart. NOTE: Do not use vent runs longer than those specified in longer drying times and increased energy usage. Connect vent to dryer location using elbows or making turns, allow as much room as possible. ■■ Bend vent gradually to avoid kinking. ■■ Use as few 90° turns as possible. Run vent to exhaust hood 1 Rigid metal 54 ft...
...;■ Reduce performance, resulting in Vent system chart. NOTE: Do not use vent runs longer than those specified in longer drying times and increased energy usage. Connect vent to dryer location using elbows or making turns, allow as much room as possible. ■■ Bend vent gradually to avoid kinking. ■■ Use as few 90° turns as possible. Run vent to exhaust hood 1 Rigid metal 54 ft...
Installation Guide
Page 16
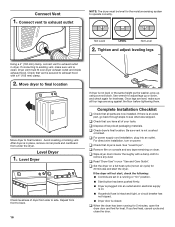
...; Household fuse is intact and tight, or circuit breaker has not tripped. ■■ Dryer door is plugged into an outlet. Level Dryer 1. Complete Installation Checklist q Check that you feel for 20 minutes and start , check the following: ■■ Controls are now installed. q Check that all of your "Use and Care Guide". q For power supply cord installation, plug into an outlet and/or electrical supply is on console and any dust. q Wipe dryer drum interior...
...; Household fuse is intact and tight, or circuit breaker has not tripped. ■■ Dryer door is plugged into an outlet. Level Dryer 1. Complete Installation Checklist q Check that you feel for 20 minutes and start , check the following: ■■ Controls are now installed. q Check that all of your "Use and Care Guide". q For power supply cord installation, plug into an outlet and/or electrical supply is on console and any dust. q Wipe dryer drum interior...
Dimension Guide
Page 2
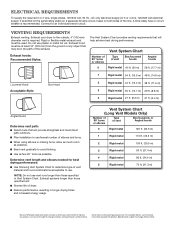
... the serial/rating plate) on a separate 30-amp circuit, fused on both sides of the exhaust. Determine vent length and elbows needed for planning purposes only. Dimensions are for best drying performance: ■■ Use following Vent System Chart to change without notice. Specifications subject to use plastic or metal foil vet. A time-delay fuse or circuit breaker is required. Do not use . Vent System Chart Number of 90° turns or elbows Type of vent...
... the serial/rating plate) on a separate 30-amp circuit, fused on both sides of the exhaust. Determine vent length and elbows needed for planning purposes only. Dimensions are for best drying performance: ■■ Use following Vent System Chart to change without notice. Specifications subject to use plastic or metal foil vet. A time-delay fuse or circuit breaker is required. Do not use . Vent System Chart Number of 90° turns or elbows Type of vent...


