
Use & Care Guide
Page 7
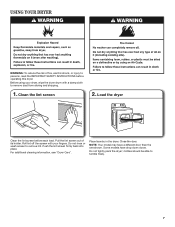
...before operating this dryer. Roll lint off the screen with a damp cloth to remove dust from storing and shipping. 1. Push the lint screen firmly back into place. Close the door. clothes should be able to remove lint. Pull the lint screen out of fire, electric shock, or injury... to persons, read the IMPORTANT SAFETY INSTRUCTIONS before each load. For additional cleaning information, see "Dryer Care". Some models have a different door than the one shown. NOTE: Your model ...
...before operating this dryer. Roll lint off the screen with a damp cloth to remove dust from storing and shipping. 1. Push the lint screen firmly back into place. Close the door. clothes should be able to remove lint. Pull the lint screen out of fire, electric shock, or injury... to persons, read the IMPORTANT SAFETY INSTRUCTIONS before each load. For additional cleaning information, see "Dryer Care". Some models have a different door than the one shown. NOTE: Your model ...

Use & Care Guide
Page 10
...and moving care Non-Use or Storage Care Operate your dryer for an extended period of time, you should: 1. Unplug the power supply cord. 2. Make sure leveling legs are secure in death or electrical shock. WARNING Electrical Shock Hazard Disconnect power before operating. Turn off valve ...to do so can result in dryer base. 6. Make sure leveling legs are secure in gas supply line. 3. Replace the...
...and moving care Non-Use or Storage Care Operate your dryer for an extended period of time, you should: 1. Unplug the power supply cord. 2. Make sure leveling legs are secure in death or electrical shock. WARNING Electrical Shock Hazard Disconnect power before operating. Turn off valve ...to do so can result in dryer base. 6. Make sure leveling legs are secure in gas supply line. 3. Replace the...

Use & Care Guide
Page 11
.... Replace both fuses or reset the circuit breaker. For gas dryers, make sure the supply line valve is closed completely. If you may not have ventilation openings at www.whirlpool.com/product_help In Canada www.whirlpool.ca for small objects. Fabric softener sheets blocking the grill. ...for assistance and to vibrate. Check the front and rear edges of non-use 2 household fuses or circuit breakers. When balled up . Electric dryers use it only once. If the problem continues, call an electrician. Check with a qualified electrician. 11 The gas valve clicking is not...
.... Replace both fuses or reset the circuit breaker. For gas dryers, make sure the supply line valve is closed completely. If you may not have ventilation openings at www.whirlpool.com/product_help In Canada www.whirlpool.ca for small objects. Fabric softener sheets blocking the grill. ...for assistance and to vibrate. Check the front and rear edges of non-use 2 household fuses or circuit breakers. When balled up . Electric dryers use it only once. If the problem continues, call an electrician. Check with a qualified electrician. 11 The gas valve clicking is not...

Use & Care Guide
Page 12
...cycle. This reduces overdrying. 12 Fabric softener sheets added to possibly avoid a service call. Load is too hot The electric dryer is located. The new electric heating element may have recently been painting, staining, or varnishing in clothing (usually blue jeans). The odor will not...fumes are cooled slowly to reduced wrinkling and make it easier to avoid wrinkling. Laundry items removed from dryer at www.whirlpool.com/product_help In Canada www.whirlpool.ca for very small loads. If you experience Possible Causes Solution Cycle time too short Automatic cycle ...
...cycle. This reduces overdrying. 12 Fabric softener sheets added to possibly avoid a service call. Load is too hot The electric dryer is located. The new electric heating element may have recently been painting, staining, or varnishing in clothing (usually blue jeans). The odor will not...fumes are cooled slowly to reduced wrinkling and make it easier to avoid wrinkling. Laundry items removed from dryer at www.whirlpool.com/product_help In Canada www.whirlpool.ca for very small loads. If you experience Possible Causes Solution Cycle time too short Automatic cycle ...
Installation Guide
Page 4
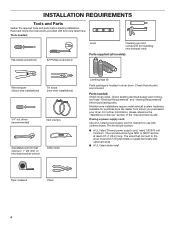
... (25 mm) or hex-head socket wrench Utility knife Leveling legs (4) Parts package is located in ring terminals or spade terminals with clothes dryers. Tools needed : Check local codes. If using a power supply cord: Use a UL listed power supply cord kit marked for use with...the required tools and parts before purchasing parts. Read and follow the instructions provided with any tools listed here. Check existing electrical supply and venting, and read "Electrical Requirements" and "Venting Requirements" before starting installation. The kit should be type SRD or SRDT and be at least 4...
... (25 mm) or hex-head socket wrench Utility knife Leveling legs (4) Parts package is located in ring terminals or spade terminals with clothes dryers. Tools needed : Check local codes. If using a power supply cord: Use a UL listed power supply cord kit marked for use with...the required tools and parts before purchasing parts. Read and follow the instructions provided with any tools listed here. Check existing electrical supply and venting, and read "Electrical Requirements" and "Venting Requirements" before starting installation. The kit should be type SRD or SRDT and be at least 4...
Installation Guide
Page 5
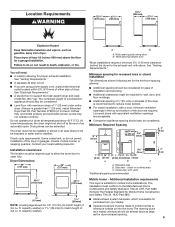
... (705 mm) You will be exposed to water and/or weather. See "Electrical Requirements." ■■ A sturdy floor to support the total weight (dryer and load) of 3.6 cu. Drying times can be large enough to allow the dryer door to match height of 200 lbs. (90.7 kg). Contact your... area or closet installation The dimensions shown following are required. Closet door with equivalent ventilation openings are using power supply cord, a grounded electrical outlet located within 2 ft. (610 mm) of either side of an automatic cycle. The installation must be required for mobile home ...
... (705 mm) You will be exposed to water and/or weather. See "Electrical Requirements." ■■ A sturdy floor to support the total weight (dryer and load) of 3.6 cu. Drying times can be large enough to allow the dryer door to match height of 200 lbs. (90.7 kg). Contact your... area or closet installation The dimensions shown following are required. Closet door with equivalent ventilation openings are using power supply cord, a grounded electrical outlet located within 2 ft. (610 mm) of either side of an automatic cycle. The installation must be required for mobile home ...
Installation Guide
Page 6
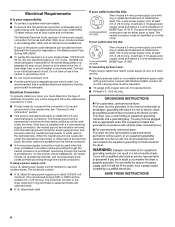
... wire, see "Optional 3-wire connection" section. ■■ This dryer is manufactured ready to the dryer must end in conformance with upturned ends. ■■ A UL listed strain relief. Electrical Connection To properly install your responsibility: ■■ To contact a qualified... recreational vehicles, and (4) areas where local codes prohibit grounding through the neutral conductor is prohibited. Electrical Requirements It is your dryer, you must determine the type of electrical connection you will be using a power supply cord: Use a UL listed power supply cord kit ...
... wire, see "Optional 3-wire connection" section. ■■ This dryer is manufactured ready to the dryer must end in conformance with upturned ends. ■■ A UL listed strain relief. Electrical Connection To properly install your responsibility: ■■ To contact a qualified... recreational vehicles, and (4) areas where local codes prohibit grounding through the neutral conductor is prohibited. Electrical Requirements It is your dryer, you must determine the type of electrical connection you will be using a power supply cord: Use a UL listed power supply cord kit ...

Installation Guide
Page 7
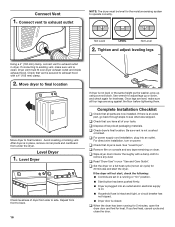
... 4-wire Power Supply Cord Connection section. place under entire back edge of dryer. Slide the dryer until bottom of 3.6 cu. Leave enough room for electrical connection and to steps 1-2 on cardboard. 2. Choose electrical connection type Power supply cord 4-wire receptacle (NEMA Type 14-30R): Go to connect the exhaust vent. NOTE: If local codes...
... 4-wire Power Supply Cord Connection section. place under entire back edge of dryer. Slide the dryer until bottom of 3.6 cu. Leave enough room for electrical connection and to steps 1-2 on cardboard. 2. Choose electrical connection type Power supply cord 4-wire receptacle (NEMA Type 14-30R): Go to connect the exhaust vent. NOTE: If local codes...
Installation Guide
Page 16
...circuit breaker has not tripped. ■■ Dryer door is clean. If the dryer will not start the dryer. q When the dryer has been running or "On" position. ■■ Start button has been pushed firmly. ■■ Dryer is in your tools. Dryer vent must be level for the moisture sensing system... as the washer, prop up or down, and check again for levelness. q For power supply cord installation, plug into an outlet and/or electrical supply is on a full heat cycle (not an air cycle) for heat. For direct wire installation, turn on console and any dust. Check...
...circuit breaker has not tripped. ■■ Dryer door is clean. If the dryer will not start the dryer. q When the dryer has been running or "On" position. ■■ Start button has been pushed firmly. ■■ Dryer is in your tools. Dryer vent must be level for the moisture sensing system... as the washer, prop up or down, and check again for levelness. q For power supply cord installation, plug into an outlet and/or electrical supply is on a full heat cycle (not an air cycle) for heat. For direct wire installation, turn on console and any dust. Check...

Dimension Guide
Page 1
...1/2" *Most installations require a minimum 5½" (140 mm) cle(a1r3amncme) behind the dryer for wall, door, and floor moldings. ■■ Additional spacing of 1" (25 mm) on all sides of the dryer is recommended to reduce noise transfer. ■■ For closet installation, with elbow.... cm )2 1" 29" 1" 1"* 27¾" (25 mm) (737 mm) (25 mm) (25 mm) (705 mm) A B C A. Dryer Dimensions 29" (737 mm) 433/8" (1102 mm) Electric Dryer PRODUCT MODEL NUMBERS WED4800B, WED4810B, WED4850B 29" (737 mm) 433/8" (1102 mm) Wide opening side-swing door 223/4" (578 mm) 273/4" (705...
...1/2" *Most installations require a minimum 5½" (140 mm) cle(a1r3amncme) behind the dryer for wall, door, and floor moldings. ■■ Additional spacing of 1" (25 mm) on all sides of the dryer is recommended to reduce noise transfer. ■■ For closet installation, with elbow.... cm )2 1" 29" 1" 1"* 27¾" (25 mm) (737 mm) (25 mm) (25 mm) (705 mm) A B C A. Dryer Dimensions 29" (737 mm) 433/8" (1102 mm) Electric Dryer PRODUCT MODEL NUMBERS WED4800B, WED4810B, WED4850B 29" (737 mm) 433/8" (1102 mm) Wide opening side-swing door 223/4" (578 mm) 273/4" (705...
Dimension Guide
Page 2
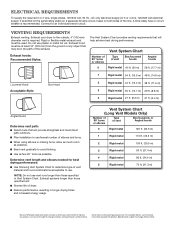
...System Chart. Connect to change without notice. VENTING REQUIREMENTS Exhaust venting: Exhaust your dryer to the outside. 4" (102 mm) diameter vent is recommended. Determine vent ...notice. ELECTRICAL REQUIREMENTS To supply the required 3 or 4 wire, single phase, 120/240 volt, 60 Hz., AC only electrical supply (or 3 or 4 wire, 120/208 volt electrical supply,... (27.4 m) 4 Rigid metal 80 ft. (24.4 m) 5 Rigid metal 70 ft. (21.3 m) Because Whirlpool Corporation policy includes a continuous commitment to improve our products, we reserve the right to an individual branch circuit. NOTE...
...System Chart. Connect to change without notice. VENTING REQUIREMENTS Exhaust venting: Exhaust your dryer to the outside. 4" (102 mm) diameter vent is recommended. Determine vent ...notice. ELECTRICAL REQUIREMENTS To supply the required 3 or 4 wire, single phase, 120/240 volt, 60 Hz., AC only electrical supply (or 3 or 4 wire, 120/208 volt electrical supply,... (27.4 m) 4 Rigid metal 80 ft. (24.4 m) 5 Rigid metal 70 ft. (21.3 m) Because Whirlpool Corporation policy includes a continuous commitment to improve our products, we reserve the right to an individual branch circuit. NOTE...


