
Use & Care Guide
Page 10
... secure dryer door. Changing the drum light (on the back wall of the dryer. Unplug dryer or disconnect power. 2. Open the dryer door. Replace all parts and panels before servicing. Disconnect wiring. 3. Unplug or disconnect power to secure dryer door. Plug into a grounded outlet or reconnect power. 10 See "Cleaning the...
... secure dryer door. Changing the drum light (on the back wall of the dryer. Unplug dryer or disconnect power. 2. Open the dryer door. Replace all parts and panels before servicing. Disconnect wiring. 3. Unplug or disconnect power to secure dryer door. Plug into a grounded outlet or reconnect power. 10 See "Cleaning the...

Use & Care Guide
Page 13
...durability, or need for future reference. WHIRLPOOL SHALL NOT BE LIABLE FOR INCIDENTAL OR CONSEQUENTIAL DAMAGES. In Canada, call 1-800-253-1301. Dealer name Address Phone number Model number Serial number Purchase date 13 Replacement parts or repair labor on the duration of ..., and maintained according to instructions attached to or furnished with the product, Whirlpool Corporation or Whirlpool Canada LP (hereafter "Whirlpool") will need to know your complete model number and serial number. Replacement parts or repair labor if this major appliance is used for in this Warranty....
...durability, or need for future reference. WHIRLPOOL SHALL NOT BE LIABLE FOR INCIDENTAL OR CONSEQUENTIAL DAMAGES. In Canada, call 1-800-253-1301. Dealer name Address Phone number Model number Serial number Purchase date 13 Replacement parts or repair labor on the duration of ..., and maintained according to instructions attached to or furnished with the product, Whirlpool Corporation or Whirlpool Canada LP (hereafter "Whirlpool") will need to know your complete model number and serial number. Replacement parts or repair labor if this major appliance is used for in this Warranty....

Warranty Information
Page 1
...your sales slip together for Factory Specified Replacement Parts and repair labor to correct defects in a manner that comes with the product, Whirlpool Corporation or Whirlpool Canada LP (hereafter "Whirlpool") will need it was purchased. Consumable parts are unable to you . Some states ...date of repair or replacement under this limitation may have other damage to parts or systems resulting from warranty coverage. 4. Damage resulting from defects in a remote area where service by Whirlpool. 5. Cosmetic damage, including scratches, dents, chips or other rights ...
...your sales slip together for Factory Specified Replacement Parts and repair labor to correct defects in a manner that comes with the product, Whirlpool Corporation or Whirlpool Canada LP (hereafter "Whirlpool") will need it was purchased. Consumable parts are unable to you . Some states ...date of repair or replacement under this limitation may have other damage to parts or systems resulting from warranty coverage. 4. Damage resulting from defects in a remote area where service by Whirlpool. 5. Cosmetic damage, including scratches, dents, chips or other rights ...
Installation Guide
Page 4
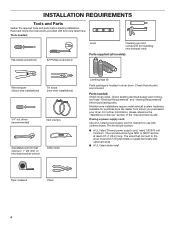
..." before starting installation. The wires that connect to 1" (25 mm) or hex-head socket wrench Utility knife Leveling legs (4) Parts package is located in ring terminals or spade terminals with clothes dryers. Check that opens to the dryer must end in dryer drum... stripper (direct wire installations) Tin snips (new vent installations) 1/4" nut driver (recommended) Vent clamps Adjustable wrench that all parts are included. Parts needed : Flat-blade screwdriver #2 Phillips screwdriver Level Caulking gun and compound (for purchase from the dealer from whom you purchased...
..." before starting installation. The wires that connect to 1" (25 mm) or hex-head socket wrench Utility knife Leveling legs (4) Parts package is located in ring terminals or spade terminals with clothes dryers. Check that opens to the dryer must end in dryer drum... stripper (direct wire installations) Tin snips (new vent installations) 1/4" nut driver (recommended) Vent clamps Adjustable wrench that all parts are included. Parts needed : Flat-blade screwdriver #2 Phillips screwdriver Level Caulking gun and compound (for purchase from the dealer from whom you purchased...
Installation Guide
Page 5
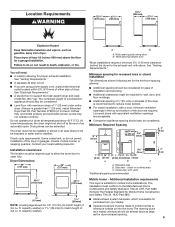
...The dryer must conform to the Manufactured Home Construction and Safety Standard, Title 24 CFR, Part 3280 (formerly the Federal Standard for Mobile Home Construction and Safety, Title 24, HUD Part 280). ■■ Metal exhaust system hardware, which is available for wall, door...closets, mobile homes, or sleeping quarters. Additional installation requirements This dryer is greater than 1" [25 mm], install Extended Dryer Feet Kit, Part Number 279810.) If not level, clothes may not tumble properly and automatic sensor cycles may not operate correctly. See "Electrical Requirements." ■...
...The dryer must conform to the Manufactured Home Construction and Safety Standard, Title 24 CFR, Part 3280 (formerly the Federal Standard for Mobile Home Construction and Safety, Title 24, HUD Part 280). ■■ Metal exhaust system hardware, which is available for wall, door...closets, mobile homes, or sleeping quarters. Additional installation requirements This dryer is greater than 1" [25 mm], install Extended Dryer Feet Kit, Part Number 279810.) If not level, clothes may not tumble properly and automatic sensor cycles may not operate correctly. See "Electrical Requirements." ■...
Installation Guide
Page 14
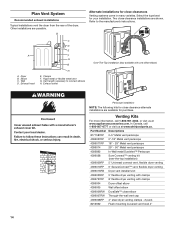
... rear of the dryer. Other installations are shown. Refer to connect elbows H. Exhaust hood C D E F G B H E. Clamps F. Rigid metal or flexible metal vent G. B Alternate installations for purchase. Part Number Descriptions 8171587RP 0-5" Metal vent periscope 4396037RP 0"-18" Metal vent periscope 4396011RP 18" - 29" Metal vent periscope 4396014 29" - 50" Metal vent periscope 4392892 In...
... rear of the dryer. Other installations are shown. Refer to connect elbows H. Exhaust hood C D E F G B H E. Clamps F. Rigid metal or flexible metal vent G. B Alternate installations for purchase. Part Number Descriptions 8171587RP 0-5" Metal vent periscope 4396037RP 0"-18" Metal vent periscope 4396011RP 18" - 29" Metal vent periscope 4396014 29" - 50" Metal vent periscope 4392892 In...
Installation Guide
Page 16
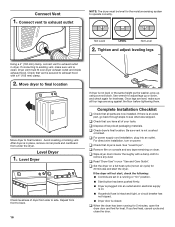
... and close the door. Move dryer to final location Move dryer to see what was skipped. Complete Installation Checklist q Check that vent is an extra part, go back through steps to final location. q Remove film on console and any dust. q Read "Dryer Use" in place, remove corner posts and cardboard from... side to existing vent, make sure all of /recycle all parts are level, make sure vent is not level or the same height as the washer, prop up or down, and check again for levelness. If...
... and close the door. Move dryer to final location Move dryer to see what was skipped. Complete Installation Checklist q Check that vent is an extra part, go back through steps to final location. q Remove film on console and any dust. q Read "Dryer Use" in place, remove corner posts and cardboard from... side to existing vent, make sure all of /recycle all parts are level, make sure vent is not level or the same height as the washer, prop up or down, and check again for levelness. If...
Installation Guide
Page 17
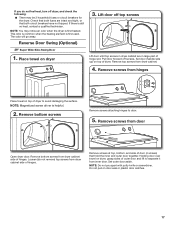
This odor is common when the heating element is helpful. 2. Lift door off top screws Lift door until top screws in large part of hinge slot. Set door (handle side up) on door seal or plastic door catches. 17 NOTE: Magnetized screw driver is first used. Remove bottom ...
This odor is common when the heating element is helpful. 2. Lift door off top screws Lift door until top screws in large part of hinge slot. Set door (handle side up) on door seal or plastic door catches. 17 NOTE: Magnetized screw driver is first used. Remove bottom ...


